> ## Documentation Index
> Fetch the complete documentation index at: https://docs.zuper.co/llms.txt
> Use this file to discover all available pages before exploring further.
# Creating Work Orders
A work order keeps subcontractor work visible and accountable. When you raise one in Zuper, the job link, subcontractor, scope, and cost are all in one place — giving you a clear record of what was commissioned, who is doing it, and where the work stands at every stage.
Use this article to create a work order, add items, and manage it from start to finish.
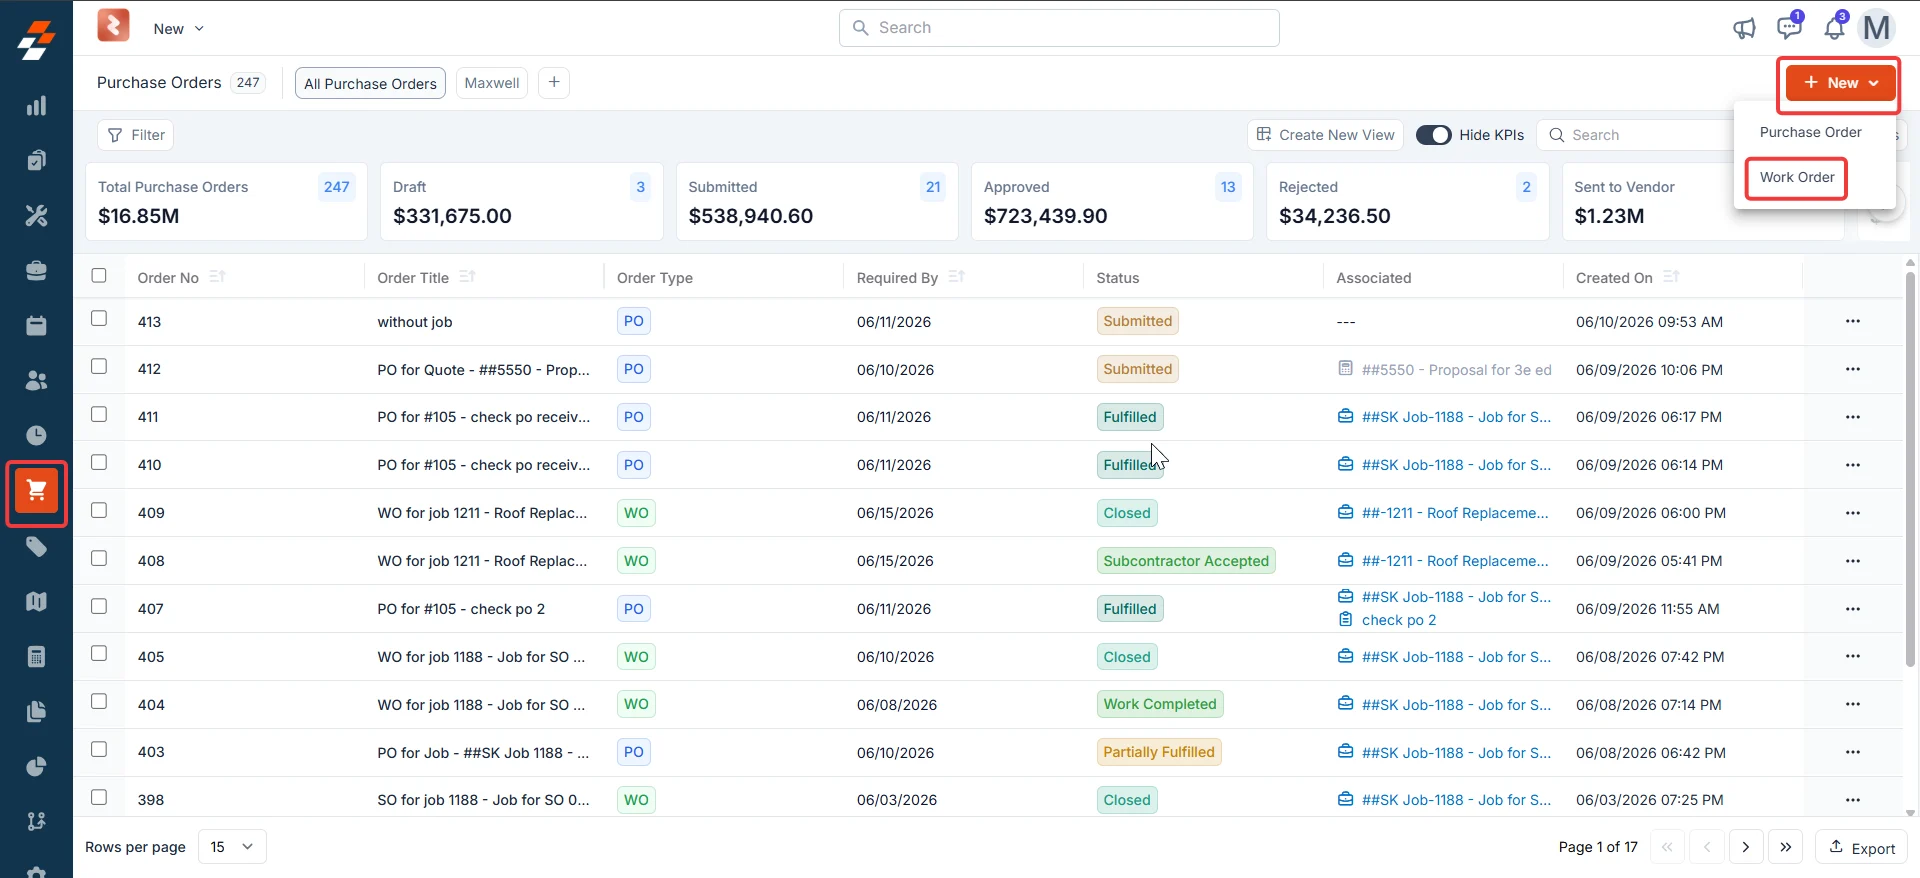
**Navigation**: *Purchasing* → *Purchase Orders* → *+ New* → *Work Order*
**Plan availability**: To enable this feature, contact your account administrator or email [support@zuper.co](mailto:support@zuper.co).
## Before you begin
Make sure the following are in place before you create a work order:
* The **Purchase Orders** module is enabled for your account.
* The subcontractor is added under **Vendors** with complete contact and address details.
* The job you want to associate with the work order exists in Zuper.
***
## Create a work order
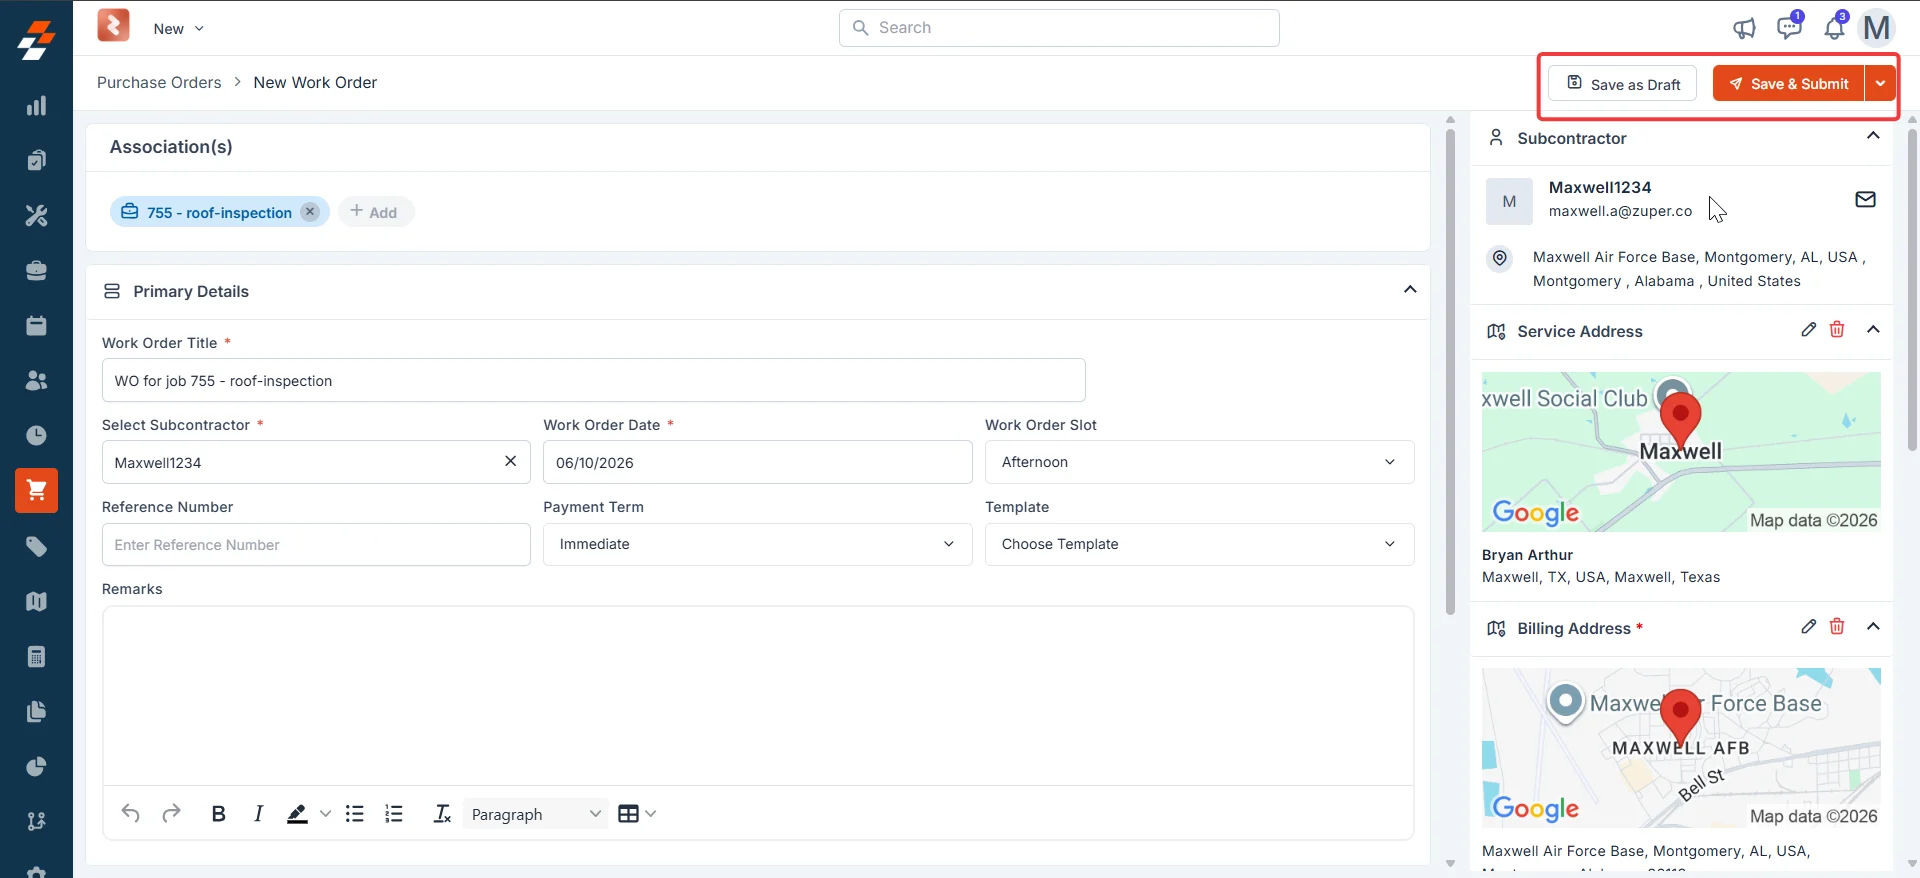
**Open the work order form**
1. Select the **Purchasing** module from the left navigation menu and choose **Purchase Orders**.
2. Select **+ New** in the top-right corner. A dropdown appears with two options.
3. Select the **work Order**. The **New Work Order** form opens.
 ***
**Add an association**
The **Association(s)** section links the work order to an existing job. This is how Zuper connects the subcontractor's work to your project record.
1. In the **Association(s)** section at the top of the form, select **+ Add**.
2. Search for and select the job you want to link to this work order.
Once the job is linked, proceed to the next section to enter the primary details.
***
**Add an association**
The **Association(s)** section links the work order to an existing job. This is how Zuper connects the subcontractor's work to your project record.
1. In the **Association(s)** section at the top of the form, select **+ Add**.
2. Search for and select the job you want to link to this work order.
Once the job is linked, proceed to the next section to enter the primary details.
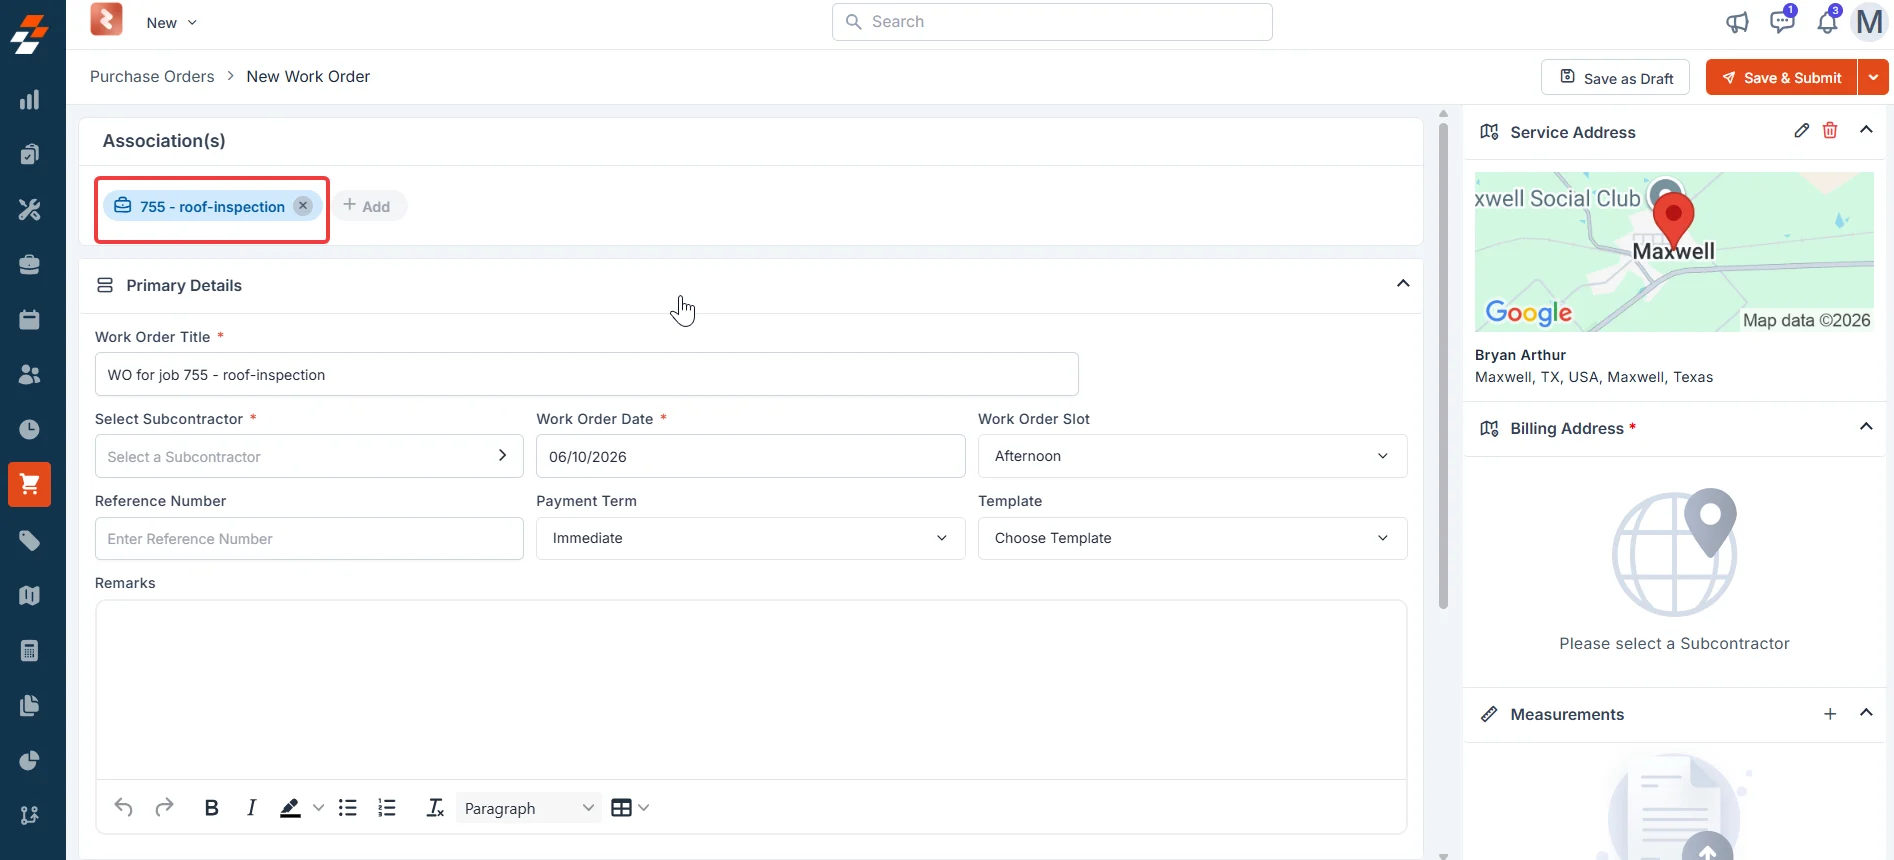 ***
**Fill in the primary details**
1. Review the **Work Order Title** field. If a job is associated, this field pre-fills with the job name. If no job is associated, enter a clear, descriptive title manually.
Associate a job before filling in other details. Zuper automatically pre-fills several fields, saving time and reducing errors.
2. In the **Select Sub Contractor** field, choose the subcontractor from your vendor list. Only active vendors appear here. When you select one, their contact details and address automatically populate the right panel.
If the subcontractor has not been added to Zuper yet, you can create them directly from the side sheet. Select **+ Quick Create** at the bottom of the vendor list, enter their details, and save. The new subcontractor becomes available to select immediately.
3. In the **Work Order Date** field, enter the date the subcontractor is scheduled to perform the work.
* If a job is associated, this field pre-fills with the job's start date.
* If no start date is set on the job, Zuper uses the job's due date instead.
A work order cannot be created without associating a job.
4. From the **Work Order Slot** list, select the preferred time of day — for example, **Morning** or **Afternoon**.
5. In the **Reference Number** field, enter an optional internal or vendor-specific reference ID.
6. From the **Payment Term** list, select the applicable payment agreement.
7. From the **Template** list, select the template for the work order PDF.
Keep the selection as **Choose Template** to use Zuper's built-in default format — this is the recommended option for work orders. If your organization has created a custom template, select it from the list. The **Default Template** option is intended for purchase orders and should not be selected for work orders.
8. In the **Remarks** field, enter any internal notes relevant to this work order. These notes are visible on the work order record.
**Addresses** \
The **Service Address** and **Billing Address** in the right panel are automatically pulled from the associated job and the selected subcontractor. Select the pencil icon next to each address to edit them.
***
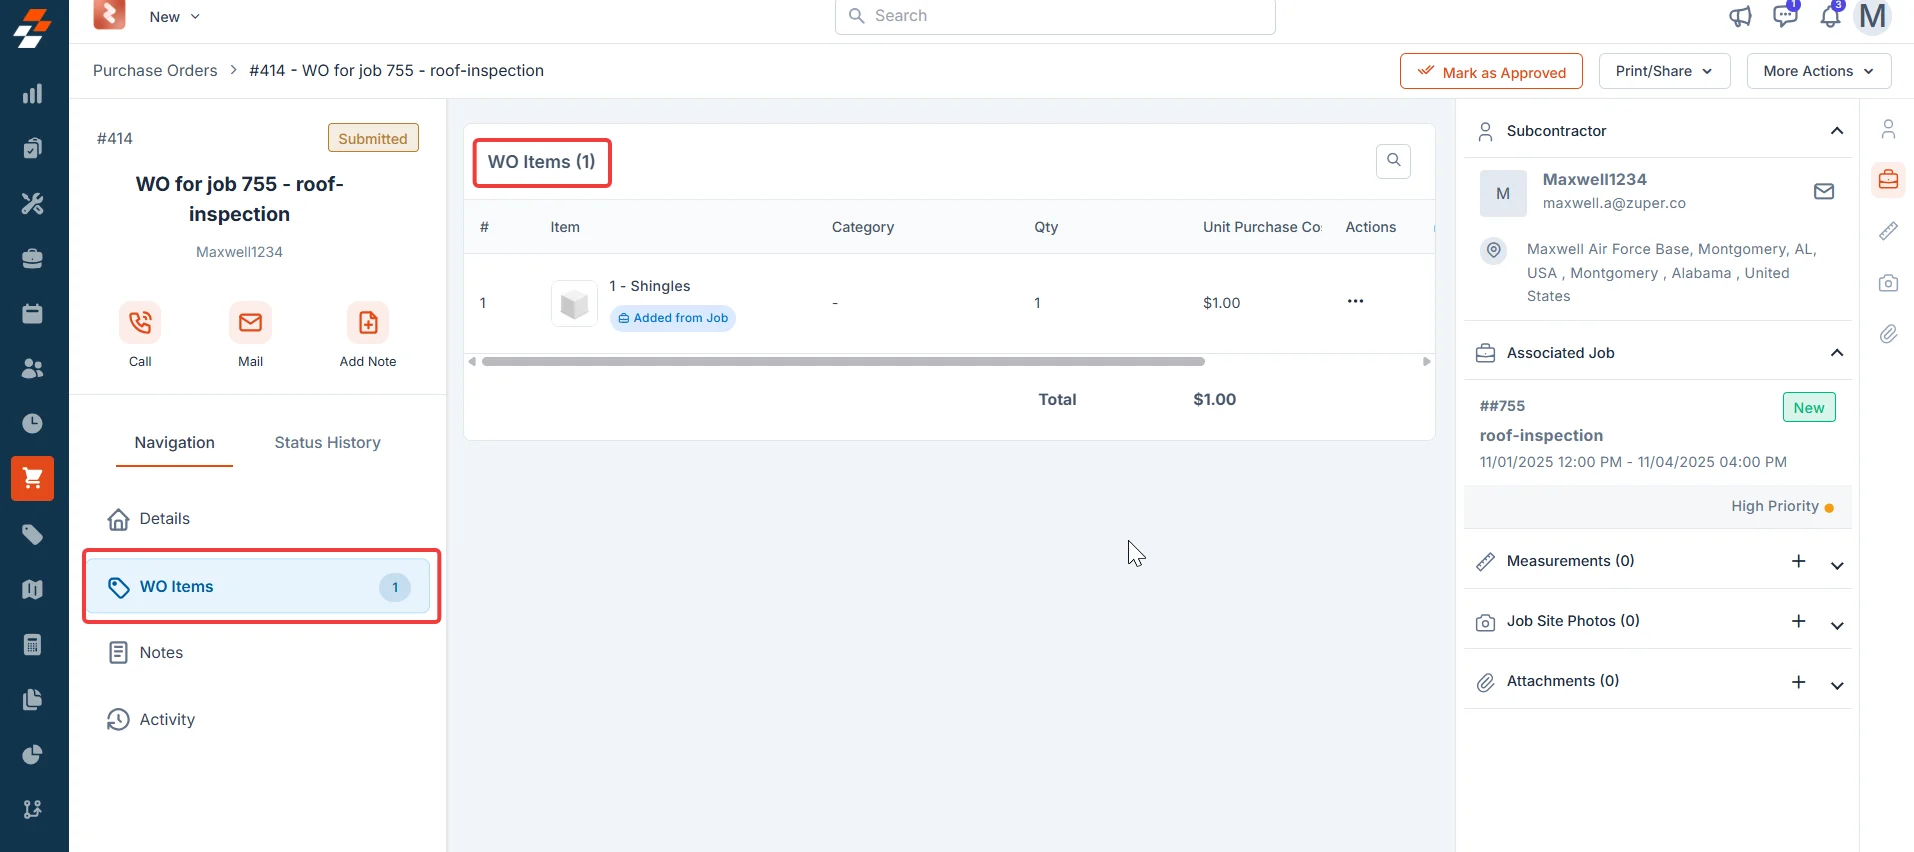
**Add WO items**
WO items are the services or labor tasks you are commissioning the subcontractor to perform. Add them from your existing catalog, or enter a custom item for anything not in the catalog.
1. Scroll down to the **WO Items** section.
2. Select **+ Add**. A dropdown appears with two options:
* **Line Item** — Select from your existing services.
* **Custom Line Item** — Enter a one-off item that is not in your inventory.
You can select multiple items at once. Use the filters at the top of the modal to narrow results by service type, trade, or category.
If a job is associated with this work order — or if the WO was created directly from a job — services from that job carry forward automatically into the **WO Items** section. Only services modeled as **Fixed Labor** appear here. Services that are part of a **Bundle**, **Section**, or **Item Group** also appear as individual line items, provided they are Fixed Labor services.
3. In the **Service Date** field, enter the date the subcontractor is scheduled to perform the work.
* If a job is associated, this field pre-fills with the job's start date.
* If no start date is set on the job, Zuper uses the job's due date instead.
***
**Fill in the primary details**
1. Review the **Work Order Title** field. If a job is associated, this field pre-fills with the job name. If no job is associated, enter a clear, descriptive title manually.
Associate a job before filling in other details. Zuper automatically pre-fills several fields, saving time and reducing errors.
2. In the **Select Sub Contractor** field, choose the subcontractor from your vendor list. Only active vendors appear here. When you select one, their contact details and address automatically populate the right panel.
If the subcontractor has not been added to Zuper yet, you can create them directly from the side sheet. Select **+ Quick Create** at the bottom of the vendor list, enter their details, and save. The new subcontractor becomes available to select immediately.
3. In the **Work Order Date** field, enter the date the subcontractor is scheduled to perform the work.
* If a job is associated, this field pre-fills with the job's start date.
* If no start date is set on the job, Zuper uses the job's due date instead.
A work order cannot be created without associating a job.
4. From the **Work Order Slot** list, select the preferred time of day — for example, **Morning** or **Afternoon**.
5. In the **Reference Number** field, enter an optional internal or vendor-specific reference ID.
6. From the **Payment Term** list, select the applicable payment agreement.
7. From the **Template** list, select the template for the work order PDF.
Keep the selection as **Choose Template** to use Zuper's built-in default format — this is the recommended option for work orders. If your organization has created a custom template, select it from the list. The **Default Template** option is intended for purchase orders and should not be selected for work orders.
8. In the **Remarks** field, enter any internal notes relevant to this work order. These notes are visible on the work order record.
**Addresses** \
The **Service Address** and **Billing Address** in the right panel are automatically pulled from the associated job and the selected subcontractor. Select the pencil icon next to each address to edit them.
***
**Add WO items**
WO items are the services or labor tasks you are commissioning the subcontractor to perform. Add them from your existing catalog, or enter a custom item for anything not in the catalog.
1. Scroll down to the **WO Items** section.
2. Select **+ Add**. A dropdown appears with two options:
* **Line Item** — Select from your existing services.
* **Custom Line Item** — Enter a one-off item that is not in your inventory.
You can select multiple items at once. Use the filters at the top of the modal to narrow results by service type, trade, or category.
If a job is associated with this work order — or if the WO was created directly from a job — services from that job carry forward automatically into the **WO Items** section. Only services modeled as **Fixed Labor** appear here. Services that are part of a **Bundle**, **Section**, or **Item Group** also appear as individual line items, provided they are Fixed Labor services.
3. In the **Service Date** field, enter the date the subcontractor is scheduled to perform the work.
* If a job is associated, this field pre-fills with the job's start date.
* If no start date is set on the job, Zuper uses the job's due date instead.
 After adding items, you can bulk-select them and remove them using the bulk action controls at the top of the section.
4. From the **Service Slot** list, select the preferred time of day — for example, **Morning** or **Afternoon**.
5. In the **Reference Number** field, enter an optional internal or vendor-specific reference ID.
6. From the **Payment Term** list, select the applicable payment agreement.
7. From the **Template** list, select the template for the work order PDF.
Keep the selection as **Choose Template** to use Zuper's built-in default format — this is the recommended option for work orders. If your organization has created a custom template, select it from the list. The **Default Template** option is intended for purchase orders and should not be selected for work orders.
8. In the **Remarks** field, enter any internal notes relevant to this work order. These notes are visible on the work order record.
**Addresses** \
The **Service Address** and **Billing Address** in the right panel are automatically pulled from the associated job and the selected subcontractor. Select the pencil icon next to each address to edit them.
***
**Complete custom fields**
If your organization has configured custom fields for purchase orders, those same fields apply to work orders. Scroll to the **Custom Fields** section and complete any field marked as required before saving.
***
## Right-side panel
The right-hand panel provides three additional sections to enrich the work order before you send it to the subcontractor.
**Measurements** \
Record site measurements relevant to the job. The subcontractor can view these on the portal when you choose to include them while sending.
**Job site photos** \
Attach reference photos from the job site. These give the subcontractor visual context before they begin work. You can choose whether to include them when you send the work order.
**Attachments** \
Upload supporting documents — drawings, specifications, contracts, or other files the subcontractor needs. Select **+ Add Attachments** and choose files from your device.
After adding items, you can bulk-select them and remove them using the bulk action controls at the top of the section.
4. From the **Service Slot** list, select the preferred time of day — for example, **Morning** or **Afternoon**.
5. In the **Reference Number** field, enter an optional internal or vendor-specific reference ID.
6. From the **Payment Term** list, select the applicable payment agreement.
7. From the **Template** list, select the template for the work order PDF.
Keep the selection as **Choose Template** to use Zuper's built-in default format — this is the recommended option for work orders. If your organization has created a custom template, select it from the list. The **Default Template** option is intended for purchase orders and should not be selected for work orders.
8. In the **Remarks** field, enter any internal notes relevant to this work order. These notes are visible on the work order record.
**Addresses** \
The **Service Address** and **Billing Address** in the right panel are automatically pulled from the associated job and the selected subcontractor. Select the pencil icon next to each address to edit them.
***
**Complete custom fields**
If your organization has configured custom fields for purchase orders, those same fields apply to work orders. Scroll to the **Custom Fields** section and complete any field marked as required before saving.
***
## Right-side panel
The right-hand panel provides three additional sections to enrich the work order before you send it to the subcontractor.
**Measurements** \
Record site measurements relevant to the job. The subcontractor can view these on the portal when you choose to include them while sending.
**Job site photos** \
Attach reference photos from the job site. These give the subcontractor visual context before they begin work. You can choose whether to include them when you send the work order.
**Attachments** \
Upload supporting documents — drawings, specifications, contracts, or other files the subcontractor needs. Select **+ Add Attachments** and choose files from your device.
 Files added in **Attachments** also appear in the email configuration dialog box when you send the work order. You can choose to include or remove them before sending.
***
## Left-side panel
Once the work order is saved, the left-side panel gives you access to four sections that support the full WO lifecycle.
Files added in **Attachments** also appear in the email configuration dialog box when you send the work order. You can choose to include or remove them before sending.
***
## Left-side panel
Once the work order is saved, the left-side panel gives you access to four sections that support the full WO lifecycle.
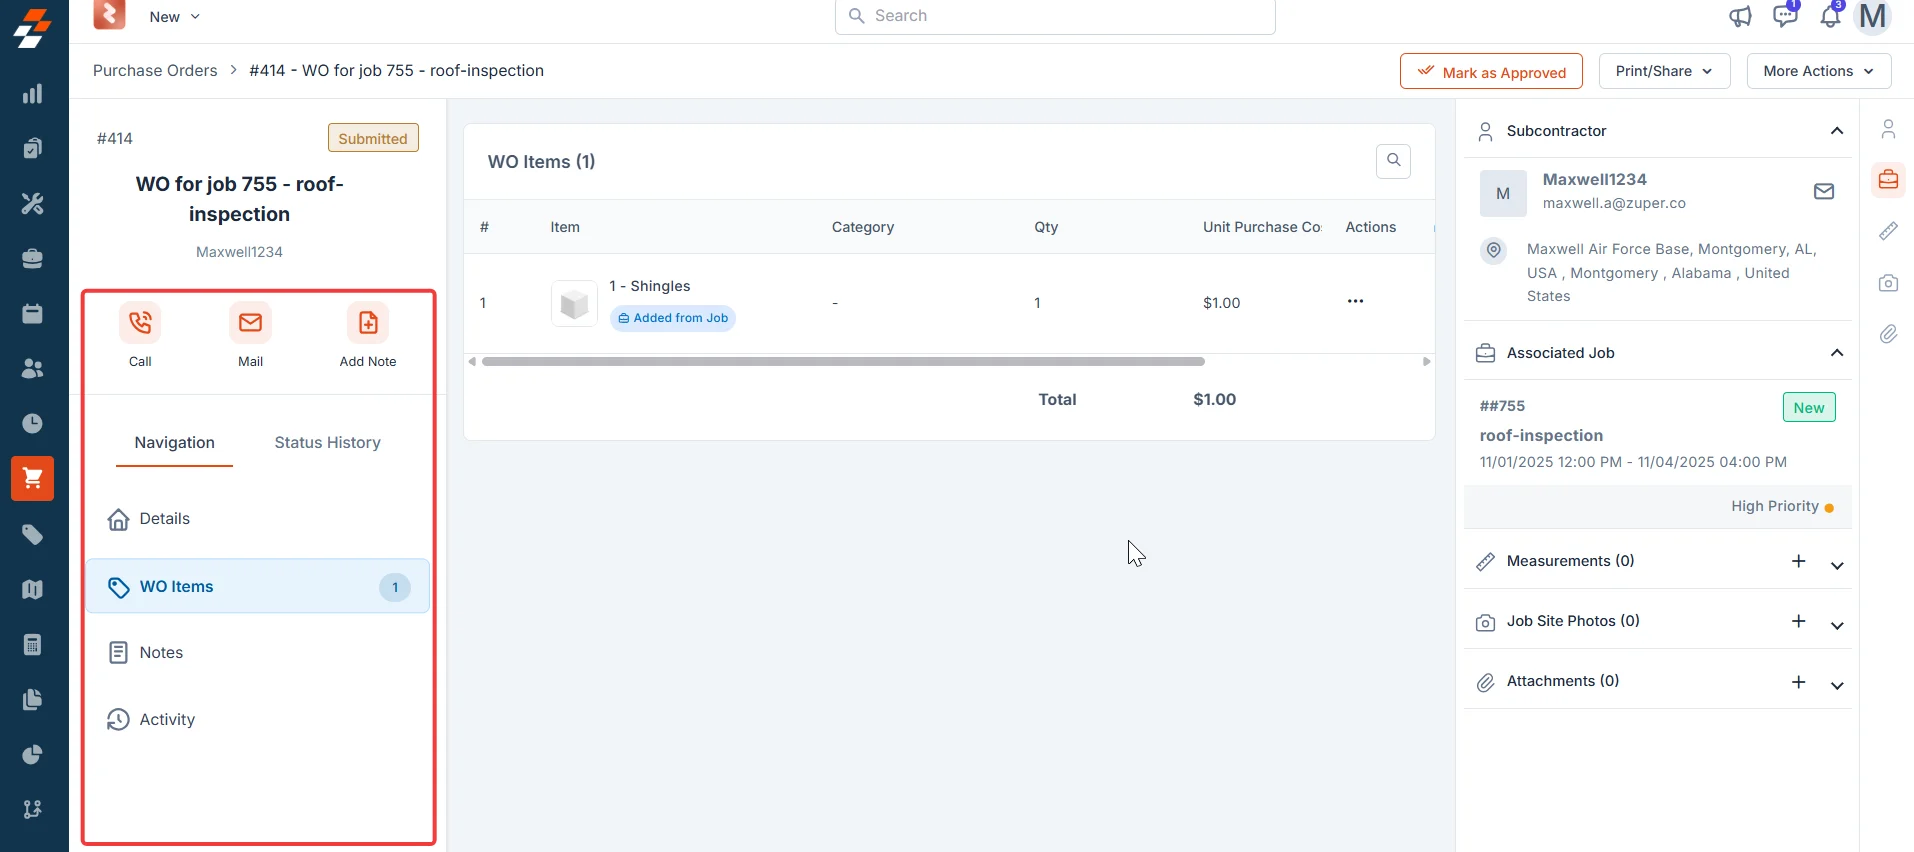 | Section | What it shows |
| ------------------ | ---------------------------------------------------------------------------------------------------------------------------------------------------------------------- |
| **WO items** | All services and labor tasks added to the work order. Review and manage line items from here after creation. |
| **Notes** | Internal notes added at any point in the lifecycle. Notes are visible to your team and are not shared with the subcontractor. |
| **Activity** | A timestamped log of every action taken on the work order — including status changes, edits, and communications. |
| **Status history** | The full audit trail of every status change: who made it, any remarks recorded at that stage, and any documents attached. Select any entry to download attached files. |
***
## Save the work order
Once you have filled in all required details and added your WO items, you have two options:
* **Save as Draft** — Saves the work order without submitting it. Use this if you need to review or complete the details later.
* **Save and Submit** — Saves the work order and immediately moves it to **Submitted** status, ready for approval or sending workflow.
| Section | What it shows |
| ------------------ | ---------------------------------------------------------------------------------------------------------------------------------------------------------------------- |
| **WO items** | All services and labor tasks added to the work order. Review and manage line items from here after creation. |
| **Notes** | Internal notes added at any point in the lifecycle. Notes are visible to your team and are not shared with the subcontractor. |
| **Activity** | A timestamped log of every action taken on the work order — including status changes, edits, and communications. |
| **Status history** | The full audit trail of every status change: who made it, any remarks recorded at that stage, and any documents attached. Select any entry to download attached files. |
***
## Save the work order
Once you have filled in all required details and added your WO items, you have two options:
* **Save as Draft** — Saves the work order without submitting it. Use this if you need to review or complete the details later.
* **Save and Submit** — Saves the work order and immediately moves it to **Submitted** status, ready for approval or sending workflow.
 ***
## Work order creation from job, quote, and subcontractor
### Create a work order from the Subcontractor
From the existing subcontractor details page, from the work orders tab, select "**+ Create New WO**" to create a new work order.
**Navigation**: *Subcontractors* → *Work Orders* → *+ Create New WO*
1. Go to the **Vendors** module from the left navigation menu and select the subcontractor.
2. Select the **Work Orders** tab on the subcontractor details page.
3. Select **+ Create New WO** in the top-right corner of the work orders list.
4. Complete the work order form and save.
***
## Work order creation from job, quote, and subcontractor
### Create a work order from the Subcontractor
From the existing subcontractor details page, from the work orders tab, select "**+ Create New WO**" to create a new work order.
**Navigation**: *Subcontractors* → *Work Orders* → *+ Create New WO*
1. Go to the **Vendors** module from the left navigation menu and select the subcontractor.
2. Select the **Work Orders** tab on the subcontractor details page.
3. Select **+ Create New WO** in the top-right corner of the work orders list.
4. Complete the work order form and save.
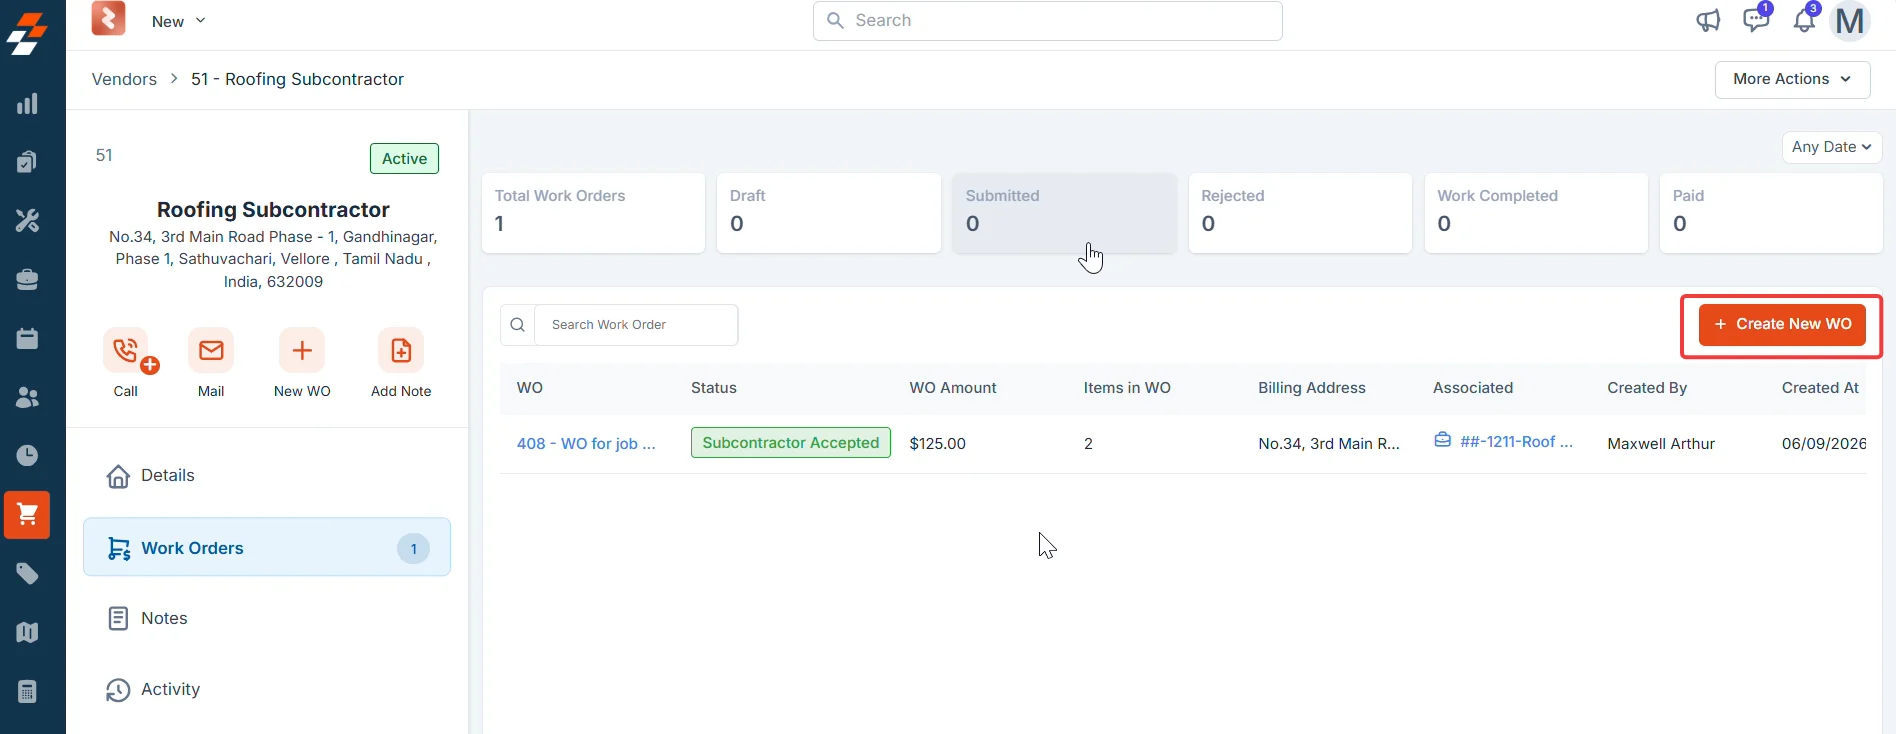 The new work order appears in the **Work Orders** tab. The status summary bar at the top of the tab updates to reflect the new total.
### Create a work order from a job
**Navigation**: *Jobs* → *\[Job name]* → *Assets Associated* → *Work Order*
1. Go to the **Jobs** module from the left navigation menu and open the job.
2. In the right-side panel, locate **Purchase Orders**.
3. Select the **+** icon next to **Purchase Orders**.
4. From the menu that appears, select **Work Order**.
5. Complete the work order form and save.
The new work order appears in the **Work Orders** tab. The status summary bar at the top of the tab updates to reflect the new total.
### Create a work order from a job
**Navigation**: *Jobs* → *\[Job name]* → *Assets Associated* → *Work Order*
1. Go to the **Jobs** module from the left navigation menu and open the job.
2. In the right-side panel, locate **Purchase Orders**.
3. Select the **+** icon next to **Purchase Orders**.
4. From the menu that appears, select **Work Order**.
5. Complete the work order form and save.
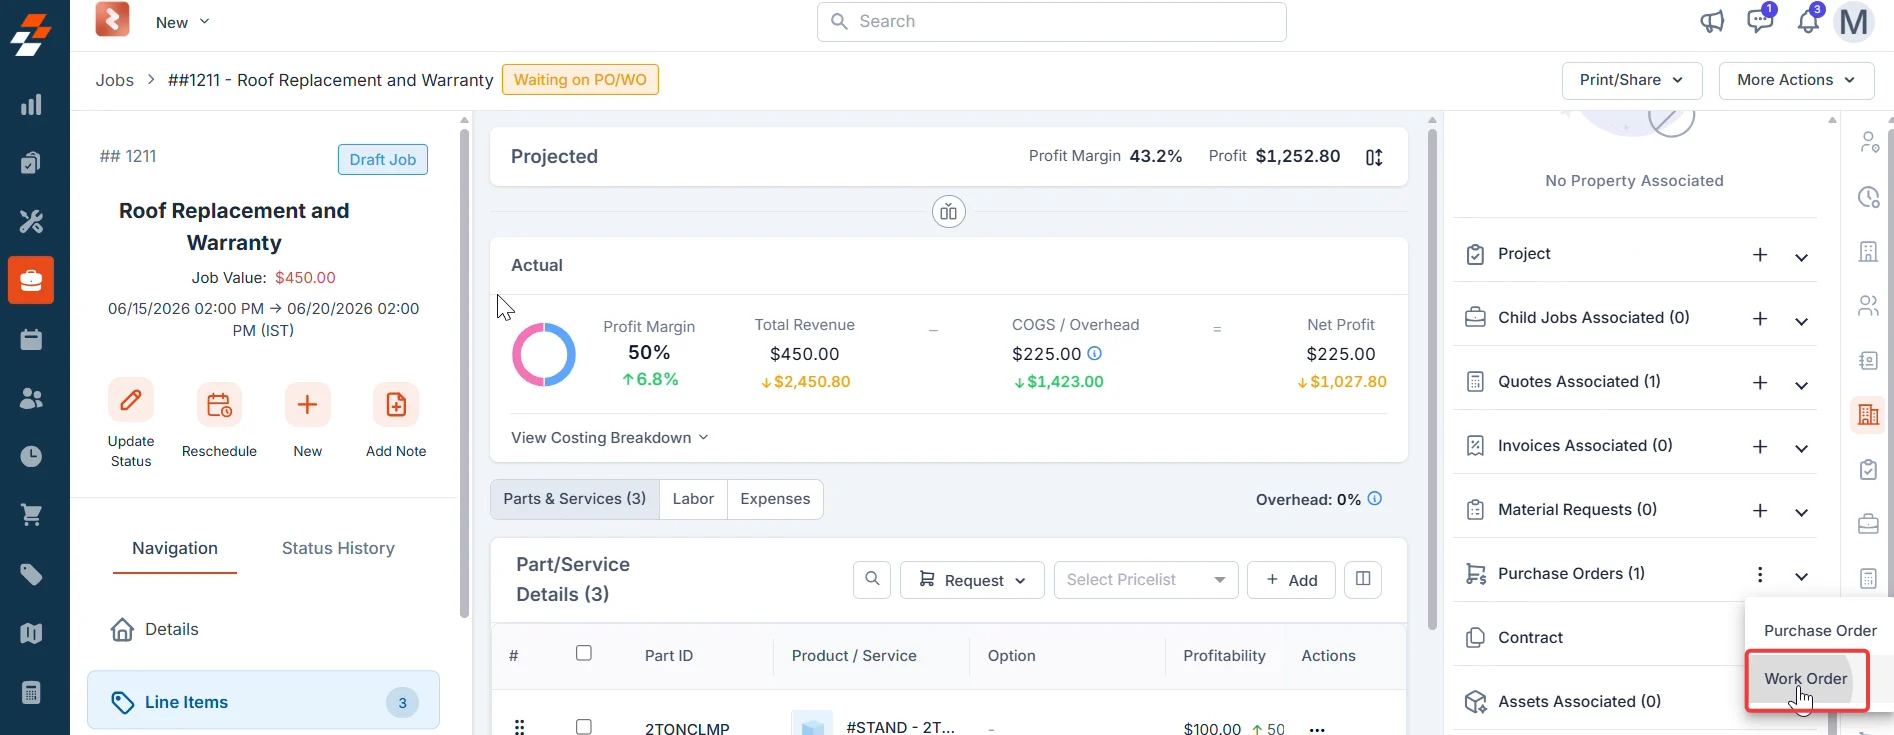 The work order is created and linked to the job. You can view it under **Assets Associated** on the job details page.
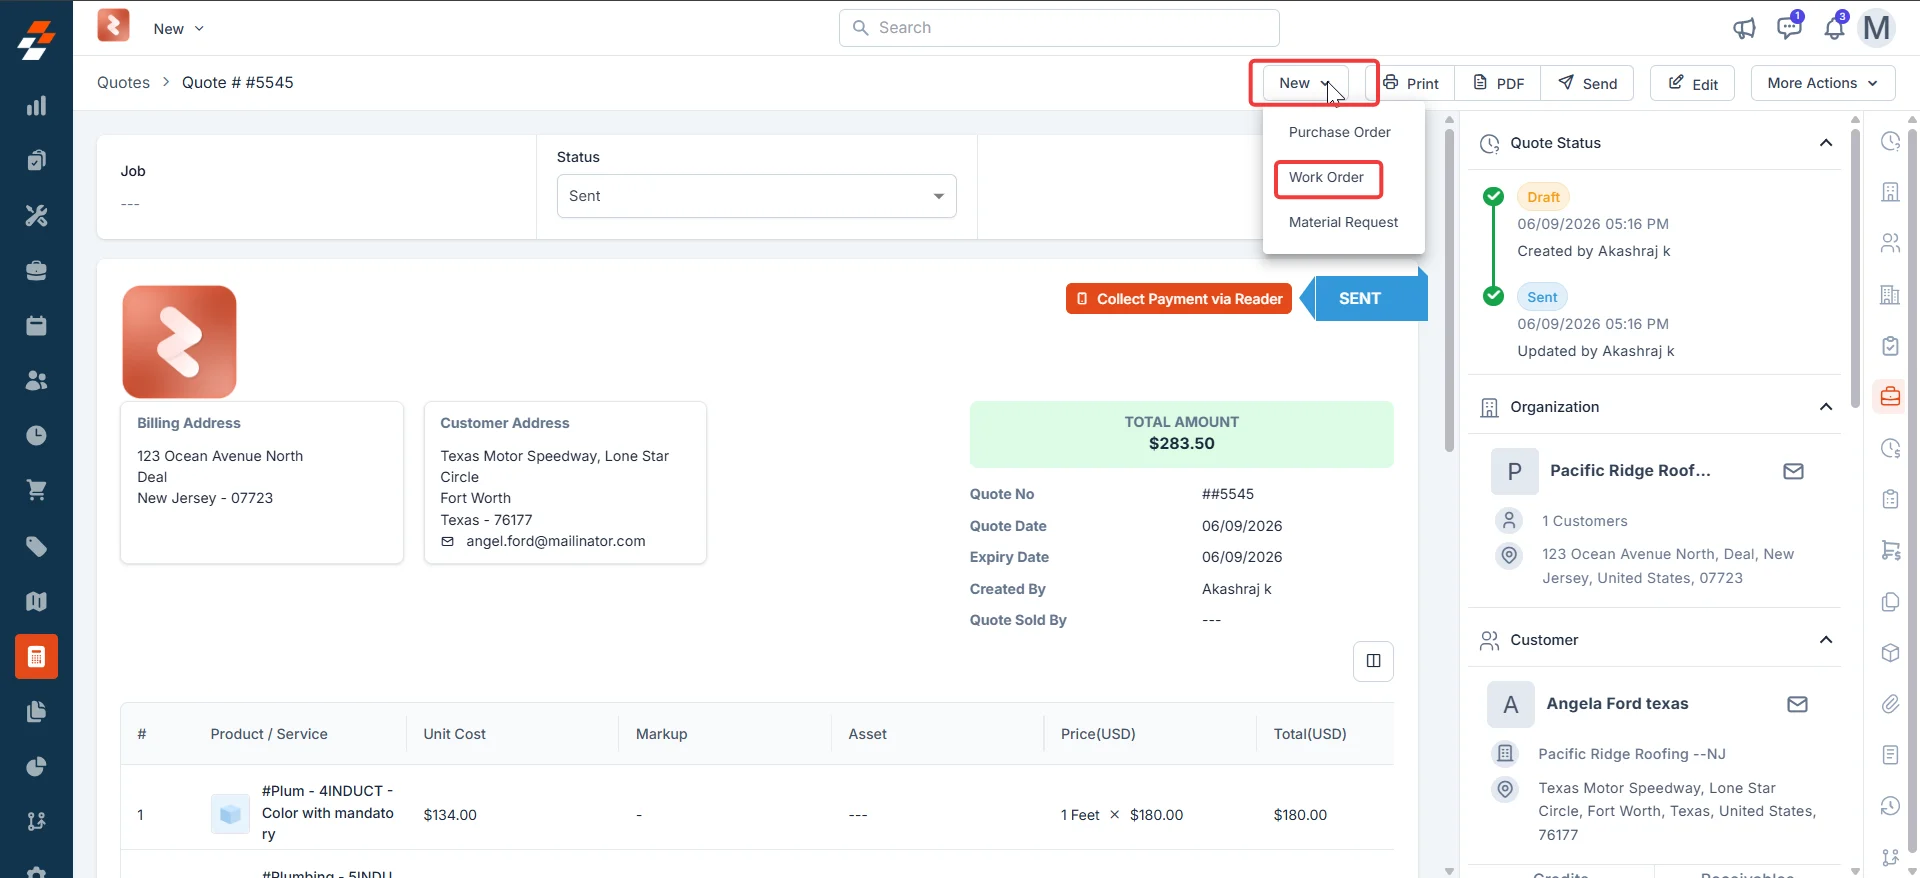
### Create a work order from a quote
**Navigation**: *Quotes* → *\[Quote name]* → *New* → *Work Order*
1. Go to the **Accounting** module from the left navigation menu and select **Quotes**.
2. Open the quote you want to create a work order for.
3. Select **New** in the top-right corner of the quote details page.
4. From the dropdown menu, select **Work Order**.
The work order is created and linked to the job. You can view it under **Assets Associated** on the job details page.
### Create a work order from a quote
**Navigation**: *Quotes* → *\[Quote name]* → *New* → *Work Order*
1. Go to the **Accounting** module from the left navigation menu and select **Quotes**.
2. Open the quote you want to create a work order for.
3. Select **New** in the top-right corner of the quote details page.
4. From the dropdown menu, select **Work Order**.
 5. Complete the work order form and save.
The work order is created and linked to the quote.
## What happens next
Once the work order is created, it enters the status workflow. You advance the work order manually at each stage from the work order detail page.
```text theme={null}
Draft → Submitted → Approved / Rejected → Sent to Subcontractor
→ Subcontractor (Accepted /Rejected) → Work Completed → Paid → Closed / Canceled
```
Zuper does not automatically advance the status — except when the **Automatically Send PO to Vendor after Approval** toggle is enabled in your Purchasing settings. When that setting is on, Zuper sends the work order to the subcontractor automatically as soon as it is approved, without requiring a manual send action.
***
## More actions
From the work order detail page, you can perform the following actions after creation.
| Action | What it does | When available |
| --------------------------- | ------------------------------------------------------------------------------------------------------------------------------------------- | ----------------------------------------------- |
| **Edit** | Opens the work order for editing. Selecting **Edit** returns the WO to **Draft** status so you can make changes. | Draft through Subcontractor Accepted / Rejected |
| **Clone** | Creates a copy of the work order with all details pre-filled. Use this when you regularly work with the same subcontractor on similar jobs. | Any status |
| **Print / Share via email** | Generates a PDF of the work order and lets you email it directly to the subcontractor from Zuper. | All statuses except Draft |
| **Delete WO** | Permanently removes the work order. This action cannot be undone. | All statuses |
**Print / Share via email** is not available while the work order is in **Draft** status. Once the WO moves past Draft, you can use this option at any point to send a copy to the subcontractor or any other recipient.
***
## FAQs
Only users with admin-level access can create work orders in Zuper. These users also have access to the **Purchase Orders** module. If you do not see the option to create a work order, contact your Zuper administrator to verify your permissions.
A material order is used to buy physical parts or products from a vendor. A work order is used to commission labor or specialist services from a subcontractor. Both live in the **Material Orders** module but follow different workflows.
Yes. While the work order is in **Draft** status, you can reopen it and update any details. Once the work order reaches **Work Completed** status, editing is no longer allowed.
Zuper generates work order documents as PDFs. Select the template that matches your organization's standard format from the **Template** list when creating the work order.
You can add them on the spot. In the **Select Sub Contractor** field, select **+ Quick Create** at the bottom of the vendor dropdown, enter their details, and save. The new subcontractor is available to select immediately.
***
## Related articles
* [Subcontractors](/Purchasing/Work%20Orders/Sub-Contractors/Sub-Contractors)
* [Work order status](/Purchasing/Work%20Orders/Work%20order%20status)
* [Creating a purchase order](/Purchasing/Purchase-Orders/Creating-purchase-order)
* [Understanding purchase order status](/Purchasing/Purchase-Orders/Purchase-order-status)
* [Vendors](/Purchasing/Vendors/Vendors)
5. Complete the work order form and save.
The work order is created and linked to the quote.
## What happens next
Once the work order is created, it enters the status workflow. You advance the work order manually at each stage from the work order detail page.
```text theme={null}
Draft → Submitted → Approved / Rejected → Sent to Subcontractor
→ Subcontractor (Accepted /Rejected) → Work Completed → Paid → Closed / Canceled
```
Zuper does not automatically advance the status — except when the **Automatically Send PO to Vendor after Approval** toggle is enabled in your Purchasing settings. When that setting is on, Zuper sends the work order to the subcontractor automatically as soon as it is approved, without requiring a manual send action.
***
## More actions
From the work order detail page, you can perform the following actions after creation.
| Action | What it does | When available |
| --------------------------- | ------------------------------------------------------------------------------------------------------------------------------------------- | ----------------------------------------------- |
| **Edit** | Opens the work order for editing. Selecting **Edit** returns the WO to **Draft** status so you can make changes. | Draft through Subcontractor Accepted / Rejected |
| **Clone** | Creates a copy of the work order with all details pre-filled. Use this when you regularly work with the same subcontractor on similar jobs. | Any status |
| **Print / Share via email** | Generates a PDF of the work order and lets you email it directly to the subcontractor from Zuper. | All statuses except Draft |
| **Delete WO** | Permanently removes the work order. This action cannot be undone. | All statuses |
**Print / Share via email** is not available while the work order is in **Draft** status. Once the WO moves past Draft, you can use this option at any point to send a copy to the subcontractor or any other recipient.
***
## FAQs
Only users with admin-level access can create work orders in Zuper. These users also have access to the **Purchase Orders** module. If you do not see the option to create a work order, contact your Zuper administrator to verify your permissions.
A material order is used to buy physical parts or products from a vendor. A work order is used to commission labor or specialist services from a subcontractor. Both live in the **Material Orders** module but follow different workflows.
Yes. While the work order is in **Draft** status, you can reopen it and update any details. Once the work order reaches **Work Completed** status, editing is no longer allowed.
Zuper generates work order documents as PDFs. Select the template that matches your organization's standard format from the **Template** list when creating the work order.
You can add them on the spot. In the **Select Sub Contractor** field, select **+ Quick Create** at the bottom of the vendor dropdown, enter their details, and save. The new subcontractor is available to select immediately.
***
## Related articles
* [Subcontractors](/Purchasing/Work%20Orders/Sub-Contractors/Sub-Contractors)
* [Work order status](/Purchasing/Work%20Orders/Work%20order%20status)
* [Creating a purchase order](/Purchasing/Purchase-Orders/Creating-purchase-order)
* [Understanding purchase order status](/Purchasing/Purchase-Orders/Purchase-order-status)
* [Vendors](/Purchasing/Vendors/Vendors)