> ## Documentation Index
> Fetch the complete documentation index at: https://docs.zuper.co/llms.txt
> Use this file to discover all available pages before exploring further.

# Configuring Job Card Templates

In Zuper, administrators can configure job card templates by defining categories, layouts, and content formatting options. The templates can be customized based on business needs, providing flexibility in format, orientation, border settings, and text styling.

This guide explains how to create, edit, and manage job card templates in Zuper.

<Frame>
  **Navigation**: *Settings ->  Modules -> Jobs -> Job Card Templates*
</Frame>

## Navigating to job card templates

To configure job card templates, follow these steps:

* Select the "**Settings**" module from the left navigation menu.
* Click "**Modules"** and select "**Jobs**" to open the Job Settings page.
* Choose **Job Card Templates**.

<img src="https://mintcdn.com/zuperinc/OTKEr7h7gBrChRr8/images/job2.png?fit=max&auto=format&n=OTKEr7h7gBrChRr8&q=85&s=7f6af7418ec4981d904c52b75dea74f4" alt="Job2 Pn" width="1916" height="879" data-path="images/job2.png" />

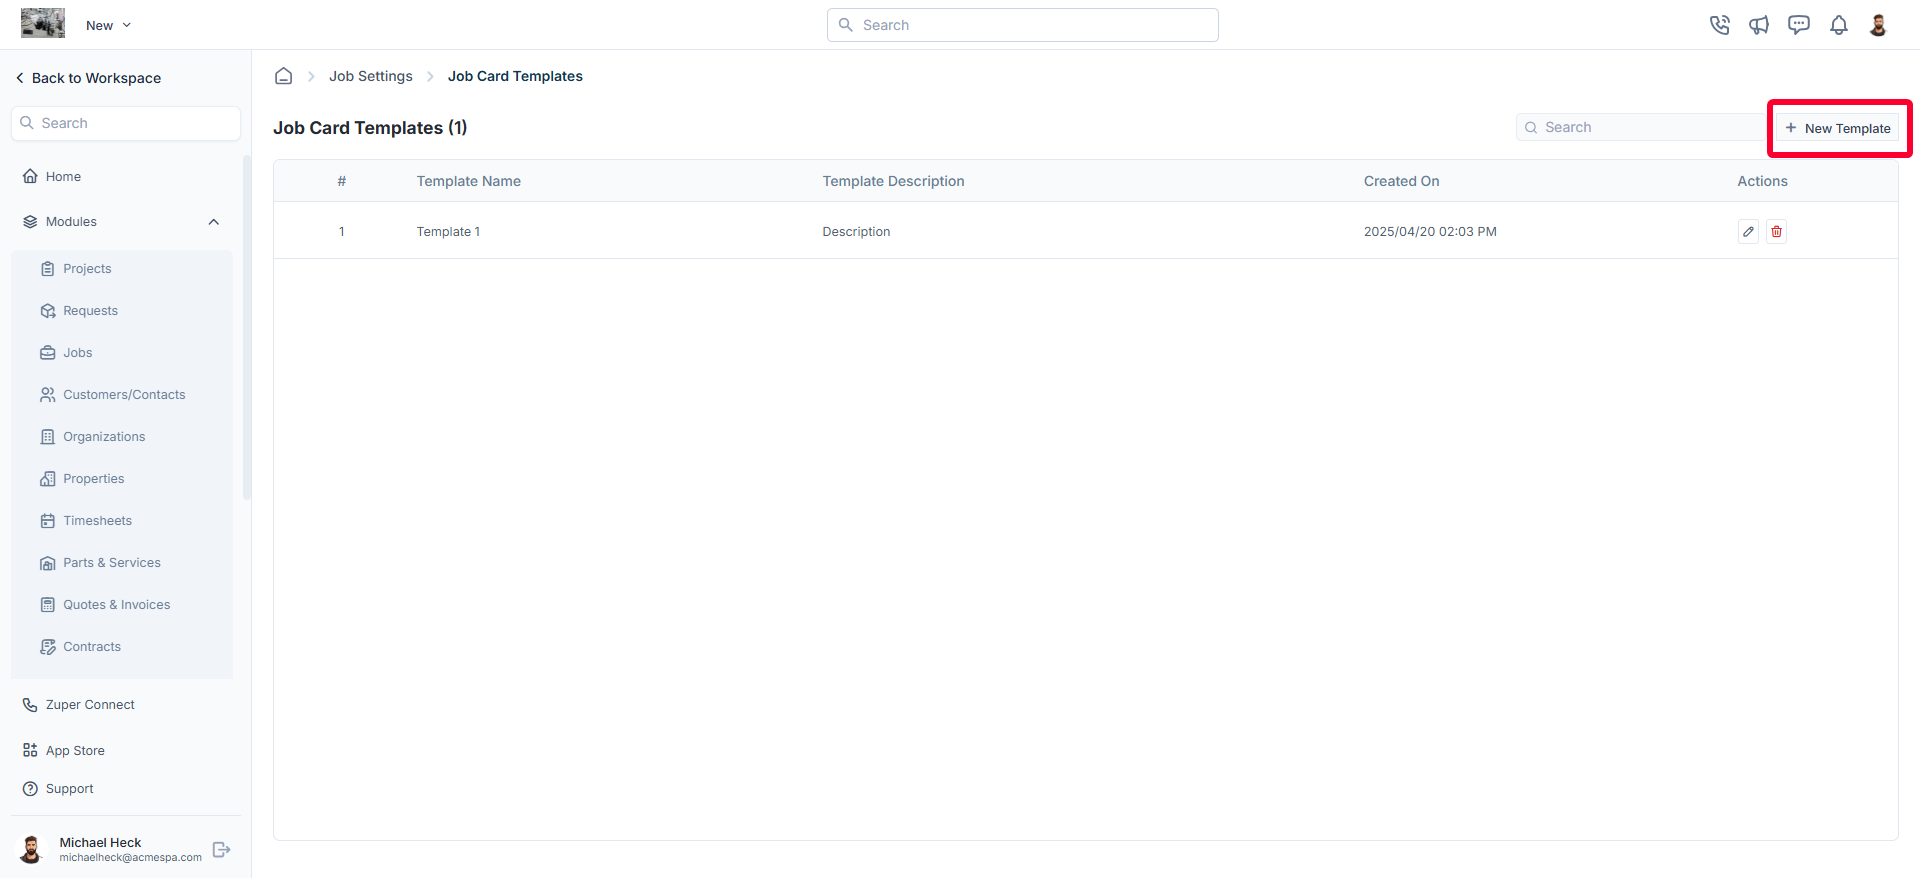
* The job card templates listing page will appear, displaying all existing templates.

## Creating a new job card template

To create a new job card template:

* On the job card templates listing page, click **+ New Template**.

<img src="https://mintcdn.com/zuperinc/p87sruICm1mYfxS7/images/job3.png?fit=max&auto=format&n=p87sruICm1mYfxS7&q=85&s=6cb2ca4dd4c60a3f38ddc8000435f2d2" alt="Job3 Pn" width="1920" height="878" data-path="images/job3.png" />

* A new job card template dialog box will appear.
* Fill in the following details:
  1. **Template Name** (*Mandatory*): Enter a unique name for the job card template.
  2. **Job Category** (*Mandatory*): Select the relevant job category from the dropdown menu.
  3. **Template Description** (*Mandatory*): Provide a brief description of the template.
  4. **Format** (*Mandatory*): Choose the document size from the available options:
     * A3
     * A4
     * A5
     * Letter
     * Legal
     * Tabloid
  5. **Orientation** (*Mandatory*): Select either **Landscape** or **Portrait**.
  6. **Border Settings** (*Mandatory*):  Define the margins for the job card layout:
     * Top Border (e.g., 10mm)
     * Right Border (e.g., 10mm)
     * Bottom Border (e.g., 10mm)
     * Left Border (e.g., 10mm)
  7. Click **Proceed** to move to the template editor.

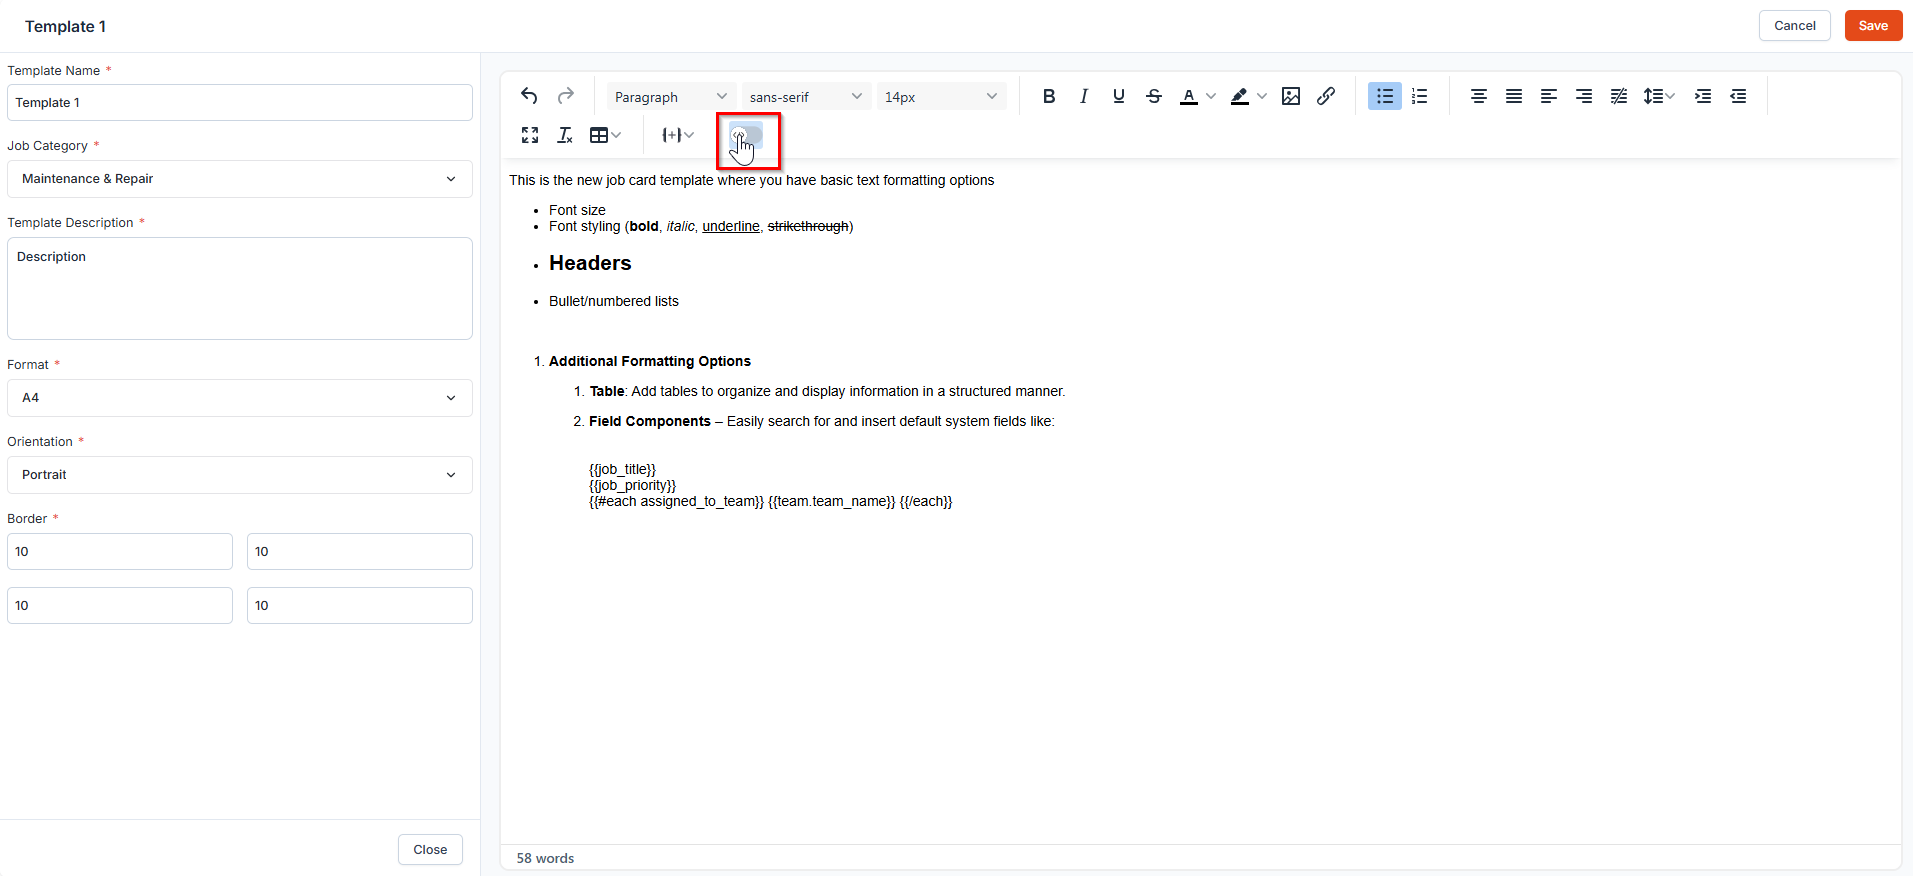
**Editing a job card template's content**

Once the template is created, you can customize the content using the Template Editor.

**Template editor customization options**

The Template Editor offers various formatting tools and components to help you design and structure your job card layout with ease.

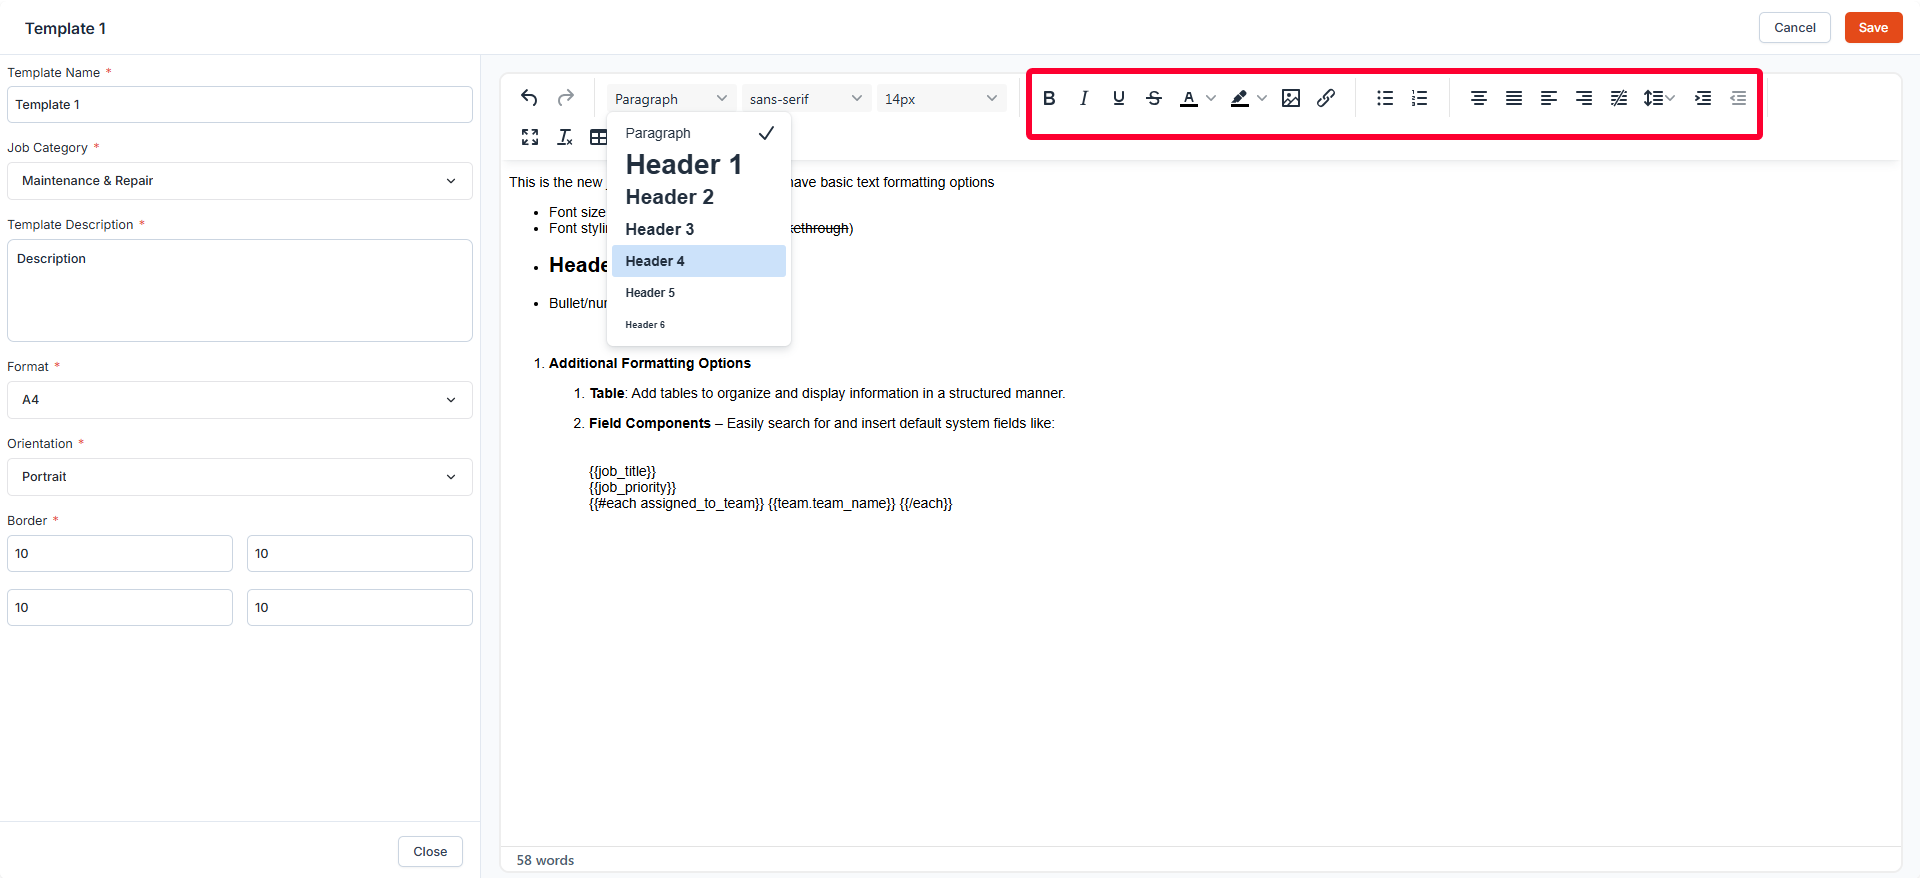
**Text formatting options**

Basic text formatting options such as font size, font styling (bold, italic, underline, strikethrough), headers, and bullet/numbered lists are available to help you format your content effectively.

<img src="https://mintcdn.com/zuperinc/p87sruICm1mYfxS7/images/job57.png?fit=max&auto=format&n=p87sruICm1mYfxS7&q=85&s=91988b0d1b5634cd43e5bf004c6aef56" alt="Job57 Pn" width="1920" height="878" data-path="images/job57.png" />

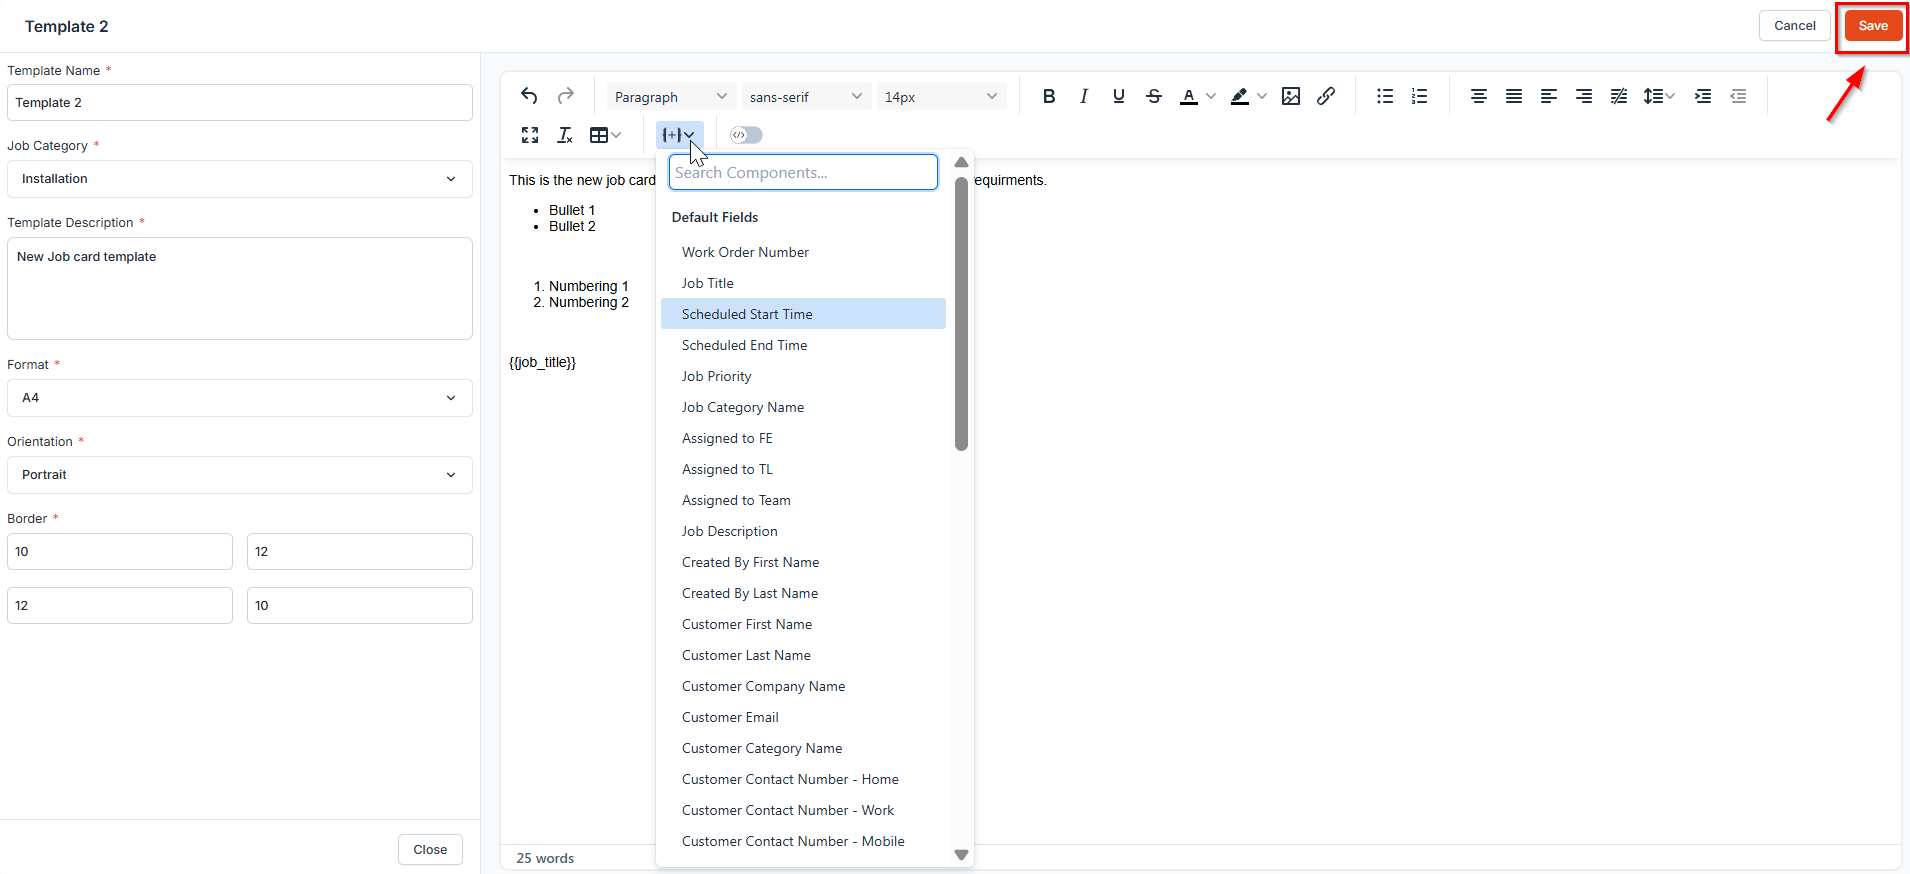
**Additional formatting options**

1. **Table**:  Add tables to organize and display information in a structured manner.
2. **Field Components** – Easily search for and insert default system fields like:
   * Work Order Number
   * Job Priority
   * Job Description
   * Customer Email
   * Assigned to FE and more.

Once you have customized the template, click **Save** to successfully create your Job Card Template.

<img src="https://mintcdn.com/zuperinc/p87sruICm1mYfxS7/images/job6.png?fit=max&auto=format&n=p87sruICm1mYfxS7&q=85&s=0829f59f200a7b9e73f47c8990a20c1c" alt="Job6 Pn" width="1910" height="874" data-path="images/job6.png" />

<Note>
  Note: The Template Editor also includes a Code Mode. Switching to code mode allows you to create and edit templates directly using HTML for greater customization.

  <img src="https://mintcdn.com/zuperinc/p87sruICm1mYfxS7/images/job58.png?fit=max&auto=format&n=p87sruICm1mYfxS7&q=85&s=606bea658637fc4a787a6091cd7e6632" alt="Job58 Pn" width="1913" height="876" data-path="images/job58.png" />
</Note>

## Editing a job card template

To modify an existing job card template:

* Navigate to the job card templates listing page.
* Click the pencil <Icon icon="pencil" color="#010101" /> icon next to the specific template.

<img src="https://mintcdn.com/zuperinc/p87sruICm1mYfxS7/images/job7.png?fit=max&auto=format&n=p87sruICm1mYfxS7&q=85&s=ac3ee10bd545391f55e7518dbf393ad7" alt="Job7 Pn" width="1907" height="766" data-path="images/job7.png" />

* The template editor will open.
* Make the necessary changes.
* Click **Save** to update the template.

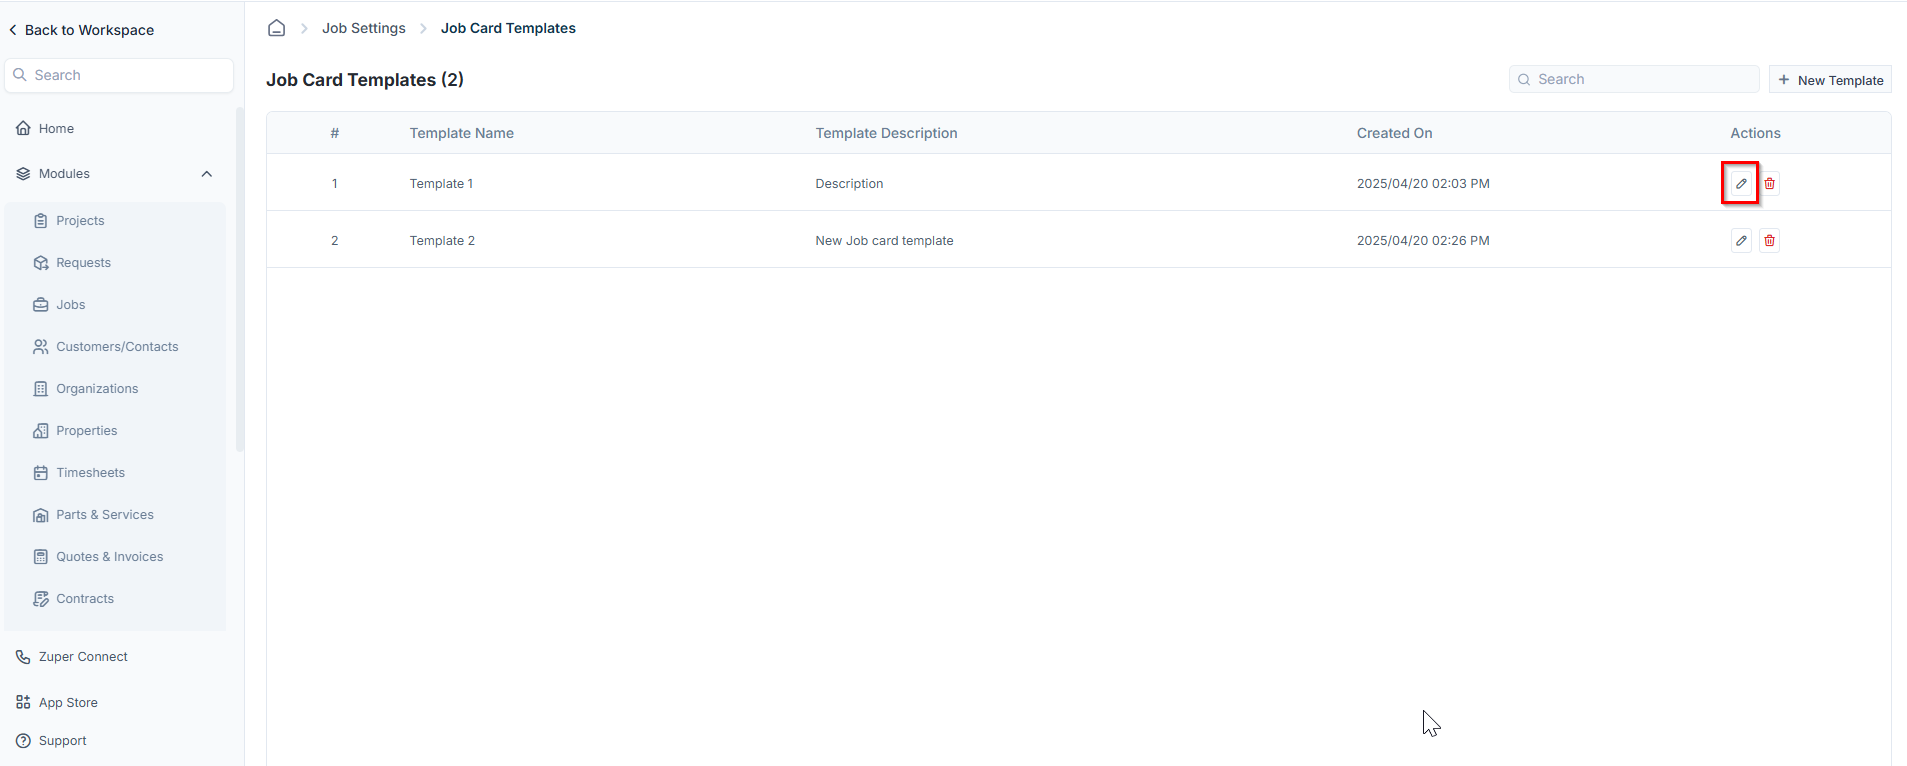
## Deleting a job card template

If a job card template is no longer needed, follow these steps to delete it:

* Navigate to the job card templates listing page.
* Click the delete icon <Icon icon="trash-can" color="#060606" /> next to the template you want to remove.

<img src="https://mintcdn.com/zuperinc/p87sruICm1mYfxS7/images/job8.png?fit=max&auto=format&n=p87sruICm1mYfxS7&q=85&s=f50bc8e8c54aad5be91adb247f3ad790" alt="Job8 Pn" width="1907" height="766" data-path="images/job8.png" />

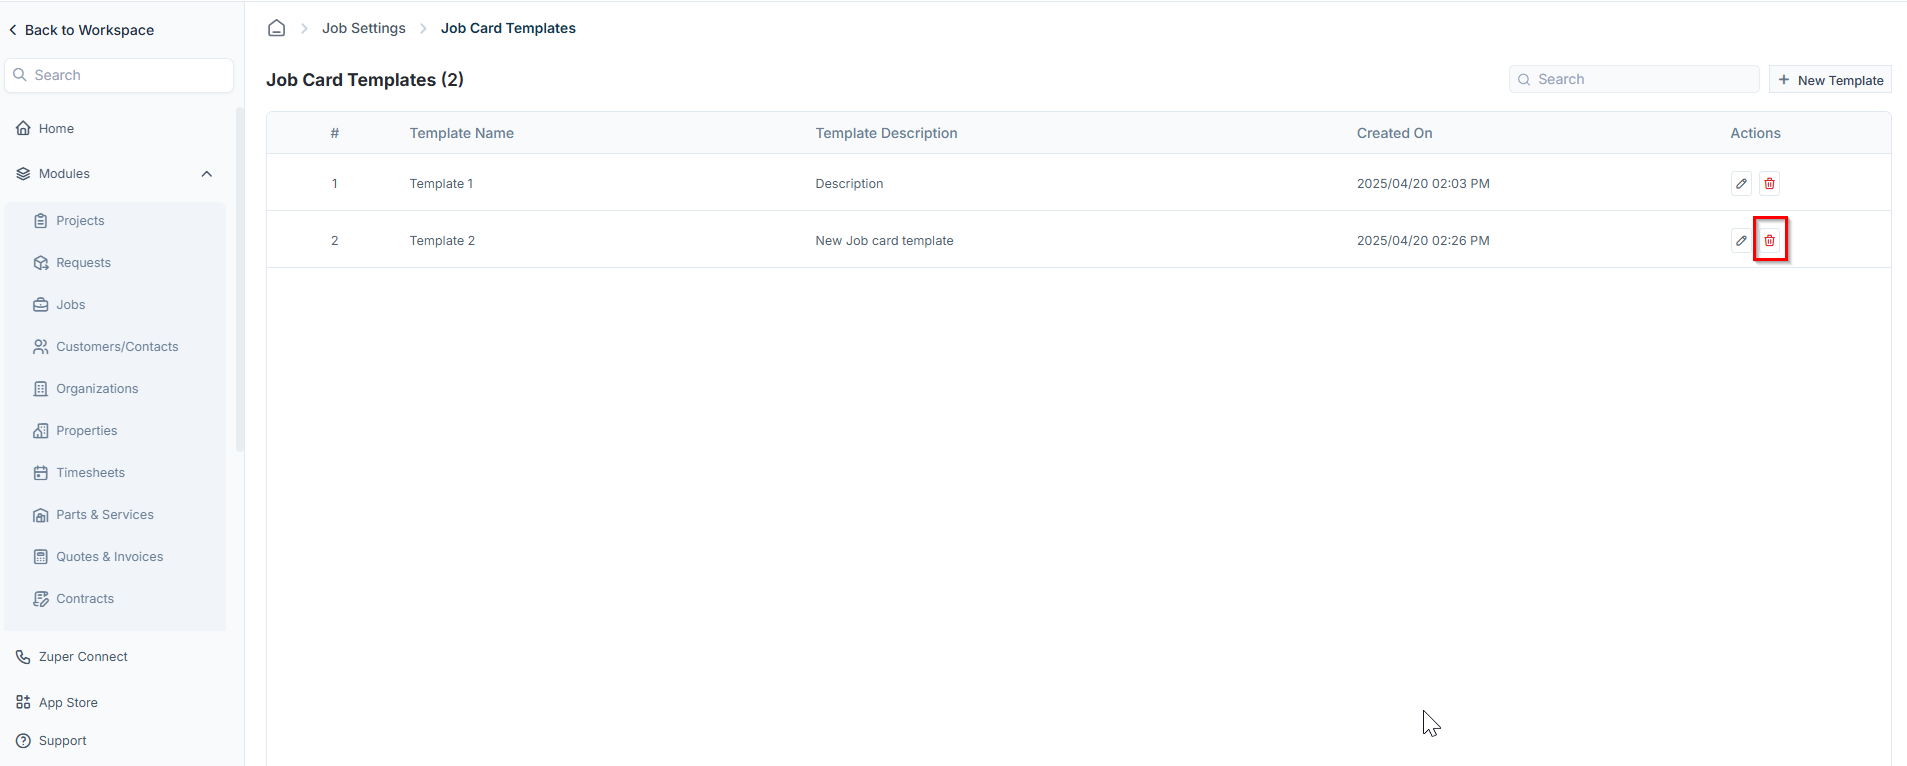
* A confirmation dialog box will appear.
* Click **Delete** to permanently remove the job card template.

***

## Using dynamic variables in job card templates

<Frame>
  **Navigation**: *Settings* → *Document Templates* → *Job Card Templates*
</Frame>

Job card templates in Zuper use dynamic variables to pull live data from a job directly into your document. When Zuper generates a job card, every placeholder in your template is replaced with real values — the customer name, the technician's checklist answers, the job status, and more.

You do not need a technical background to use these patterns. Each one follows the same logic: wrap the data you want in the correct set of tags, and Zuper fills in the rest when the document renders. Think of each pattern as a reusable building block. Copy it into your template, adjust the field names to match your setup, and combine patterns to build more complex layouts.

This article is a reference companion to the Job Card Templates feature. For steps on creating or editing a template, see [Configuring Job Card Templates](#).

<Note>
  Every dynamic variable expression sits between double curly braces: `{{ }}`. Expressions that open a block — such as a loop or a condition — also need a closing tag. For example, `{{#each checklist}}` opens a loop and `{{/each}}` closes it. A missing closing tag is one of the most common causes of a template not rendering correctly.
</Note>

***

Before you start

Two building blocks appear throughout every pattern in this article.

* A **field** is any piece of job data you want to display — for example, `{{job_title}}` or `{{customer.customer_first_name}}`.
* A **helper** is a built-in function that lets you loop through a list, compare values, split text, or format a date before it renders.

<Note>
  An **array** is a list of items that Zuper stores together — for example, all the checklist questions on a job, or all the assets linked to a work order. When a pattern in this article refers to an array, think of it as a collection you can loop through, one item at a time.
</Note>

**Helper quick reference**

Use this table as a fast lookup while you build your template.

| Helper                                                  | Purpose                                                     |
| ------------------------------------------------------- | ----------------------------------------------------------- |
| `{{#each array}}`                                       | Loop any array                                              |
| `{{#eachLastInstance array "key"}}`                     | Return only the latest entry in an array by key             |
| `{{#if field}}`                                         | Render content only if the field has a value                |
| `{{#stringEq a "b"}}`                                   | Match strings — loose, not case-sensitive                   |
| `{{#stringEqStrict a 'b'}}`                             | Match strings — strict and case-sensitive                   |
| `{{#split field ','}}`                                  | Split a string and loop each part                           |
| `{{.}}`                                                 | The current value inside a `{{#split}}` or `{{#each}}` loop |
| `{{../field}}`                                          | Access a field from the parent scope                        |
| `{{formatDateWithTimeZone date "MM/DD/YYYY" timezone}}` | Format a date with a time zone                              |

***

## Patterns

<AccordionGroup>
  <Accordion title="Pattern 1 — Checklist loop and question matching">
    Use this pattern when you want to display the answer to a specific checklist question — for example, a pre-work photo or a remarks field. Loop through all checklist items with `{{#each checklist}}`, then use `{{#stringEqStrict question 'Your Question Name'}}` to target the exact question you want. Add one block per question you need to display.

    **Key fields:** `checklist`, `question`, `answer`

    ***

    Example 1 — Display a photo answer

    Use this example when your checklist question captures one or more photos. Zuper stores photo answers as a comma-separated list of image links, so the template splits that list and renders each image individually.

    ```handlebars theme={null}
    {{#each checklist}}

      {{#stringEqStrict question 'Pre-Work Photo'}}
        {{#if answer}}
          {{#split answer ','}}
            <img src="{{.}}" style="width:140px;" />
          {{/split}}
        {{/if}}
      {{/stringEqStrict}}

    {{/each}}
    ```

    <Tip>
      Replace `'Pre-Work Photo'` with the exact name of your photo question. Question names are case-sensitive — the capitalization must match what appears in your checklist exactly.
    </Tip>

    ***

    Example 2 — Display a text remarks answer

    Use this example when your checklist question captures a free-text response. Zuper stores multi-line text answers with a line break between each entry, so the template splits on that break and wraps each line in its own paragraph.

    ```handlebars theme={null}
    {{#each checklist}}

      {{#stringEqStrict question 'Misc. Remarks'}}
        {{#if answer}}
          {{#split answer '\n'}}
            <p>{{.}}</p>
          {{/split}}
        {{/if}}
      {{/stringEqStrict}}

    {{/each}}
    ```

    <Tip>
      Replace `'Misc. Remarks'` with the exact name of your text question. To display answers for additional questions, copy this block and update the question name for each one.
    </Tip>
  </Accordion>

  <Accordion title="Pattern 2 — Service task and asset inspection: label field lookup">
    Use this pattern when you want to display a specific answer from an inspection form — for example, the shingle type recorded during a roof inspection, or the condition noted during an equipment check. Zuper stores inspection answers inside each service task or asset on the job. This pattern finds the answer by its field name and displays it in your document.

    Inspection forms can be attached to a job in two ways — through a service task, or directly through an asset. The code you use depends on where the inspection form lives.

    **Key fields:** `service_tasks` / `assets`, `label`, `value`

    ***

    **Service task version**

    **What each line does:**

    | Expression                                                 | What it does                                                                                                      |
    | ---------------------------------------------------------- | ----------------------------------------------------------------------------------------------------------------- |
    | `{{#each service_tasks}}`                                  | Opens the loop — goes through every service task on the job, one at a time                                        |
    | `{{#stringEqStrict service_task_title "ROOF INSPECTION"}}` | Finds the specific service task you want by matching its title exactly                                            |
    | `{{#if asset_inspection_submission_uid}}`                  | Checks that an inspection form has been submitted for this service task — skips the task if nothing was filled in |
    | `{{#if asset_inspection_submission_uid.data}}`             | Checks that the submitted form contains field data before trying to display anything                              |
    | `{{#each asset_inspection_submission_uid.data}}`           | Opens the inner loop — goes through every field in the inspection form, one at a time                             |
    | `{{#stringEqStrict label "Shingle Type:"}}`                | Finds the specific field you want by matching its label exactly                                                   |
    | `{{#if value}}{{value}}{{/if}}`                            | Displays the field value only if one exists — leaves no blank gap if the field was not filled in                  |

    ```handlebars theme={null}
    {{#each service_tasks}}
      {{#stringEqStrict service_task_title "JOB WALK FORM"}}
        {{#if asset_inspection_submission_uid}}
          {{#if asset_inspection_submission_uid.data}}
            <table>
              <tr>
                <td>Client/contact name:</td>
                <td>
                  {{#each asset_inspection_submission_uid.data}}
                    {{#stringEqStrict label "Client/contact name:"}}
                      {{#if value}}{{value}}{{/if}}
                    {{/stringEqStrict}}
                  {{/each}}
                </td>
                <td>Type of service:</td>
                <td>
                  {{#each asset_inspection_submission_uid.data}}
                    {{#stringEqStrict label "Type of service:"}}
                      {{#if value}}{{value}}{{/if}}
                    {{/stringEqStrict}}
                  {{/each}}
                </td>
              </tr>
            </table>
          {{/if}}
        {{/if}}
      {{/stringEqStrict}}
    {{/each}}
    ```

    <Tip>
      Replace `"JOB WALK FORM"` with your task title exactly as it appears in Zuper — including capitalization. Replace the label string to pull any field by its name.
    </Tip>

    ***

    **Asset version**

    **What each line does:**

    | Expression                                                 | What it does                                                                                                |
    | ---------------------------------------------------------- | ----------------------------------------------------------------------------------------------------------- |
    | `{{#each assets}}`                                         | Opens the loop — goes through every asset on the job, one at a time                                         |
    | `{{#if asset_inspection_form_submission_uid}}`             | Checks that an inspection form has been submitted for this asset — skips the asset if nothing was filled in |
    | `{{#each asset_inspection_form_submission_uid.data}}`      | Opens the inner loop — goes through every field in the inspection form, one at a time                       |
    | `{{#stringEqStrict label "Time Gas Leak Detector Used:"}}` | Finds the specific field you want by matching its label exactly                                             |
    | `{{#if value}}{{value}}{{/if}}`                            | Displays the field value only if one exists — leaves no blank gap if the field was not filled in            |

    ```handlebars theme={null}
    {{#each assets}}
      {{#if asset_inspection_form_submission_uid}}
        {{#each asset_inspection_form_submission_uid.data}}
          {{#stringEqStrict label "Time Gas Leak Detector Used:"}}
            {{#if value}}
              <tr>
                <td>Time Gas Leak Detector Used:</td>
                <td colspan="3">{{value}}</td>
              </tr>
            {{/if}}
          {{/stringEqStrict}}
        {{/each}}
      {{/if}}
    {{/each}}
    ```

    <Note>
      The asset version does not need a title match step. Every asset on the job is checked automatically, and the inspection form attached to each one is read in turn. This pattern prints values from every asset inspection form associated with the job. If the job has multiple assets, each with its own inspection form, the document displays a result for each one. Review your output after generating the document to confirm the results are as expected.
    </Note>
  </Accordion>

  <Accordion title="Pattern 3 — Asset inspection: pass, fail, and N/A">
    Use this pattern to display a color-coded visual for each field in an asset inspection form. The template loops through the inspection data and matches each result value to a styled badge.

    **Key fields:** `asset_inspection_submission_uid.data`, `label`, `value`

    ```handlebars theme={null}
    {{#each asset_inspection_submission_uid.data}}
      <tr>
        <td>{{label}}</td>
        <td>
          {{#stringEqStrict value "Pass"}}
            <span class="badge-pass">Pass</span>
          {{/stringEqStrict}}
          {{#stringEqStrict value "Fail"}}
            <span class="badge-fail">Fail</span>
          {{/stringEqStrict}}
          {{#stringEqStrict value "N/A"}}
            <span class="badge-na">N/A</span>
          {{/stringEqStrict}}
        </td>
      </tr>
    {{/each}}
    ```

    <Note>
      Define `.badge-pass`, `.badge-fail`, and `.badge-na` in your template's CSS section to apply colors to each result badge. Copy the example below into your template's CSS section to get started. Adjust the colors to match your brand.
    </Note>

    ```css theme={null}
    /* Pass — green */
    .badge-pass {
      background-color: #e6f4ea;
      color: #2d6a4f;
      padding: 2px 8px;
      border-radius: 4px;
      font-weight: bold;
    }
    /* Fail — red */
    .badge-fail {
      background-color: #fdecea;
      color: #b91c1c;
      padding: 2px 8px;
      border-radius: 4px;
      font-weight: bold;
    }
    /* N/A — gray */
    .badge-na {
      background-color: #f3f4f6;
      color: #6b7280;
      padding: 2px 8px;
      border-radius: 4px;
      font-weight: bold;
    }
    ```

    <Tip>
      The colors above are suggestions. Replace the `background-color` and `color` values with your own hex codes to match your company's style. The `padding`, `border-radius`, and `font-weight` values control the badge's shape and size — leave these unchanged to start, then adjust as needed.
    </Tip>
  </Accordion>

  <Accordion title="Pattern 4 — Job status: render sections by current status">
    Use this pattern to show or hide sections of your template based on the job's current status. Zuper tracks every status a job passes through, but your document only needs to reflect where the job is right now. The `{{#eachLastInstance}}` helper handles this — it returns only the most recent status entry so the right section renders every time.

    **Key fields:** `job_status`, `status_name`

    <Warning>
      Always use `{{#eachLastInstance job_status "status_name"}}` instead of `{{#each job_status}}`. Plain `{{#each}}` renders your content once for every status transition the job has ever had, not just the current one.
    </Warning>

    ```handlebars theme={null}
    {{#eachLastInstance job_status "status_name"}}

      {{#stringEq status_name "Scheduled"}}
        <p>Job is scheduled.</p>
      {{/stringEq}}

      {{#stringEq status_name "Work Started Onsite"}}
        <p>Work is in progress.</p>
        {{! Nest Pattern 1 here to show pre-work photos }}
      {{/stringEq}}

      {{#stringEq status_name "Work On Hold Onsite"}}
        <p>Work is on hold.</p>
      {{/stringEq}}

      {{#stringEq status_name "Completed"}}
        <p>Job completed.</p>
        {{! Nest Pattern 1 here to show completion photos }}
        {{! Nest Pattern 2 here to show inspection results }}
      {{/stringEq}}

    {{/eachLastInstance}}
    ```

    <Note>
      Add more `{{#stringEq status_name "..."}}` blocks for any custom statuses in your workflow.
    </Note>
  </Accordion>

  <Accordion title="Pattern 5 — Dynamic checklist: type-based rendering">
    Use this pattern when you want every checklist item to appear automatically as a two-column row — question on the left, answer on the right — without listing question names individually.

    **Key fields:** `checklist`, `question`, `answer`, `type`

    | Type value      | Renders as                          |
    | --------------- | ----------------------------------- |
    | `HEADER`        | Skipped — no row rendered           |
    | `IMAGE`         | Single image                        |
    | `MULTI_IMAGE`   | Multiple images, split by comma     |
    | `MULTI_ITEM`    | Multiple paragraphs, split by comma |
    | `MULTI_LINE`    | Multiple paragraphs, split by comma |
    | `SIGNATURE`     | Signature image, split by comma     |
    | `SINGLE_ITEM`   | Single paragraph, split by comma    |
    | Any other value | Plain text                          |

    ***

    Example 1 — Display a specific checklist answer as text

    Use this when you want to show the answer to one specific checklist question as plain text in your document. In this example, the question is "Work completed notes."

    ```handlebars theme={null}
    {{#eachLastInstance job_status "status_name"}}
      {{#stringEq status_name "Completed"}}

        {{#each checklist}}
          {{#stringEq question "Work completed notes"}}
            <tr>
              <td style="width:30%;"><p>{{question}}</p></td>
              <td style="width:70%;">
                {{#if answer}}
                  <p style="white-space:pre-line;">{{answer}}</p>
                {{/if}}
              </td>
            </tr>
          {{/stringEq}}
        {{/each}}

      {{/stringEq}}
    {{/eachLastInstance}}
    ```

    This displays one row — the question on the left, the text answer on the right. All other checklist items are skipped.

    ***

    Example 2 — Display a specific checklist answer as an image

    Use this when the answer to a checklist question is a photo captured by the field executive. In this example, the question is "Site photo."

    ```handlebars theme={null}
    {{#eachLastInstance job_status "status_name"}}
      {{#stringEq status_name "Completed"}}

        {{#each checklist}}
          {{#stringEq question "Site photo"}}
            <tr>
              <td style="width:30%;"><p>{{question}}</p></td>
              <td style="width:70%;">
                {{#if answer}}
                  <img src="{{answer}}" style="width:140px; object-fit:contain;">
                {{/if}}
              </td>
            </tr>
          {{/stringEq}}
        {{/each}}

      {{/stringEq}}
    {{/eachLastInstance}}
    ```

    This displays one row — the question on the left, the photo on the right. Replace `"Site photo"` with the exact question text from your checklist.

    <Note>
      Use these examples when you need a single specific checklist item. To display all checklist items at once, use the full dynamic loop in Pattern 5 above.
    </Note>
  </Accordion>

  <Accordion title="Pattern 6 — Common job variables">
    Use these placeholders to display the most commonly used job, customer, and organization fields anywhere in your template.

    **Job details**

    | Field name           | Placeholder                      |
    | -------------------- | -------------------------------- |
    | Work order number    | `{{work_order_number}}`          |
    | Job title            | `{{job_title}}`                  |
    | Job description      | `{{job_description}}`            |
    | Job category         | `{{job_category.category_name}}` |
    | Scheduled start time | `{{scheduled_start_time}}`       |
    | Scheduled end time   | `{{scheduled_end_time}}`         |

    **Customer**

    | Field name    | Placeholder                               |
    | ------------- | ----------------------------------------- |
    | First name    | `{{customer.customer_first_name}}`        |
    | Last name     | `{{customer.customer_last_name}}`         |
    | Email address | `{{customer.customer_email}}`             |
    | Mobile number | `{{customer.customer_contact_no.mobile}}` |

    **Address**

    | Field name | Placeholder                     |
    | ---------- | ------------------------------- |
    | Street     | `{{customer_address.street}}`   |
    | City       | `{{customer_address.city}}`     |
    | State      | `{{customer_address.state}}`    |
    | ZIP code   | `{{customer_address.zip_code}}` |

    **Assigned technician**

    | Field name        | Placeholder                  |
    | ----------------- | ---------------------------- |
    | First name        | `{{user.first_name}}`        |
    | Last name         | `{{user.last_name}}`         |
    | Work phone number | `{{user.work_phone_number}}` |

    **Organization**

    | Field name        | Placeholder                          |
    | ----------------- | ------------------------------------ |
    | Organization name | `{{organization.organization_name}}` |

    <Note>
      Every placeholder above is optional. Wrap any placeholder in `{{#if field}}...{{/if}}` before adding it to your template. This prevents empty gaps in your document when a field has no value on a particular job.
    </Note>
  </Accordion>

  <Accordion title="Pattern 7 — Date formatting">
    Use `formatDateWithTimeZone` to display any date field in a readable format. Always pass `timezone` as the third argument so dates display in the customer's local time zone.

    **Syntax:** `{{formatDateWithTimeZone field "FORMAT" timezone}}`

    ```handlebars theme={null}
    {{! Short date }}
    {{formatDateWithTimeZone scheduled_start_time "MM/DD/YYYY" timezone}}

    {{! Date with time }}
    {{formatDateWithTimeZone scheduled_start_time "MM/DD/YYYY hh:mm A" timezone}}

    {{! Full readable date }}
    {{formatDateWithTimeZone scheduled_start_time "dddd, MMMM DD, YYYY" timezone}}
    ```

    | Format token          | Example output            |
    | --------------------- | ------------------------- |
    | `MM/DD/YYYY`          | 04/29/2026                |
    | `MM-DD-YYYY`          | 04-29-2026                |
    | `MM/DD/YYYY hh:mm A`  | 04/29/2026 02:30 PM       |
    | `dddd, MMMM DD, YYYY` | Wednesday, April 29, 2026 |

    <Note>
      `timezone` is a job-level field that Zuper populates automatically. Omitting it causes dates to display in UTC instead of the customer's local time zone.
    </Note>
  </Accordion>

  <Accordion title="Pattern 8 — Custom fields">
    Use this pattern to display job-level custom fields. You can display a single field by its name, display all fields of a specific type, or display fields that belong to a specific group.

    **Key fields:** `custom_fields`, `label`, `value`, `type`, `group_name`

    ***

    **Example 1 — Display a specific custom field by name**

    Use this example when you want to display one specific custom field — for example, the invoice amount paid on a job. The template finds the field by matching its exact label and displays its value.

    | Expression                                        | What it does                                                                               |
    | ------------------------------------------------- | ------------------------------------------------------------------------------------------ |
    | `{{#each custom_fields}}`                         | Opens the loop — goes through every custom field on the job, one at a time                 |
    | `{{#if group_name}}{{else}}`                      | Skips any fields that belong to a group — targets only standalone fields                   |
    | `{{#stringEqStrict label "Invoice amount paid"}}` | Finds the specific field by matching its label exactly                                     |
    | `{{#if value}}{{value}}{{/if}}`                   | Displays the value only if one exists — leaves no blank gap if the field was not filled in |

    ```handlebars theme={null}
    {{#each custom_fields}}
      {{#if group_name}}{{else}}
        {{#stringEqStrict label "Invoice amount paid"}}
          {{#if value}}{{value}}{{/if}}
        {{/stringEqStrict}}
      {{/if}}
    {{/each}}
    ```

    <Tip>
      Replace `"Invoice amount paid"` with the exact label of your custom field as it appears in Zuper — including capitalization.
    </Tip>

    ***

    **Example 2 — Display all fields of a specific type**

    Use this example when you want to display all custom fields of a given type — for example, all time fields or all multi-line text fields. The template loops through every custom field and renders each one that matches the type you specify.

    | Expression                                       | What it does                                                                     |
    | ------------------------------------------------ | -------------------------------------------------------------------------------- |
    | `{{#each custom_fields}}`                        | Opens the loop — goes through every custom field on the job, one at a time       |
    | `{{#if value}}`                                  | Skips any fields with no value — prevents blank rows in your document            |
    | `{{#stringEqStrict type "TIME"}}`                | Matches all fields of the TIME type and formats the value as a readable time     |
    | `{{formatCustomDate value "hh:mm A" "hh:mm A"}}` | Formats the time value — for example, 02:30 PM                                   |
    | `{{#stringEqStrict type "MULTI_LINE"}}`          | Matches all fields of the MULTI\_LINE type and displays the value as a paragraph |
    | `{{#stringEqStrict type "LOOKUP"}}`              | Matches all fields of the LOOKUP type and displays the selected value            |

    ```handlebars theme={null}
    {{#each custom_fields}}
      {{#if value}}
        {{#stringEqStrict type "TIME"}}
          <p>{{label}}: {{formatCustomDate value "hh:mm A" "hh:mm A"}}</p>
        {{/stringEqStrict}}
        {{#stringEqStrict type "MULTI_LINE"}}
          <p>{{label}}: {{value}}</p>
        {{/stringEqStrict}}
        {{#stringEqStrict type "LOOKUP"}}
          <p>{{label}}: {{value}}</p>
        {{/stringEqStrict}}
      {{/if}}
    {{/each}}
    ```

    <Tip>
      Add a `{{#stringEqStrict type "..."}}` block for each custom field type you use. Types you do not include produce no output and do not cause errors.
    </Tip>

    ***

    **Example 3 — Display fields from a specific group by label**

    Use this example when your custom fields are organized into groups in Zuper — for example, a group called "Payment Details" that contains fields like "Invoice amount paid" and "Payment method." The template finds the group by name, then looks up the specific field you want by its label.

    | Expression                                         | What it does                                                                               |
    | -------------------------------------------------- | ------------------------------------------------------------------------------------------ |
    | `{{#each custom_fields}}`                          | Opens the loop — goes through every custom field on the job, one at a time                 |
    | `{{#if group_name}}`                               | Checks whether the field belongs to a group — skips standalone fields                      |
    | `{{#stringEqStrict group_name "Payment Details"}}` | Finds the specific group by matching its name exactly                                      |
    | `{{#stringEqStrict label "Invoice amount paid"}}`  | Finds the specific field within the group by matching its label exactly                    |
    | `{{#if value}}{{value}}{{/if}}`                    | Displays the value only if one exists — leaves no blank gap if the field was not filled in |

    ```handlebars theme={null}
    {{#each custom_fields}}
      {{#if group_name}}
        {{#stringEqStrict group_name "Payment Details"}}
          {{#stringEqStrict label "Invoice amount paid"}}
            {{#if value}}{{value}}{{/if}}
          {{/stringEqStrict}}
          {{#stringEqStrict label "Payment method"}}
            {{#if value}}{{value}}{{/if}}
          {{/stringEqStrict}}
        {{/stringEqStrict}}
      {{/if}}
    {{/each}}
    ```

    <Tip>
      Replace `"Payment Details"` with your group name exactly as it appears in Zuper. Replace `"Invoice amount paid"` and `"Payment method"` with the exact labels of the fields you want to display from that group. Add one `{{#stringEqStrict label "..."}}` block for each additional field you need.
    </Tip>
  </Accordion>

  <Accordion title="Pattern 9 — Parent scope with ../">
    Think of a nested loop like a folder inside a folder. The job is the outer folder. The checklist is the inner folder. When you are working inside the inner folder, Zuper can only see what is in that folder — not what is in the outer one.

    Use `../` before a field name to step out one level and pull in fields from the job level — for example, the job title or work order number.

    ```handlebars theme={null}
    {{#each checklist}}

      {{! 'question' and 'answer' come from the checklist scope }}
      <p>{{question}}: {{answer}}</p>

      {{! 'job_title' lives on the job (outer scope) — use ../ to access it }}
      <p>Job: {{../job_title}}</p>

      {{! Go up two levels with ../../ when nested inside two loops }}
      {{#split answer ','}}
        <img src="{{.}}">
        <small>{{../../work_order_number}}</small>
      {{/split}}

    {{/each}}
    ```

    | Prefix   | Accesses           |
    | -------- | ------------------ |
    | (none)   | Current loop scope |
    | `../`    | One level up       |
    | `../../` | Two levels up      |

    <Warning>
      A missing `../` is one of the most common reasons a field renders blank inside a loop. If a field is showing as empty and you are inside a `{{#each}}` block, check whether it needs a `../` prefix.
    </Warning>
  </Accordion>
</AccordionGroup>

***

## FAQs

<AccordionGroup>
  <Accordion title="Why is a field showing as blank in my rendered document?">
    The most likely causes are that the field has no value on that job, or the field is inside a loop and needs a `../` prefix to reach the parent scope. Wrap the field in `{{#if field}}...{{/if}}` to confirm whether it has a value. If you are inside a `{{#each}}` block, add `../` before the field name and test again. If the issue continues, contact [Support](mailto:support@zuper.co).
  </Accordion>

  <Accordion title="Why is my job status section repeating multiple times?">
    Check for two things. First, confirm you are using `{{#eachLastInstance job_status "status_name"}}` and not `{{#each job_status}}`. Plain `{{#each}}` repeats the section for every status the job has ever had. `{{#eachLastInstance}}` shows only the current one. Second, confirm your `{{#stringEq status_name "..."}}` filter is present and the status name matches exactly what appears in Zuper — including capitalization. A missing or mismatched filter causes the section to show nothing or display the wrong content.
  </Accordion>

  <Accordion title="What is the difference between {{#stringEq}} and {{#stringEqStrict}}?">
    `{{#stringEq}}` performs a loose match and is not case-sensitive. Use it for status name comparisons such as "Completed" or "Scheduled." `{{#stringEqStrict}}` performs an exact, case-sensitive match. Use it when matching question names, inspection labels, or result values such as "Pass," "Fail," or "N/A."
  </Accordion>

  <Accordion title="Can I nest patterns inside each other?">
    Yes. The most common combination is nesting Pattern 1 (checklist loop) or Pattern 2 (inspection results) inside a Pattern 4 job status block. This lets you show checklist photos only when a job reaches a specific status, for example.
  </Accordion>

  <Accordion title="How do I display a date in the customer's local time zone?">
    Use `{{formatDateWithTimeZone field "FORMAT" timezone}}`. Always include `timezone` as the third argument — it is a job-level field that Zuper populates automatically. Omitting it causes dates to display in UTC instead of the customer's local zone. See Pattern 7 for format token examples.
  </Accordion>
</AccordionGroup>

***

## Related articles

* [Configuring Job Card Templates](#) — Create and manage job card document templates
* [Configuring Job Checklist](#) — Set up checklist questions that appear on jobs
* [Configuring Service Tasks](#) — Configure service tasks and attach inspection forms
* [Configuring Inspection Forms](#) — Create and manage asset-level inspection forms
* [Configuring Job Custom Fields](#) — Add and configure job-level custom fields
