> ## Documentation Index
> Fetch the complete documentation index at: https://docs.zuper.co/llms.txt
> Use this file to discover all available pages before exploring further.
# Configuring Job Categories
The Job Category Hub in Zuper allows administrators to create and manage job categories, ensuring streamlined job classification, tracking, and execution. Within this section, you can also define category-specific job statuses, checklists, service tasks, skill requirements, and time-tracking settings.
**Navigation**: *Settings -> Modules -> Jobs -> Job Category Hub*
## Navigating to job categories
To configure job categories:
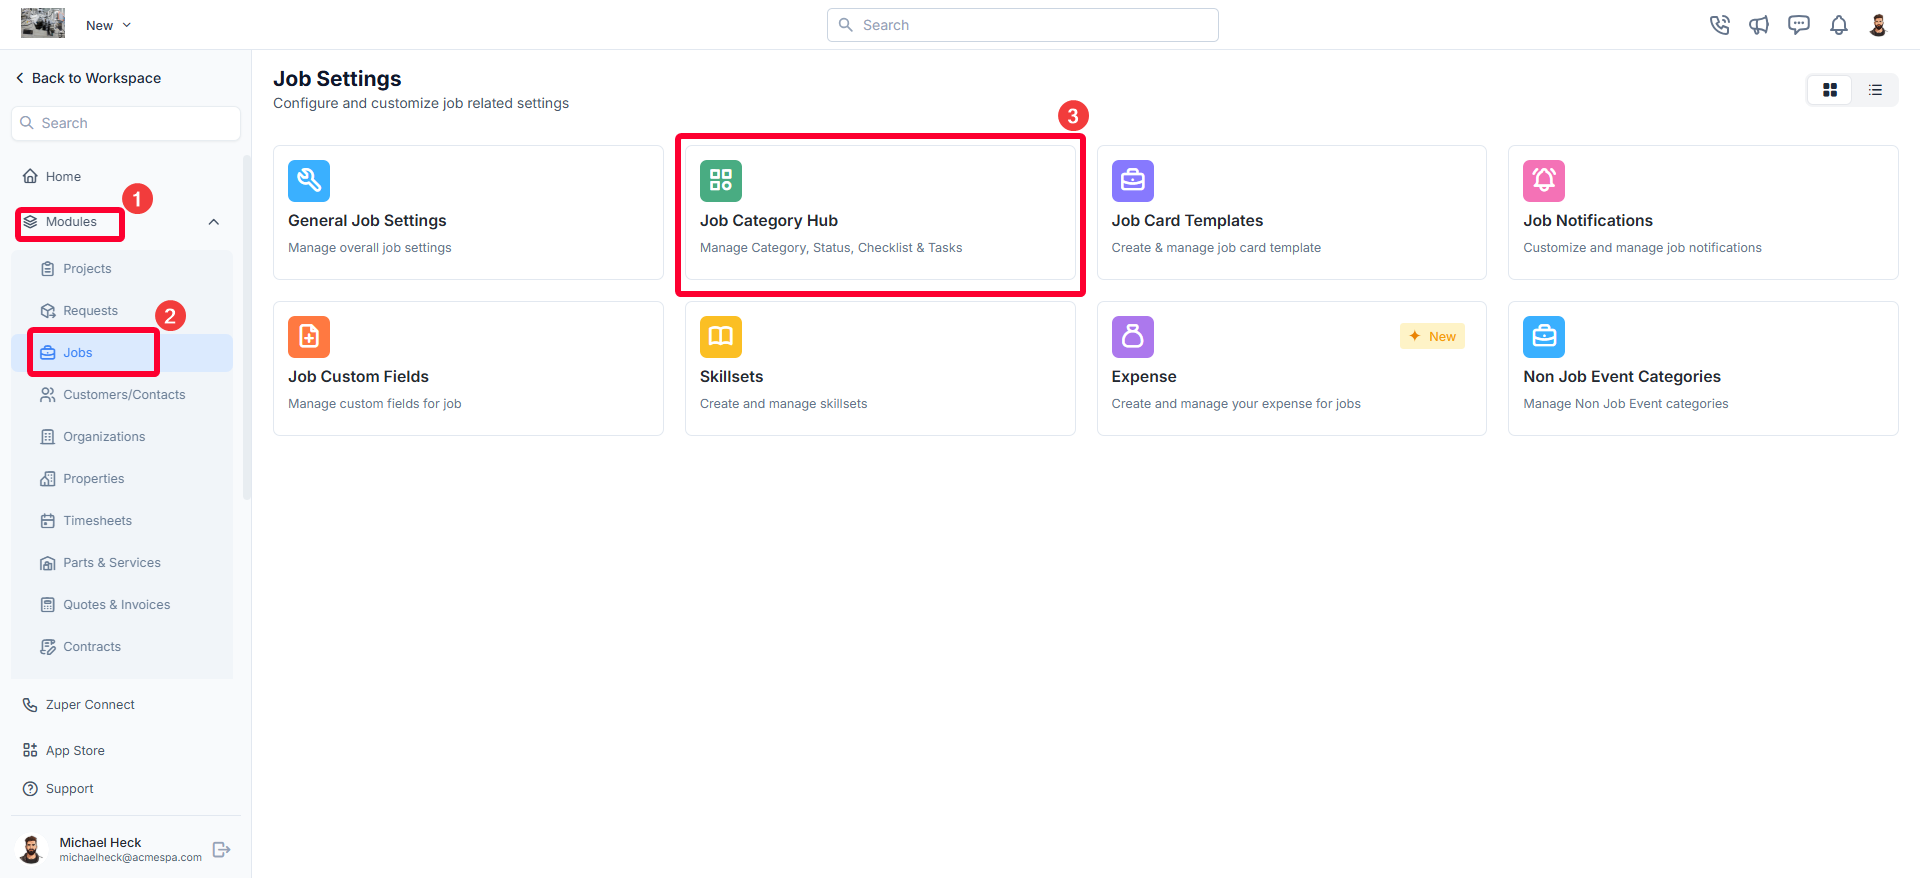
* Select the "**Settings**" module from the left navigation menu.
 * Click "**Modules"** and choose "**Jobs"** to open the **Job Settings** page.
* Select "**Job Category Hub**." You can view all the configured job categories.
* Click "**Modules"** and choose "**Jobs"** to open the **Job Settings** page.
* Select "**Job Category Hub**." You can view all the configured job categories.
 ## Creating a new job category
To create a new job category, follow these steps:
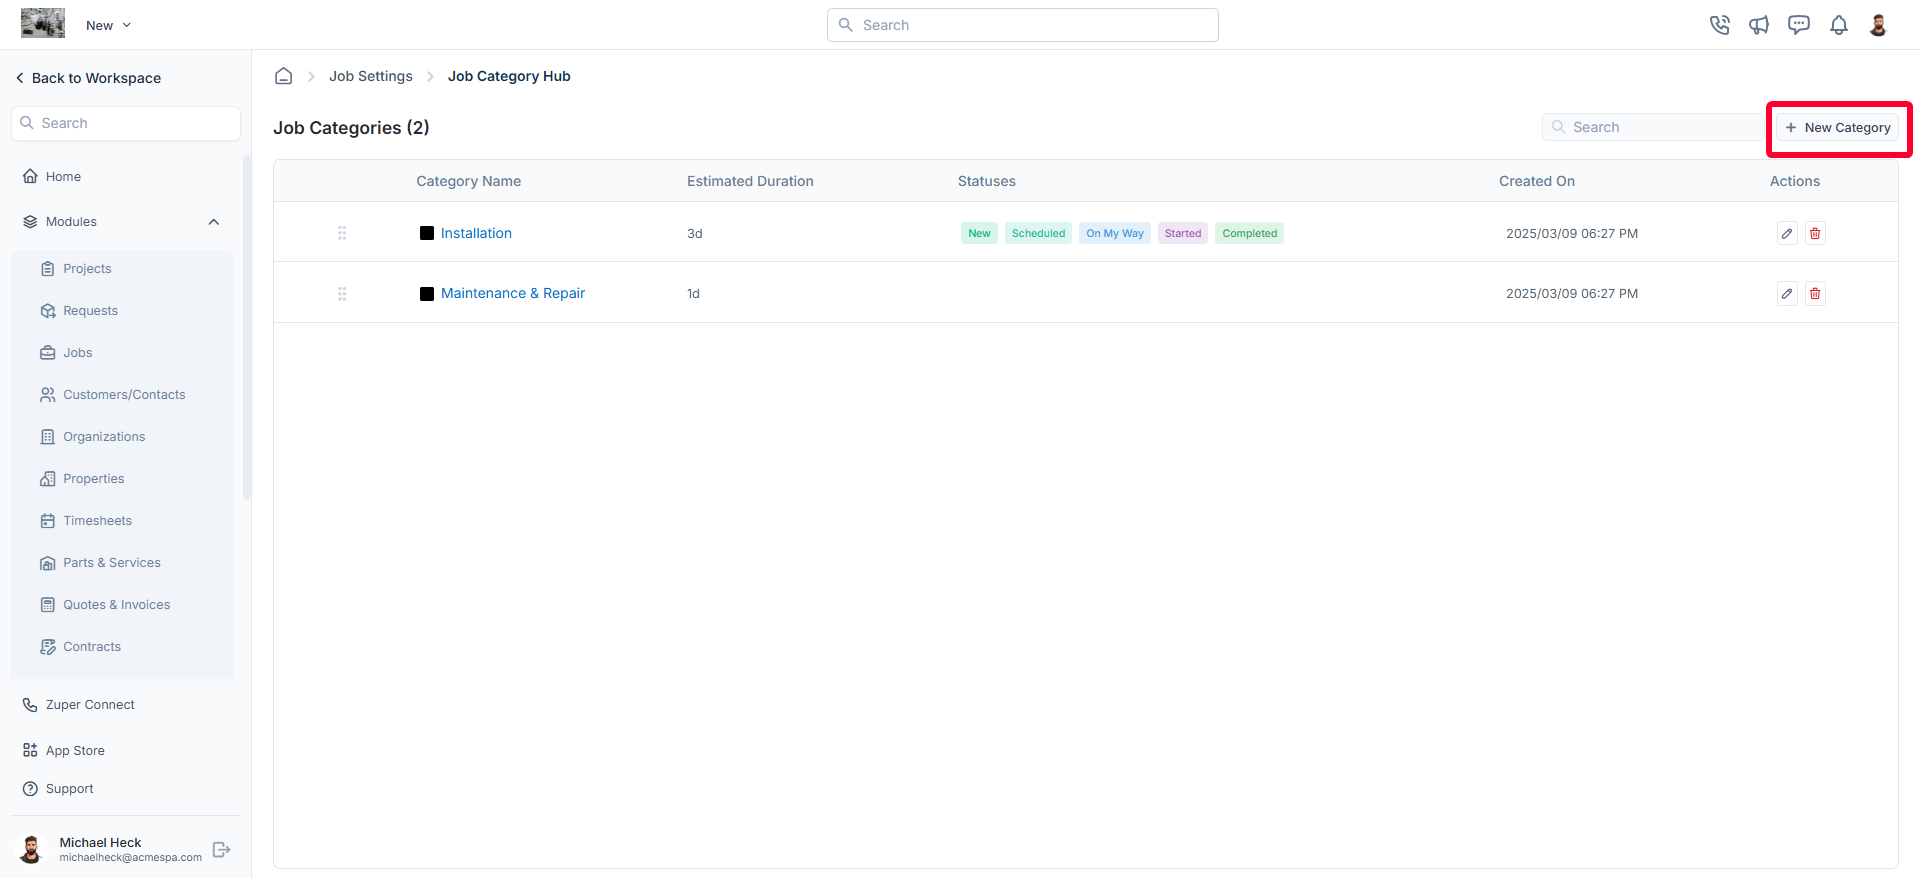
* On the job categories listing page, click "**+ New Category**." The **Create New Job Category** dialog box will appear.
## Creating a new job category
To create a new job category, follow these steps:
* On the job categories listing page, click "**+ New Category**." The **Create New Job Category** dialog box will appear.
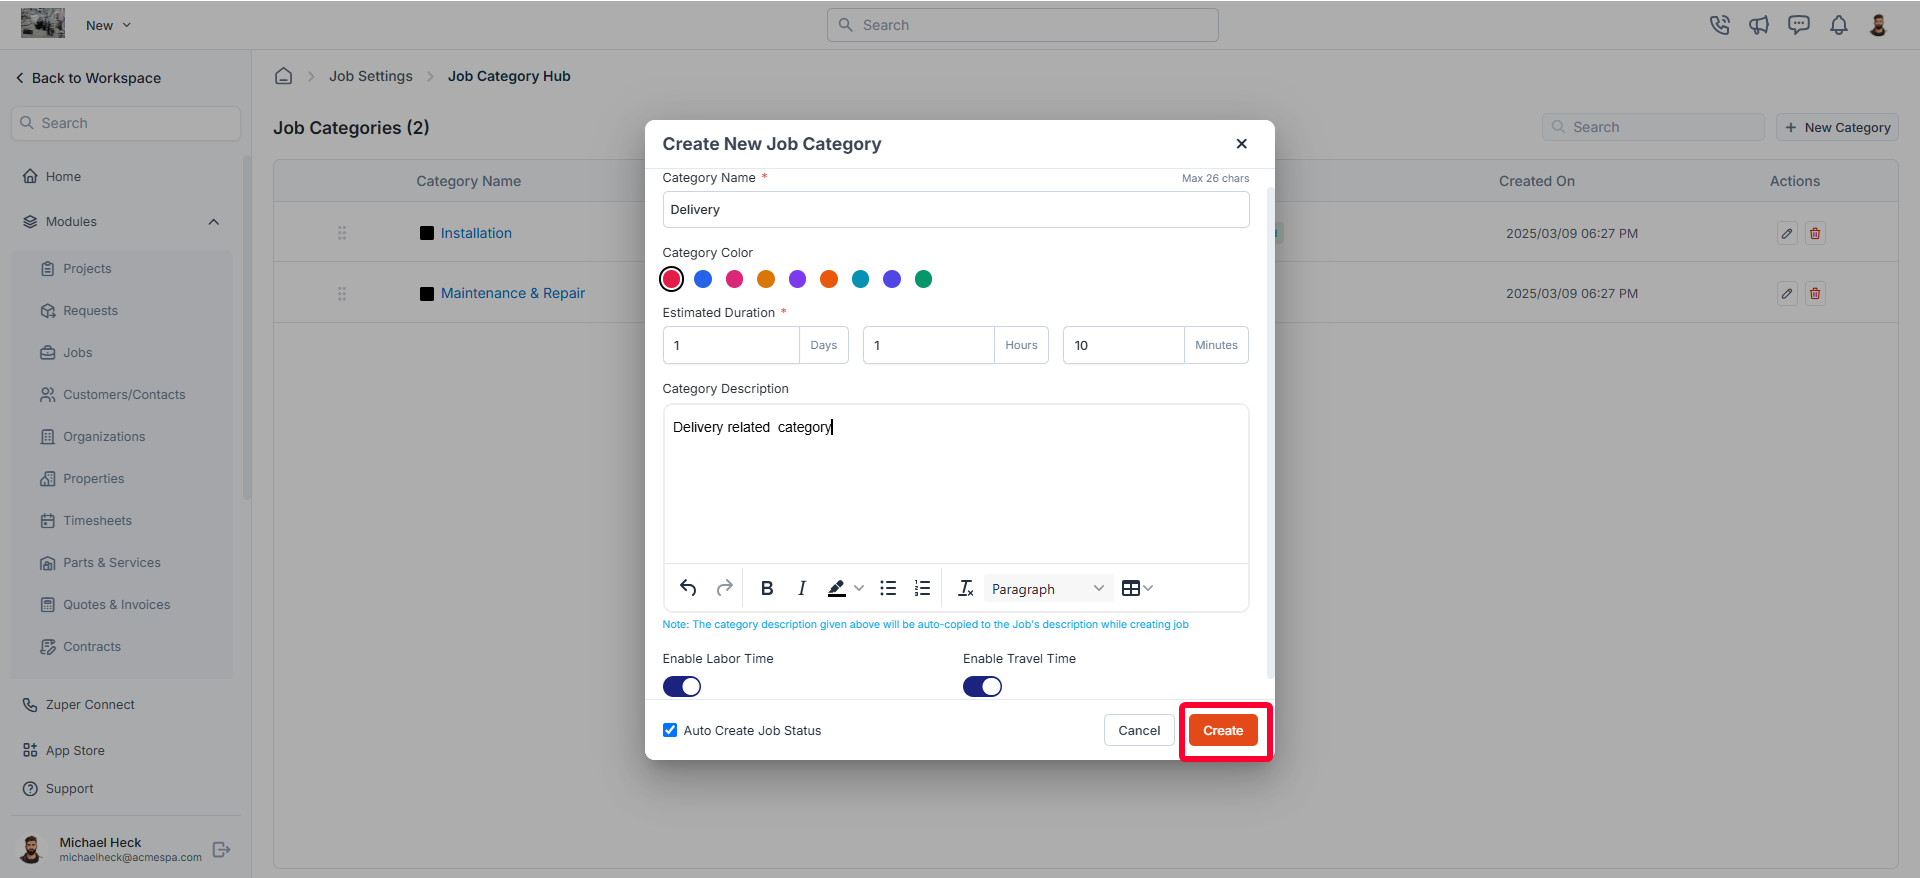
 * Provide the following details and click "**Create"** to create a new job category:
1. **Category Name** (Mandatory): Enter a unique name for the job category.
2. **Category Color**: Choose a color to represent this category visually.
3. **Estimated Duration** (Mandatory): Define the expected duration in days, hours, and minutes to complete jobs in this category.
4. **Category Description**: Add a brief description of the job category.
5. **Enable/Disable Labor Time**: Toggle labor time tracking on or off.
6. **Enable/Disable Travel Time**: Toggle travel time tracking on or off.
7. **Auto Create Job Status**: Check this option to enable automatic job status creation with predefined statuses for the category.
* Provide the following details and click "**Create"** to create a new job category:
1. **Category Name** (Mandatory): Enter a unique name for the job category.
2. **Category Color**: Choose a color to represent this category visually.
3. **Estimated Duration** (Mandatory): Define the expected duration in days, hours, and minutes to complete jobs in this category.
4. **Category Description**: Add a brief description of the job category.
5. **Enable/Disable Labor Time**: Toggle labor time tracking on or off.
6. **Enable/Disable Travel Time**: Toggle travel time tracking on or off.
7. **Auto Create Job Status**: Check this option to enable automatic job status creation with predefined statuses for the category.
 **Note**: Configuring travel and labor time tracking at the job category level grants you full control over how time is logged according to the specific nature of each job.
For example, while tracking travel and labor time may be essential for field service jobs, it can be disabled for internal tasks such as administrative activities or material planning. This capability allows businesses to tailor time tracking to their operational needs effectively.
### Editing a job category
To modify an existing job category:
* On the job categories listing page, click the icon next to the specific job category.
**Note**: Configuring travel and labor time tracking at the job category level grants you full control over how time is logged according to the specific nature of each job.
For example, while tracking travel and labor time may be essential for field service jobs, it can be disabled for internal tasks such as administrative activities or material planning. This capability allows businesses to tailor time tracking to their operational needs effectively.
### Editing a job category
To modify an existing job category:
* On the job categories listing page, click the icon next to the specific job category.
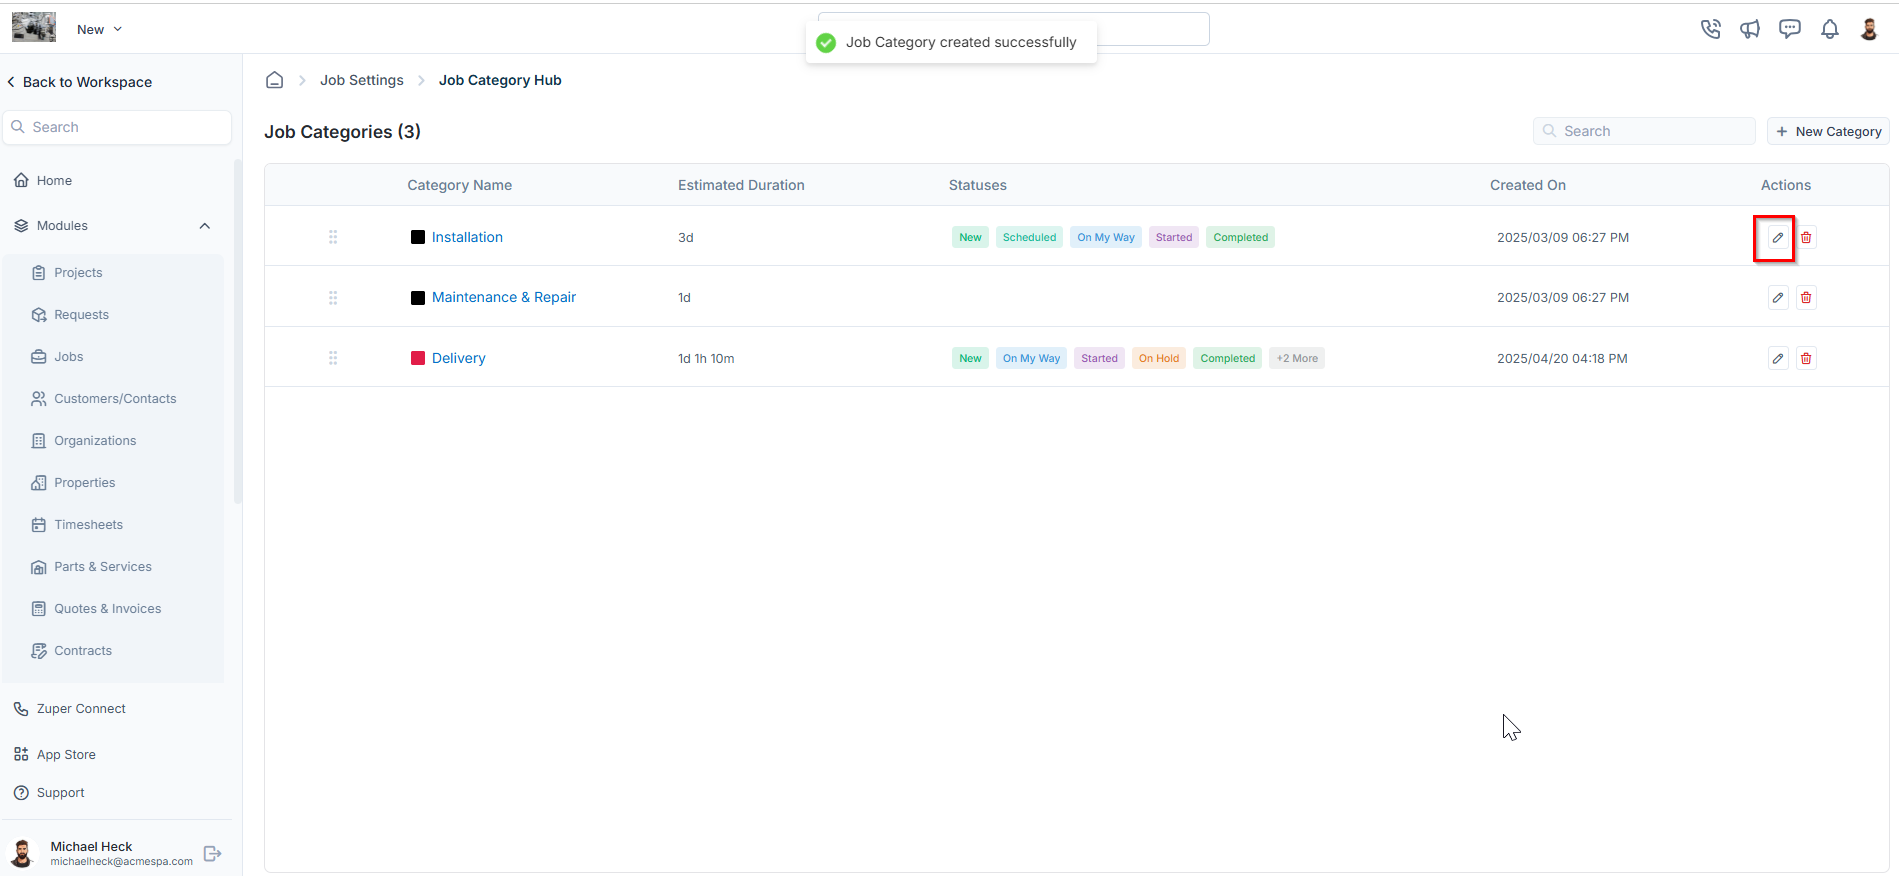 * The **Edit Job Category** will open.
* Make the necessary changes.
* Click **Update** to save the changes.
### Deleting a job category
If a job category is no longer needed, follow these steps to delete it:
* On the job categories listing page, click the icon next to the specific job category you want to remove.
* The **Edit Job Category** will open.
* Make the necessary changes.
* Click **Update** to save the changes.
### Deleting a job category
If a job category is no longer needed, follow these steps to delete it:
* On the job categories listing page, click the icon next to the specific job category you want to remove.
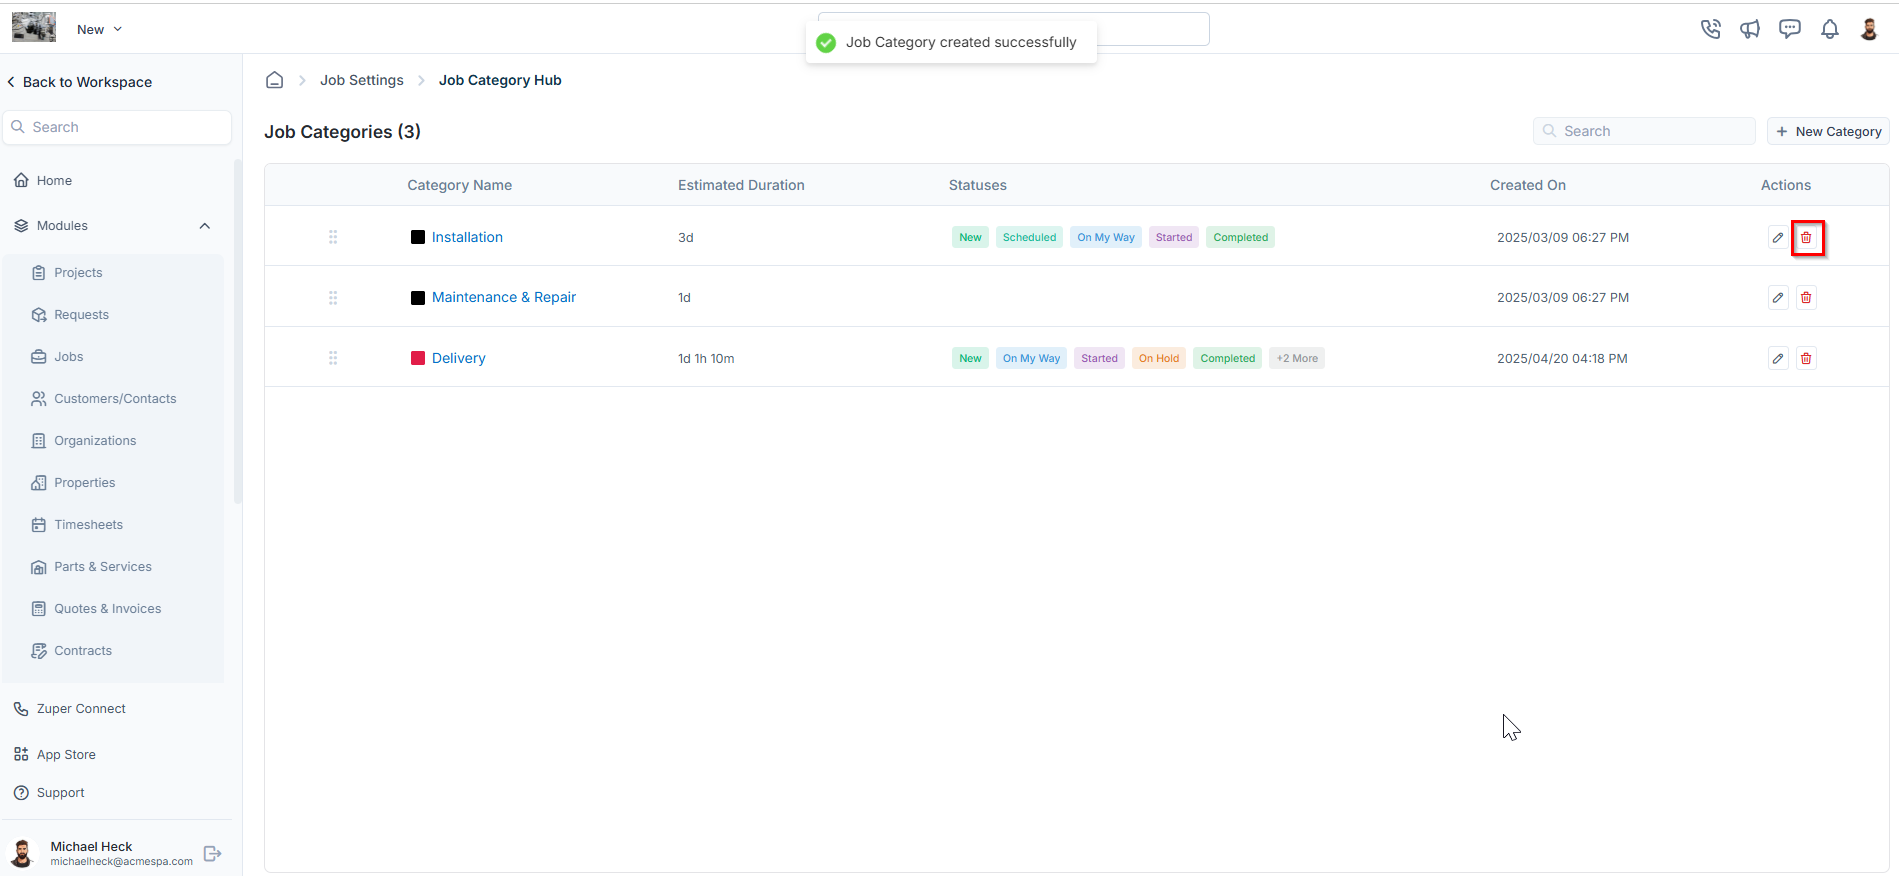 * A **confirmation dialog box** will appear.
* Click **Delete** to permanently remove the job category.
# Managing job categories
You can create and manage job statuses, checklists, service tasks, and required skill sets for each job category.
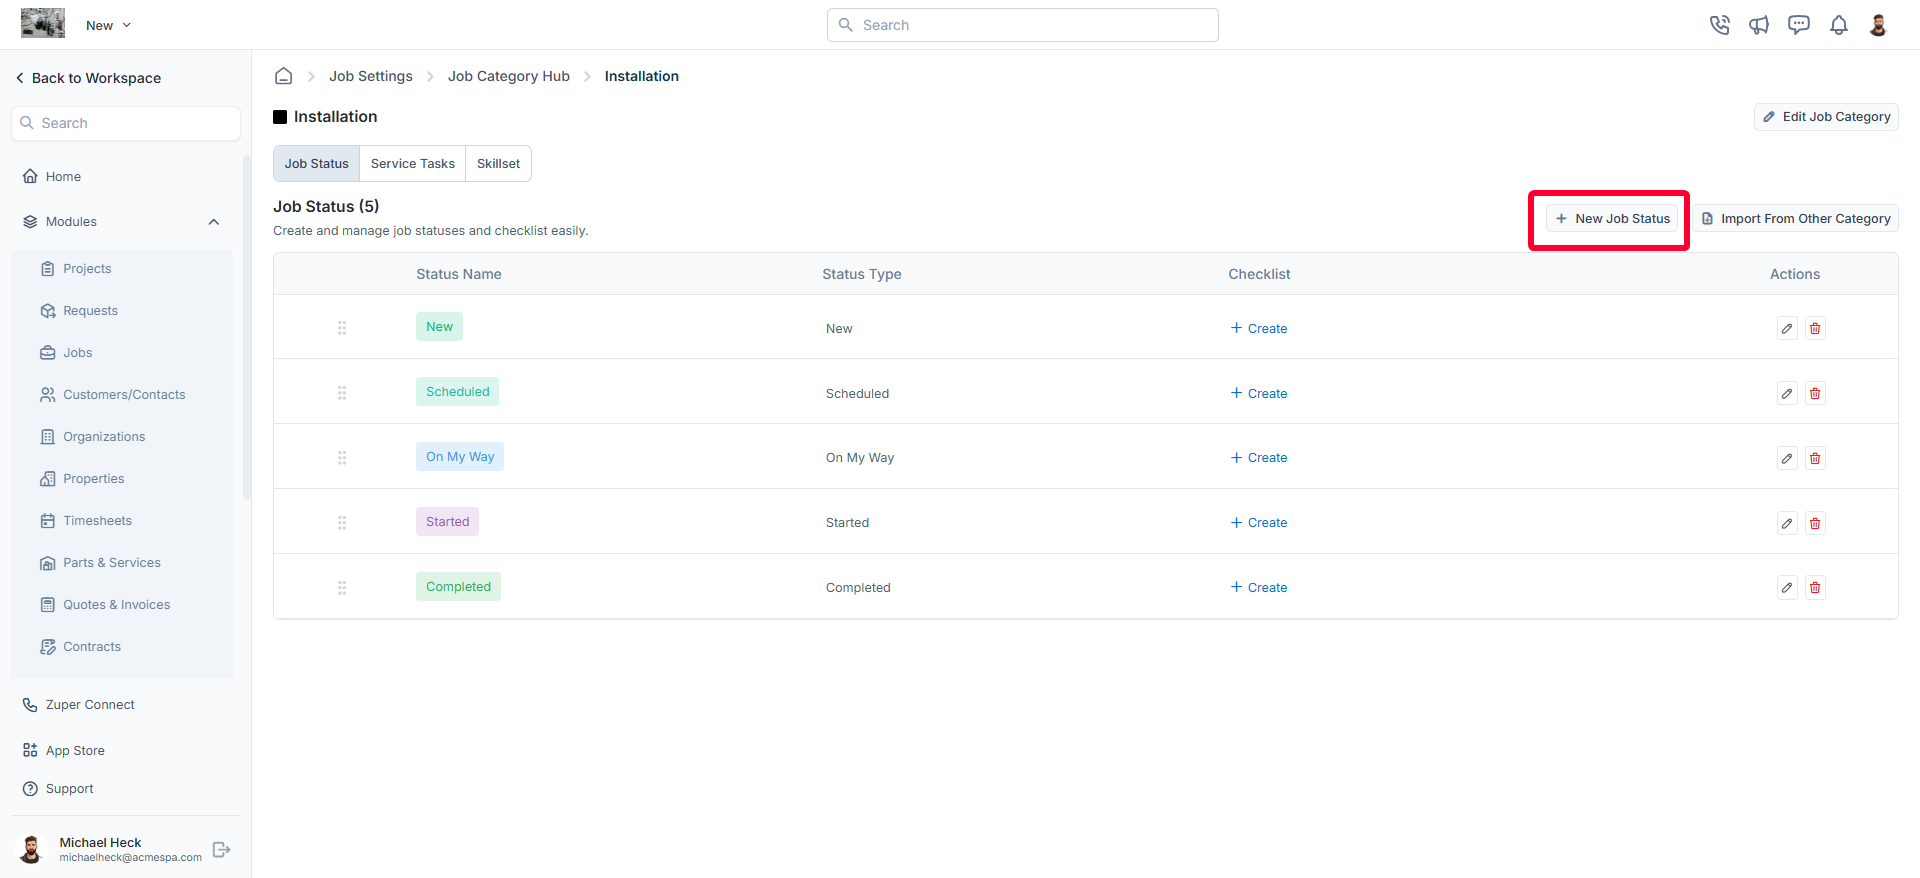
## Creating a new job status for a category
To create a new job status:
* Click on any job category from the job categories listing page.
* You will land on the **Job Category Statuses** tab, which displays:
1. **Status Name**
2. **Status Type**
3. **Checklist**. This checklist is associated with the selected status of the job category. Based on the job status update for the category, users are required to complete the checklist. To create a new checklist, refer to the [Configuring Job Checklist](https://docs.zuper.co/Settings/Modules/Jobs/Configuring-job-checklist) article.
* Click **+ New Job Status** to create a new job status for the selected category.
* A **confirmation dialog box** will appear.
* Click **Delete** to permanently remove the job category.
# Managing job categories
You can create and manage job statuses, checklists, service tasks, and required skill sets for each job category.
## Creating a new job status for a category
To create a new job status:
* Click on any job category from the job categories listing page.
* You will land on the **Job Category Statuses** tab, which displays:
1. **Status Name**
2. **Status Type**
3. **Checklist**. This checklist is associated with the selected status of the job category. Based on the job status update for the category, users are required to complete the checklist. To create a new checklist, refer to the [Configuring Job Checklist](https://docs.zuper.co/Settings/Modules/Jobs/Configuring-job-checklist) article.
* Click **+ New Job Status** to create a new job status for the selected category.
 * In the **New Job Status** dialog box, enter the following details and click "**Create**" to save the new job status for the job category.
1. **Status Name** (Mandatory): Enter a clear and descriptive name for the job status (for example, *Started*, *In Progress*, *Completed*).
2. **Status Type** (Mandatory): Select the appropriate status type from the available options. This determines how the status behaves within the job workflow.
3. **Description:** Enter additional information or context about the status to help users understand its purpose.
4. **Status Color** (Mandatory): Choose a color to visually represent the status on the job timeline, status lists, and workflow views.
5. **Dependent Status?** Enable this option to make the new status dependent on another existing status. Once enabled, select the parent status that must occur before this status becomes available.
6. **Track Time in Status?** Enable this option to track how long a job remains in this status.\
Once turned on, enter the **Estimated Duration** using the fields for **Days**, **Hours**, and **Minutes**. This helps set expectations for how long a job should ideally remain in this stage and supports monitoring and performance analysis.
* In the **New Job Status** dialog box, enter the following details and click "**Create**" to save the new job status for the job category.
1. **Status Name** (Mandatory): Enter a clear and descriptive name for the job status (for example, *Started*, *In Progress*, *Completed*).
2. **Status Type** (Mandatory): Select the appropriate status type from the available options. This determines how the status behaves within the job workflow.
3. **Description:** Enter additional information or context about the status to help users understand its purpose.
4. **Status Color** (Mandatory): Choose a color to visually represent the status on the job timeline, status lists, and workflow views.
5. **Dependent Status?** Enable this option to make the new status dependent on another existing status. Once enabled, select the parent status that must occur before this status becomes available.
6. **Track Time in Status?** Enable this option to track how long a job remains in this status.\
Once turned on, enter the **Estimated Duration** using the fields for **Days**, **Hours**, and **Minutes**. This helps set expectations for how long a job should ideally remain in this stage and supports monitoring and performance analysis.
 **Location settings:**
Configure location tracking for the job status:
1. **Enable/Disable Geo-Fencing**: When enabled, specify the geo-fence radius in kilometers to restrict status updates to a designated area.
2. **Enable/Disable Capture Geo-Coordinates**: Enable real-time location tracking when this status is used.
**Permissions:**
Control access and visibility for different roles:
1. **Enable for Field Executives**: Allow or restrict field executives from using this status.
2. **Enable for Managers**: Allow or restrict managers from using this status.
3. **Restrict to Custom Roles**: When enabled, select the specific roles permitted to access this status.
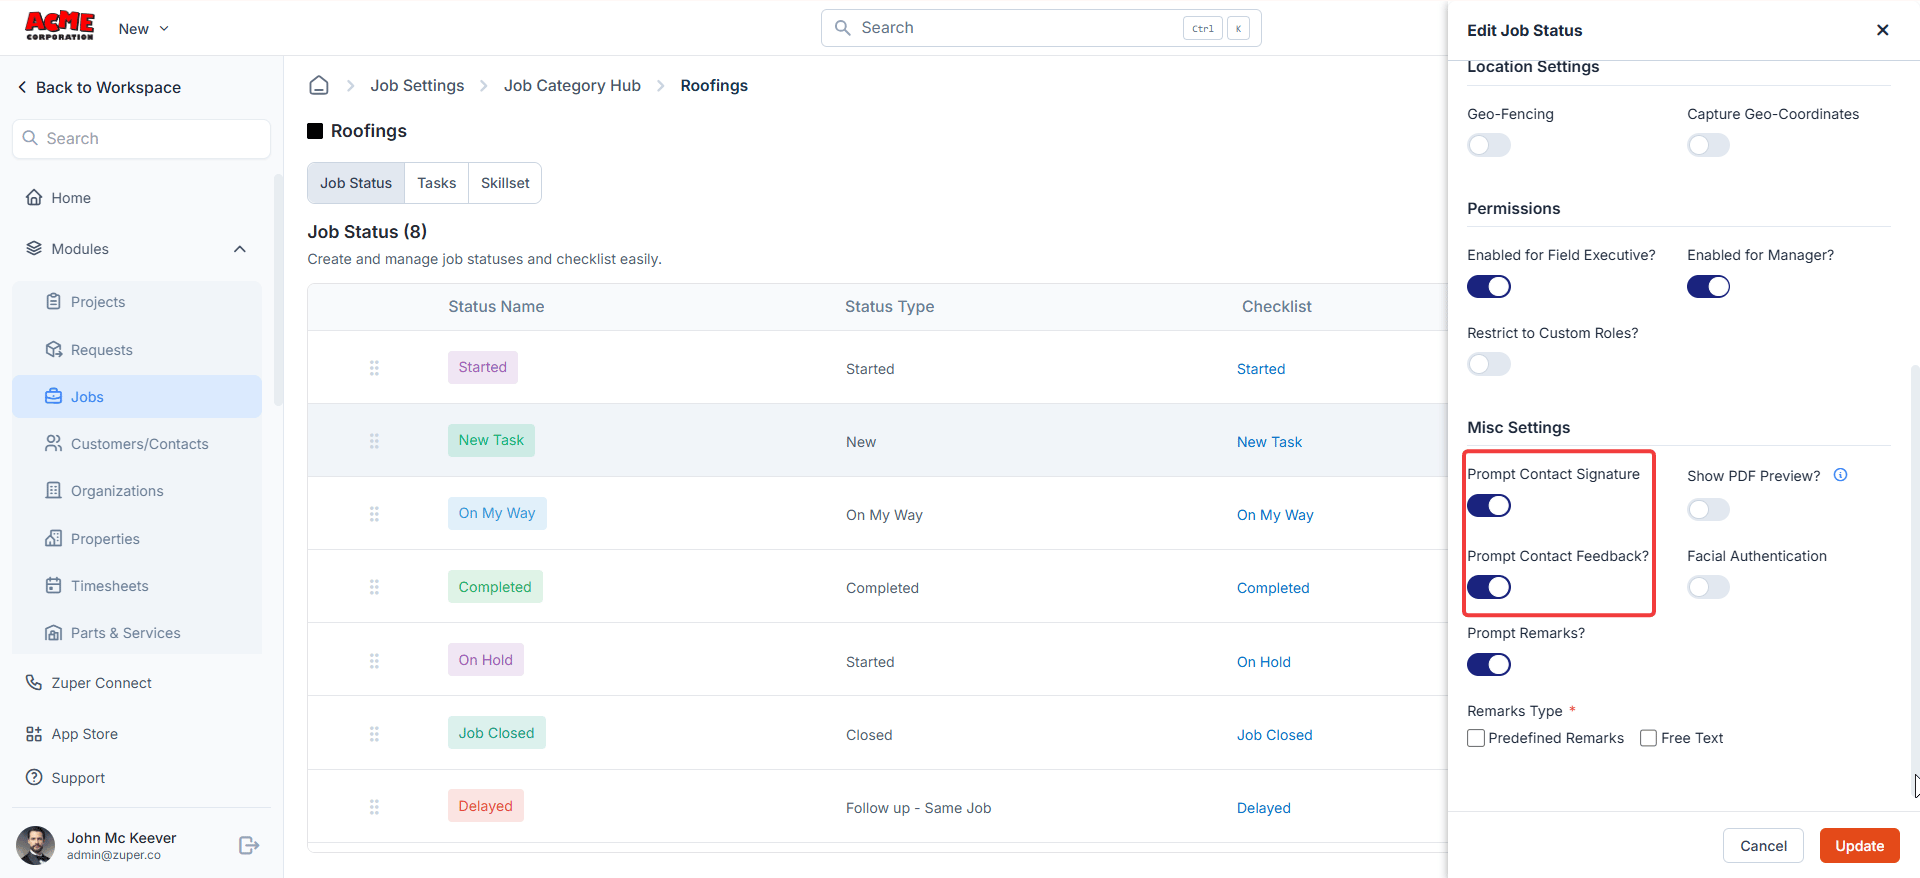
**Miscellaneous settings:**
Additional configurations for the job status:
1. **Customer Signature**: Require a customer signature when this status is updated.
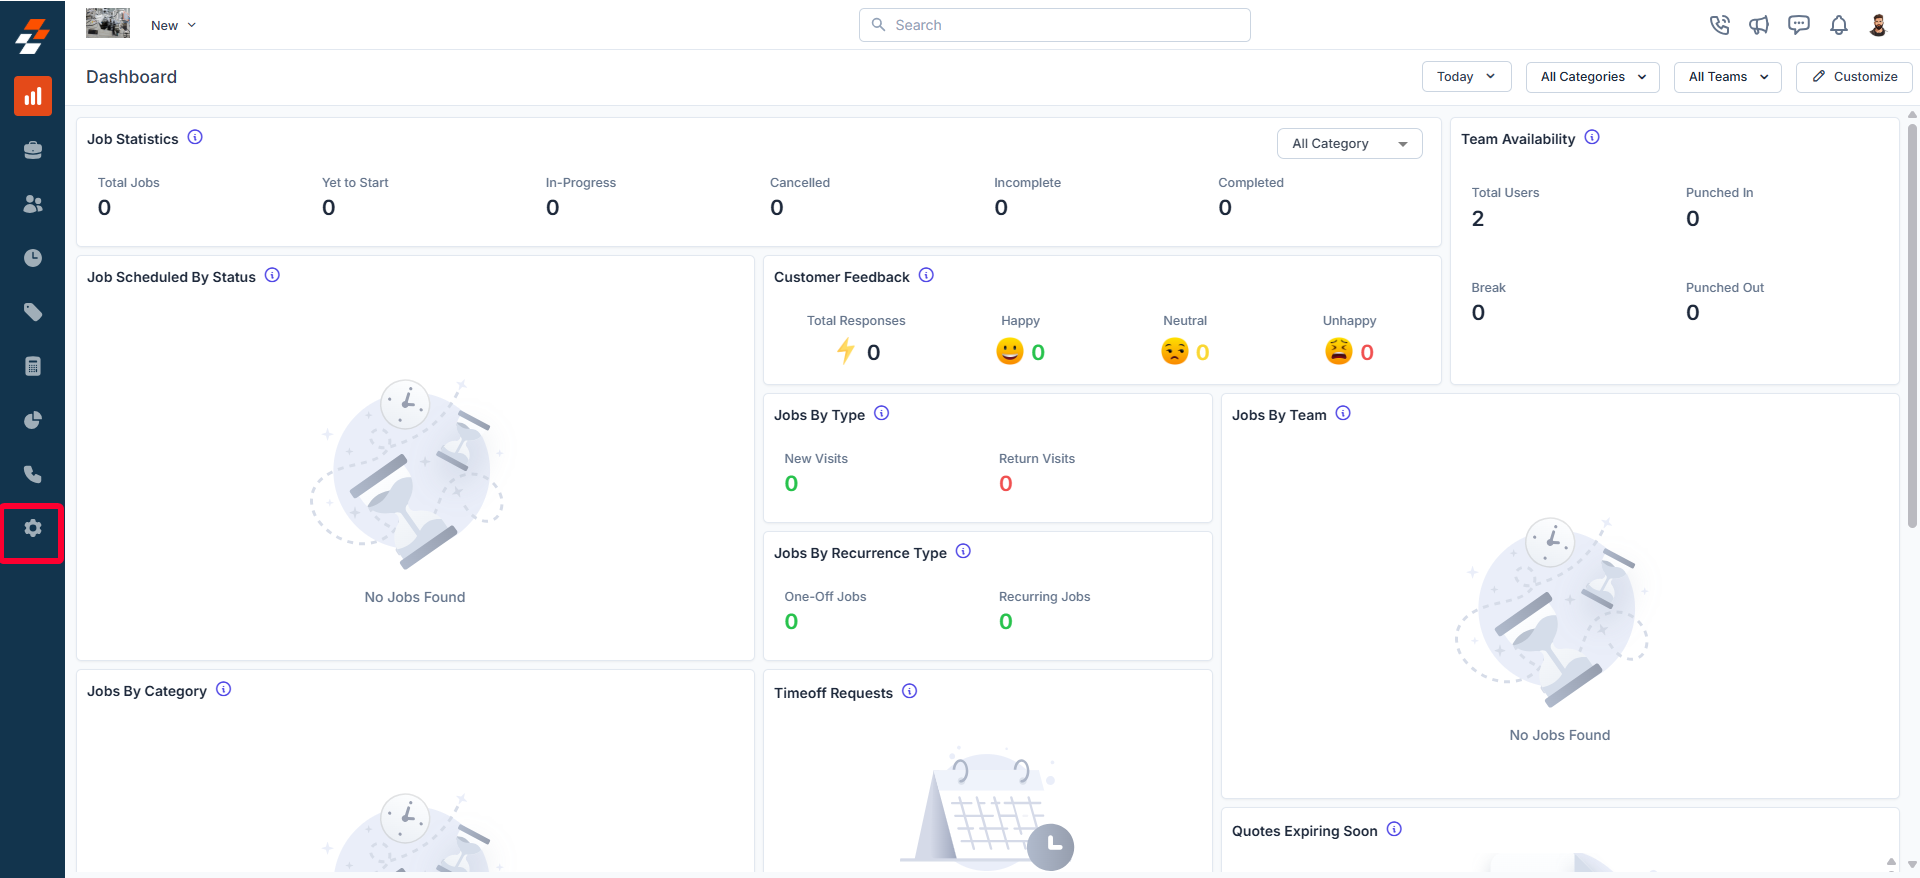
2. **Customer Feedback**: Collect customer feedback on the completed job. This option appears only when **Customer Signature** is enabled on the same status, and responses show up in the dashboard statistics.
When Customer Feedback is enabled, the field technician's mobile app displays a **3-point emoji scale** (positive, neutral, negative) after the customer signs off on the job status update. The technician submits the response on the customer's behalf at the job site.
Feedback responses are recorded against the job and reflected in your **Dashboard statistics**. To view aggregated feedback data, navigate to the Dashboard and look for the Customer Feedback widget. You can also export feedback per job using the [Jobs Feedback Report](/Legacy_Reports/Legacy_Reports#job-reports) in Legacy Reports.
**To enable Customer Feedback:**
1. Enable **Customer Signature** on the job status first.
2. The **Customer Feedback** toggle will then appear — enable it.
3. Save the status configuration.
3. Show PDF Preview: Display the preview of the PDF.
4. **Facial Authentication**: Enable facial authentication as an additional security step.
5. **Prompt Remarks**: When enabled, choose whether remarks should be:
* **Predefined**: Provide predefined remark options.
* **Free Text**: Allow users to enter custom remarks.
**Location settings:**
Configure location tracking for the job status:
1. **Enable/Disable Geo-Fencing**: When enabled, specify the geo-fence radius in kilometers to restrict status updates to a designated area.
2. **Enable/Disable Capture Geo-Coordinates**: Enable real-time location tracking when this status is used.
**Permissions:**
Control access and visibility for different roles:
1. **Enable for Field Executives**: Allow or restrict field executives from using this status.
2. **Enable for Managers**: Allow or restrict managers from using this status.
3. **Restrict to Custom Roles**: When enabled, select the specific roles permitted to access this status.
**Miscellaneous settings:**
Additional configurations for the job status:
1. **Customer Signature**: Require a customer signature when this status is updated.
2. **Customer Feedback**: Collect customer feedback on the completed job. This option appears only when **Customer Signature** is enabled on the same status, and responses show up in the dashboard statistics.
When Customer Feedback is enabled, the field technician's mobile app displays a **3-point emoji scale** (positive, neutral, negative) after the customer signs off on the job status update. The technician submits the response on the customer's behalf at the job site.
Feedback responses are recorded against the job and reflected in your **Dashboard statistics**. To view aggregated feedback data, navigate to the Dashboard and look for the Customer Feedback widget. You can also export feedback per job using the [Jobs Feedback Report](/Legacy_Reports/Legacy_Reports#job-reports) in Legacy Reports.
**To enable Customer Feedback:**
1. Enable **Customer Signature** on the job status first.
2. The **Customer Feedback** toggle will then appear — enable it.
3. Save the status configuration.
3. Show PDF Preview: Display the preview of the PDF.
4. **Facial Authentication**: Enable facial authentication as an additional security step.
5. **Prompt Remarks**: When enabled, choose whether remarks should be:
* **Predefined**: Provide predefined remark options.
* **Free Text**: Allow users to enter custom remarks.
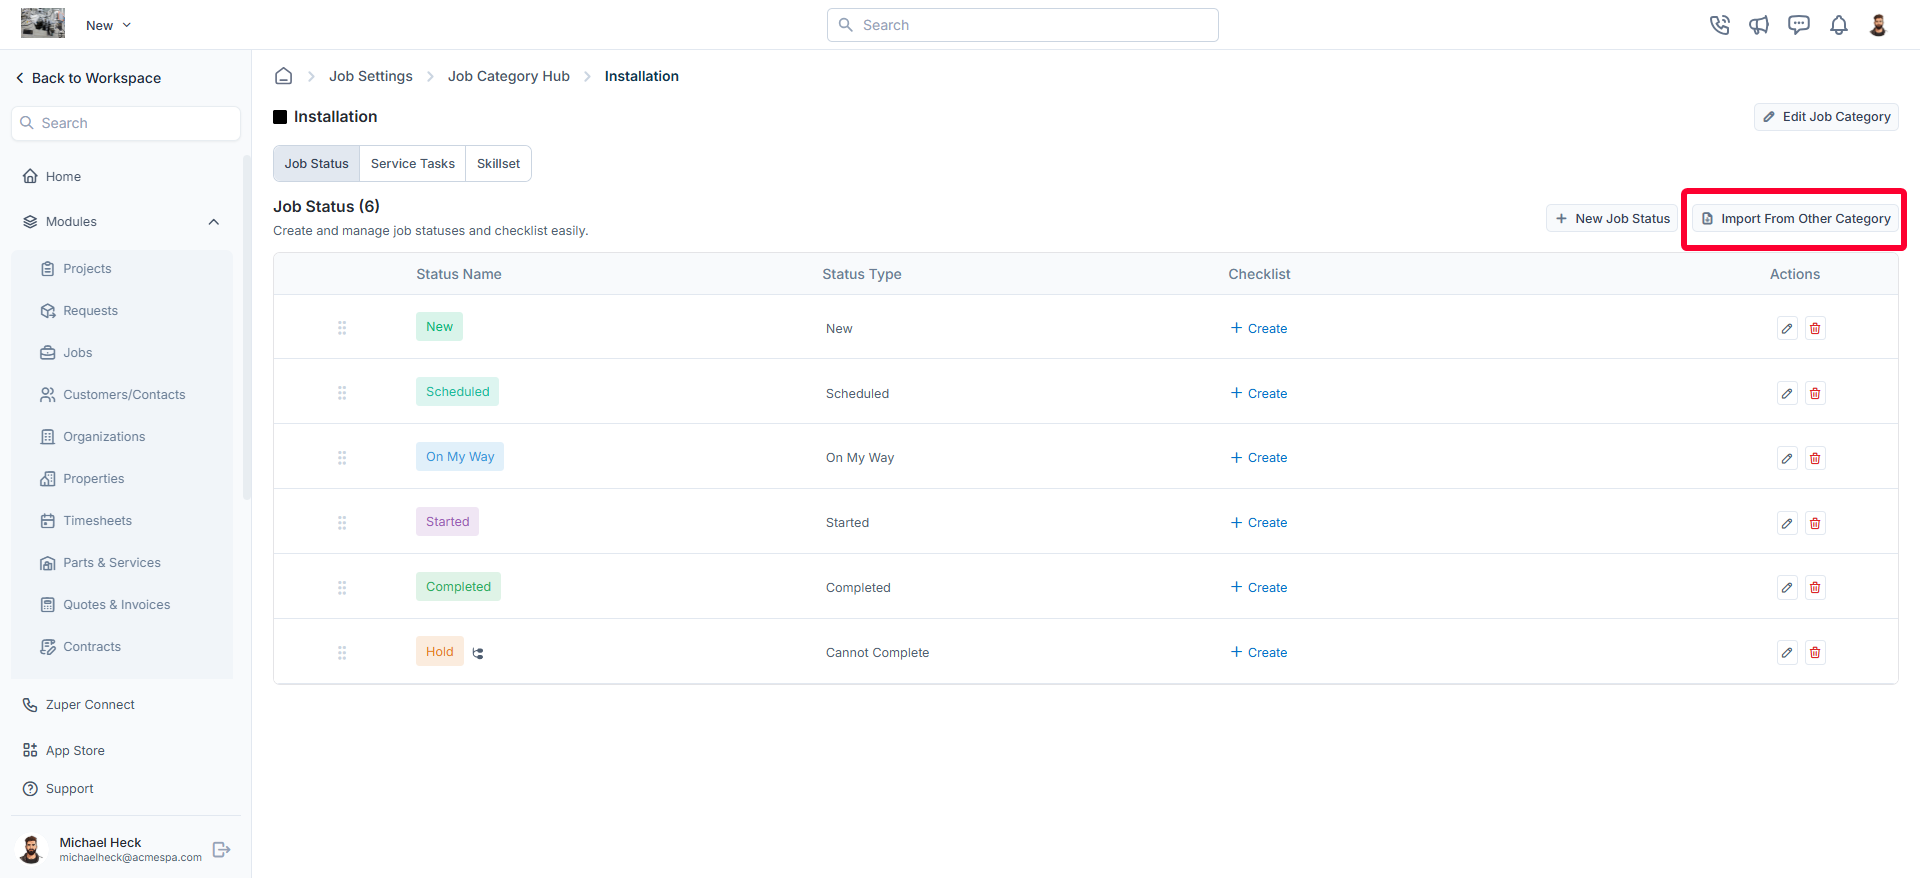
 ## Importing job statuses from another category
You can also import job statuses from an existing category instead of creating them manually:
* On the job category statuses listing page, click **Import From Other Category**.
## Importing job statuses from another category
You can also import job statuses from an existing category instead of creating them manually:
* On the job category statuses listing page, click **Import From Other Category**.
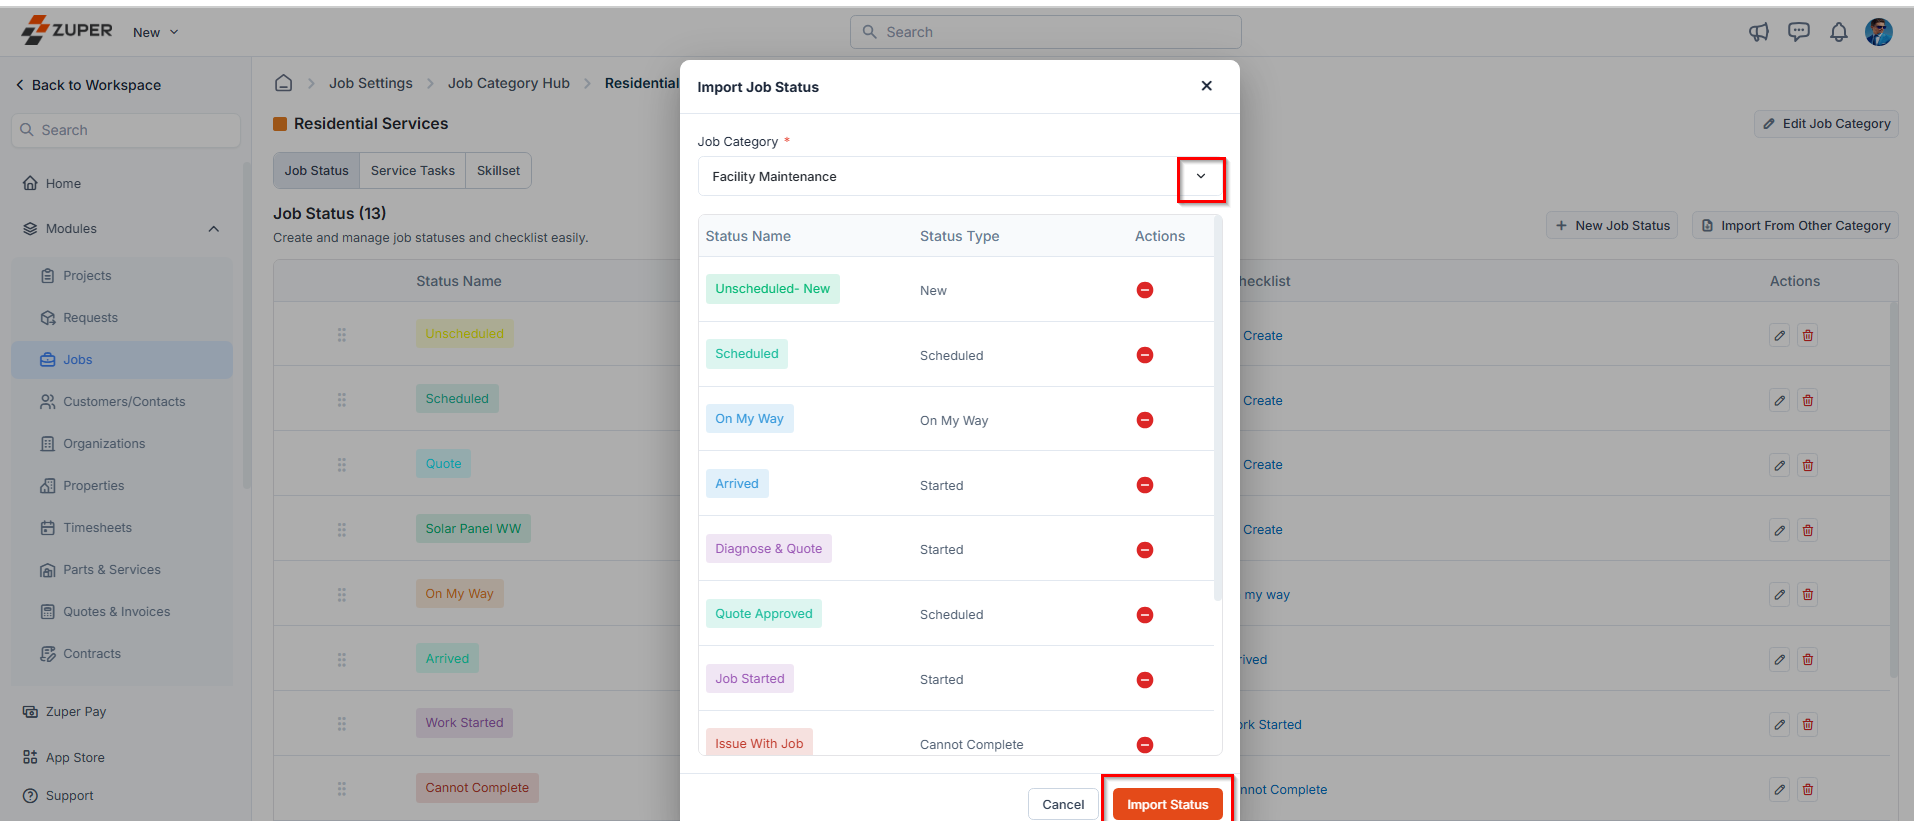
 * Select the relevant job category from the dropdown menu.
* Click **Import Status** to apply the selected job statuses to the current job category.
* Select the relevant job category from the dropdown menu.
* Click **Import Status** to apply the selected job statuses to the current job category.
 ### Editing a job status
* On the job category statuses listing page, click the icon next to the specific job status.
### Editing a job status
* On the job category statuses listing page, click the icon next to the specific job status.
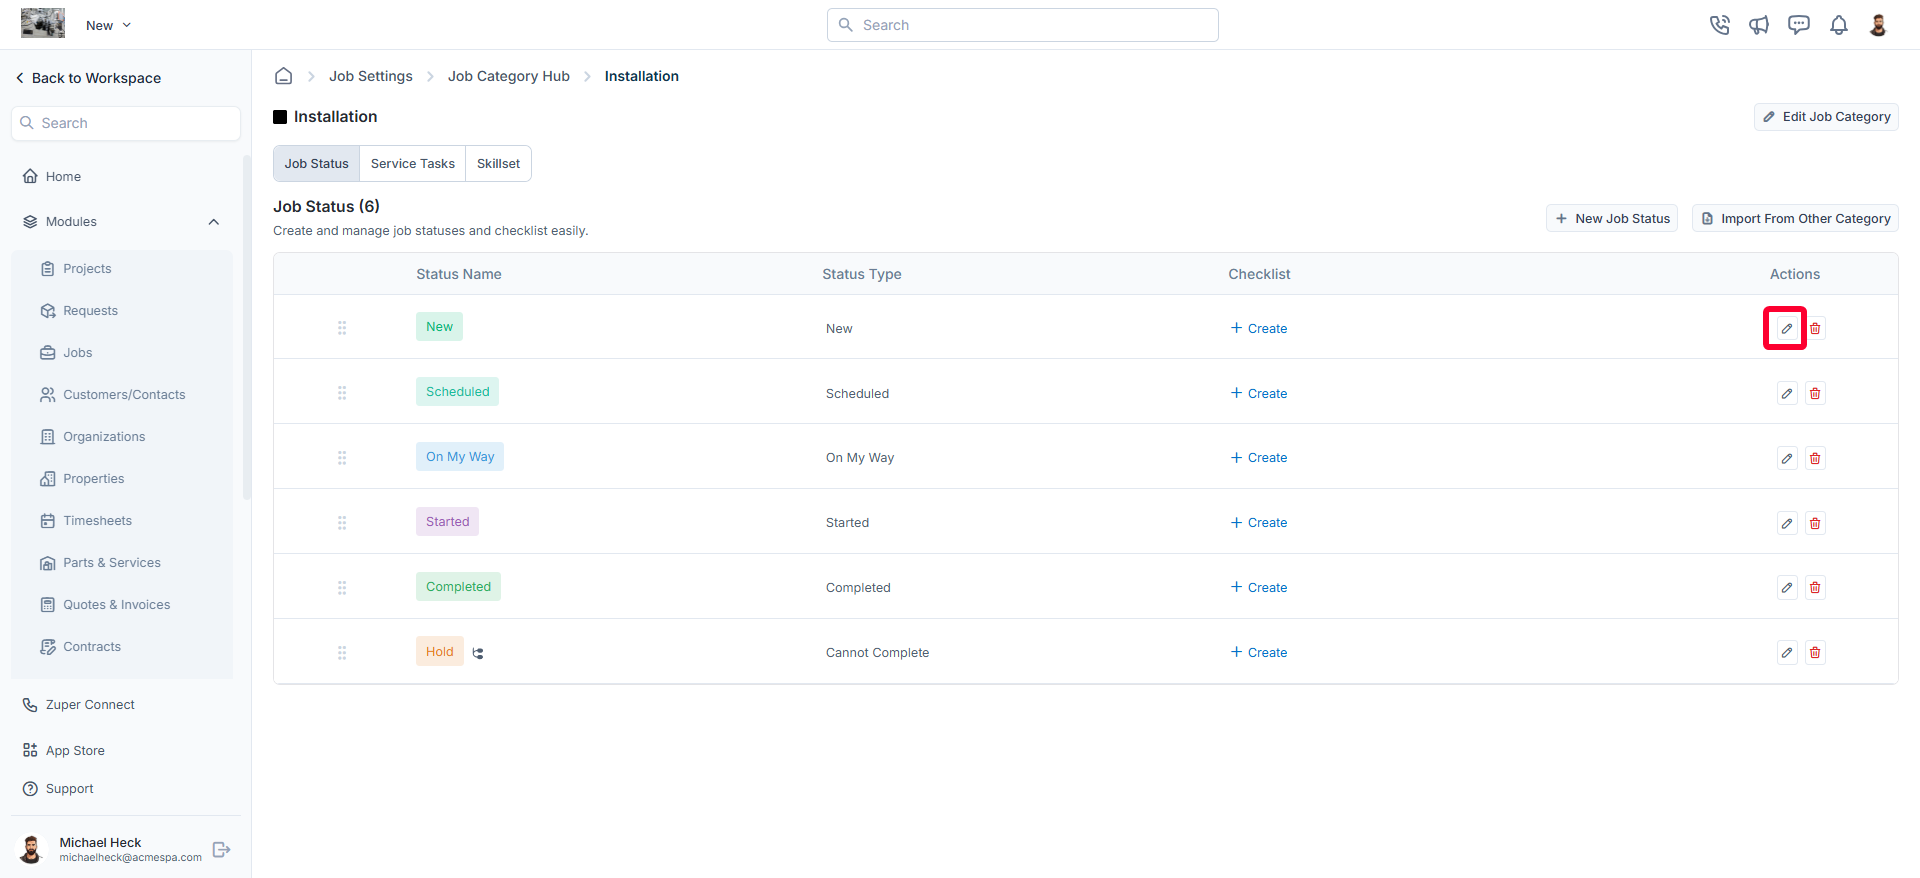 * The **Edit Job Status** dialog box opens.
* Make the necessary changes.
* Click "**Update"** to save the changes.
### Deleting a job status
* On the job category statuses listing page, click the icon next to the specific job status.
* The **Edit Job Status** dialog box opens.
* Make the necessary changes.
* Click "**Update"** to save the changes.
### Deleting a job status
* On the job category statuses listing page, click the icon next to the specific job status.
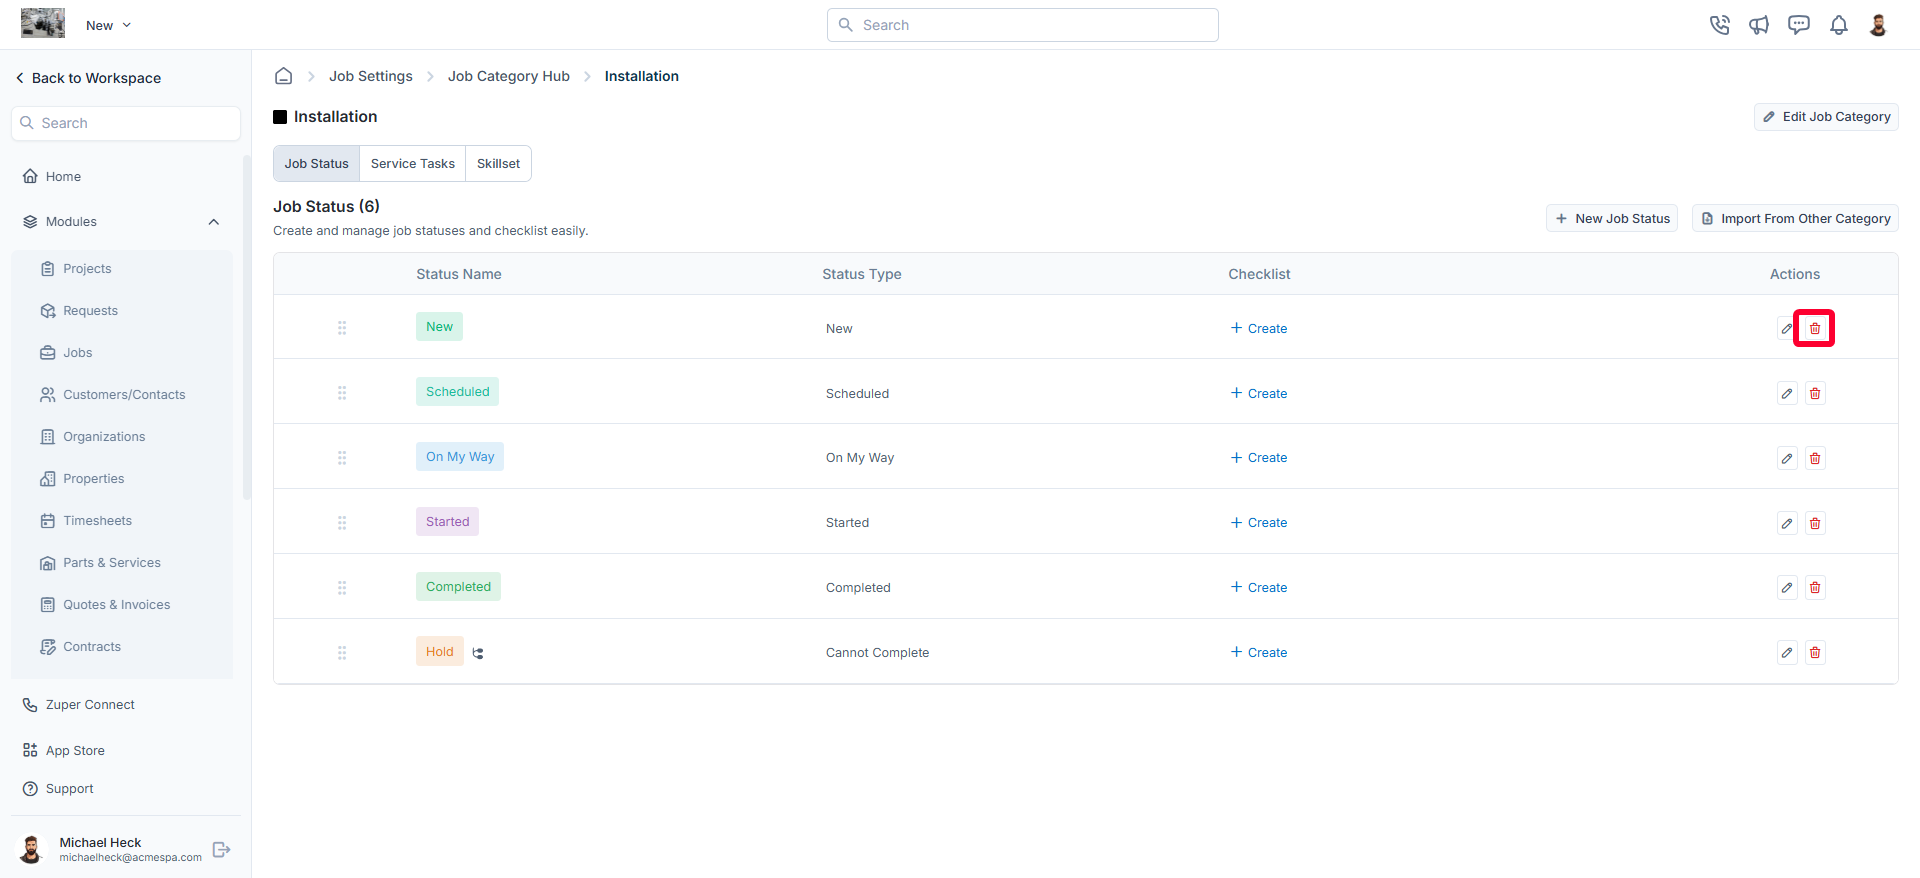 * A confirmation dialog box appears.
* Click **Delete** to permanently remove the job status from the category.
## Creating service tasks for the job category
You can associate service tasks with job categories to manage and structure them efficiently. You can also assign existing service tasks, create new ones, and configure their execution order for streamlined operations.
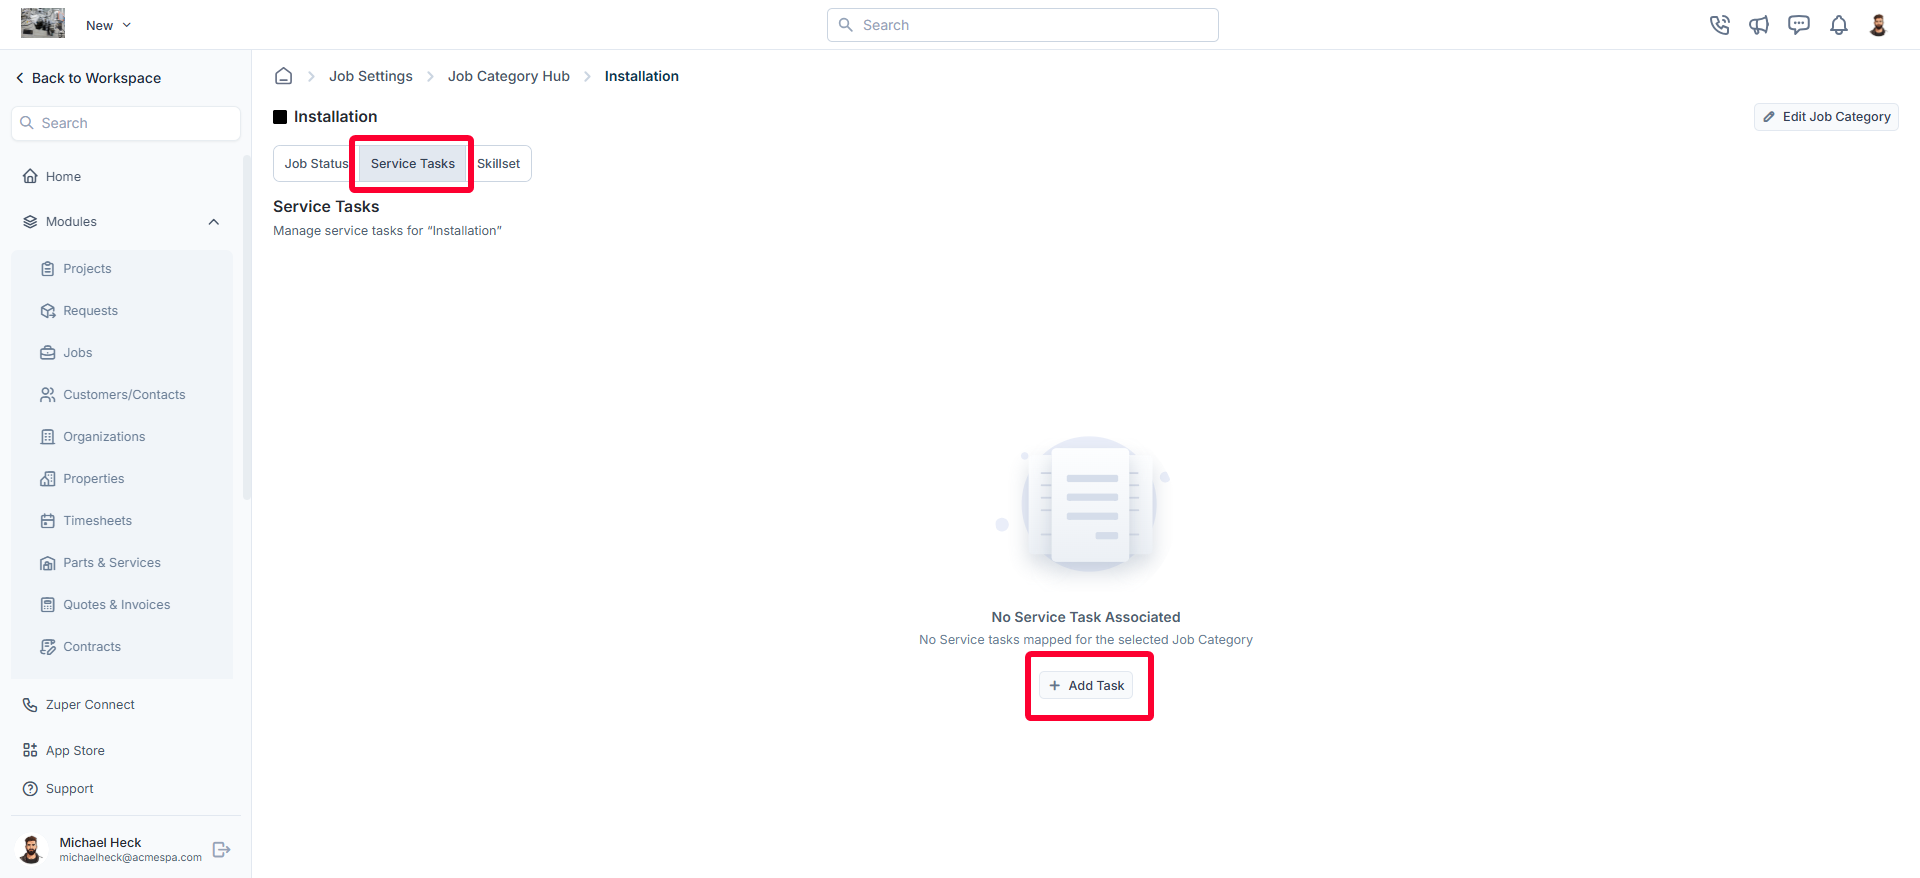
### Adding service tasks to a job category
To assign service tasks to a job category:
* Click on any job category from the **Job Categories** listing page.
* Navigate to the **Service Tasks** tab.
* Click **+ Add Task** to add an existing service task to the job category.
* A confirmation dialog box appears.
* Click **Delete** to permanently remove the job status from the category.
## Creating service tasks for the job category
You can associate service tasks with job categories to manage and structure them efficiently. You can also assign existing service tasks, create new ones, and configure their execution order for streamlined operations.
### Adding service tasks to a job category
To assign service tasks to a job category:
* Click on any job category from the **Job Categories** listing page.
* Navigate to the **Service Tasks** tab.
* Click **+ Add Task** to add an existing service task to the job category.
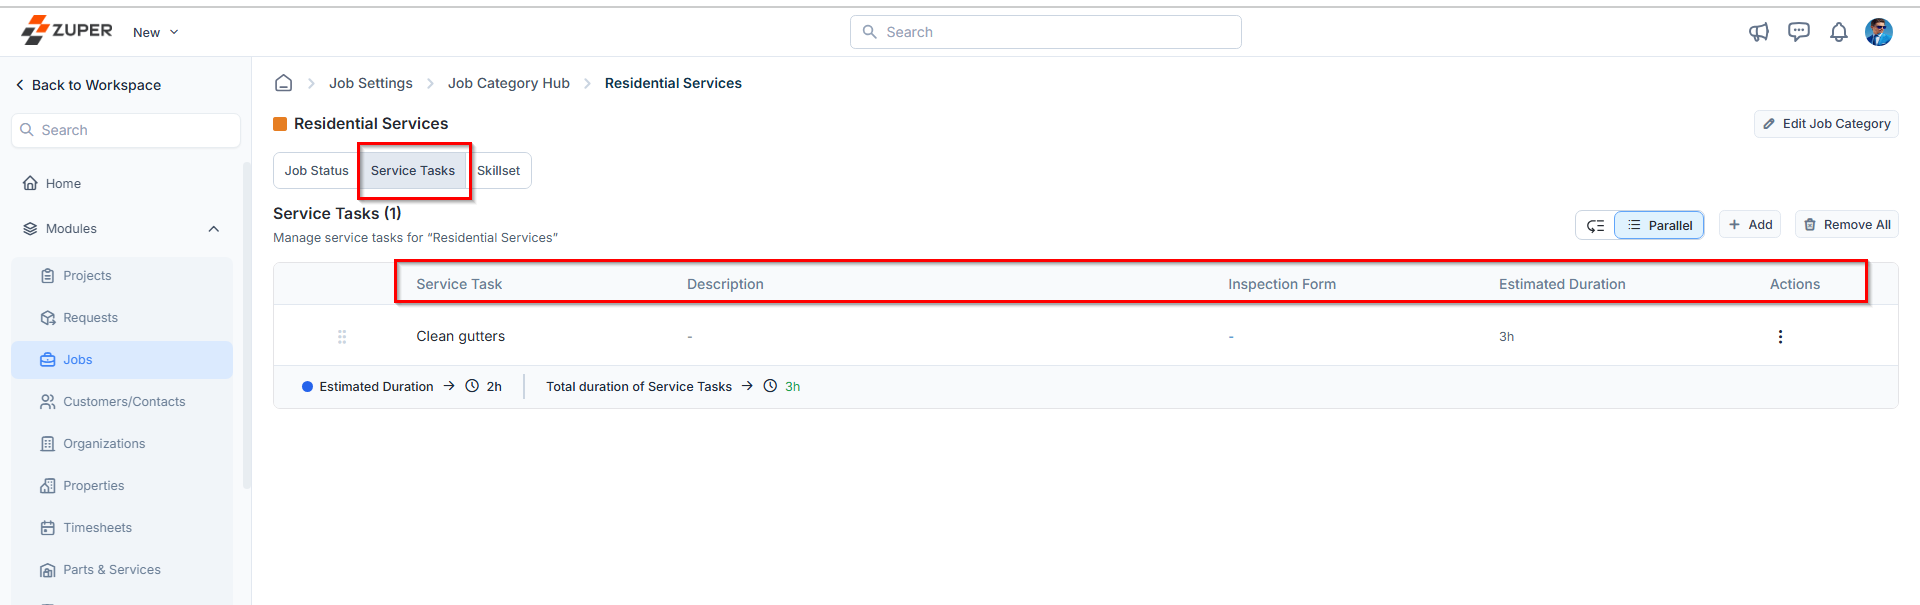
 * Once added, the list of service tasks will be displayed, including:
1. **Service Task Name**
2. **Description**
3. **Inspection Form**
4. **Estimated Duration**
* Once added, the list of service tasks will be displayed, including:
1. **Service Task Name**
2. **Description**
3. **Inspection Form**
4. **Estimated Duration**
 ### Creating a new service task
If a required service task does not exist, you can create a new one from the Add Service Task page. Follow these steps:
* Click **+ New Task** on the **Add Service Task** page.
### Creating a new service task
If a required service task does not exist, you can create a new one from the Add Service Task page. Follow these steps:
* Click **+ New Task** on the **Add Service Task** page.
 * Enter the necessary details for the new service task.
* Click **Create** to save the task.
For a detailed guide on creating service tasks, refer to the [**Configuring Service Tasks**](https://docs.zuper.co/Settings/Modules/Jobs/configuring_Job_categories) article.
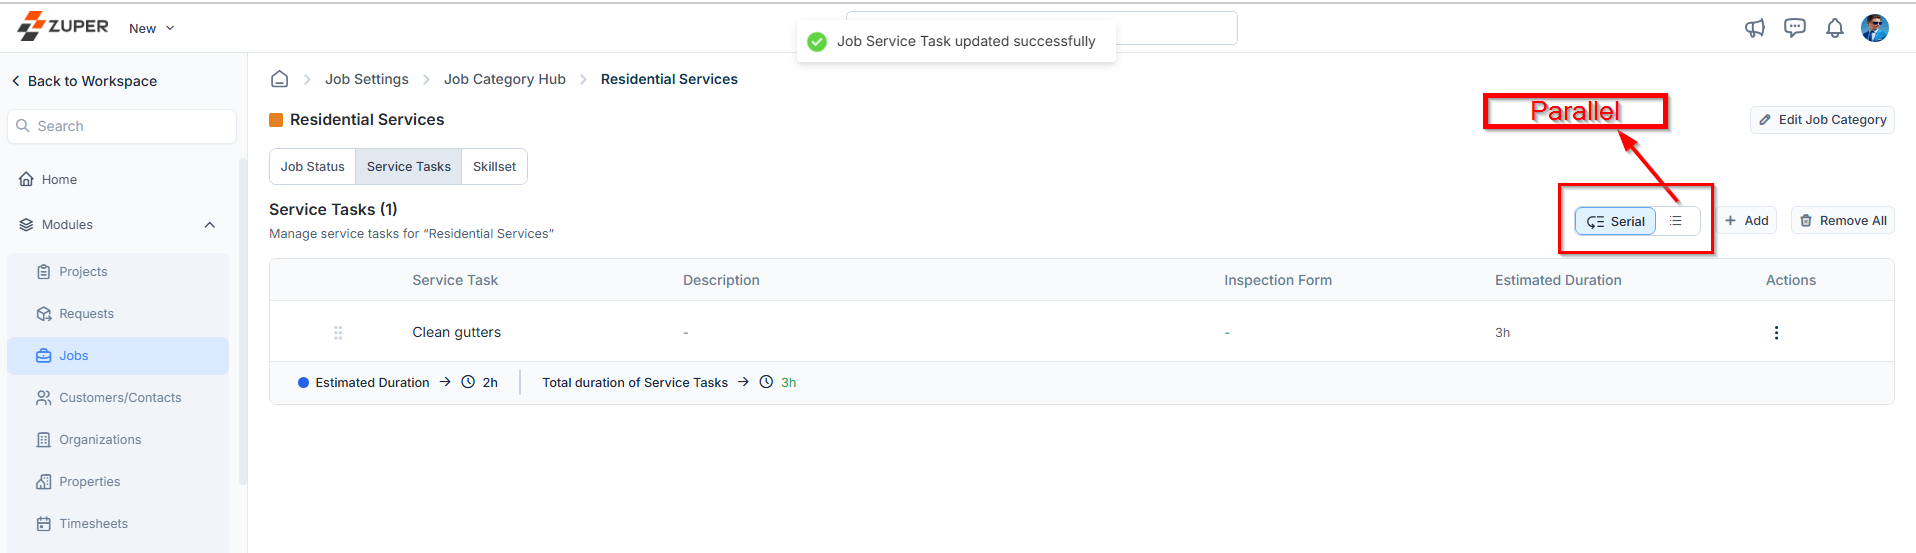
**Managing Service Task Execution Order**
You can define the sequence in which service tasks should be completed within a job category:
* **Serial Execution**: Tasks must be completed in a predefined order.
* **Parallel Execution**: Tasks can be executed in any order, allowing flexibility in task completion.
To adjust the execution sequence:
1. On the service tasks listing page:
* Click **Serial** to enforce a structured workflow where tasks follow a set order.
* Click **Parallel** to allow tasks to be completed independently in any order.
* Enter the necessary details for the new service task.
* Click **Create** to save the task.
For a detailed guide on creating service tasks, refer to the [**Configuring Service Tasks**](https://docs.zuper.co/Settings/Modules/Jobs/configuring_Job_categories) article.
**Managing Service Task Execution Order**
You can define the sequence in which service tasks should be completed within a job category:
* **Serial Execution**: Tasks must be completed in a predefined order.
* **Parallel Execution**: Tasks can be executed in any order, allowing flexibility in task completion.
To adjust the execution sequence:
1. On the service tasks listing page:
* Click **Serial** to enforce a structured workflow where tasks follow a set order.
* Click **Parallel** to allow tasks to be completed independently in any order.
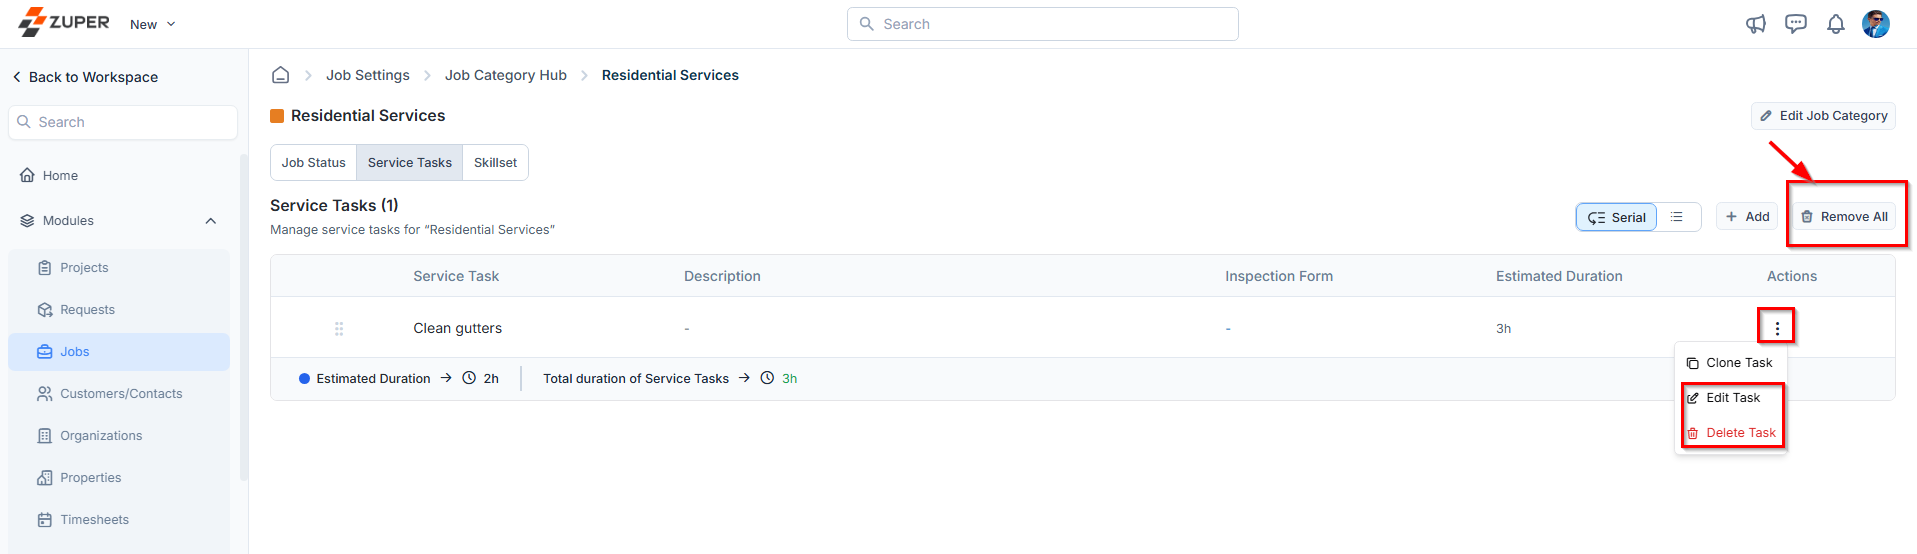
 ### Editing a service task
To modify an existing service task:
1. On the **Service Tasks** listing page, click the kebab () icon under the **Actions** column.
2. Select **Edit Task**.
3. In the **Edit Service Task** dialog box, make the necessary changes.
4. Click **Update** to save the changes.
### Deleting a service task
To remove a service task from a job category:
1. On the **Service Tasks** listing page, click the icon under the **Actions** column.
2. Select **Delete Task** next to the specific service task.
3. In the confirmation dialog box, click **Delete** to permanently remove the task.
Additionally, if you need to remove all assigned service tasks from a job category, click **Remove All**.
### Editing a service task
To modify an existing service task:
1. On the **Service Tasks** listing page, click the kebab () icon under the **Actions** column.
2. Select **Edit Task**.
3. In the **Edit Service Task** dialog box, make the necessary changes.
4. Click **Update** to save the changes.
### Deleting a service task
To remove a service task from a job category:
1. On the **Service Tasks** listing page, click the icon under the **Actions** column.
2. Select **Delete Task** next to the specific service task.
3. In the confirmation dialog box, click **Delete** to permanently remove the task.
Additionally, if you need to remove all assigned service tasks from a job category, click **Remove All**.
 ### Cloning a service task
If you need to duplicate an existing service task for reuse:
* On the **Service Tasks** listing page, click theicon under the **Actions** column.
* Select **Clone Task**.
* In the **Clone Service Task** dialog box, the **Title** field will be prefilled.
* Provide additional details such as:
1. **Description**
2. **Estimated Duration**
3. **Inspection Form**
* Click **Clone** to create a new service task within the job category.
## Creating tasks for the job category
### Add task
From the **Tasks** tab inside a job category, you can add tasks from your existing task templates, control whether tasks run in sequence or in parallel, reorder them by dragging, and manage individual tasks as your needs change.
### Add a task to a job category
1. Go to **Settings** from the left navigation menu.
2. Select **Jobs** to open **Job Settings**, then select **Job Category Hub**.
3. Select the job category you want to update.
4. Go to the **Tasks** tab.
5. Select **+ Add**. A list of your available task templates appears.
6. Select the task you want to add and confirm your selection.
### Cloning a service task
If you need to duplicate an existing service task for reuse:
* On the **Service Tasks** listing page, click theicon under the **Actions** column.
* Select **Clone Task**.
* In the **Clone Service Task** dialog box, the **Title** field will be prefilled.
* Provide additional details such as:
1. **Description**
2. **Estimated Duration**
3. **Inspection Form**
* Click **Clone** to create a new service task within the job category.
## Creating tasks for the job category
### Add task
From the **Tasks** tab inside a job category, you can add tasks from your existing task templates, control whether tasks run in sequence or in parallel, reorder them by dragging, and manage individual tasks as your needs change.
### Add a task to a job category
1. Go to **Settings** from the left navigation menu.
2. Select **Jobs** to open **Job Settings**, then select **Job Category Hub**.
3. Select the job category you want to update.
4. Go to the **Tasks** tab.
5. Select **+ Add**. A list of your available task templates appears.
6. Select the task you want to add and confirm your selection.

 The task appears in the list with the following details:
* **Task** — the name of the task.
* **Description** — a brief summary of what the task involves.
* **Trade Types** — the trade categories associated with the task.
* **Status** — whether the task is **Active**.
* **Inspection Form** — any linked inspection form.
* **EST Duration** — the estimated time to complete the task.
The task appears in the list with the following details:
* **Task** — the name of the task.
* **Description** — a brief summary of what the task involves.
* **Trade Types** — the trade categories associated with the task.
* **Status** — whether the task is **Active**.
* **Inspection Form** — any linked inspection form.
* **EST Duration** — the estimated time to complete the task.
 At the bottom of the list, Zuper displays the **Estimated Duration** set for the job category alongside the **Total duration of tasks** — so you can see at a glance whether your task durations align with the overall job estimate.
Tasks added here are drawn from your task templates. If the task you need does not exist yet, create it first in **Settings** → **Job Settings** → **Task Template**, then return here to add it. See [Task templates](/Jobs/Task_Templates) for steps.
### Set the task execution order
Once you have added tasks, you can control how your team works through them.
* Select **Serial** to require tasks to be completed one at a time, in a fixed order. Use this when each step depends on the previous one being done first.
* Select **Parallel** to allow tasks to be completed in any order. Use this when your team can work through tasks independently.
The selected mode applies to all tasks in that job category.
At the bottom of the list, Zuper displays the **Estimated Duration** set for the job category alongside the **Total duration of tasks** — so you can see at a glance whether your task durations align with the overall job estimate.
Tasks added here are drawn from your task templates. If the task you need does not exist yet, create it first in **Settings** → **Job Settings** → **Task Template**, then return here to add it. See [Task templates](/Jobs/Task_Templates) for steps.
### Set the task execution order
Once you have added tasks, you can control how your team works through them.
* Select **Serial** to require tasks to be completed one at a time, in a fixed order. Use this when each step depends on the previous one being done first.
* Select **Parallel** to allow tasks to be completed in any order. Use this when your team can work through tasks independently.
The selected mode applies to all tasks in that job category.
 ### Reorder tasks
To change the sequence of tasks, select and drag the handle (⠿) on the left side of any task row to move it to the desired position. This is only relevant when the execution order is set to **Serial**.
### Manage individual tasks
Select the three-dot icon (⋮) in the **Actions** column next to any task to access the following options:
* **Edit** — update the task details.
* **Delete** — remove the task from the job category.
To remove every task from the job category at once, select **Remove All** in the top right corner of the Tasks tab.
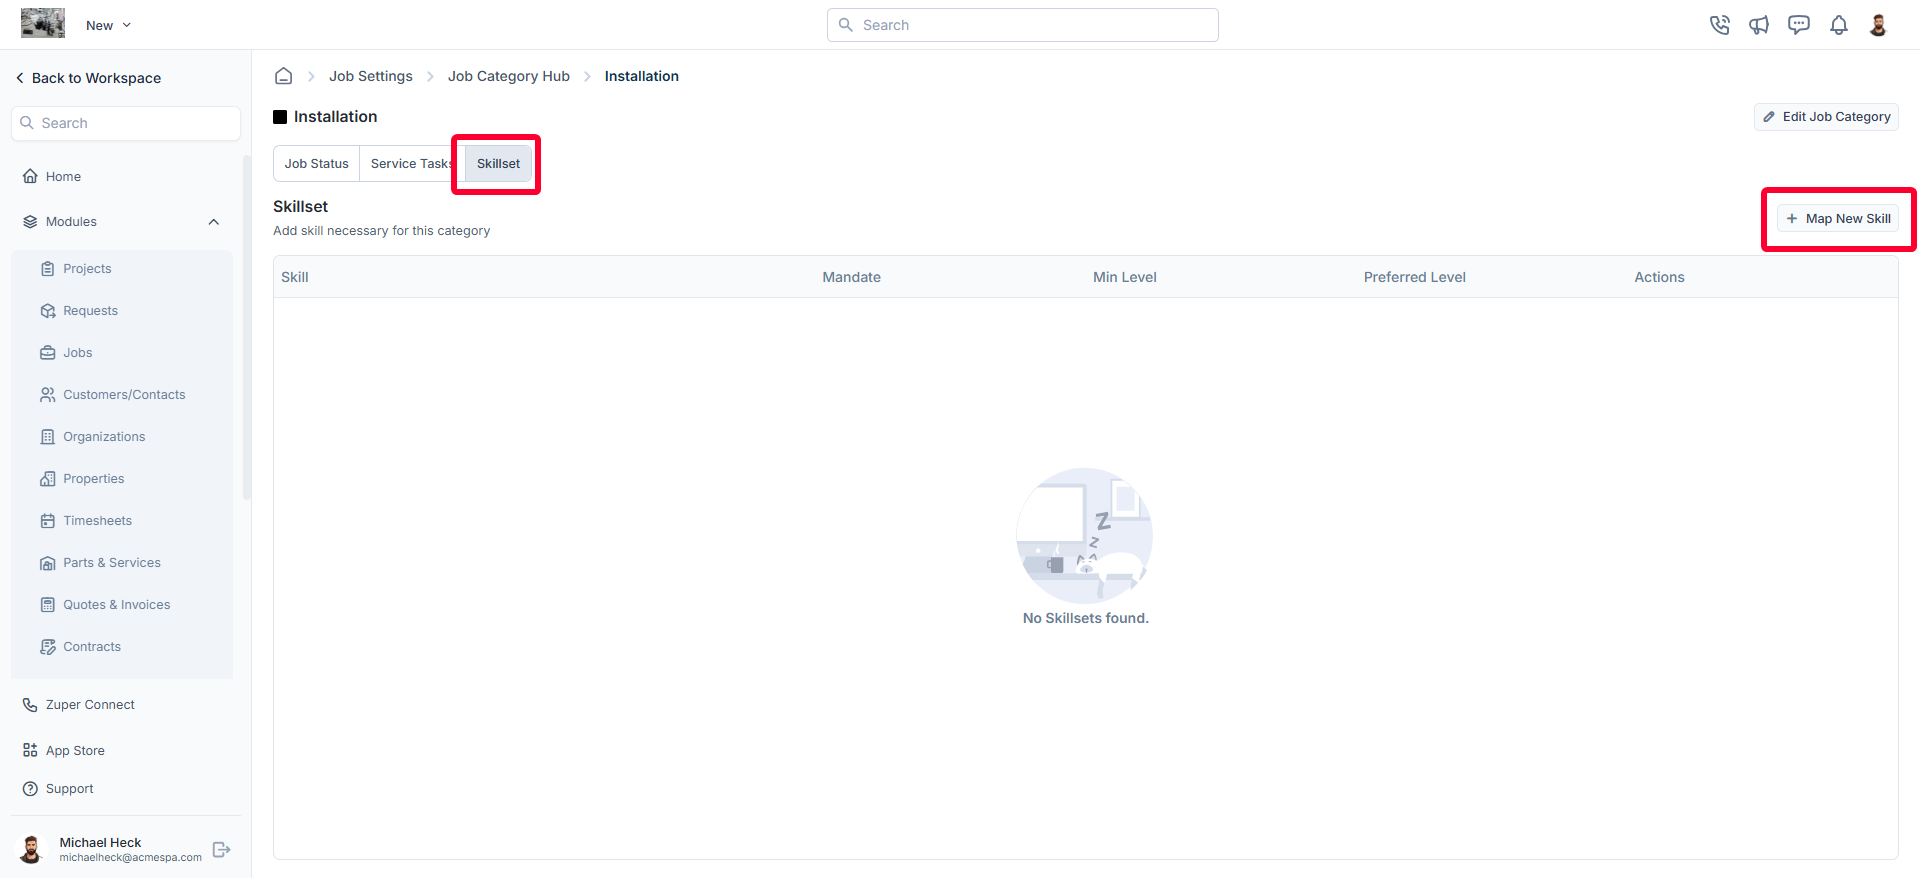
## Creating skillsets for a job category
Skillsets define the required competencies for a job category, ensuring that only qualified personnel are assigned to specific tasks. By mapping skillsets to job categories, organizations can ensure consistency in skill requirements based on job categories and improve efficiency.
### Adding skillsets to a job category
To add a skillset required for a job category:
* Click on any **job category** from the job categories listing page.
* Navigate to the **Skillset** tab to view the list of skillsets associated with the job category.
* Click **+ Map New Skill** to add a required skillset.
### Reorder tasks
To change the sequence of tasks, select and drag the handle (⠿) on the left side of any task row to move it to the desired position. This is only relevant when the execution order is set to **Serial**.
### Manage individual tasks
Select the three-dot icon (⋮) in the **Actions** column next to any task to access the following options:
* **Edit** — update the task details.
* **Delete** — remove the task from the job category.
To remove every task from the job category at once, select **Remove All** in the top right corner of the Tasks tab.
## Creating skillsets for a job category
Skillsets define the required competencies for a job category, ensuring that only qualified personnel are assigned to specific tasks. By mapping skillsets to job categories, organizations can ensure consistency in skill requirements based on job categories and improve efficiency.
### Adding skillsets to a job category
To add a skillset required for a job category:
* Click on any **job category** from the job categories listing page.
* Navigate to the **Skillset** tab to view the list of skillsets associated with the job category.
* Click **+ Map New Skill** to add a required skillset.
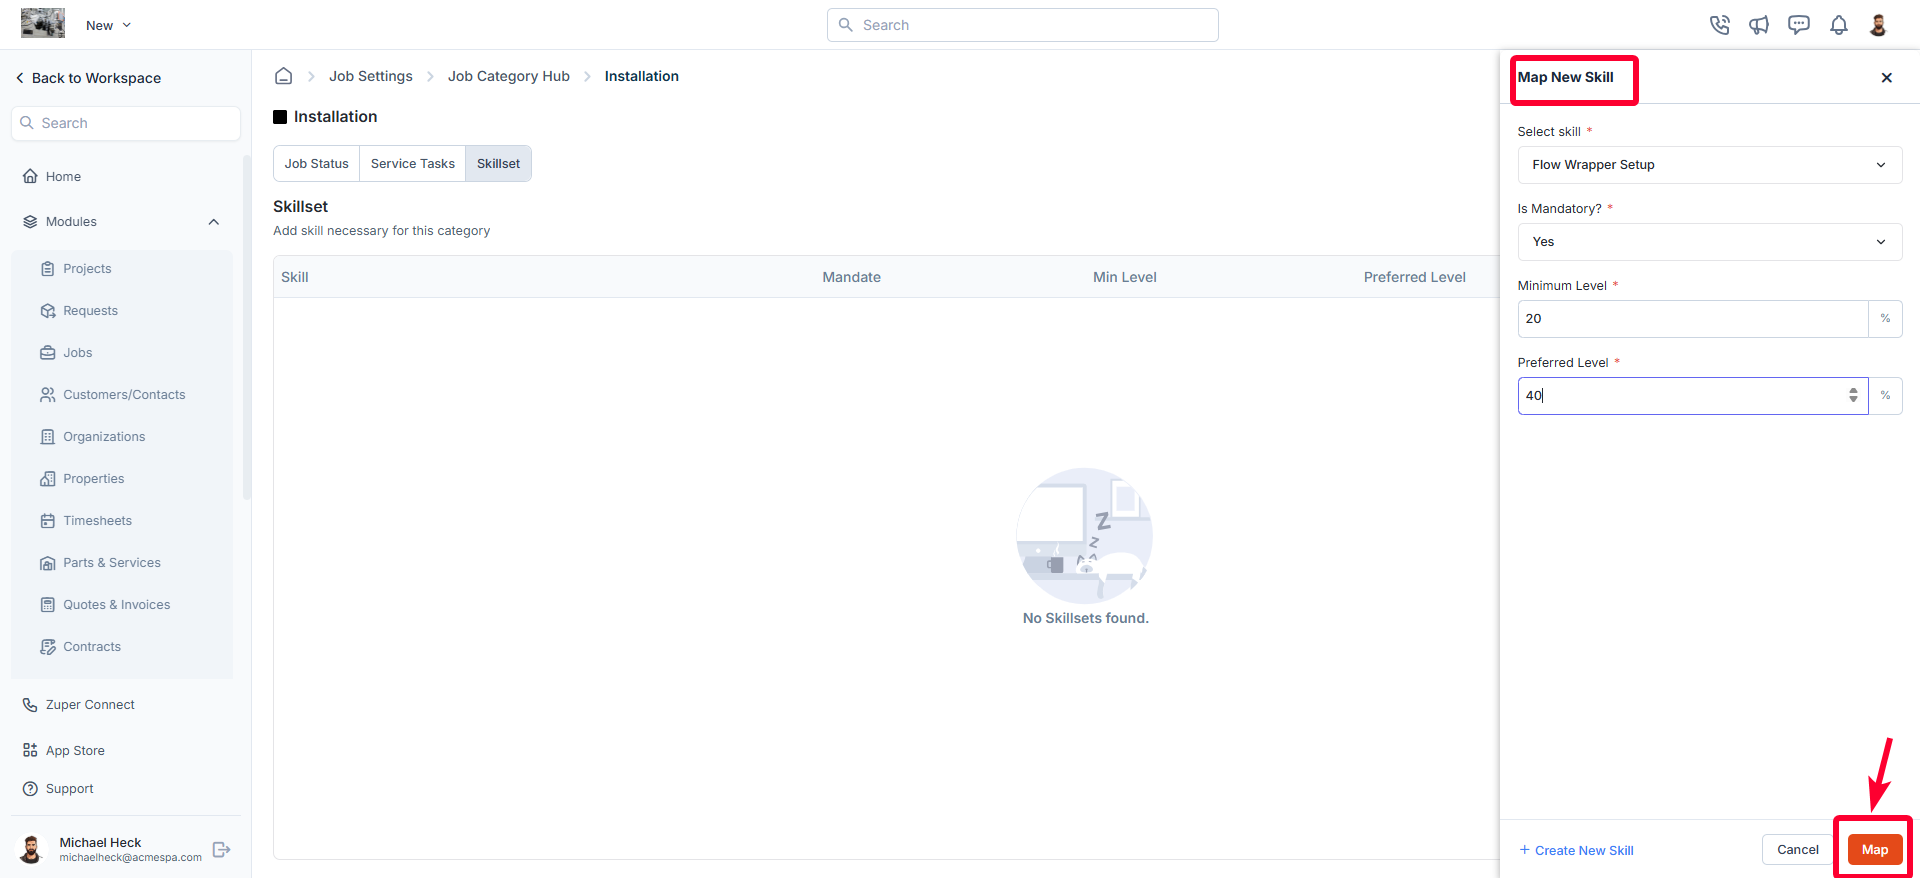
 * In the **Map New Skill** dialog box, provide the following details:
1. **Select Skill** (Mandatory): Choose a skill from the available options.
2. **Is Mandatory?** (Mandatory): Select **Yes** or **No** to indicate whether the skill is required.
3. **Minimum Level** (Mandatory): Specify the minimum proficiency level (in numbers).
4. **Preferred Level** (Mandatory): Specify the preferred proficiency level (in numbers).
5. Click **Map** to save the skillset.
* In the **Map New Skill** dialog box, provide the following details:
1. **Select Skill** (Mandatory): Choose a skill from the available options.
2. **Is Mandatory?** (Mandatory): Select **Yes** or **No** to indicate whether the skill is required.
3. **Minimum Level** (Mandatory): Specify the minimum proficiency level (in numbers).
4. **Preferred Level** (Mandatory): Specify the preferred proficiency level (in numbers).
5. Click **Map** to save the skillset.
 ### Creating a new skillset
If a required skillset does not exist, you can create a new one:
* Click **+ Create New Skill** on the **Map New Skill** page.
### Creating a new skillset
If a required skillset does not exist, you can create a new one:
* Click **+ Create New Skill** on the **Map New Skill** page.
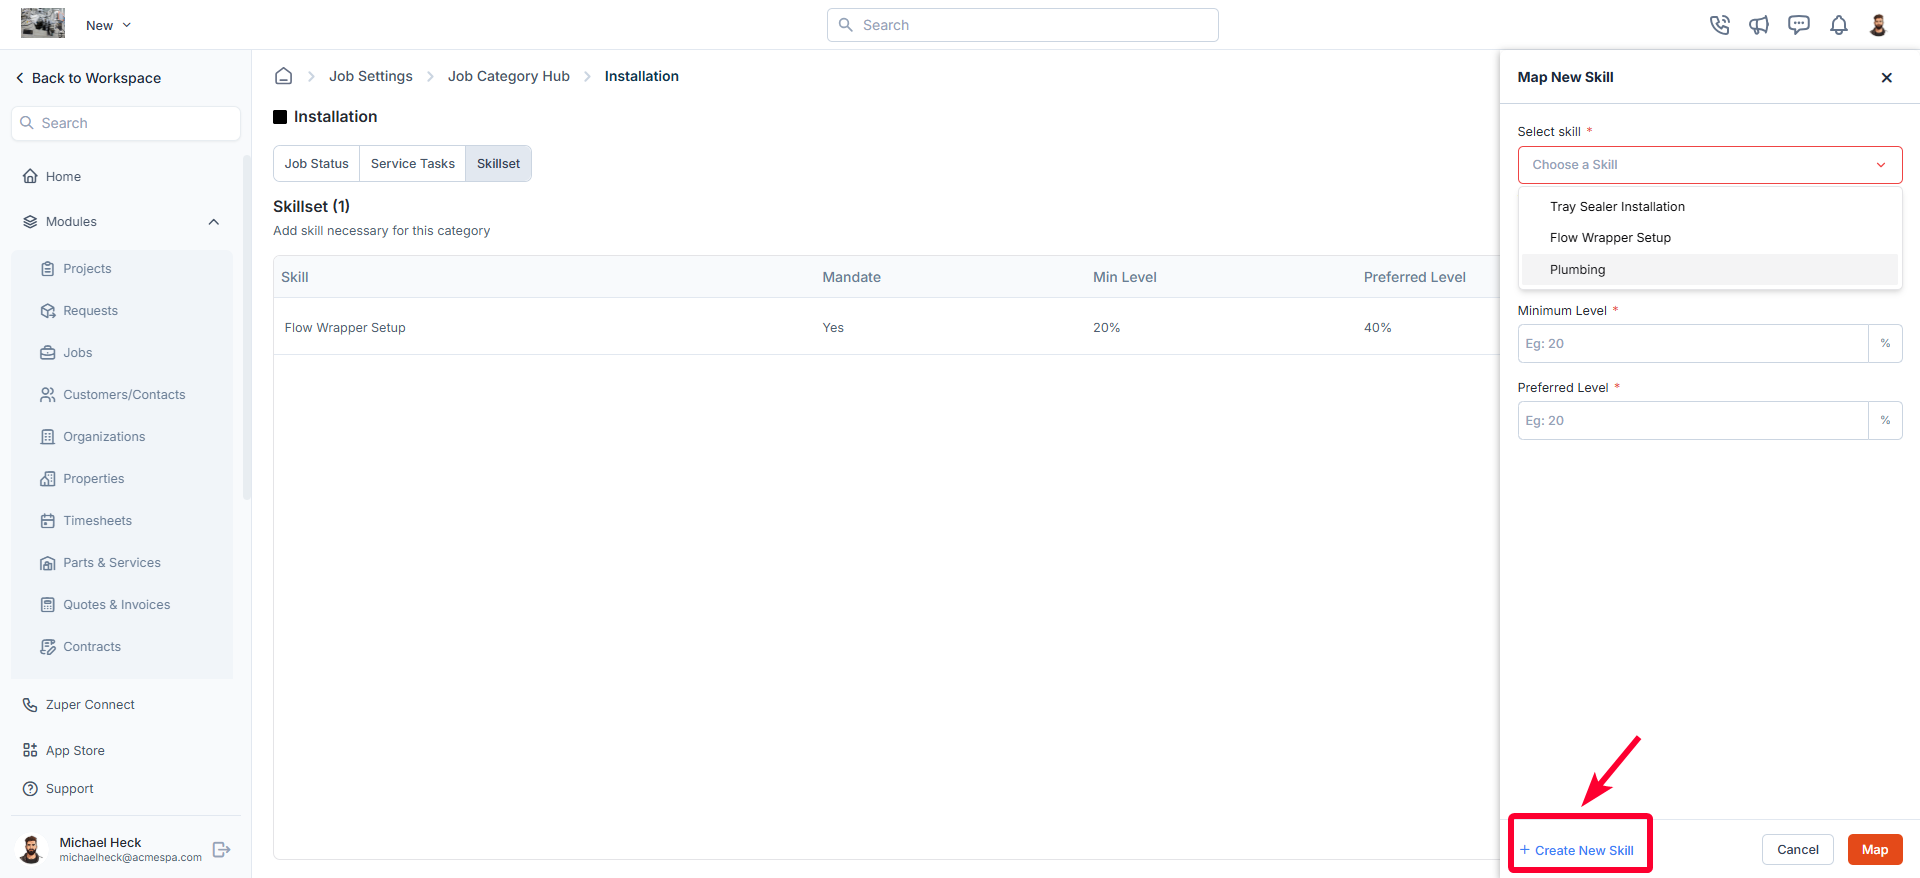 * Enter the necessary details for the new skill.
* Click **Create** to save the skill.
For a detailed guide on creating skillsets, refer to the [**Configuring Skillsets**](https://docs.zuper.co/Settings/Modules/Jobs/Configuring-skillsets) article.
### Editing a skillset
* On the **Skillsets** listing page, click the icon next to the specific skill.
* Enter the necessary details for the new skill.
* Click **Create** to save the skill.
For a detailed guide on creating skillsets, refer to the [**Configuring Skillsets**](https://docs.zuper.co/Settings/Modules/Jobs/Configuring-skillsets) article.
### Editing a skillset
* On the **Skillsets** listing page, click the icon next to the specific skill.
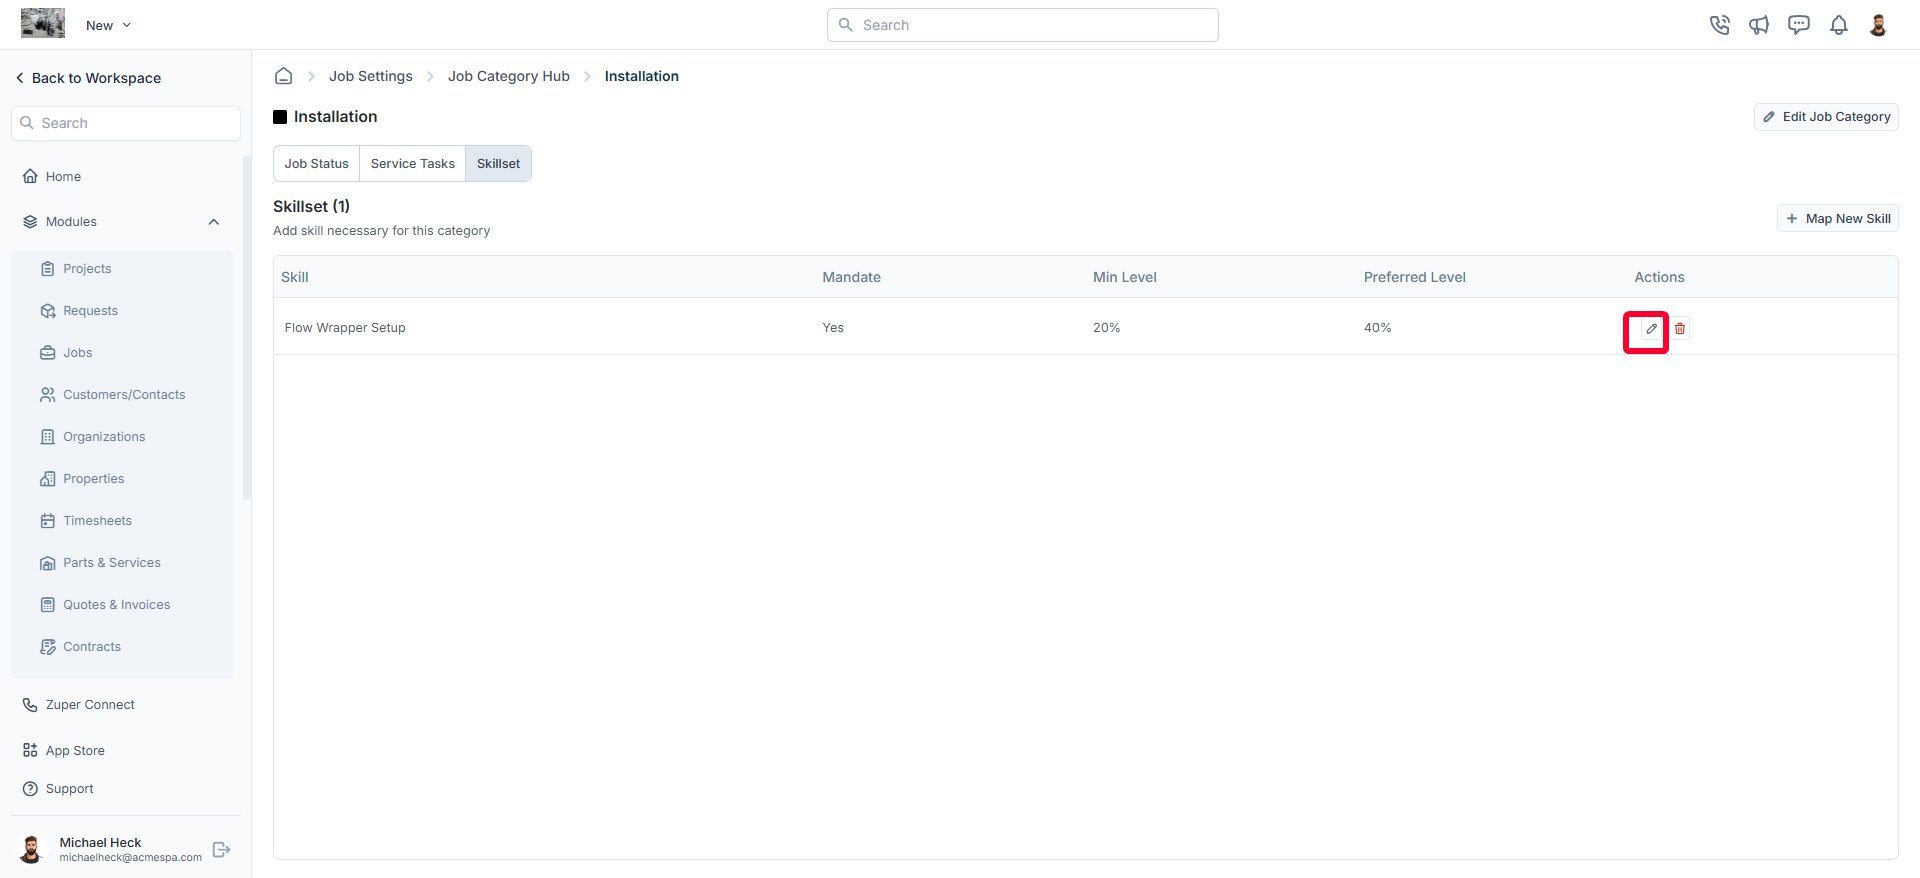 * The **Edit Skill** dialog box opens.
* Make the necessary changes.
* Click **Update** to save the changes.
### Deleting a skillset
* On the **Skillsets** listing page, click the icon next to the specific skill.
* The **Edit Skill** dialog box opens.
* Make the necessary changes.
* Click **Update** to save the changes.
### Deleting a skillset
* On the **Skillsets** listing page, click the icon next to the specific skill.
 * A confirmation dialog box appears.
* Click **Delete** to permanently remove the skill from the job category.
By configuring job categories effectively, businesses can improve job management efficiency and ensure consistent service execution tailored to operational needs.
* A confirmation dialog box appears.
* Click **Delete** to permanently remove the skill from the job category.
By configuring job categories effectively, businesses can improve job management efficiency and ensure consistent service execution tailored to operational needs.