> ## Documentation Index
> Fetch the complete documentation index at: https://docs.zuper.co/llms.txt
> Use this file to discover all available pages before exploring further.
# Configuring Parts & Services Settings
The Parts & Services module in Zuper is designed to streamline your organization’s management of parts and services. It allows you to configure and customize settings related to pricing and the organization of parts and services.
## Parts and Services General Settings
**Navigation**: *Settings -> Modules -> Parts & Services -> Parts & Services General Settings*
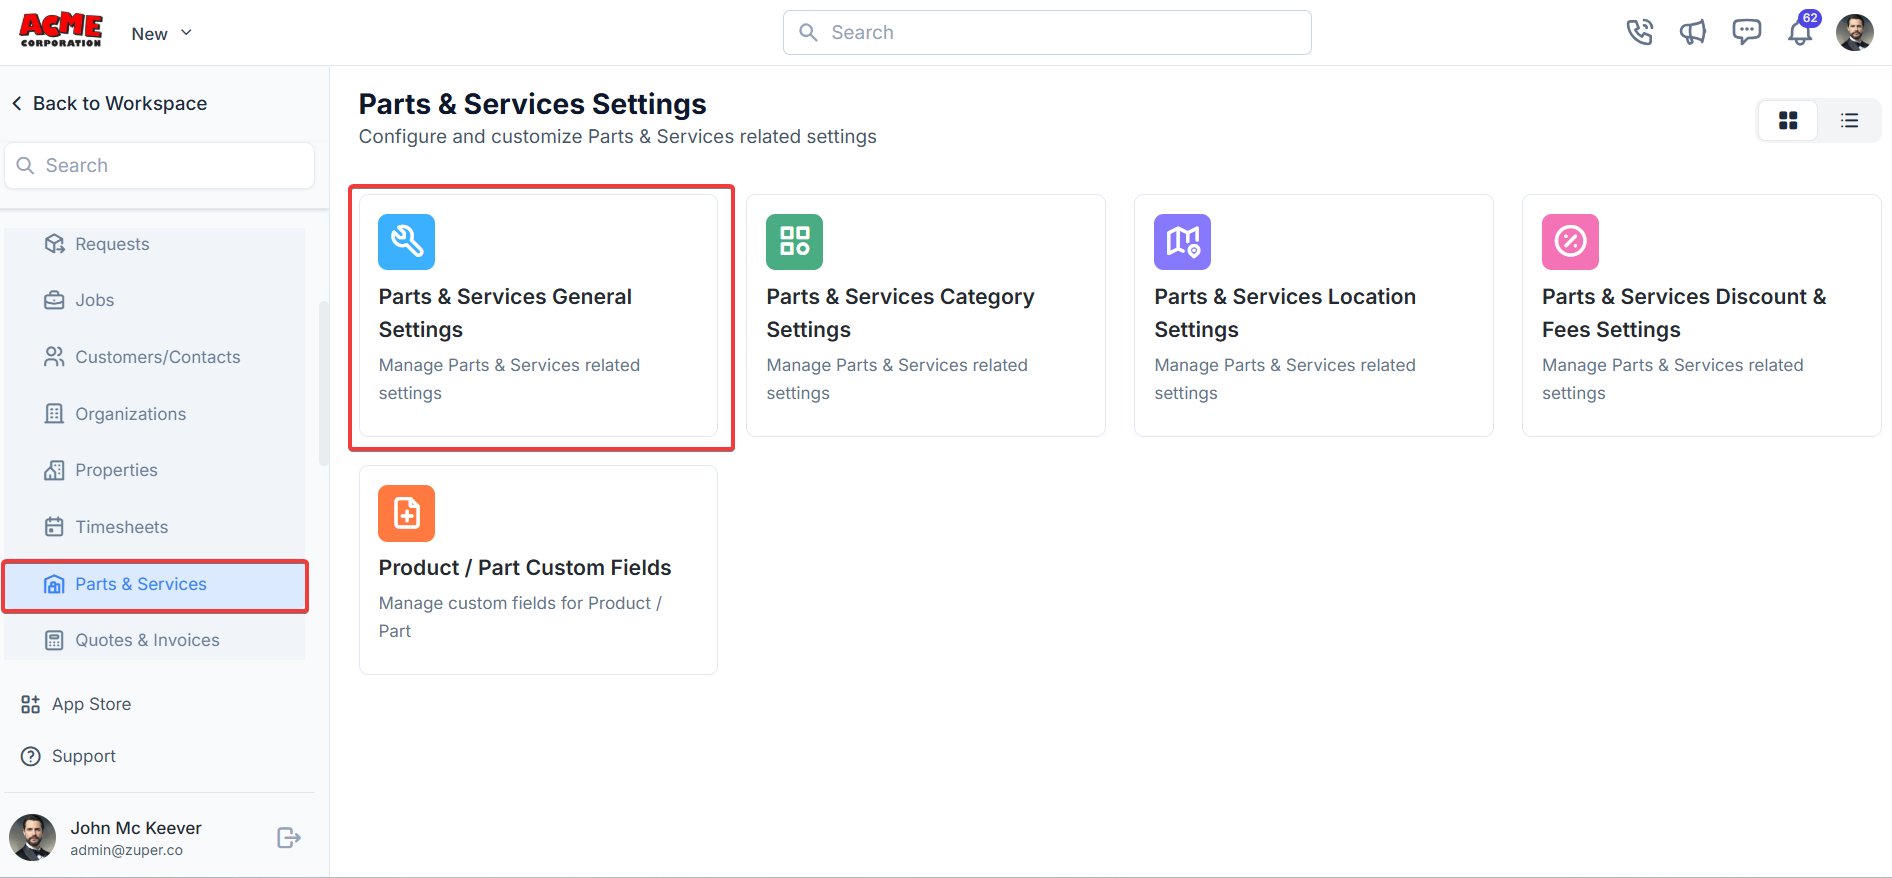
1. Select the “**Settings**” module from the left panel. Under the “**Modules**,” choose the “**Parts & Services**.” Select the “**Parts & Services General Settings**.
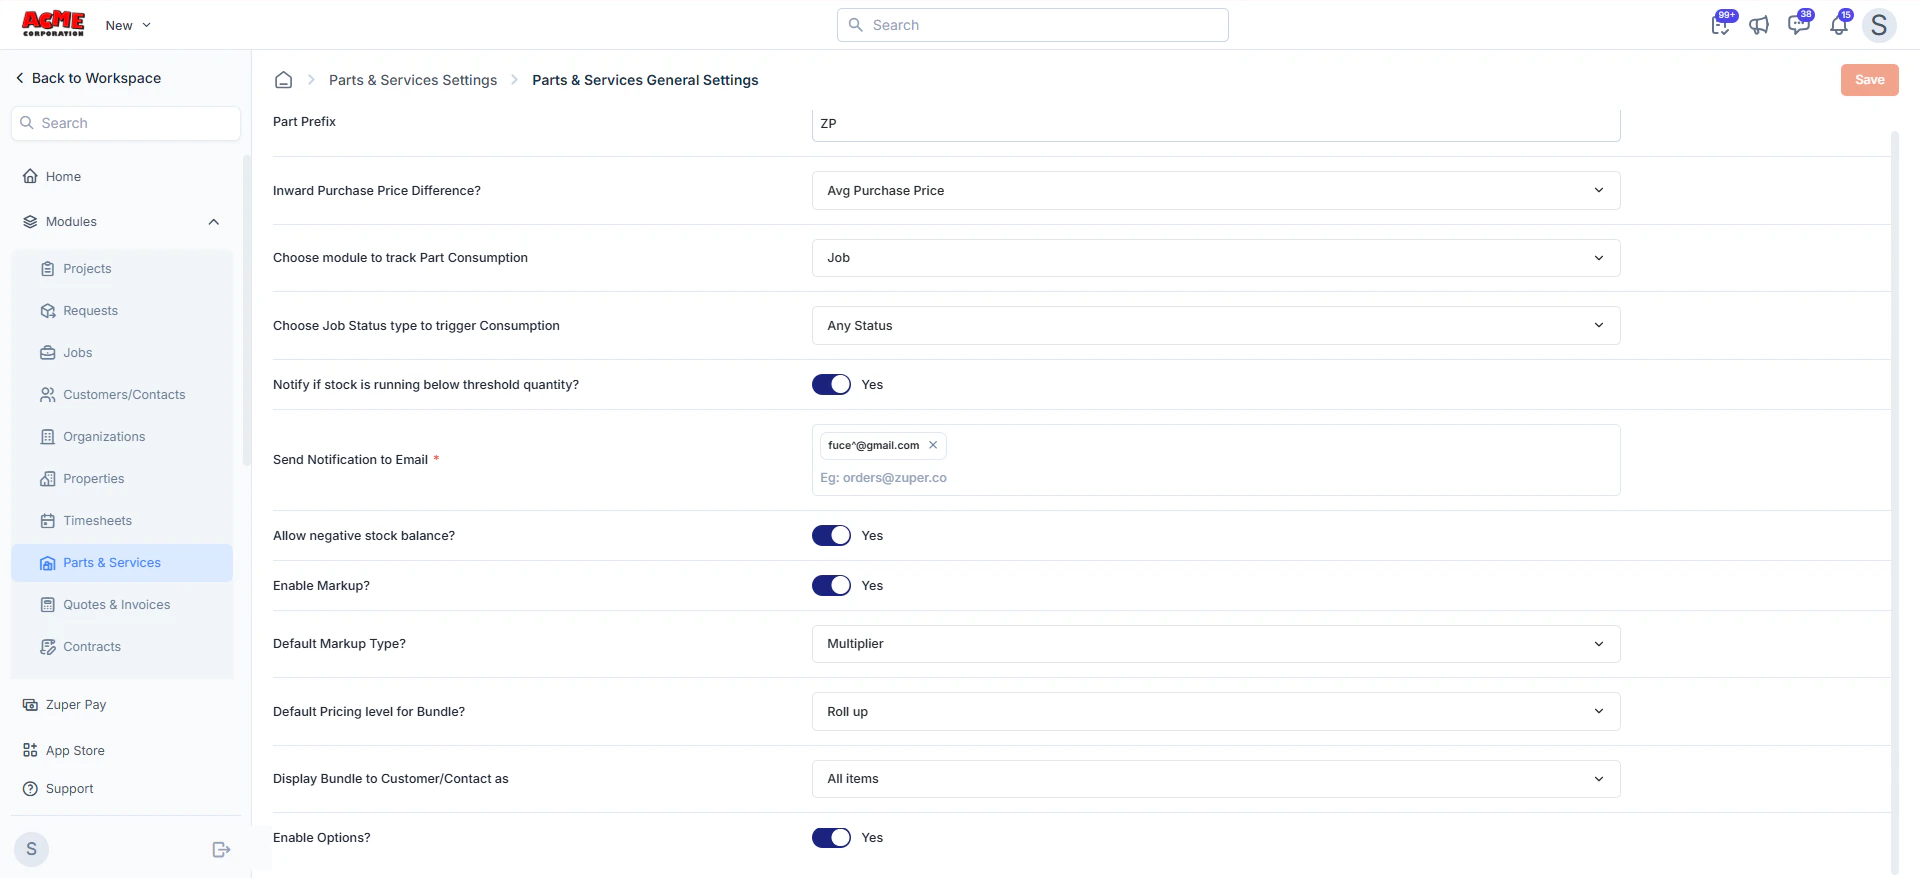
 * **Part Prefix**: Set a prefix for parts.
* **Inward Purchase Price Difference?**: Select an option to determine how purchase price differences are handled.
* **Choose module to track Part Consumption**: Select a module for tracking part consumption. You can choose the job, quote, invoice, or none.
* **Choose Job Status type to trigger Consumption** (This will be visible only if you choose the option as job in the previous option): Select a status to trigger part consumption.
* **Notify if stock is running below threshold quantity?**: Toggle Yes to enable notifications for low stock. Add email addresses to receive notifications. Toggle No to disable notifications for low stock.
* **Allow negative stock balance?**: Toggle Yes to allow negative stock balances. Toggle No to disable stock notifications.
* **Enable markup?**: Toggle to Yes to enable markup on parts.
* **Default Markup Type?**: Select the markup type. You can choose flat, percentage, or Multiplier.
* **Default Pricing level for Bundle?**: Select the pricing level. You can choose Bundle or Roll up.
* **Enable** [**Options**](https://docs.zuper.co/Inventory_Management/Parts_Services/Create_New_Part_Service#3-options)**?** Toggle to Yes enables adding configurable attributes to the product system-wide.
* **Mandate Serial No?**: Set this to **Yes** if you want the user to select a serial number while using the material in transactions such as Jobs, Quotes, and Invoices.
* Click **Save** to apply changes.
* **Part Prefix**: Set a prefix for parts.
* **Inward Purchase Price Difference?**: Select an option to determine how purchase price differences are handled.
* **Choose module to track Part Consumption**: Select a module for tracking part consumption. You can choose the job, quote, invoice, or none.
* **Choose Job Status type to trigger Consumption** (This will be visible only if you choose the option as job in the previous option): Select a status to trigger part consumption.
* **Notify if stock is running below threshold quantity?**: Toggle Yes to enable notifications for low stock. Add email addresses to receive notifications. Toggle No to disable notifications for low stock.
* **Allow negative stock balance?**: Toggle Yes to allow negative stock balances. Toggle No to disable stock notifications.
* **Enable markup?**: Toggle to Yes to enable markup on parts.
* **Default Markup Type?**: Select the markup type. You can choose flat, percentage, or Multiplier.
* **Default Pricing level for Bundle?**: Select the pricing level. You can choose Bundle or Roll up.
* **Enable** [**Options**](https://docs.zuper.co/Inventory_Management/Parts_Services/Create_New_Part_Service#3-options)**?** Toggle to Yes enables adding configurable attributes to the product system-wide.
* **Mandate Serial No?**: Set this to **Yes** if you want the user to select a serial number while using the material in transactions such as Jobs, Quotes, and Invoices.
* Click **Save** to apply changes.
 ## Category Settings
The **Category** **Settings** page allows you to organize parts, products, and services into logical groups for better inventory management and assignment to jobs, quotes, invoices, etc.
### Adding a New Category
* Navigate to **Settings** from the left navigation.
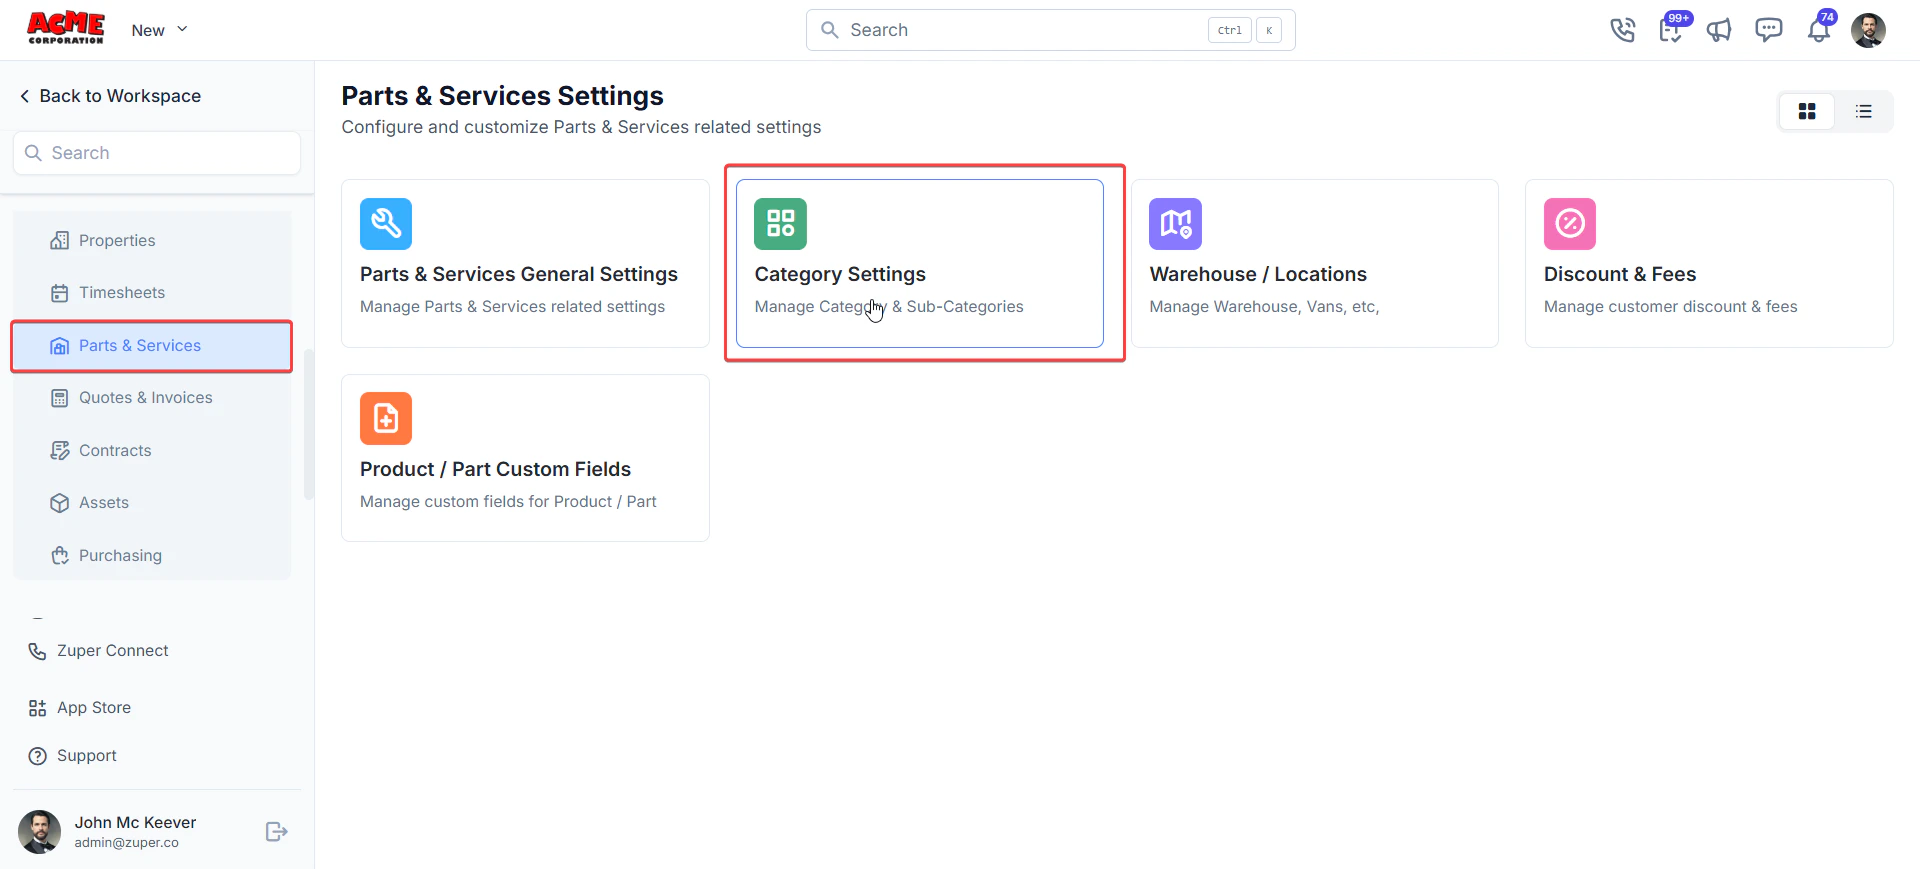
* Choose **Parts & Services** from the module and click “**Category Settings**” to create or manage a category or subcategory.
## Category Settings
The **Category** **Settings** page allows you to organize parts, products, and services into logical groups for better inventory management and assignment to jobs, quotes, invoices, etc.
### Adding a New Category
* Navigate to **Settings** from the left navigation.
* Choose **Parts & Services** from the module and click “**Category Settings**” to create or manage a category or subcategory.
 **To create a new category:**
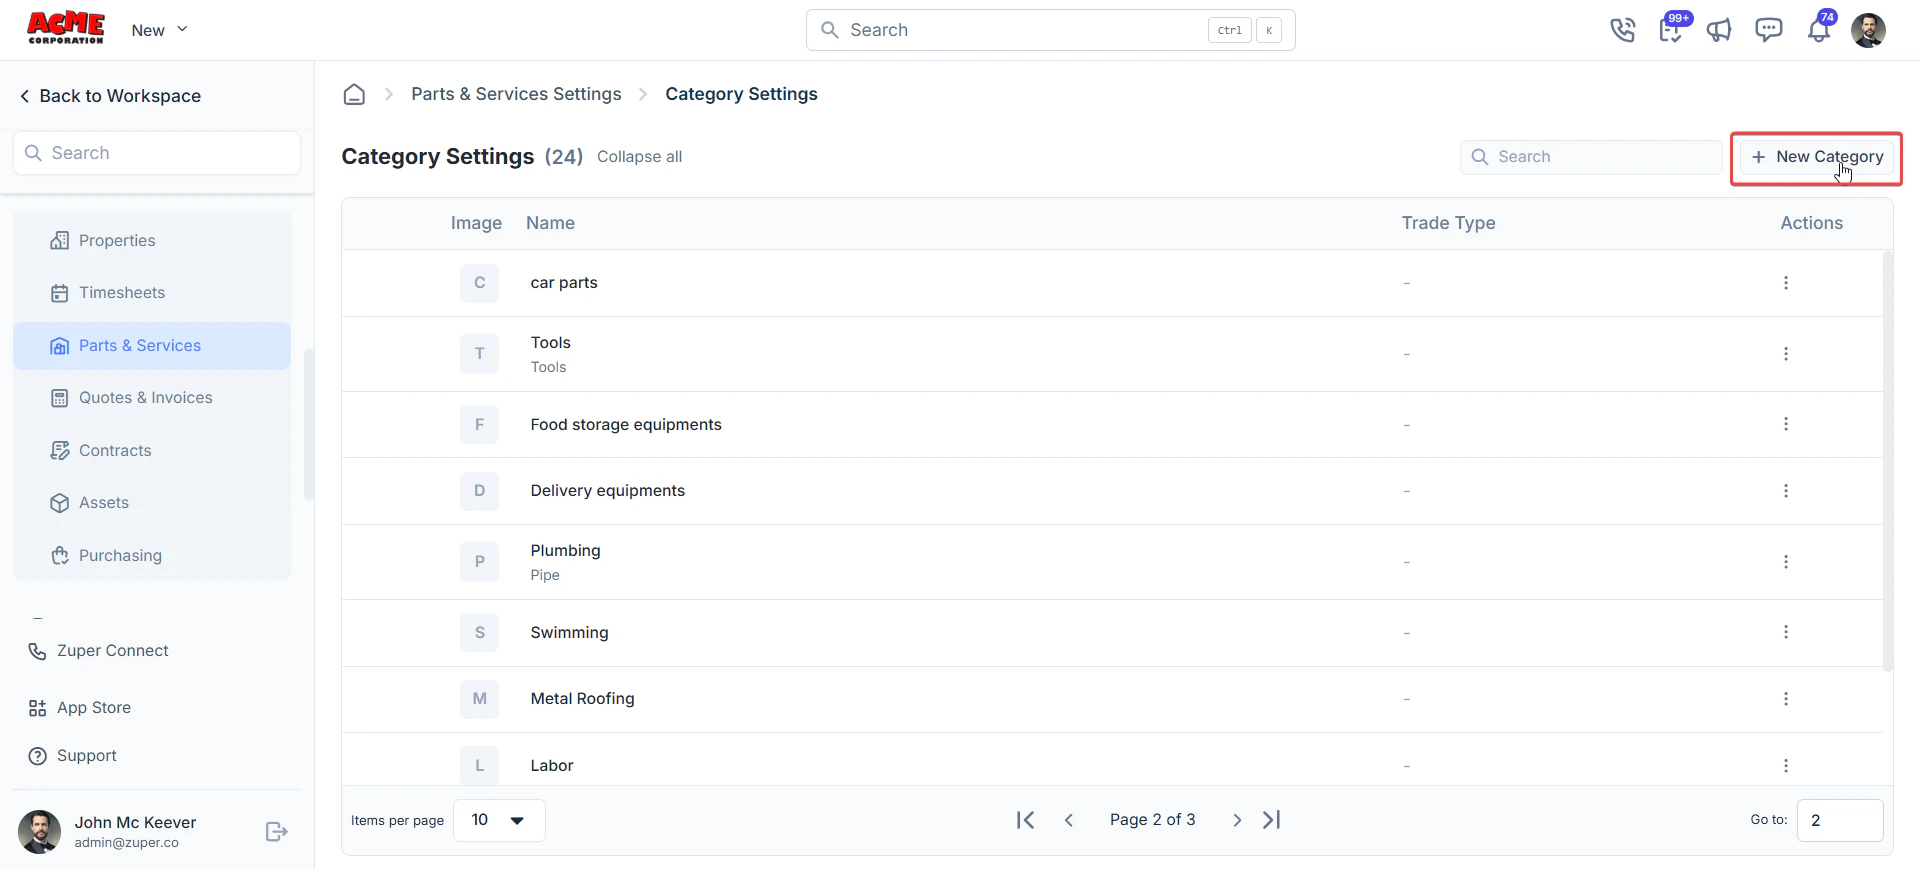
* Click **+ New Category** at the top right.
**To create a new category:**
* Click **+ New Category** at the top right.
 * The **New Category** dialog opens.
* **Category Name**: Enter a unique name.
* **Icon for Product Category**: Upload an image file (optional).
* **Trade Type(s)**: Select one or more trade types from the dropdown (e.g., Plumbing, Electrical, HVAC).
* **Category Description**: Provide a brief description (optional).
* Click **Create** to save the category.
* The **New Category** dialog opens.
* **Category Name**: Enter a unique name.
* **Icon for Product Category**: Upload an image file (optional).
* **Trade Type(s)**: Select one or more trade types from the dropdown (e.g., Plumbing, Electrical, HVAC).
* **Category Description**: Provide a brief description (optional).
* Click **Create** to save the category.
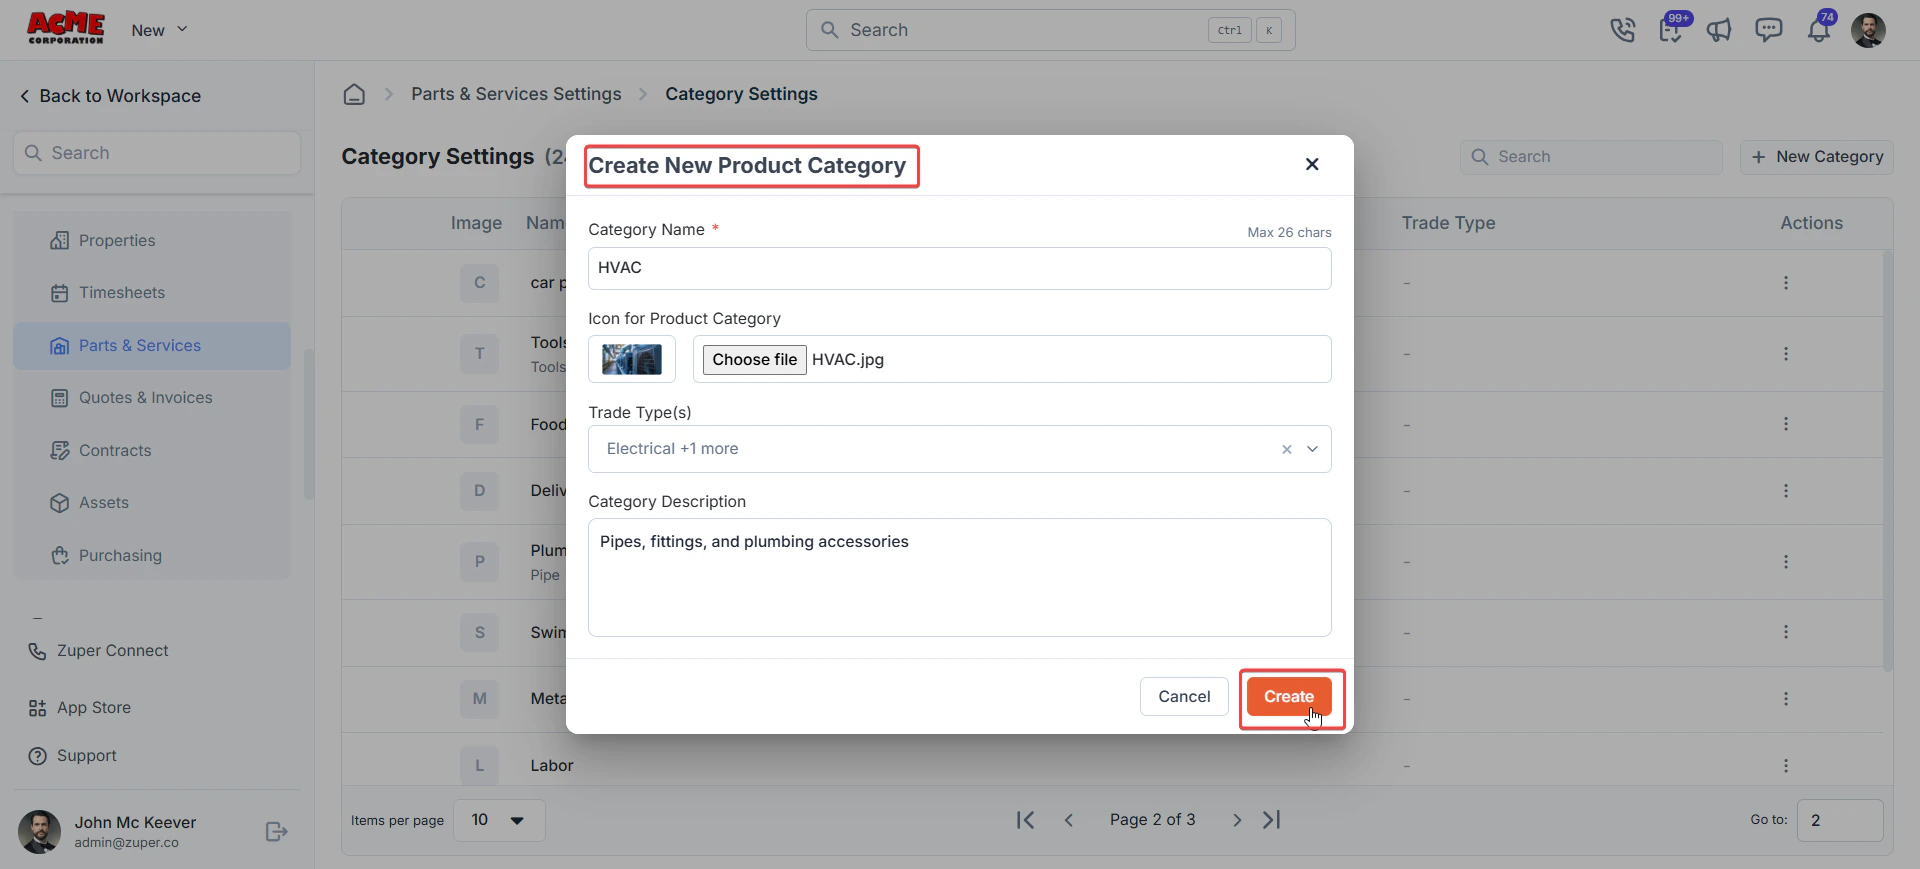 * A new category will be successfully created.
### Adding a New Sub-Category
Sub-Categories allow you to create a second level of classification under a parent category. This is useful when you want to further organize items within a broader category (e.g., “Installation”, “Maintenance”, “Spare Parts” under HVAC).
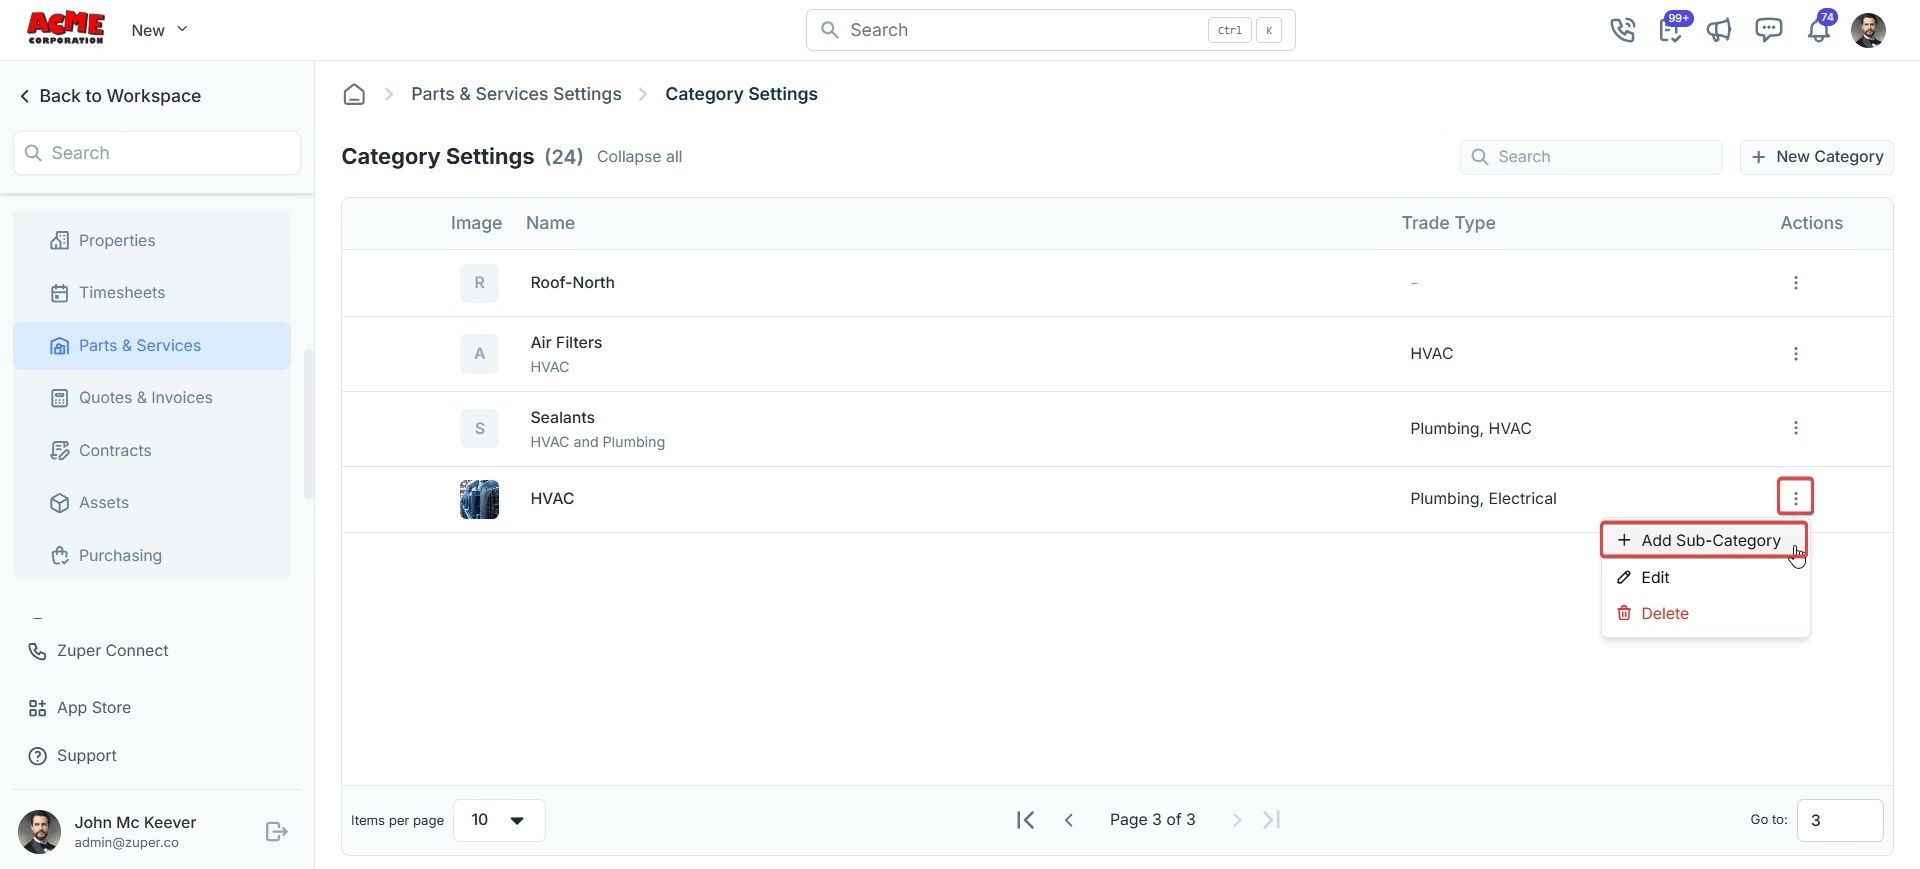
1. In the **Category Settings** listing page, click the **Context** menu for a category and select + **Add Sub-Category**.
* A new category will be successfully created.
### Adding a New Sub-Category
Sub-Categories allow you to create a second level of classification under a parent category. This is useful when you want to further organize items within a broader category (e.g., “Installation”, “Maintenance”, “Spare Parts” under HVAC).
1. In the **Category Settings** listing page, click the **Context** menu for a category and select + **Add Sub-Category**.
 2. In the **New Sub-Category for \[Category Name]** dialog (e.g., New Sub-Category for HVAC):
* **Category Name**: Enter the sub-category name.
* **Icon for Product Category**: Upload an image file (optional).
* **Trade Type(s)**: This will be inherited from the parent category.
* **Category Description**: Provide a brief description (optional).
* Click **Create** to add the sub-category.
2. In the **New Sub-Category for \[Category Name]** dialog (e.g., New Sub-Category for HVAC):
* **Category Name**: Enter the sub-category name.
* **Icon for Product Category**: Upload an image file (optional).
* **Trade Type(s)**: This will be inherited from the parent category.
* **Category Description**: Provide a brief description (optional).
* Click **Create** to add the sub-category.
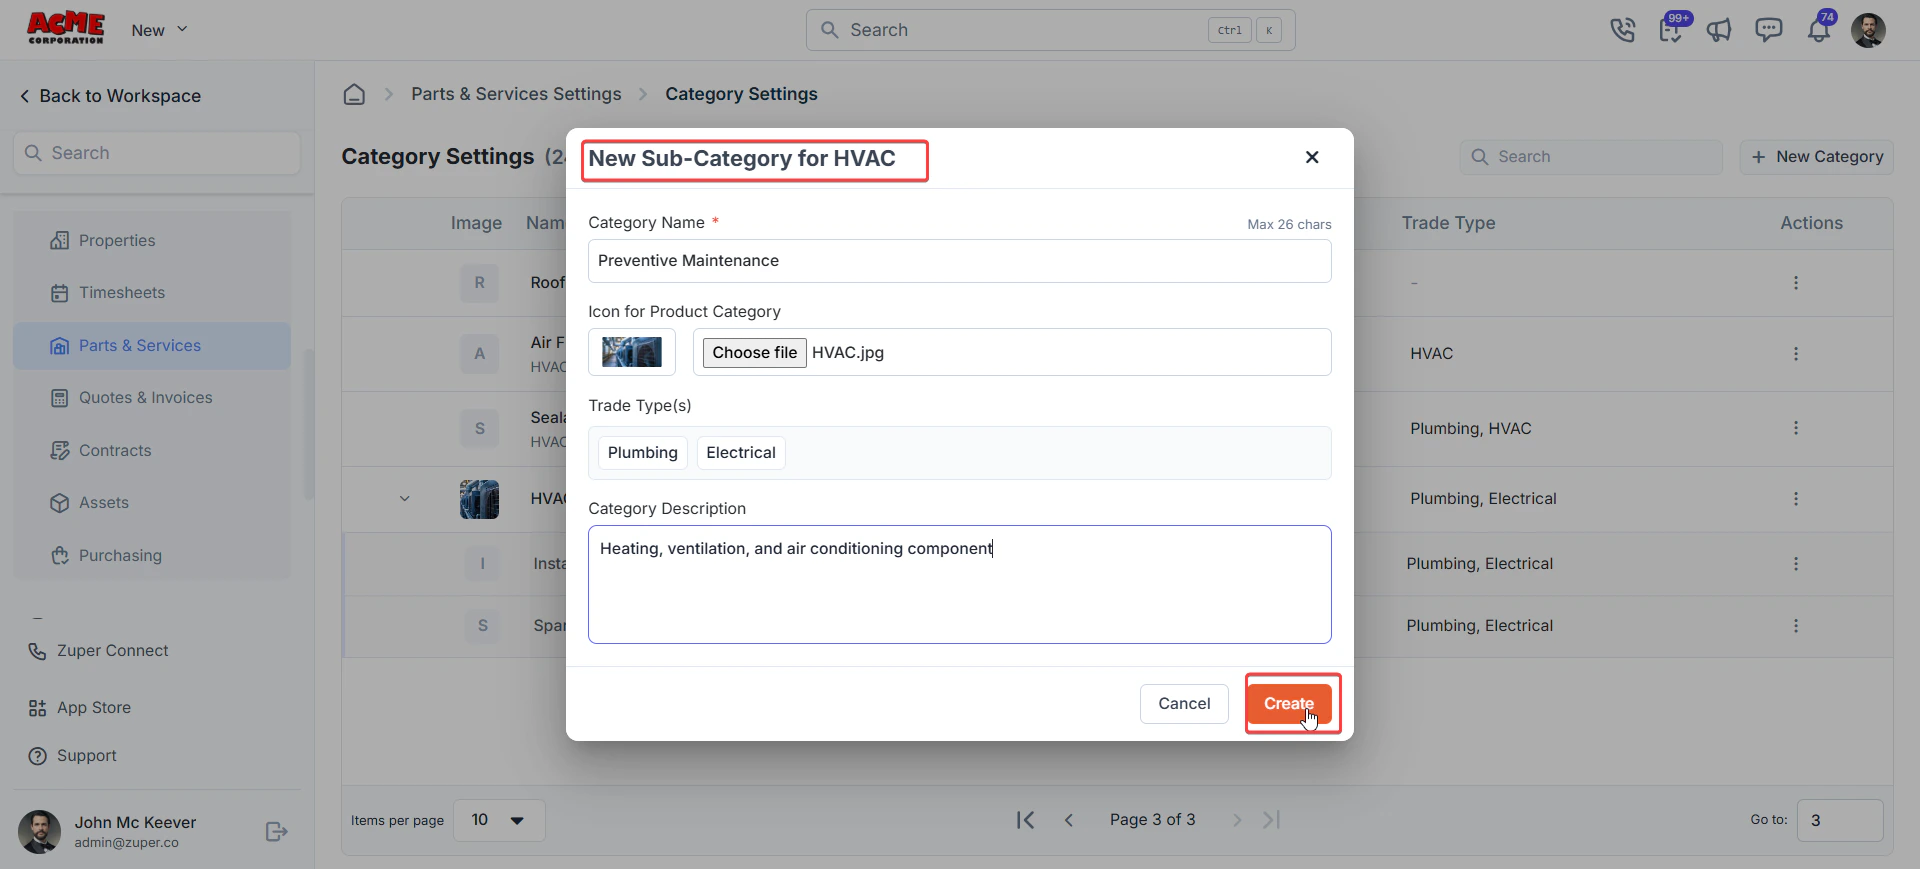 3. The parent category will show a count of sub-categories (e.g., HVAC (1)).
### Managing a category or Sub-Category
After creating categories and sub-categories, you can edit or delete them as your business needs evolve.
3. The parent category will show a count of sub-categories (e.g., HVAC (1)).
### Managing a category or Sub-Category
After creating categories and sub-categories, you can edit or delete them as your business needs evolve.
 #### Editing a Category or Sub-Category
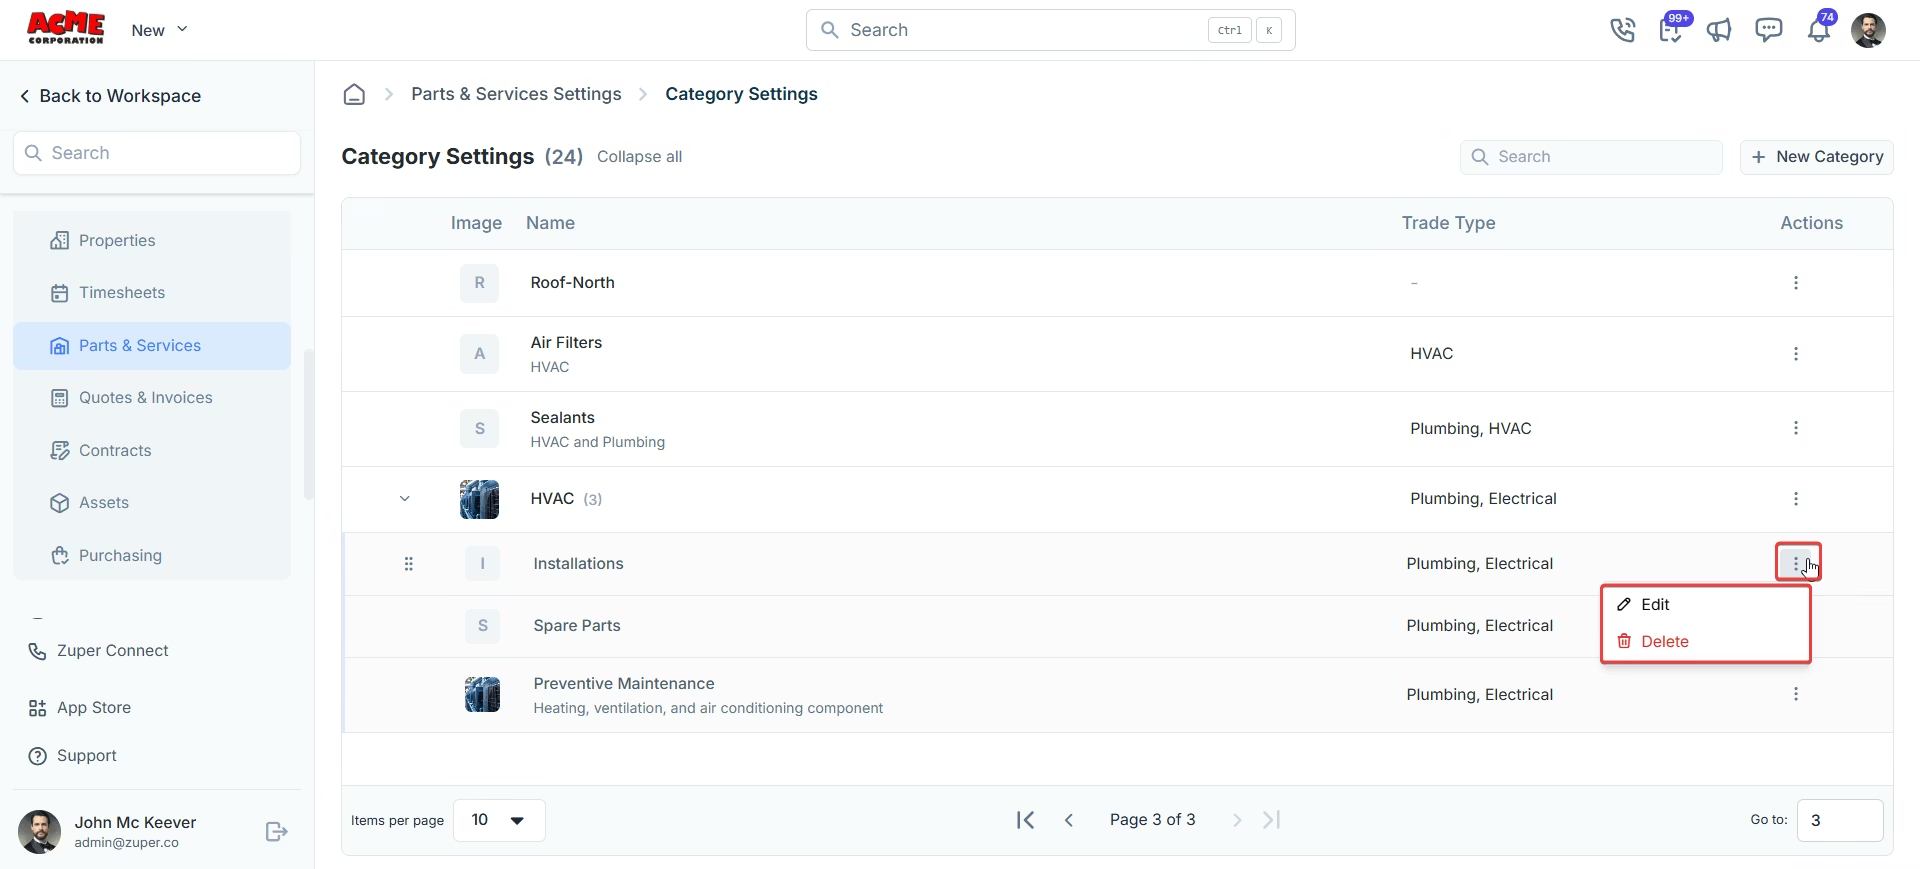
1. On the **Category Settings** page, locate the category or sub-category you want to modify.
2. Click the **context menu** (⋮) and select **Edit**.
3. In the edit dialog, make the necessary changes.
4. Click **Update** to apply changes.
#### Deleting a Category or Sub-Category
1. On the **Category Settings** page, click the **context menu** (three dots ⋮) for the category or sub-category.
2. Select **Delete**.
3. A confirmation dialog appears:
* **If the category has no sub-categories:** Simple confirmation prompt.
* **If the category has sub-categories**: Warning message: “This will also delete \[n] sub-categories.”
4. Review the warning carefully.
Note: Deleting a parent category automatically removes all its sub-categories.
5. If certain, click **Delete**. Otherwise, click **Cancel**.
#### Searching and Filtering Categories
* Use the search bar at the top to filter by name.
* Expand all categories using the **Expand all** link to view sub-categories inline.
* Reorder by dragging and dropping is the preferred location for the subcategory.
## **Parts and services locations**
Locations help organize parts and services tracking for easier management.
**Navigation**: *Settings -> Modules -> Parts & Services -> Parts & Services Locations*
Adding a new location
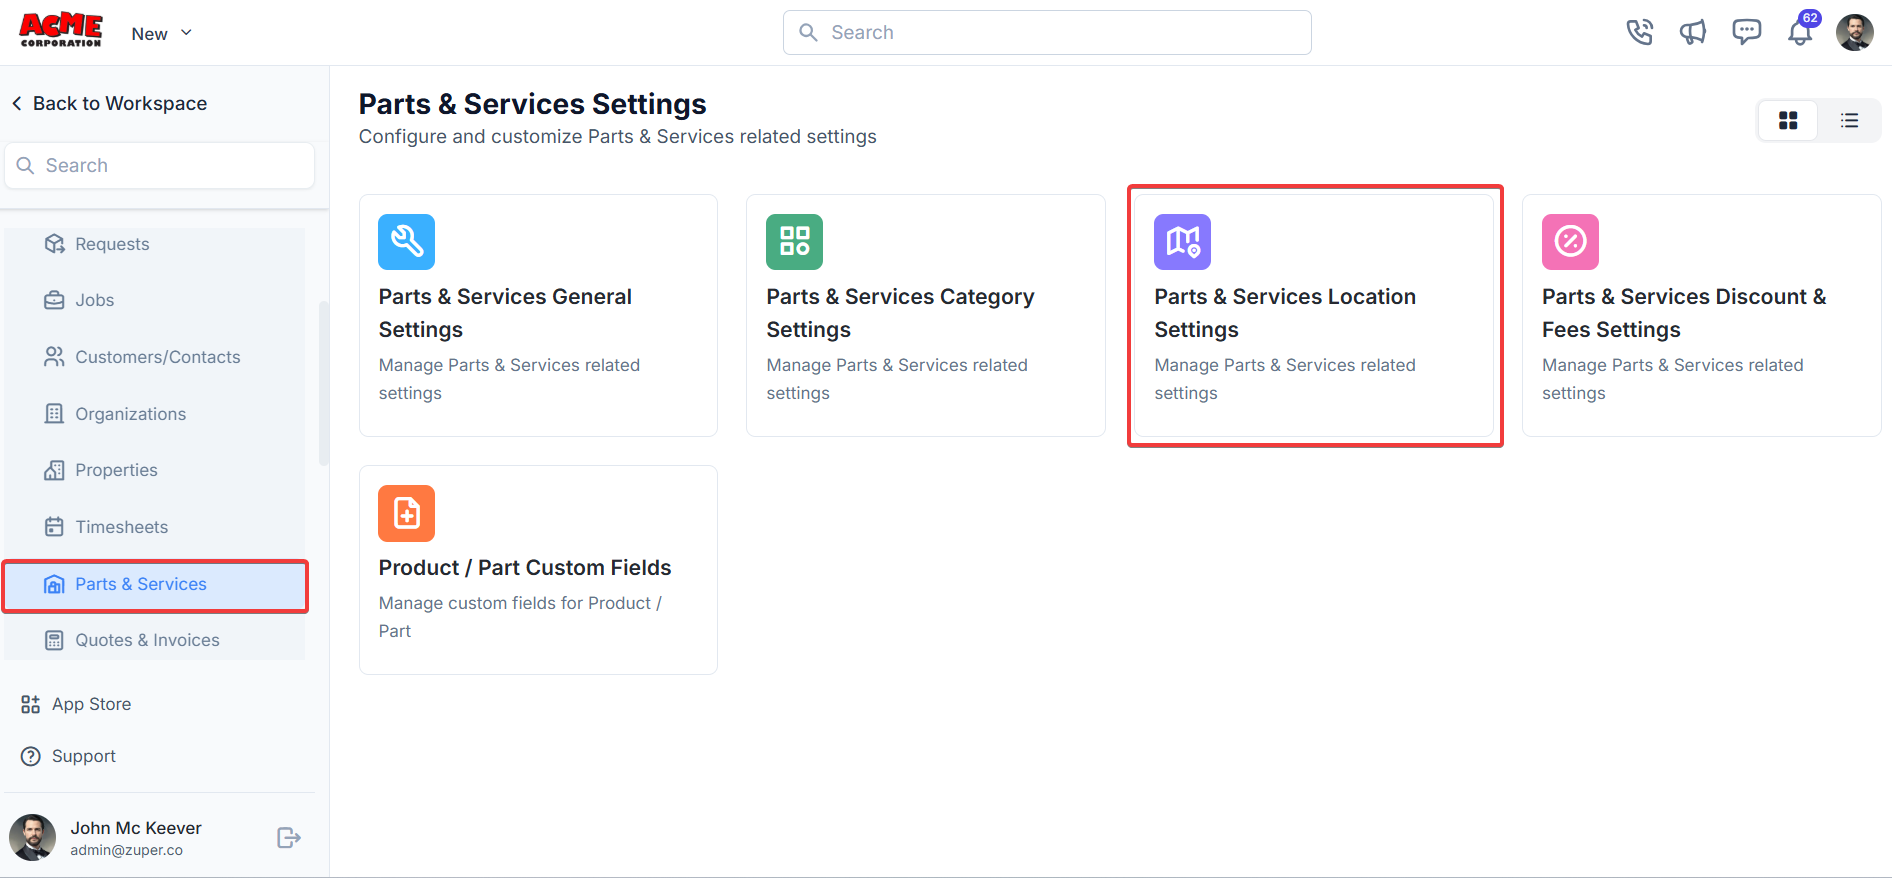
1. Select the “**Settings**” module from the left panel. Under the “**Modules**,” choose the “**Parts & Services**.” Select the “**Parts & Services Location Settings**.”
#### Editing a Category or Sub-Category
1. On the **Category Settings** page, locate the category or sub-category you want to modify.
2. Click the **context menu** (⋮) and select **Edit**.
3. In the edit dialog, make the necessary changes.
4. Click **Update** to apply changes.
#### Deleting a Category or Sub-Category
1. On the **Category Settings** page, click the **context menu** (three dots ⋮) for the category or sub-category.
2. Select **Delete**.
3. A confirmation dialog appears:
* **If the category has no sub-categories:** Simple confirmation prompt.
* **If the category has sub-categories**: Warning message: “This will also delete \[n] sub-categories.”
4. Review the warning carefully.
Note: Deleting a parent category automatically removes all its sub-categories.
5. If certain, click **Delete**. Otherwise, click **Cancel**.
#### Searching and Filtering Categories
* Use the search bar at the top to filter by name.
* Expand all categories using the **Expand all** link to view sub-categories inline.
* Reorder by dragging and dropping is the preferred location for the subcategory.
## **Parts and services locations**
Locations help organize parts and services tracking for easier management.
**Navigation**: *Settings -> Modules -> Parts & Services -> Parts & Services Locations*
Adding a new location
1. Select the “**Settings**” module from the left panel. Under the “**Modules**,” choose the “**Parts & Services**.” Select the “**Parts & Services Location Settings**.”
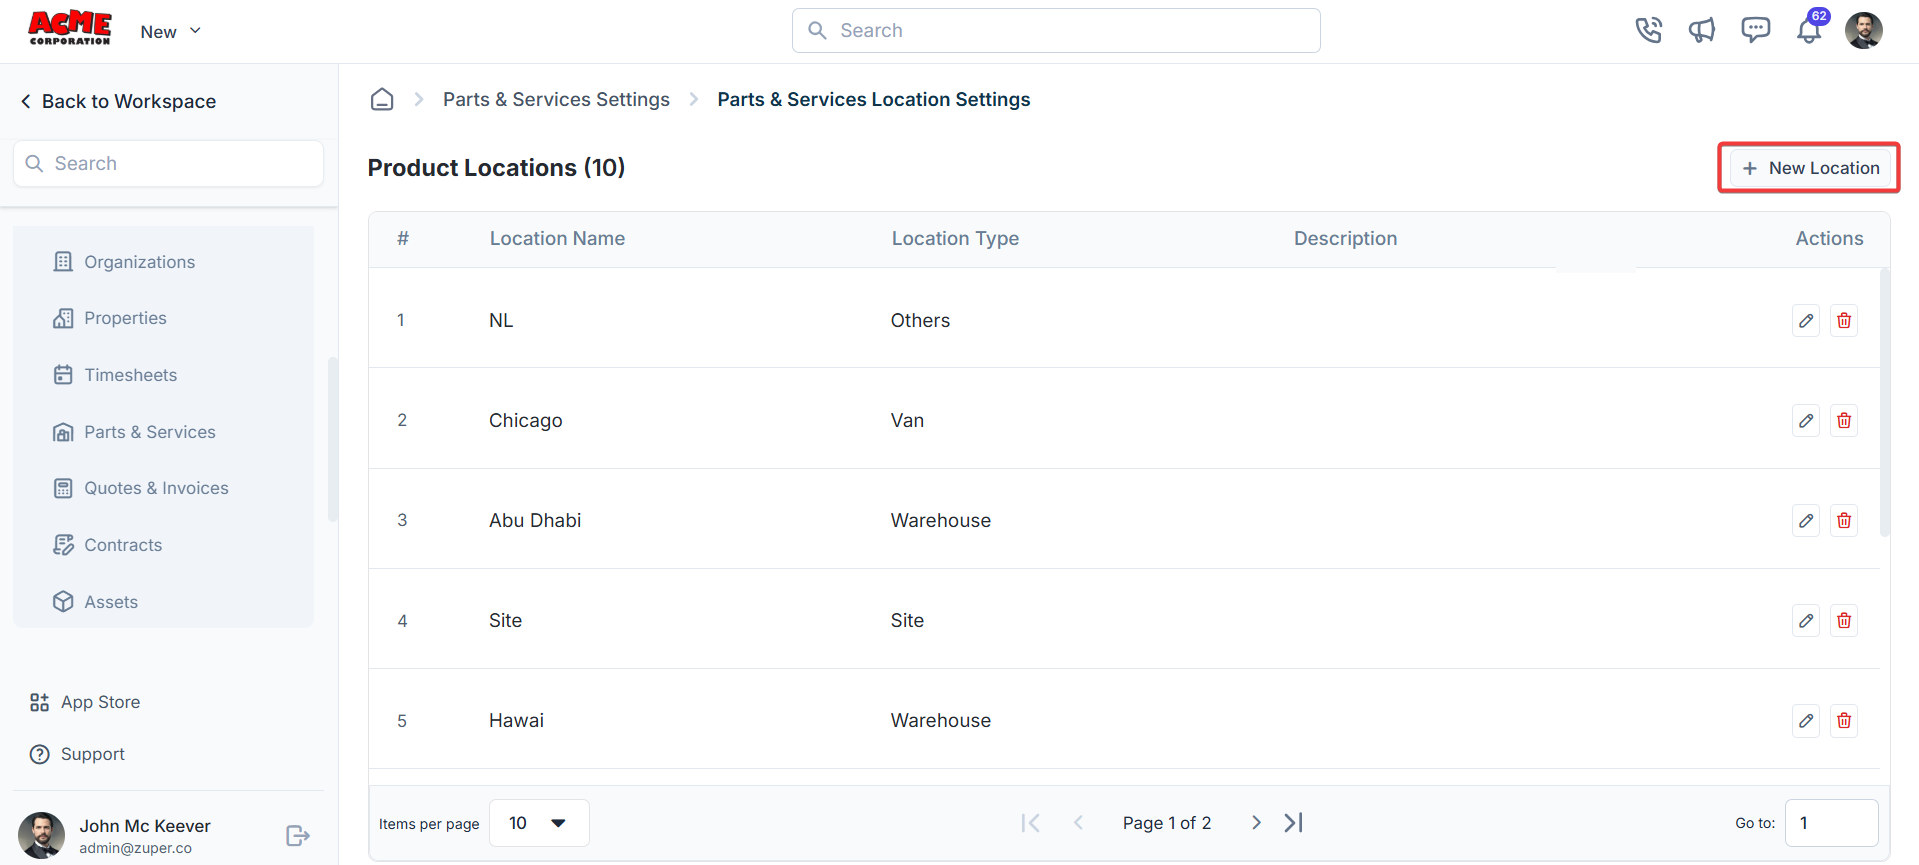
 2. Click the + New Location button.
 3. Fill in the following details.
* Location Name (Mandatory): Enter a name for the location. Maximum 26 characters.
* Location Type ( Mandatory): Select from the dropdown (Site, Warehouse, Van, Others).
* Can FE access this location? (Mandatory): Choose an option
* Location Description: Add a brief description.
* Address: Use “**Pick from map**” to select an address. A map preview will display the selected location.
* Street Address ( Mandatory): Automatically filled based on the selected address but can be edited.
* Landmark: Add a nearby landmark (optional).
* City (required): Automatically filled but editable.
* State/Province: Automatically filled but editable.
* ZIP code: Automatically filled but editable.
3. Fill in the following details.
* Location Name (Mandatory): Enter a name for the location. Maximum 26 characters.
* Location Type ( Mandatory): Select from the dropdown (Site, Warehouse, Van, Others).
* Can FE access this location? (Mandatory): Choose an option
* Location Description: Add a brief description.
* Address: Use “**Pick from map**” to select an address. A map preview will display the selected location.
* Street Address ( Mandatory): Automatically filled based on the selected address but can be edited.
* Landmark: Add a nearby landmark (optional).
* City (required): Automatically filled but editable.
* State/Province: Automatically filled but editable.
* ZIP code: Automatically filled but editable.
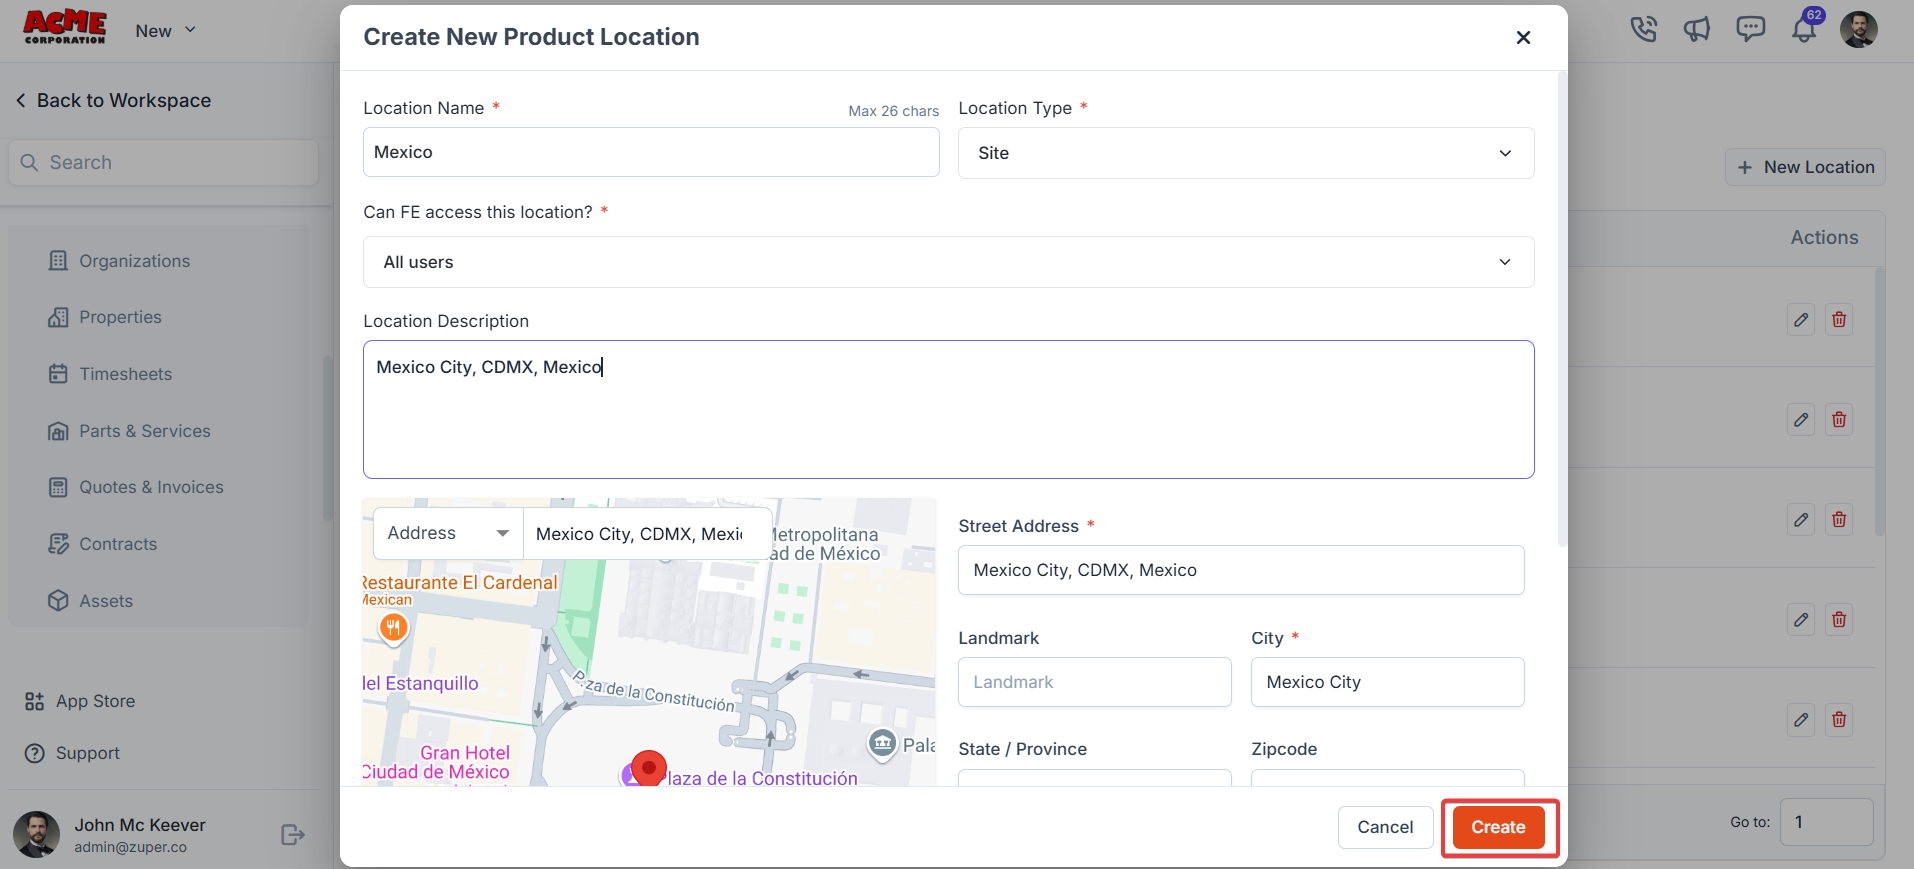 * Click **Create** to save the location.
## Discount and fees
**Navigation**: *Settings -> Modules -> Parts & Services -> Parts & Services Discount & Fees*
Zuper makes it easy to manage discounts and fees, helping you customize pricing for your customers while ensuring accurate billing.
**Adding a new discount/fees**
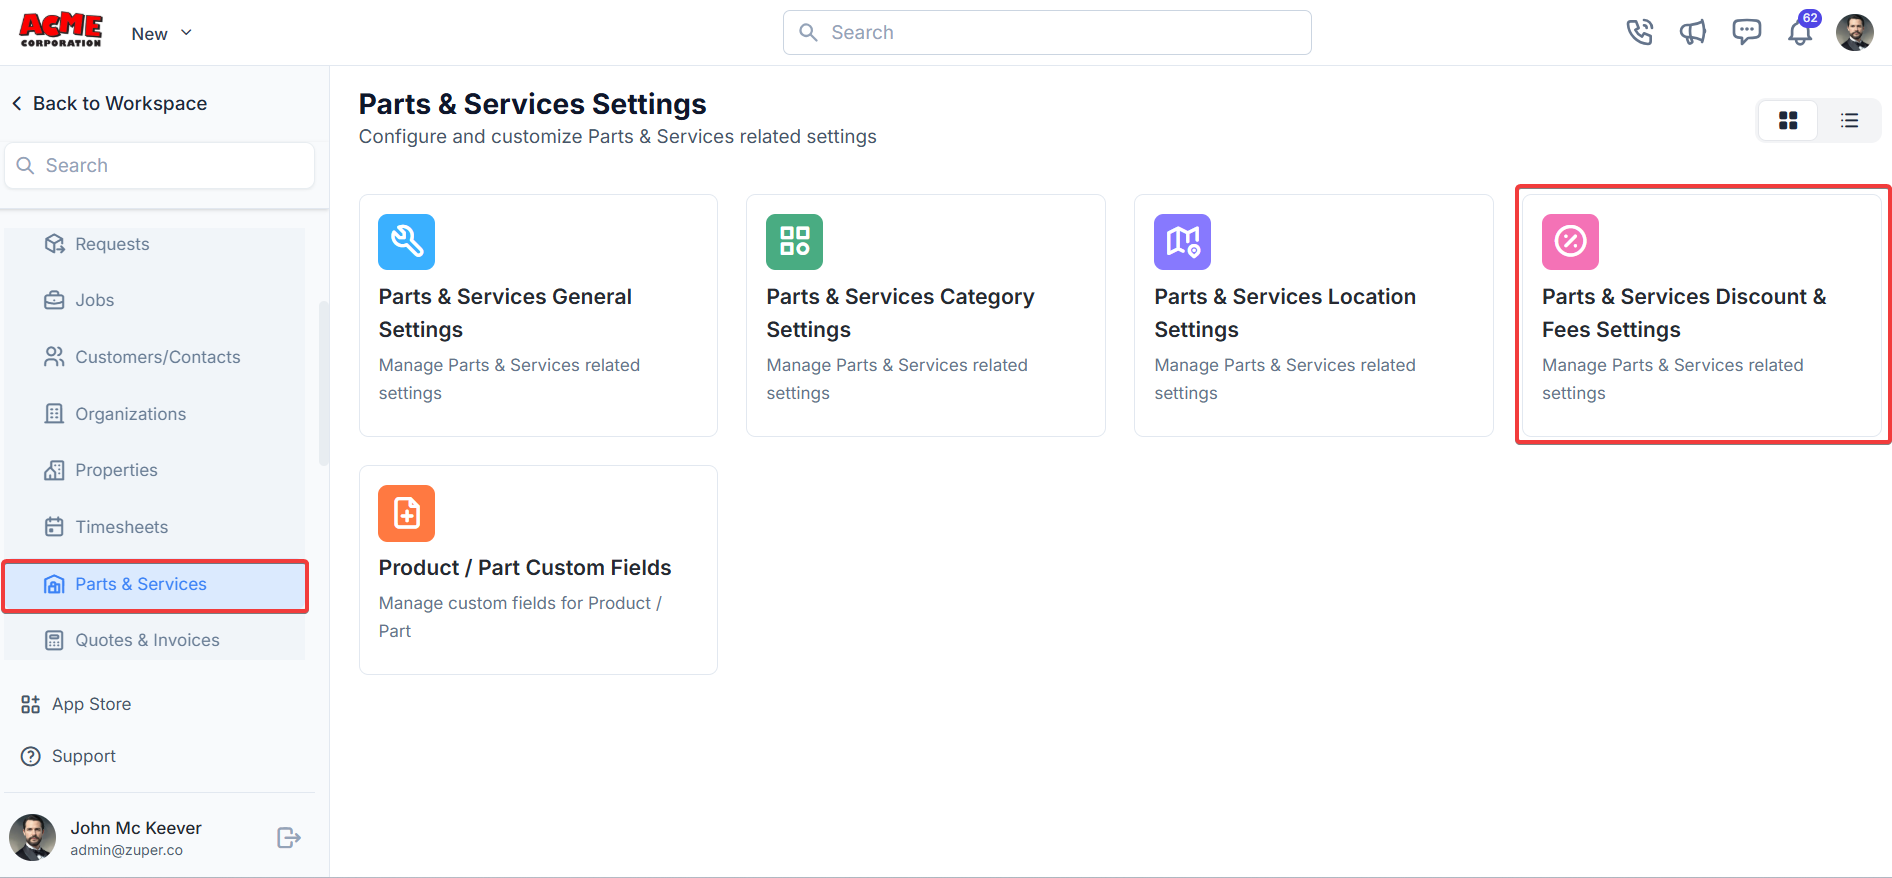
1. Select the “**Settings**” module from the left panel. Under the “**Modules**,” choose the “**Parts & Services**.” Select the “**Parts & Services Discount & Fees Settings**.”
* Click **Create** to save the location.
## Discount and fees
**Navigation**: *Settings -> Modules -> Parts & Services -> Parts & Services Discount & Fees*
Zuper makes it easy to manage discounts and fees, helping you customize pricing for your customers while ensuring accurate billing.
**Adding a new discount/fees**
1. Select the “**Settings**” module from the left panel. Under the “**Modules**,” choose the “**Parts & Services**.” Select the “**Parts & Services Discount & Fees Settings**.”
 2. Click the **+ New Discount/Fee**.
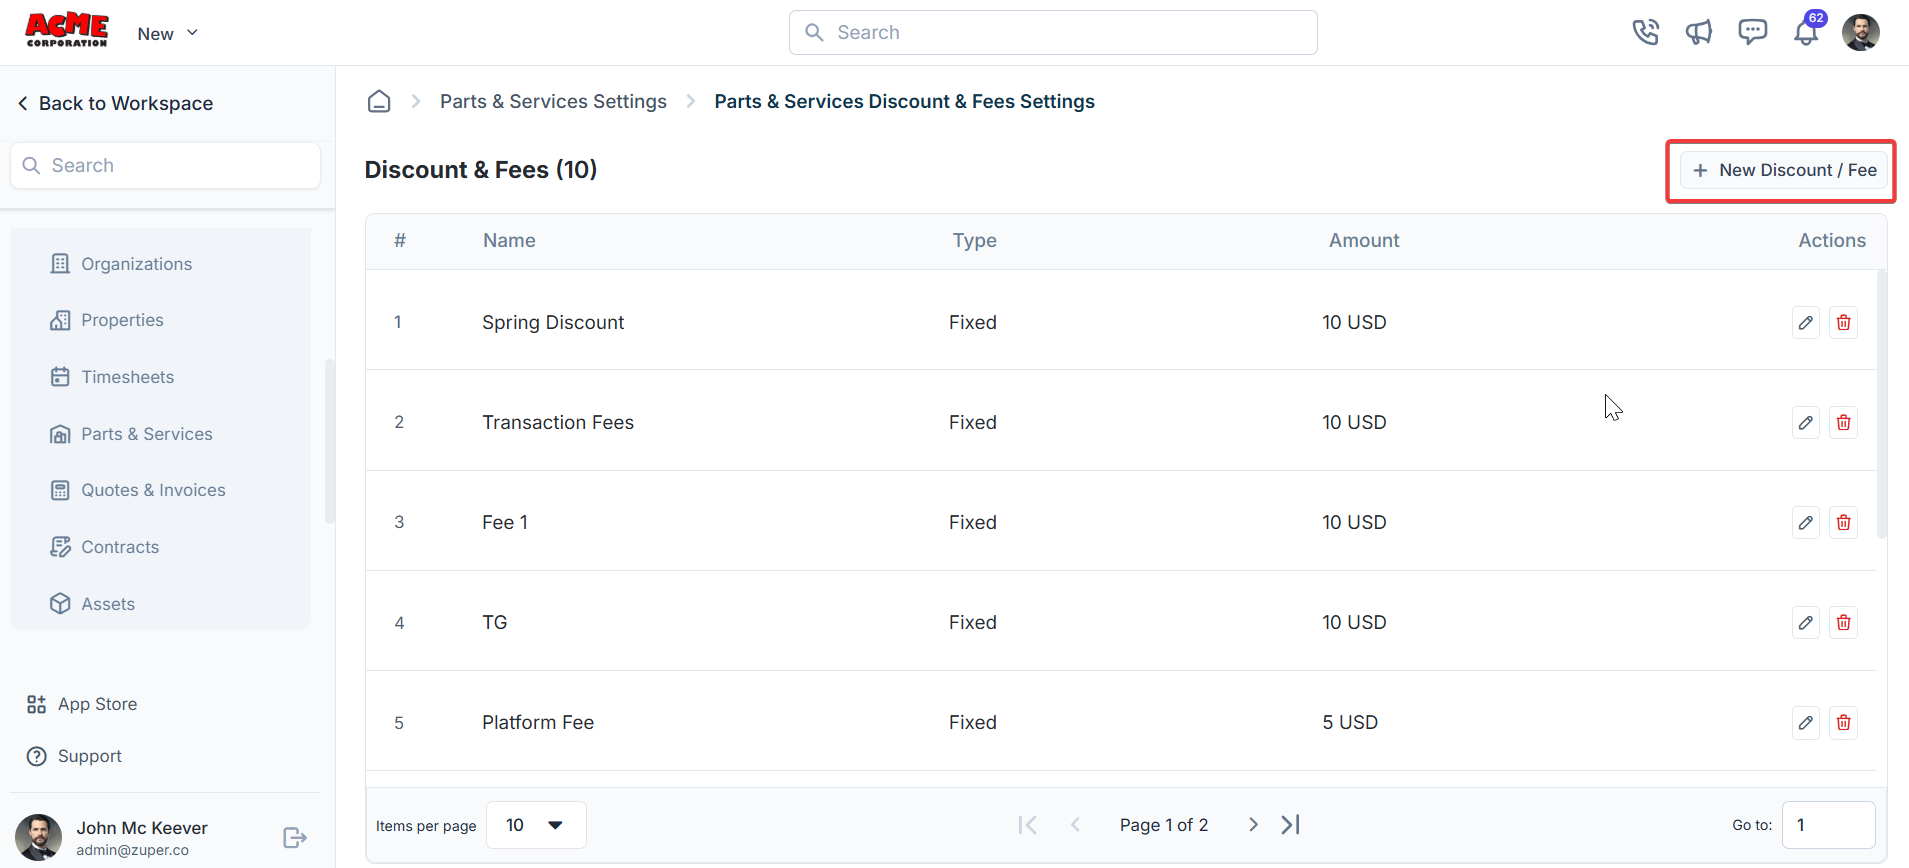 3. Enter the discount/fee details.
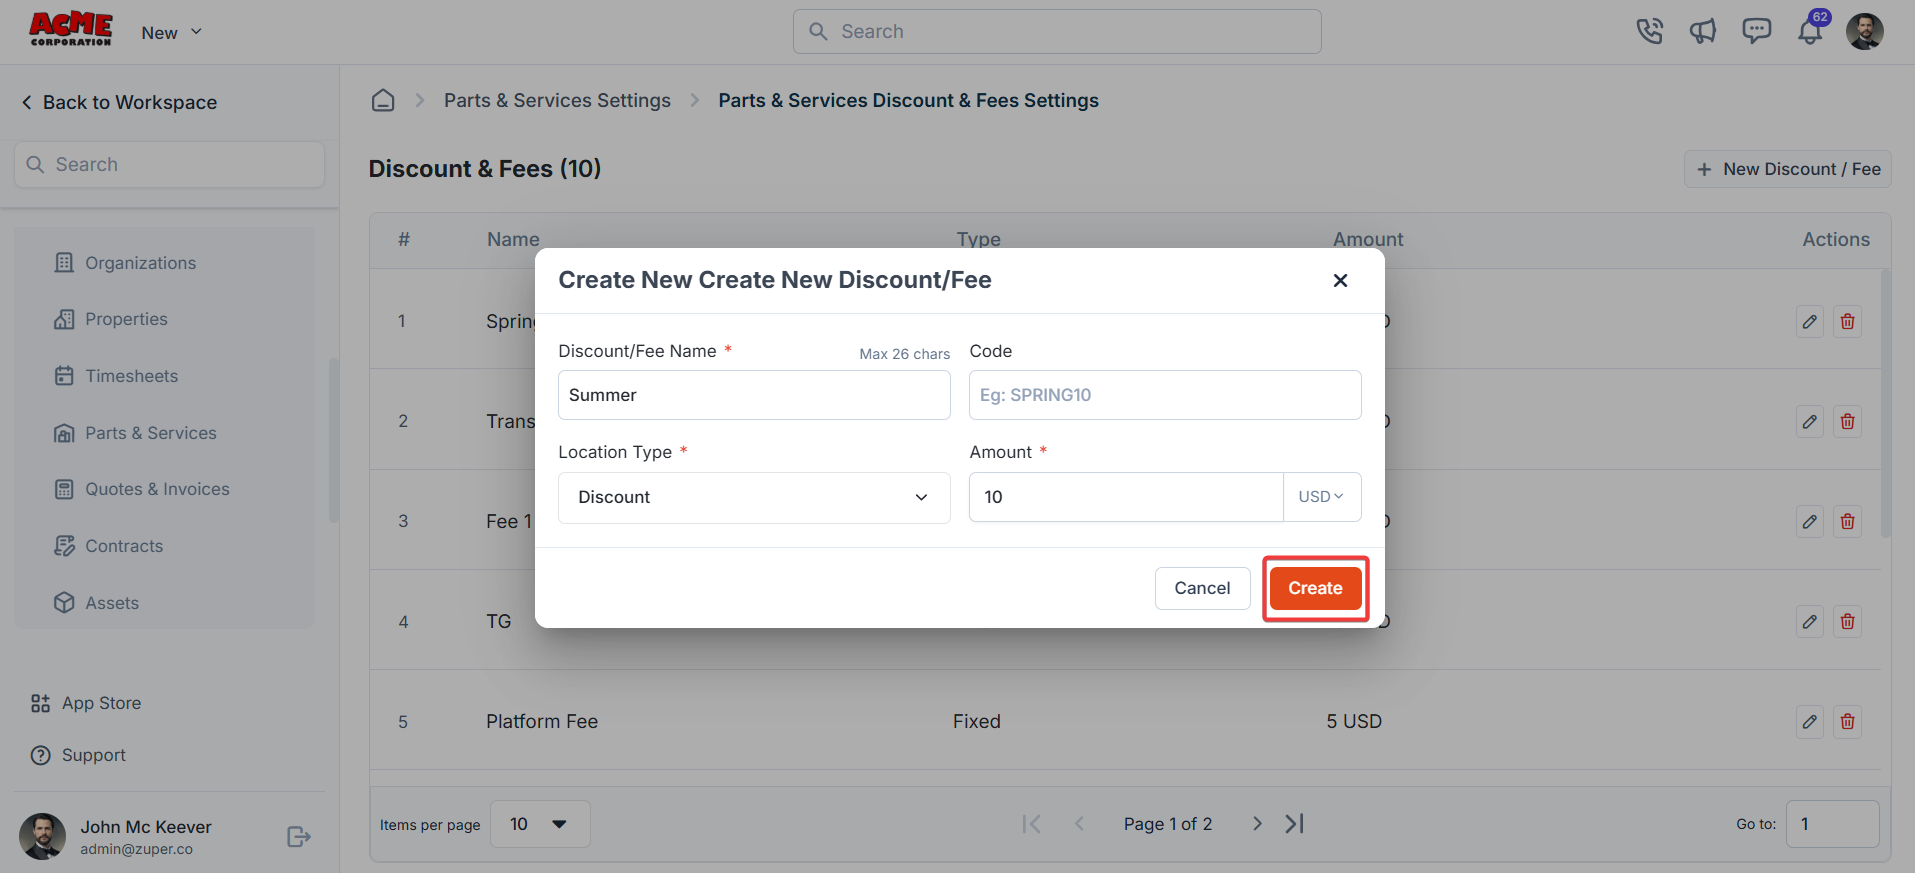
* Name: Enter a name for the discount.
* Code: An optional field that is used for redemption.
* Type: Choose the discount type. This can be either % or a flat amount. Percentage: Set a percentage (for instance, 10%). Fixed Amount: Set a flat amount (for instance, \$50).
4. Click **Create** to create the discount.
3. Enter the discount/fee details.
* Name: Enter a name for the discount.
* Code: An optional field that is used for redemption.
* Type: Choose the discount type. This can be either % or a flat amount. Percentage: Set a percentage (for instance, 10%). Fixed Amount: Set a flat amount (for instance, \$50).
4. Click **Create** to create the discount.
 ## **Product - parts custom fields**
**Navigation**: *Settings -> Modules -> Parts & Services - > Parts & Services Custom Fields*
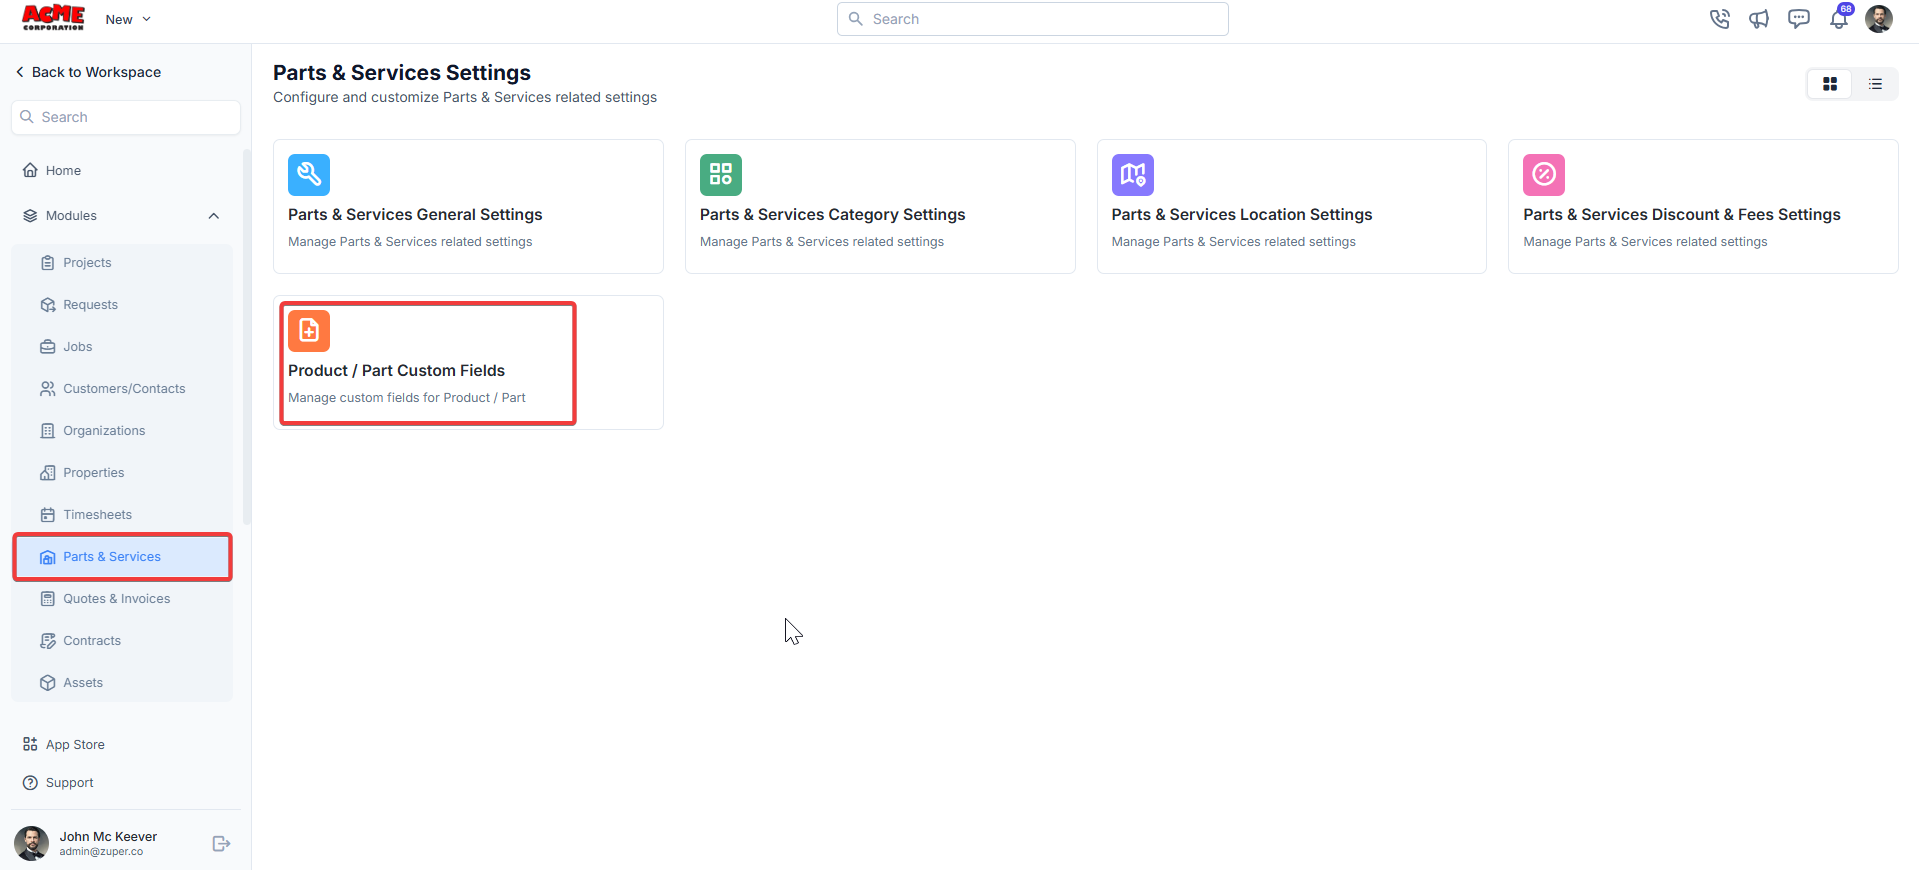
1. Select the "**Settings**" module from the left panel. Under the "**Modules**," choose the "**Parts & Services**" Select the "**Parts & Services Custom Fields**."
## **Product - parts custom fields**
**Navigation**: *Settings -> Modules -> Parts & Services - > Parts & Services Custom Fields*
1. Select the "**Settings**" module from the left panel. Under the "**Modules**," choose the "**Parts & Services**" Select the "**Parts & Services Custom Fields**."
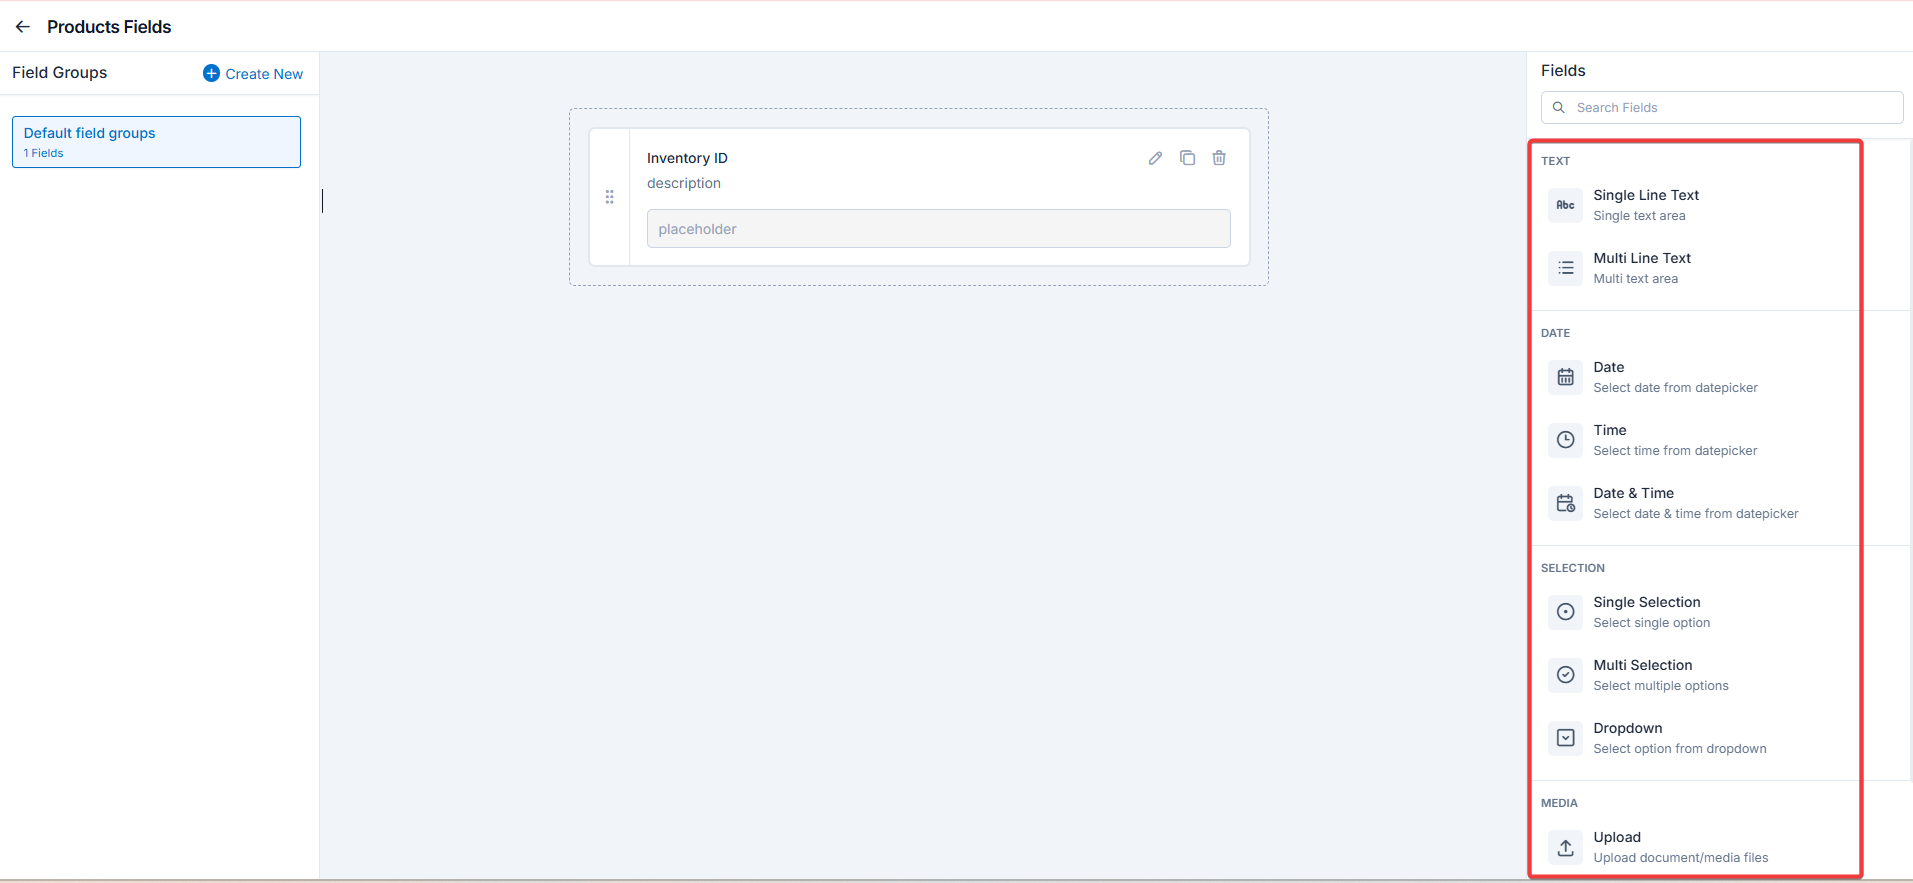
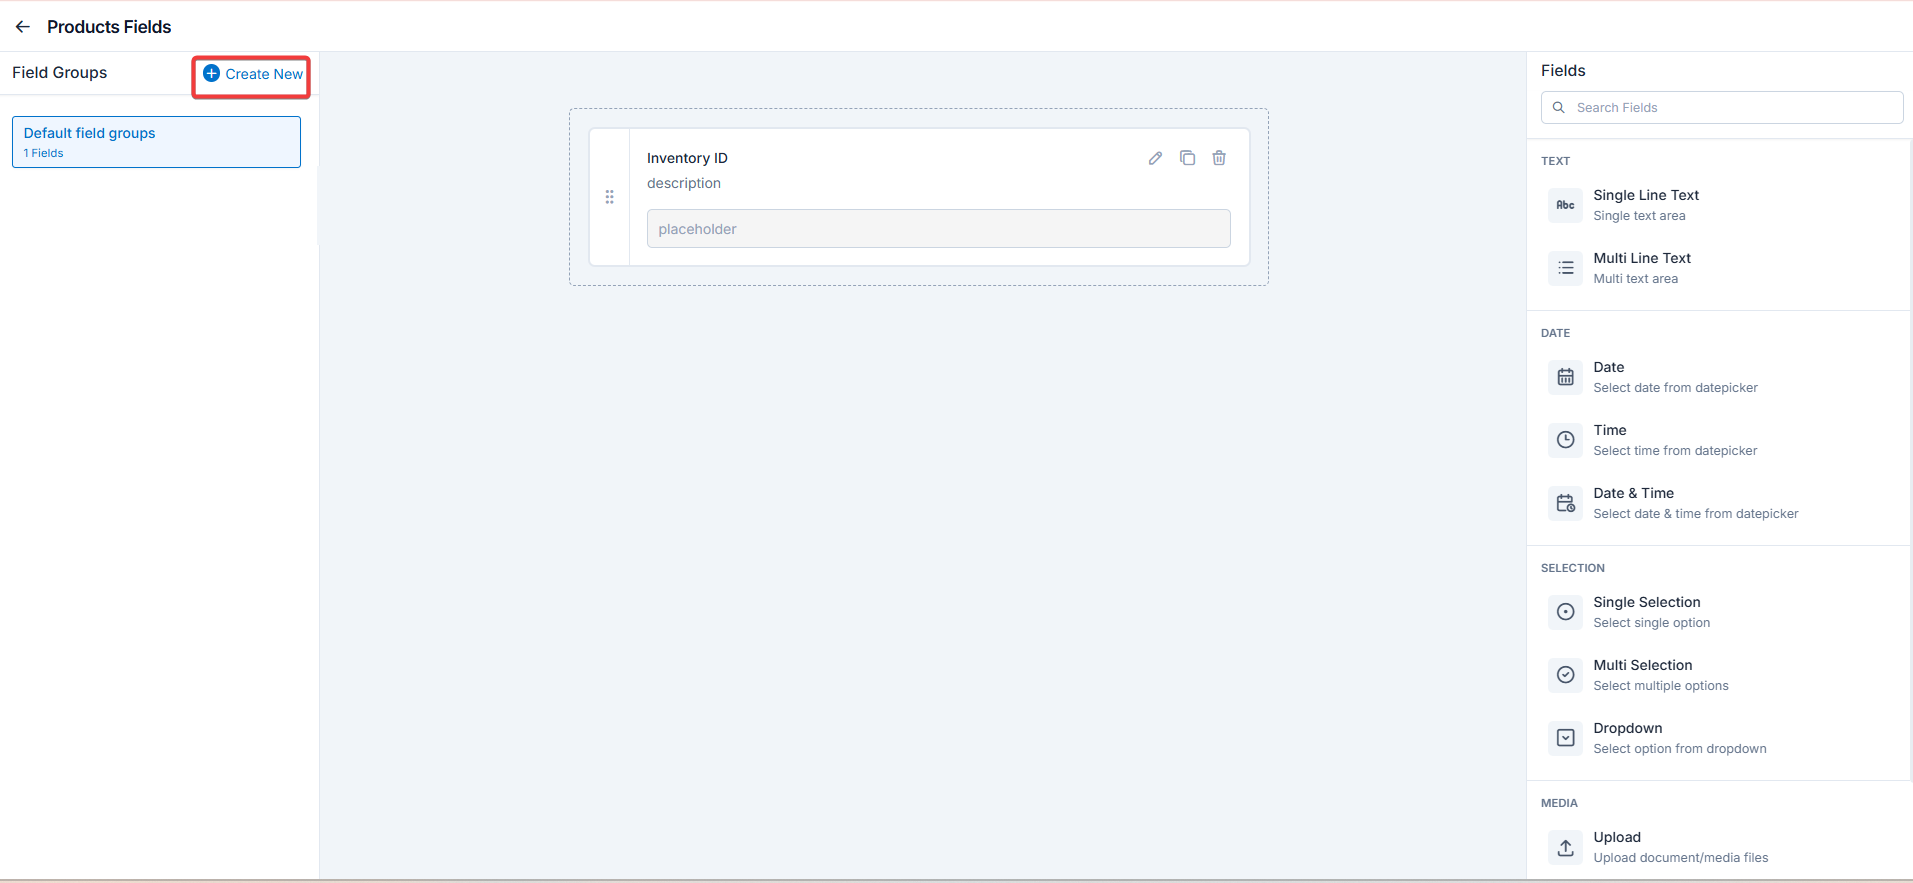
 * Single-Line Input: This allows you to create a field to enter a single line of free text.
* Multi-Line Input: This allows you to create a field to enter multiple lines of free text.
* Date Input: This allows you to create a field to select a specific date from a calendar.
* Time Input: This allows you to create a field where you can select a specific time.
* Date Time Input: This allows you to create a field where both date and time can be selected.
* Single-Selection: This allows you to create a radio input Field where one of the provided options can be selected.
* Multi-Selection: This allows you to create check boxes where the provided options can be checked.
* Drop-Down: This allows you to create a drop-down field with the required list of options.
* Upload: This allows you to create a file input field to upload files.
* **Look up** : This allows you to create a file input field to look up the products from the parts and services module.
* Single-Line Input: This allows you to create a field to enter a single line of free text.
* Multi-Line Input: This allows you to create a field to enter multiple lines of free text.
* Date Input: This allows you to create a field to select a specific date from a calendar.
* Time Input: This allows you to create a field where you can select a specific time.
* Date Time Input: This allows you to create a field where both date and time can be selected.
* Single-Selection: This allows you to create a radio input Field where one of the provided options can be selected.
* Multi-Selection: This allows you to create check boxes where the provided options can be checked.
* Drop-Down: This allows you to create a drop-down field with the required list of options.
* Upload: This allows you to create a file input field to upload files.
* **Look up** : This allows you to create a file input field to look up the products from the parts and services module.
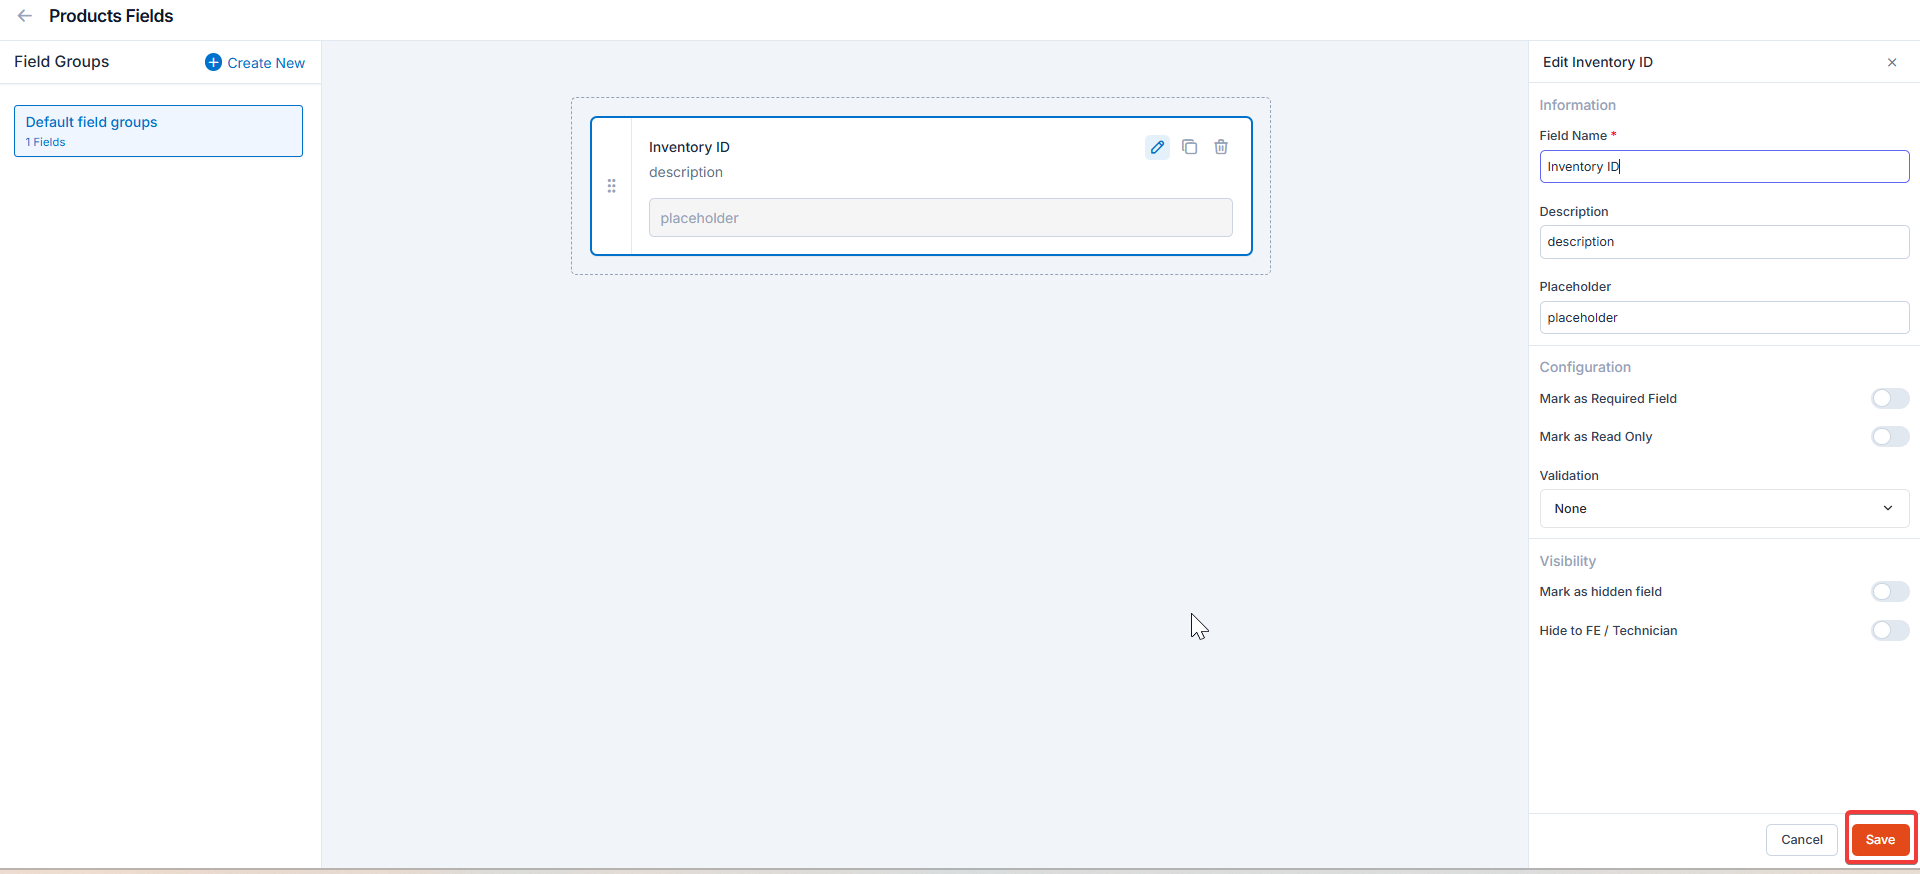 Note: You can also control the behavior and visibility of each field using the following options:
* Mark as Required Field - Makes the field mandatory to fill out before submitting the form.
* Mark as Read Only—This option makes the field non-editable; users can view the value but cannot modify it.
* Mark as hidden field- This hides the field from all users; it will not appear in the form interface.
* Hide to FE/Technician- This option makes the field invisible to technicians or front-end users during form access.
2. Click “**Create New**” to create the “**Custom Field**” group.
Note: You can also control the behavior and visibility of each field using the following options:
* Mark as Required Field - Makes the field mandatory to fill out before submitting the form.
* Mark as Read Only—This option makes the field non-editable; users can view the value but cannot modify it.
* Mark as hidden field- This hides the field from all users; it will not appear in the form interface.
* Hide to FE/Technician- This option makes the field invisible to technicians or front-end users during form access.
2. Click “**Create New**” to create the “**Custom Field**” group.
 Zuper’s Parts and Services settings let you manage your inventory and offerings effortlessly, ensuring accurate pricing and availability.