### General tab
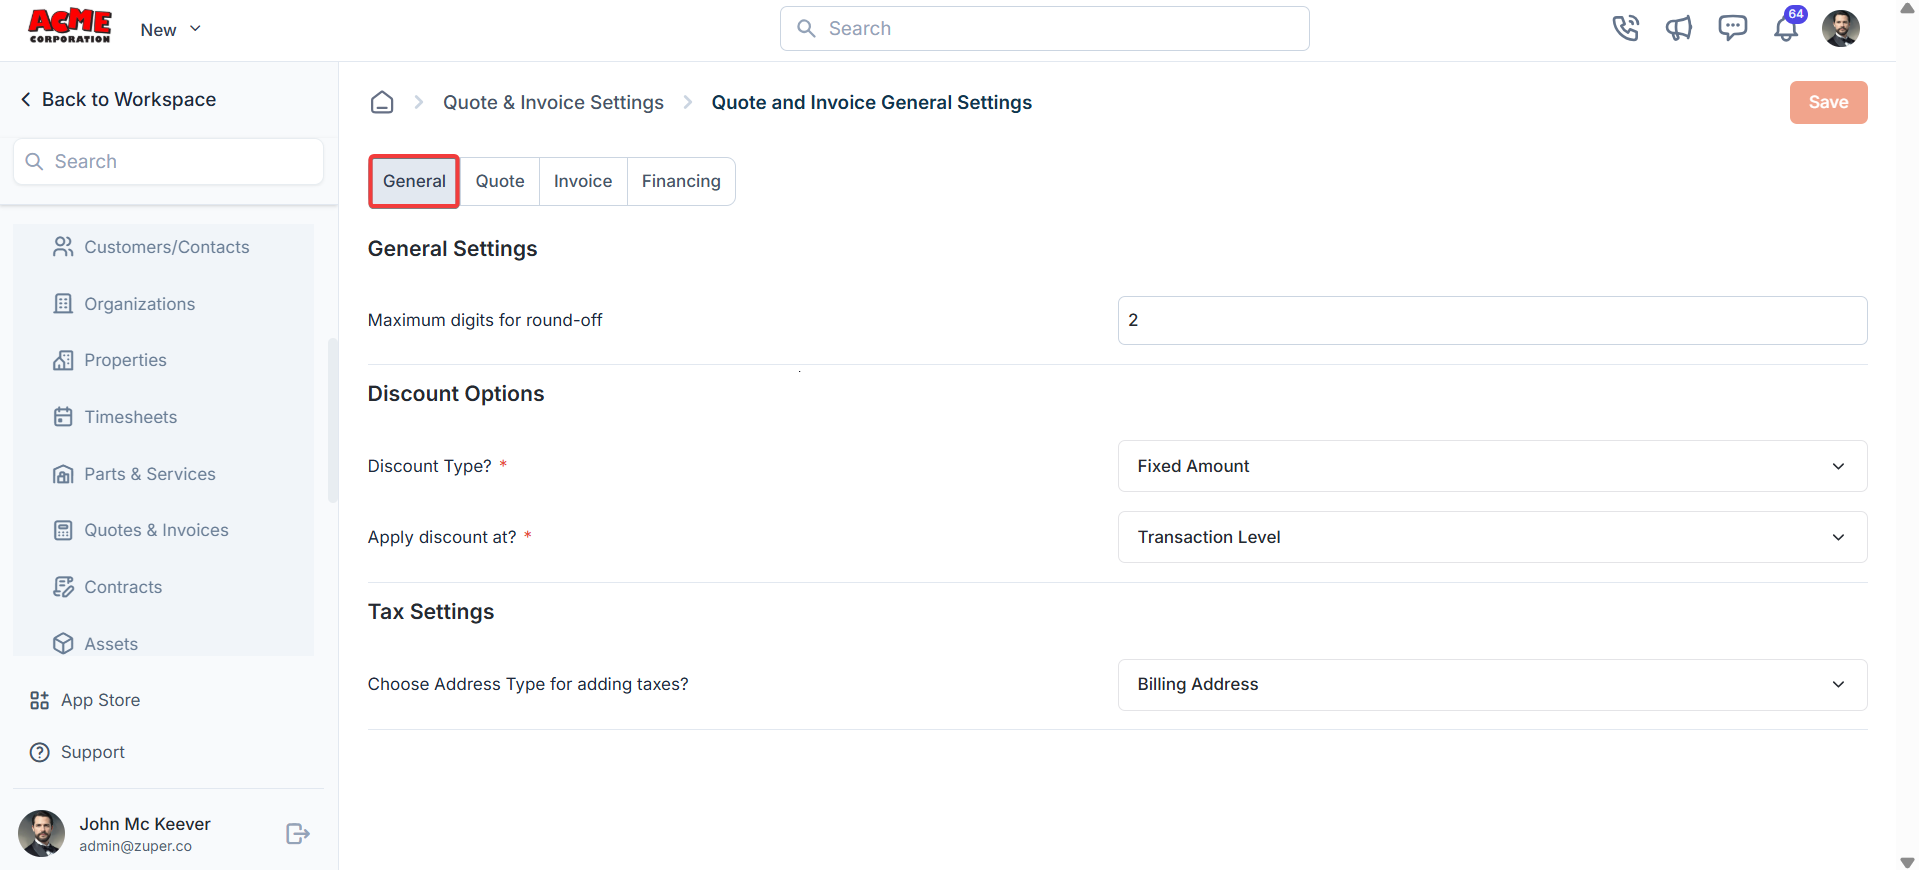
The General tab allows you to configure settings for quotes and invoices.
* Maximum Digits for Round-off: Set the number of decimal places for rounding off amounts.
**Discount Options:**
* Discount Type: Choose the default discount type (Fixed Amount or Percentage).
* Apply Discount at: Select the level at which discounts are applied (Transaction Level or Line-Item Level).
**Tax Settings:**
* Choose Address Type for Adding Taxes: Specify which address type to use for tax calculations (Billing Address or Service Address).
### General tab
The General tab allows you to configure settings for quotes and invoices.
* Maximum Digits for Round-off: Set the number of decimal places for rounding off amounts.
**Discount Options:**
* Discount Type: Choose the default discount type (Fixed Amount or Percentage).
* Apply Discount at: Select the level at which discounts are applied (Transaction Level or Line-Item Level).
**Tax Settings:**
* Choose Address Type for Adding Taxes: Specify which address type to use for tax calculations (Billing Address or Service Address).
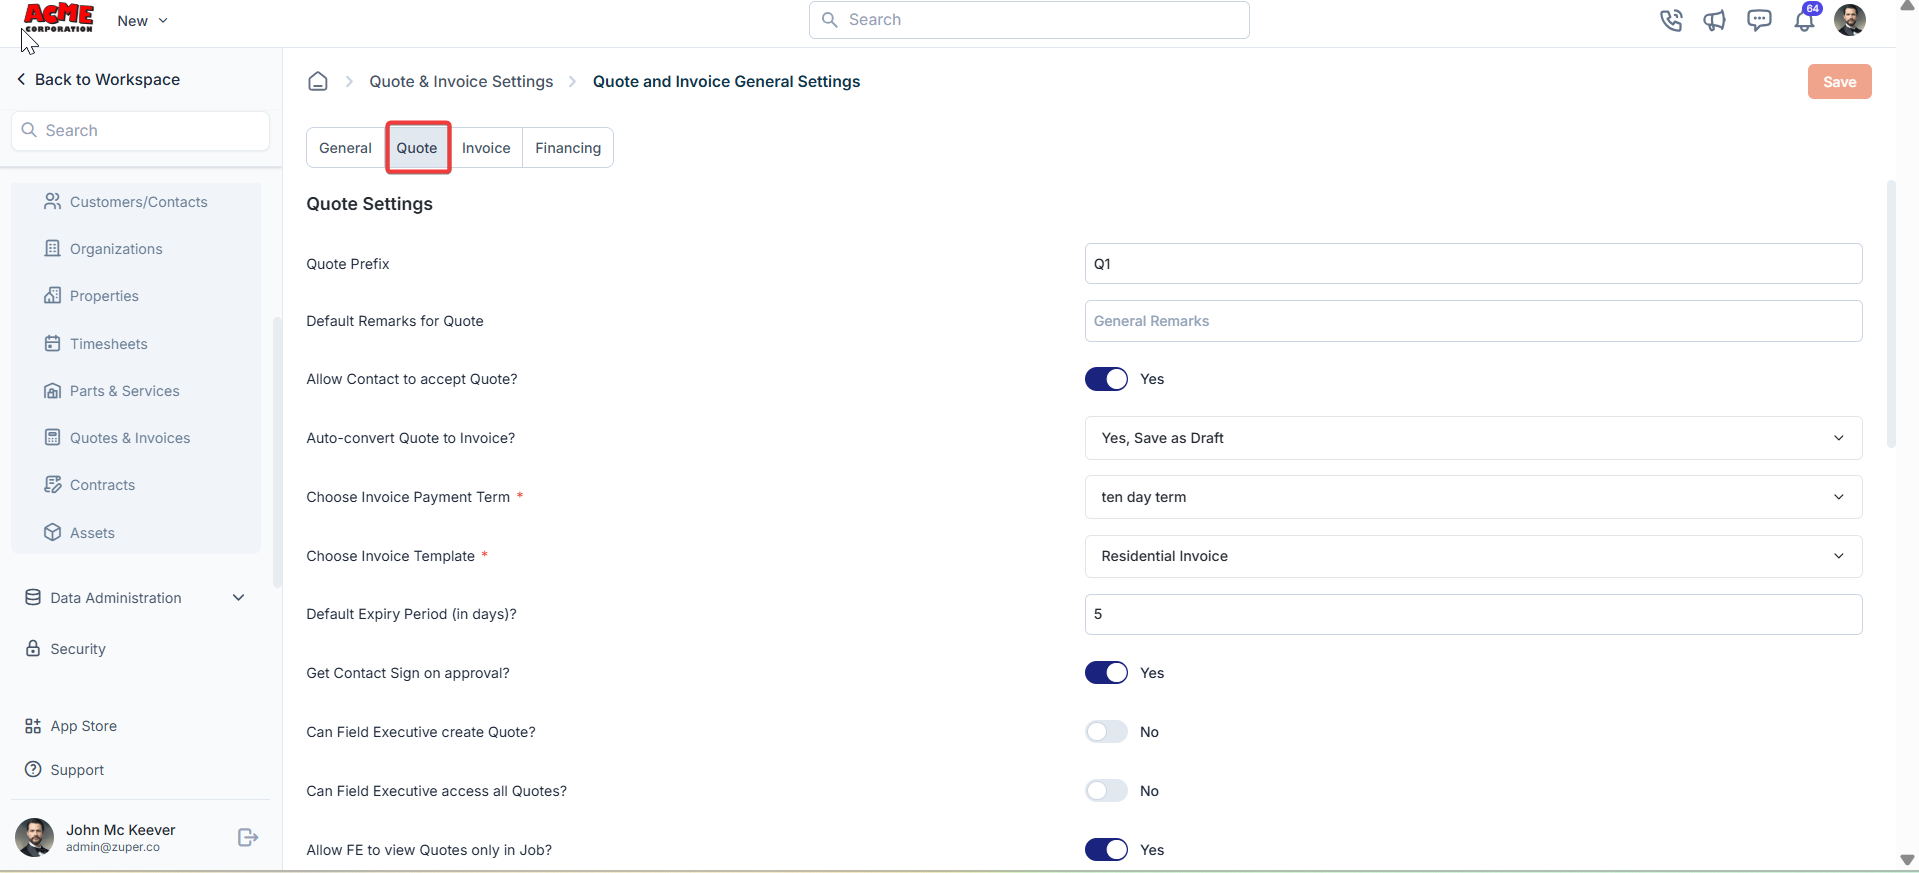
 ### Quote tab
The Quote tab lets you customize settings specific to quotes.
* Quote Prefix: Define a prefix for quote numbers.
* Default Remarks for Quote: Add default remarks that will appear on all quotes.
* Allow Contact to Accept Quote?: Enable or disable the option for contacts to accept quotes directly (Yes/No).
* Auto-convert Quote to Invoice?: Choose whether to automatically convert a quote to an invoice upon acceptance (**Yes, Save as Draft | Yes, Save and Send, or No**).
* Choose Invoice Payment Term: Set the default payment term for invoices generated from quotes (e.g., 10-day term).
* Choose Invoice Template: Select a default invoice template for quotes converted to invoices.
* Default Expiry Period (in days): Specify the default validity period for quotes.
* Get Contact Sign on Approval?: Decide if a contact’s signature is required upon quote approval.
* Can Field Executive Create Quote?: Allow field executives to create quotes. (Yes/No).
* Can Field Executive Access All Quotes?: Allow field executives to access all quotes (Yes/No).
* Allow FE to View Quotes Only in Job?: Restrict field executives to view only quotes associated with their assigned jobs (Yes/No).
* Allow Payment Collection?: Enable payment collection for quotes (Yes/No).
* Allow Sending Payment Link to Contact?: Allow sending payment links to contacts for quotes (Yes/No).
* Mandate Contact to Pay Deposit on Quote Approval?: Require contacts to pay a deposit upon approving a quote (Yes/No).
* Payment Mode Facilitating the Payment: Select the default payment mode.
* Allow Field Executive to Collect Payment?: Allow field executives to collect payments for quotes (Yes/No).
* Notify Created User on Status Updates?: Notify the user who created the quote about status updates (e.g., Accepted/Rejected/Requested for Changes) (Yes/No).
* Default Quote PDF Filename: Set the default filename format for quote PDFs.
* Choose Quote Component: Select components to include in quotes.
### Receipt settings
* Auto Send Receipt to Customer / Contact?: Enable automatically sending receipts to contacts after payment (Yes/No).
* Default Deposit Payment Receipt Template: Select a template for deposit payment receipts.
* Default Quote Email Template: Choose a default email template for sending quotes.
### Quote tab
The Quote tab lets you customize settings specific to quotes.
* Quote Prefix: Define a prefix for quote numbers.
* Default Remarks for Quote: Add default remarks that will appear on all quotes.
* Allow Contact to Accept Quote?: Enable or disable the option for contacts to accept quotes directly (Yes/No).
* Auto-convert Quote to Invoice?: Choose whether to automatically convert a quote to an invoice upon acceptance (**Yes, Save as Draft | Yes, Save and Send, or No**).
* Choose Invoice Payment Term: Set the default payment term for invoices generated from quotes (e.g., 10-day term).
* Choose Invoice Template: Select a default invoice template for quotes converted to invoices.
* Default Expiry Period (in days): Specify the default validity period for quotes.
* Get Contact Sign on Approval?: Decide if a contact’s signature is required upon quote approval.
* Can Field Executive Create Quote?: Allow field executives to create quotes. (Yes/No).
* Can Field Executive Access All Quotes?: Allow field executives to access all quotes (Yes/No).
* Allow FE to View Quotes Only in Job?: Restrict field executives to view only quotes associated with their assigned jobs (Yes/No).
* Allow Payment Collection?: Enable payment collection for quotes (Yes/No).
* Allow Sending Payment Link to Contact?: Allow sending payment links to contacts for quotes (Yes/No).
* Mandate Contact to Pay Deposit on Quote Approval?: Require contacts to pay a deposit upon approving a quote (Yes/No).
* Payment Mode Facilitating the Payment: Select the default payment mode.
* Allow Field Executive to Collect Payment?: Allow field executives to collect payments for quotes (Yes/No).
* Notify Created User on Status Updates?: Notify the user who created the quote about status updates (e.g., Accepted/Rejected/Requested for Changes) (Yes/No).
* Default Quote PDF Filename: Set the default filename format for quote PDFs.
* Choose Quote Component: Select components to include in quotes.
### Receipt settings
* Auto Send Receipt to Customer / Contact?: Enable automatically sending receipts to contacts after payment (Yes/No).
* Default Deposit Payment Receipt Template: Select a template for deposit payment receipts.
* Default Quote Email Template: Choose a default email template for sending quotes.
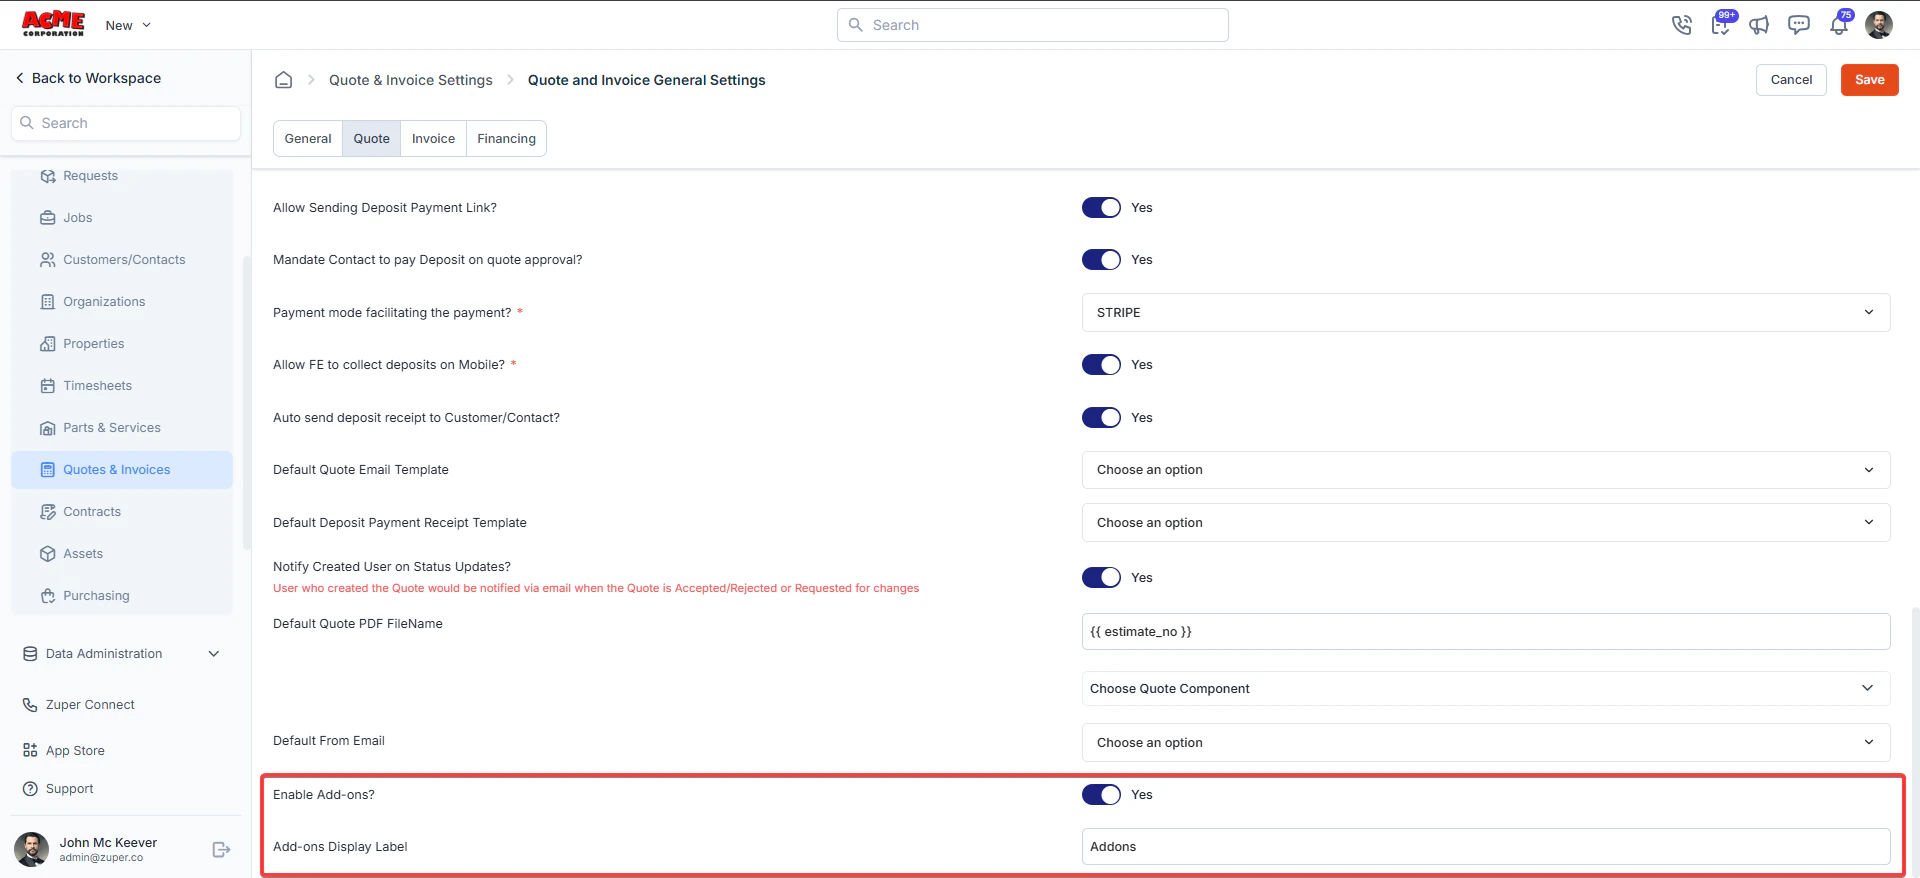
 ### Add-ons
Settings → Quotes & Invoices → Quote and Invoice General Settings → Quote tab
**Step 1: Enable Add-ons**
1. Locate **Enable Add-ons?**
2. Toggle the setting to **Yes**
Once enabled, add-ons become available in the Proposal (Quote) module.
**Step 2: Set Add-ons Display Label**
1. In the **Add-ons Display Label**, enter the label you want customers to see
* Example: Add-ons, Optional Services.
2. This label will appear in the proposal PDF presentation.
### Add-ons
Settings → Quotes & Invoices → Quote and Invoice General Settings → Quote tab
**Step 1: Enable Add-ons**
1. Locate **Enable Add-ons?**
2. Toggle the setting to **Yes**
Once enabled, add-ons become available in the Proposal (Quote) module.
**Step 2: Set Add-ons Display Label**
1. In the **Add-ons Display Label**, enter the label you want customers to see
* Example: Add-ons, Optional Services.
2. This label will appear in the proposal PDF presentation.
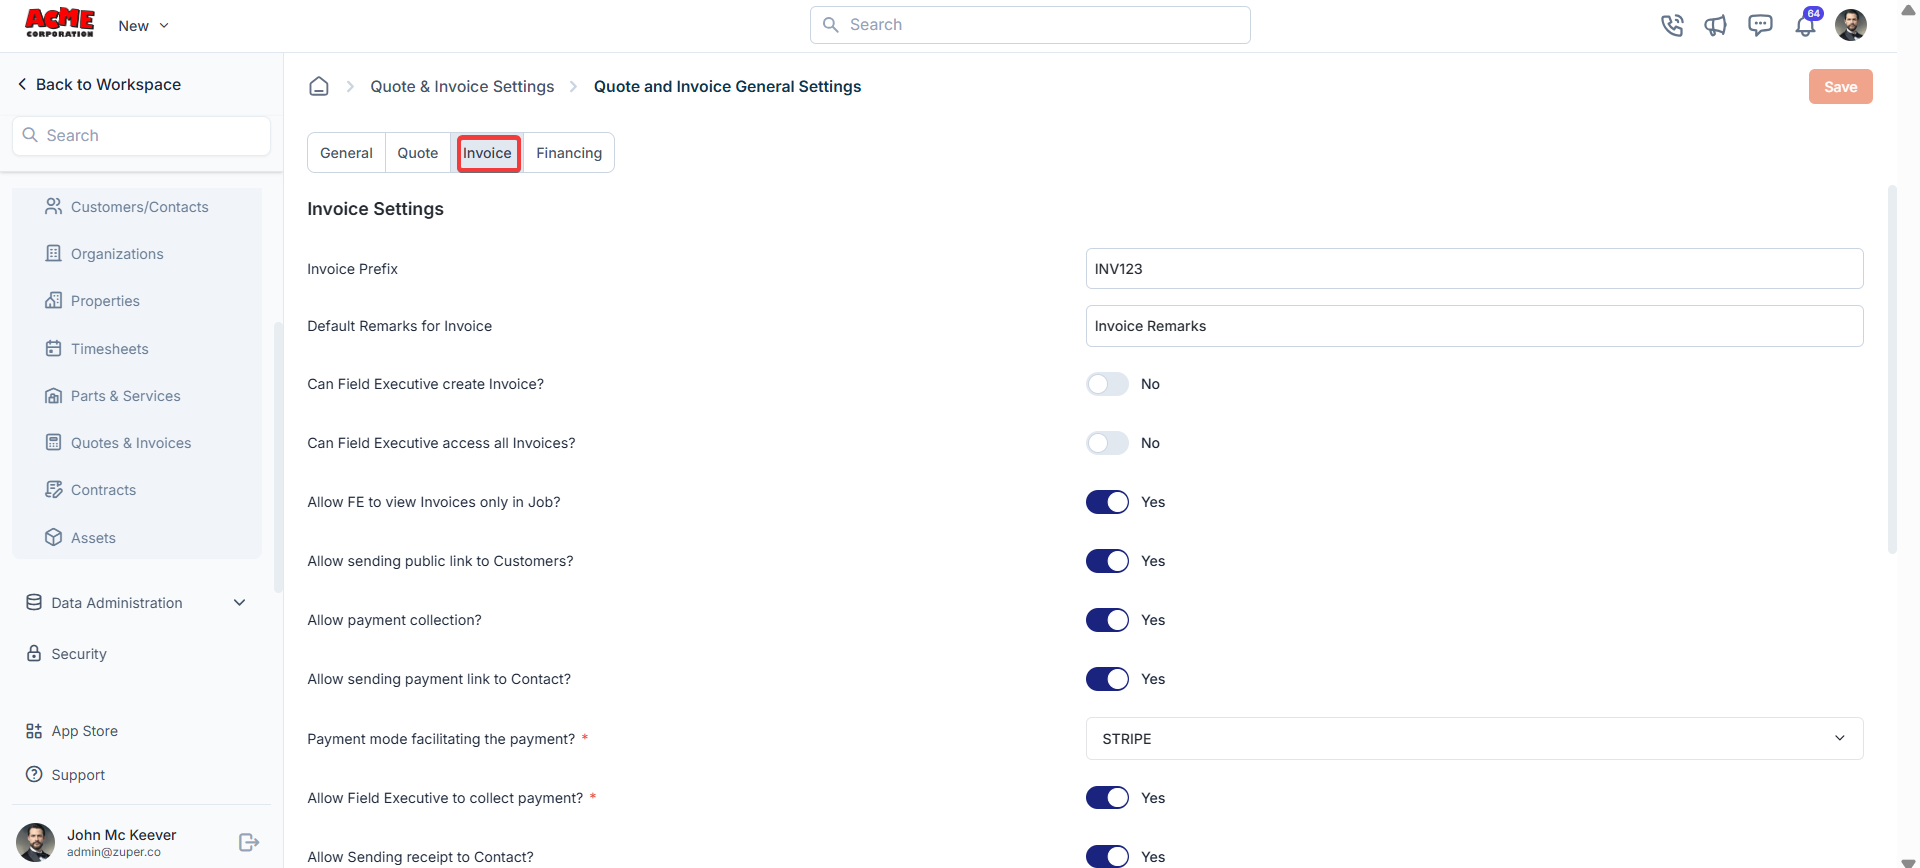
 ### Invoice tab
The Invoice tab allows you to configure settings specific to invoices.
* Invoice Prefix: Define a prefix for invoice numbers.
* Default Remarks for Invoice: Add default remarks that will appear on all invoices.
* Can Field Executive Create Invoice?: Allow field executives to create invoices (Yes/No).
* Can Field Executive Access All Invoices?: Allow field executives to access all invoices (Yes/No).
* Allow FE to View Invoices Only in Job?: Restrict field executives to view only invoices associated with their assigned jobs (Yes/No).
* Allow Sending Public Link to Customers?: Allow sending public invoice links to customers (Yes/No).
* Allow Payment Collection?: Enable payment collection for invoices (Yes/No).
* Allow Sending Payment Link to Contact?: Allow sending payment links to contacts for invoices (Yes/No).
* Payment Mode Facilitating the Payment: Select the default payment mode.
* Allow Field Executive to Collect Payment?: Allow field executives to collect invoice payments (Yes/No).
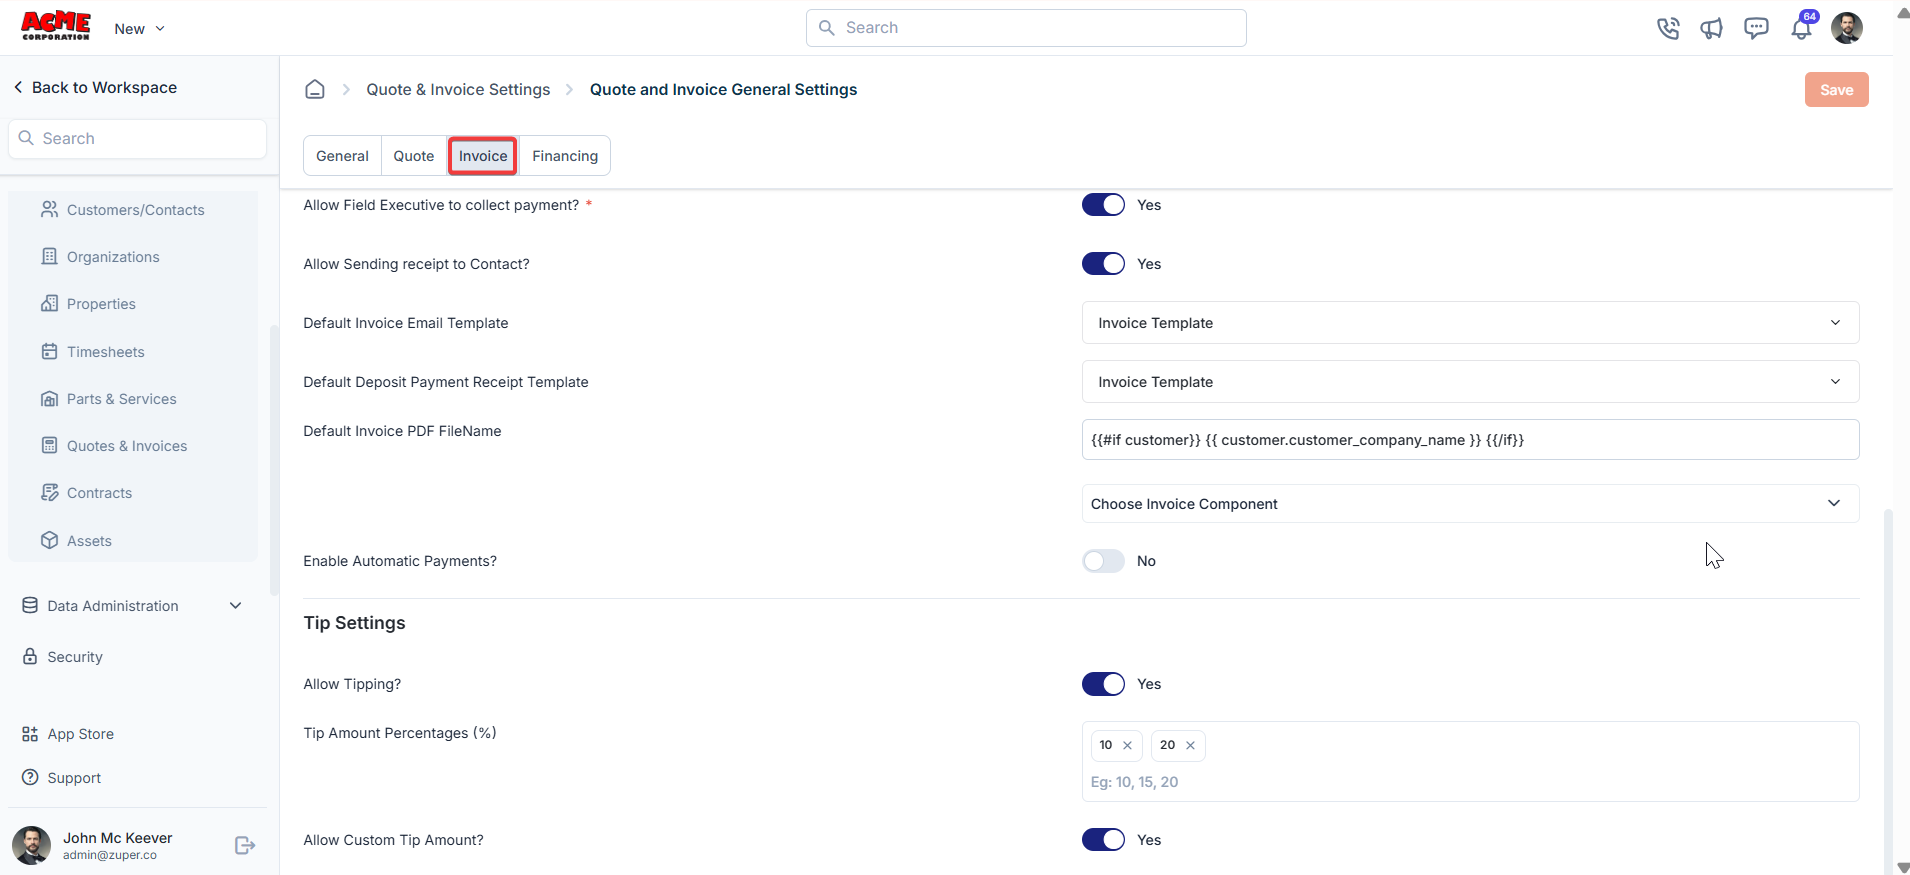
* Default Invoice PDF Filename: Set the default filename format for invoice PDFs.
* Choose Invoice Component: Select components to include in invoices.
* Enable Automatic Payments?: Enable automatic payment processing for invoices (Yes/No).
### Invoice tab
The Invoice tab allows you to configure settings specific to invoices.
* Invoice Prefix: Define a prefix for invoice numbers.
* Default Remarks for Invoice: Add default remarks that will appear on all invoices.
* Can Field Executive Create Invoice?: Allow field executives to create invoices (Yes/No).
* Can Field Executive Access All Invoices?: Allow field executives to access all invoices (Yes/No).
* Allow FE to View Invoices Only in Job?: Restrict field executives to view only invoices associated with their assigned jobs (Yes/No).
* Allow Sending Public Link to Customers?: Allow sending public invoice links to customers (Yes/No).
* Allow Payment Collection?: Enable payment collection for invoices (Yes/No).
* Allow Sending Payment Link to Contact?: Allow sending payment links to contacts for invoices (Yes/No).
* Payment Mode Facilitating the Payment: Select the default payment mode.
* Allow Field Executive to Collect Payment?: Allow field executives to collect invoice payments (Yes/No).
* Default Invoice PDF Filename: Set the default filename format for invoice PDFs.
* Choose Invoice Component: Select components to include in invoices.
* Enable Automatic Payments?: Enable automatic payment processing for invoices (Yes/No).
 **Tip Settings:**
* Allow Tipping?: Enable invoice tipping (Yes/No).
* Tip Amount Percentages (%): Set predefined tip percentage options (e.g., 10%, 15%, 20%).
* Allow Custom Tip Amount?: Customers can enter a custom tip amount (Yes/No).
**Tip Settings:**
* Allow Tipping?: Enable invoice tipping (Yes/No).
* Tip Amount Percentages (%): Set predefined tip percentage options (e.g., 10%, 15%, 20%).
* Allow Custom Tip Amount?: Customers can enter a custom tip amount (Yes/No).
 ### Financing tab
The Financing tab lets you set up financing options for quotes and invoices.
* Enable Financing?: Turn financing options on or off (Yes/No).
* Payment Mode: Facilitating the Payment: Select the payment mode for financing.
* Amount Range to Facilitate Financing Option (in USD): Define the amount range for financing.
### Financing tab
The Financing tab lets you set up financing options for quotes and invoices.
* Enable Financing?: Turn financing options on or off (Yes/No).
* Payment Mode: Facilitating the Payment: Select the payment mode for financing.
* Amount Range to Facilitate Financing Option (in USD): Define the amount range for financing.
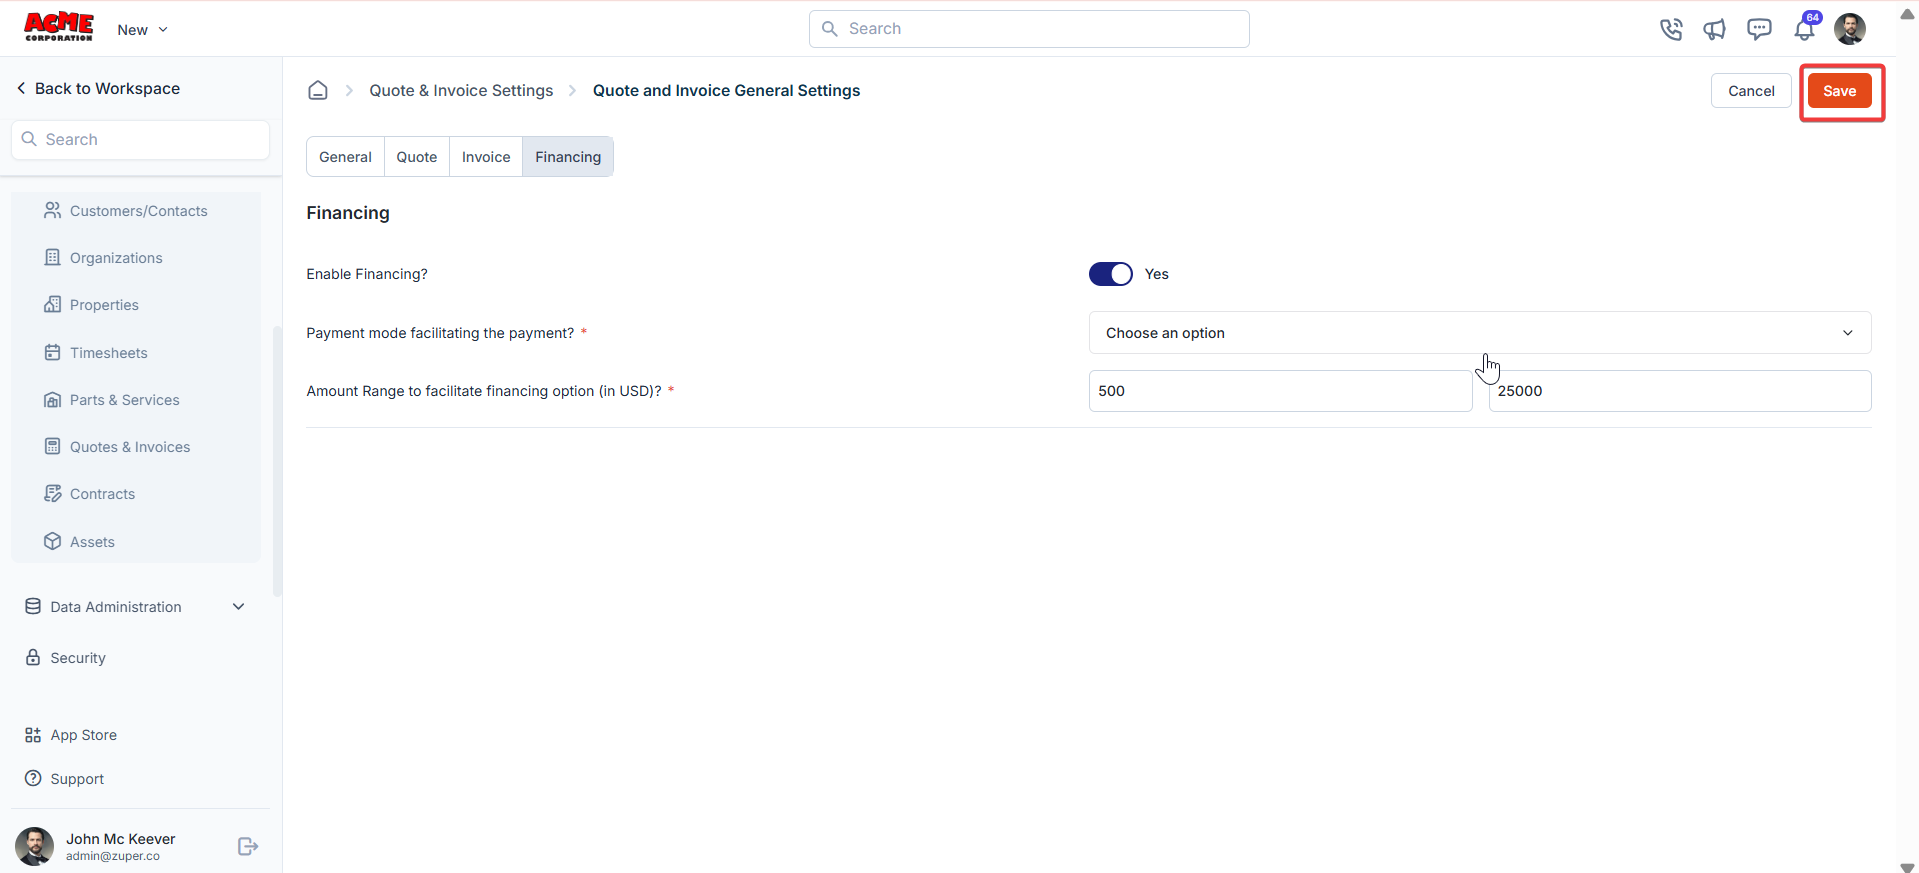 Click the “**Save**” button to save the quote and invoice general settings.
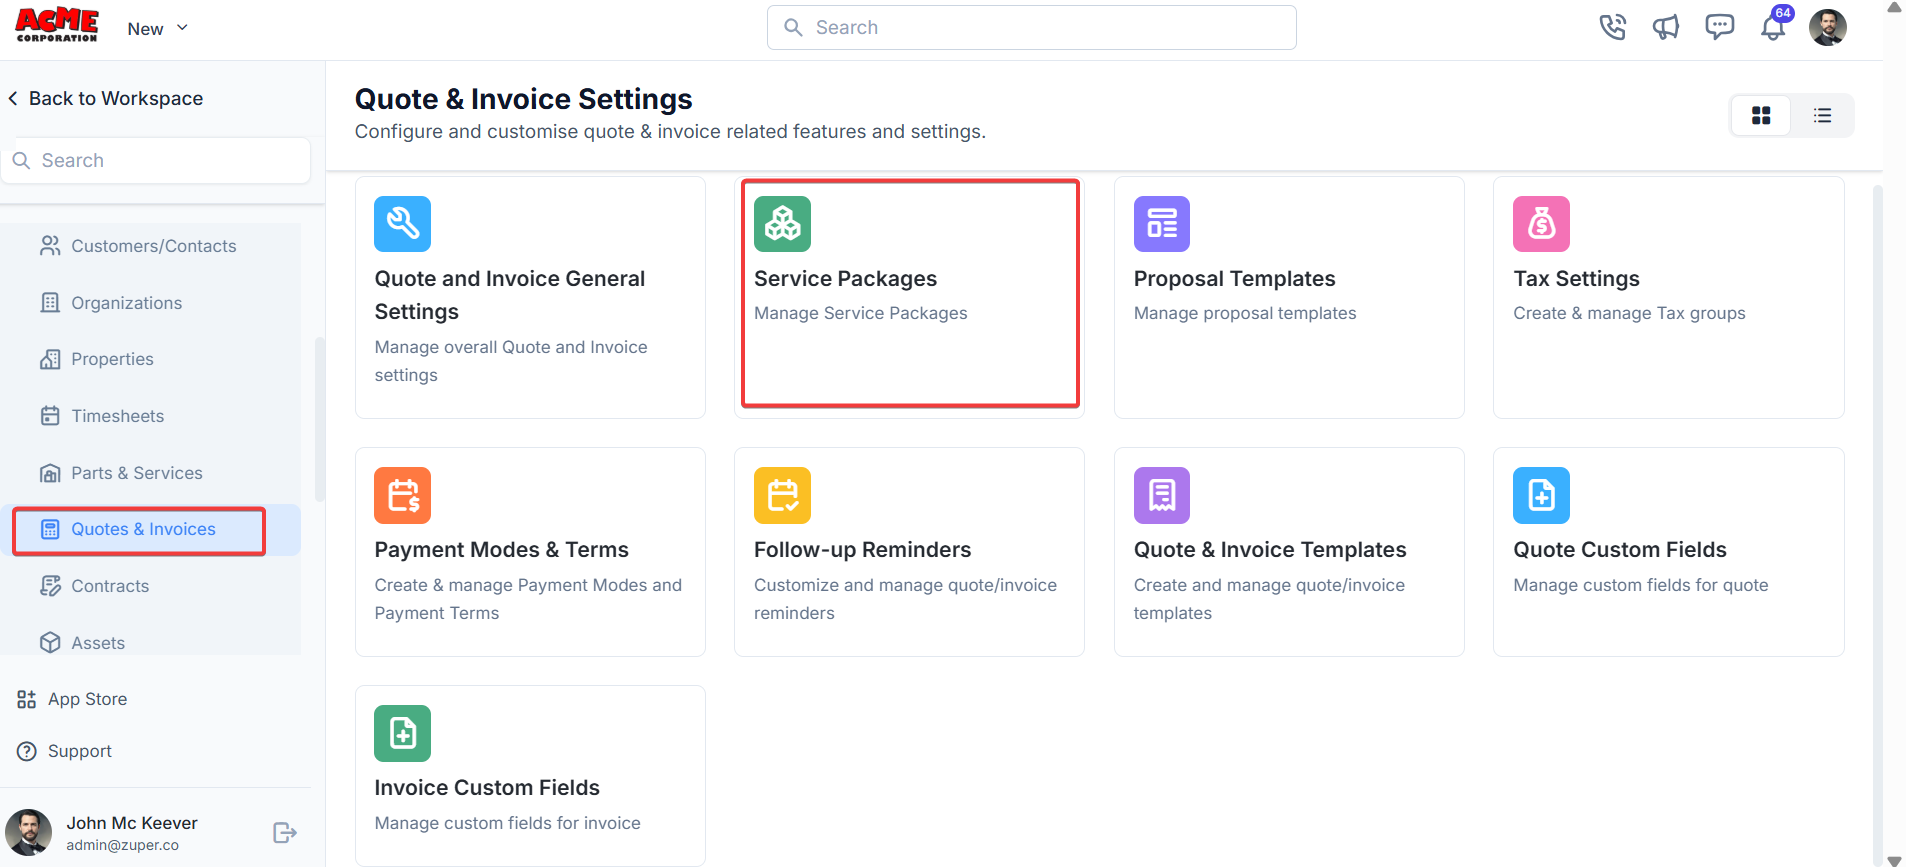
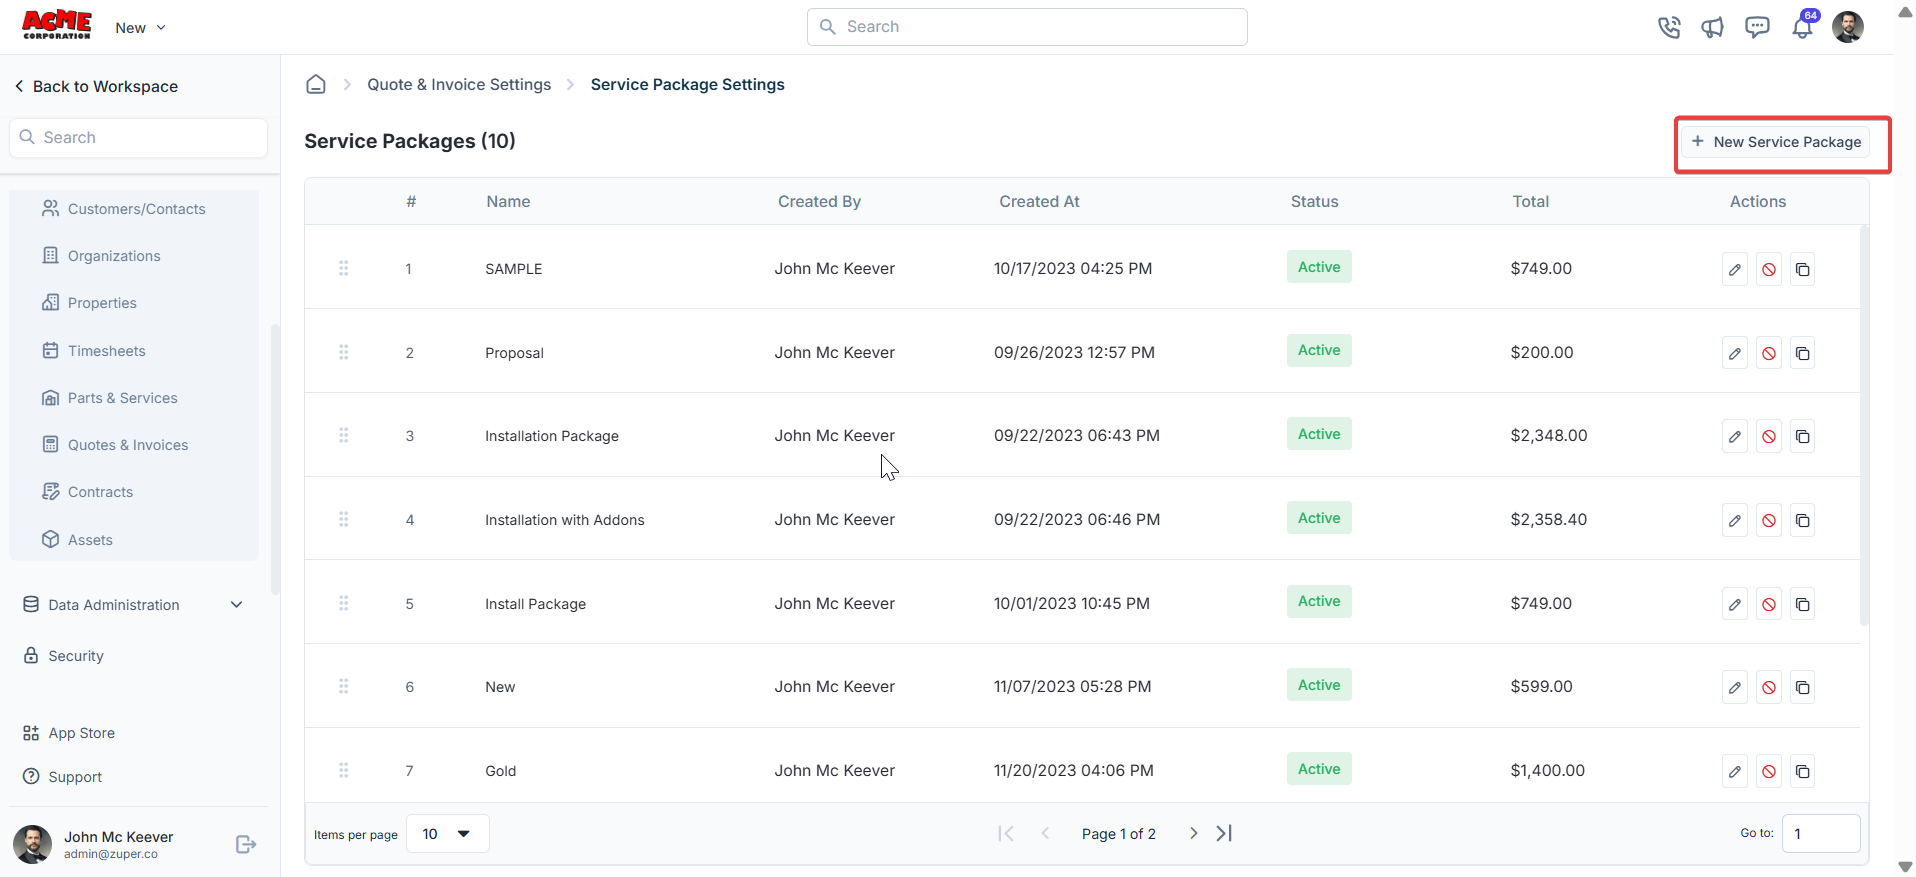
## **Service packages**
Before providing an official price quote or estimate, a business or service provider may send a preliminary document or communication to a potential client. This is called a "Proposal." It is usually used when the project or service scope needs clarification or definition before determining a specific price.
**Navigation**: *Settings -> Modules -> Quotes and Invoices -> Service Packages*
1. Select the “**Settings**” module from the left panel. Under the “**Modules**,” choose the “**Quotes & Invoices**.” Select the “**Service Packages**.”
Click the “**Save**” button to save the quote and invoice general settings.
## **Service packages**
Before providing an official price quote or estimate, a business or service provider may send a preliminary document or communication to a potential client. This is called a "Proposal." It is usually used when the project or service scope needs clarification or definition before determining a specific price.
**Navigation**: *Settings -> Modules -> Quotes and Invoices -> Service Packages*
1. Select the “**Settings**” module from the left panel. Under the “**Modules**,” choose the “**Quotes & Invoices**.” Select the “**Service Packages**.”
 2. Select the “**Service Package**s” and click the “**+ New Package**.”
 3. Under the “**Service Package Details**” section:
* Name – Enter the name of the service package.
* Description – Enter the description of the service package.
* Remarks - Enter the remarks.
* Click the "**+ Add**" button to add individual parts, products, and services.
* Alternatively, use the dropdown menu next to the "**+ Add**" button to: o Add from Group: Select a predefined group of items to add to the package.
* **Bundle**: Add a product or service bundle. Note that bundles added here will not appear as a product type in the filter menu.
* Adjust the [margin percentage](/Accounting/Profit_Margin) to instantly recalculate markup % and the total sell price for all line items.
3. Under the “**Service Package Details**” section:
* Name – Enter the name of the service package.
* Description – Enter the description of the service package.
* Remarks - Enter the remarks.
* Click the "**+ Add**" button to add individual parts, products, and services.
* Alternatively, use the dropdown menu next to the "**+ Add**" button to: o Add from Group: Select a predefined group of items to add to the package.
* **Bundle**: Add a product or service bundle. Note that bundles added here will not appear as a product type in the filter menu.
* Adjust the [margin percentage](/Accounting/Profit_Margin) to instantly recalculate markup % and the total sell price for all line items.
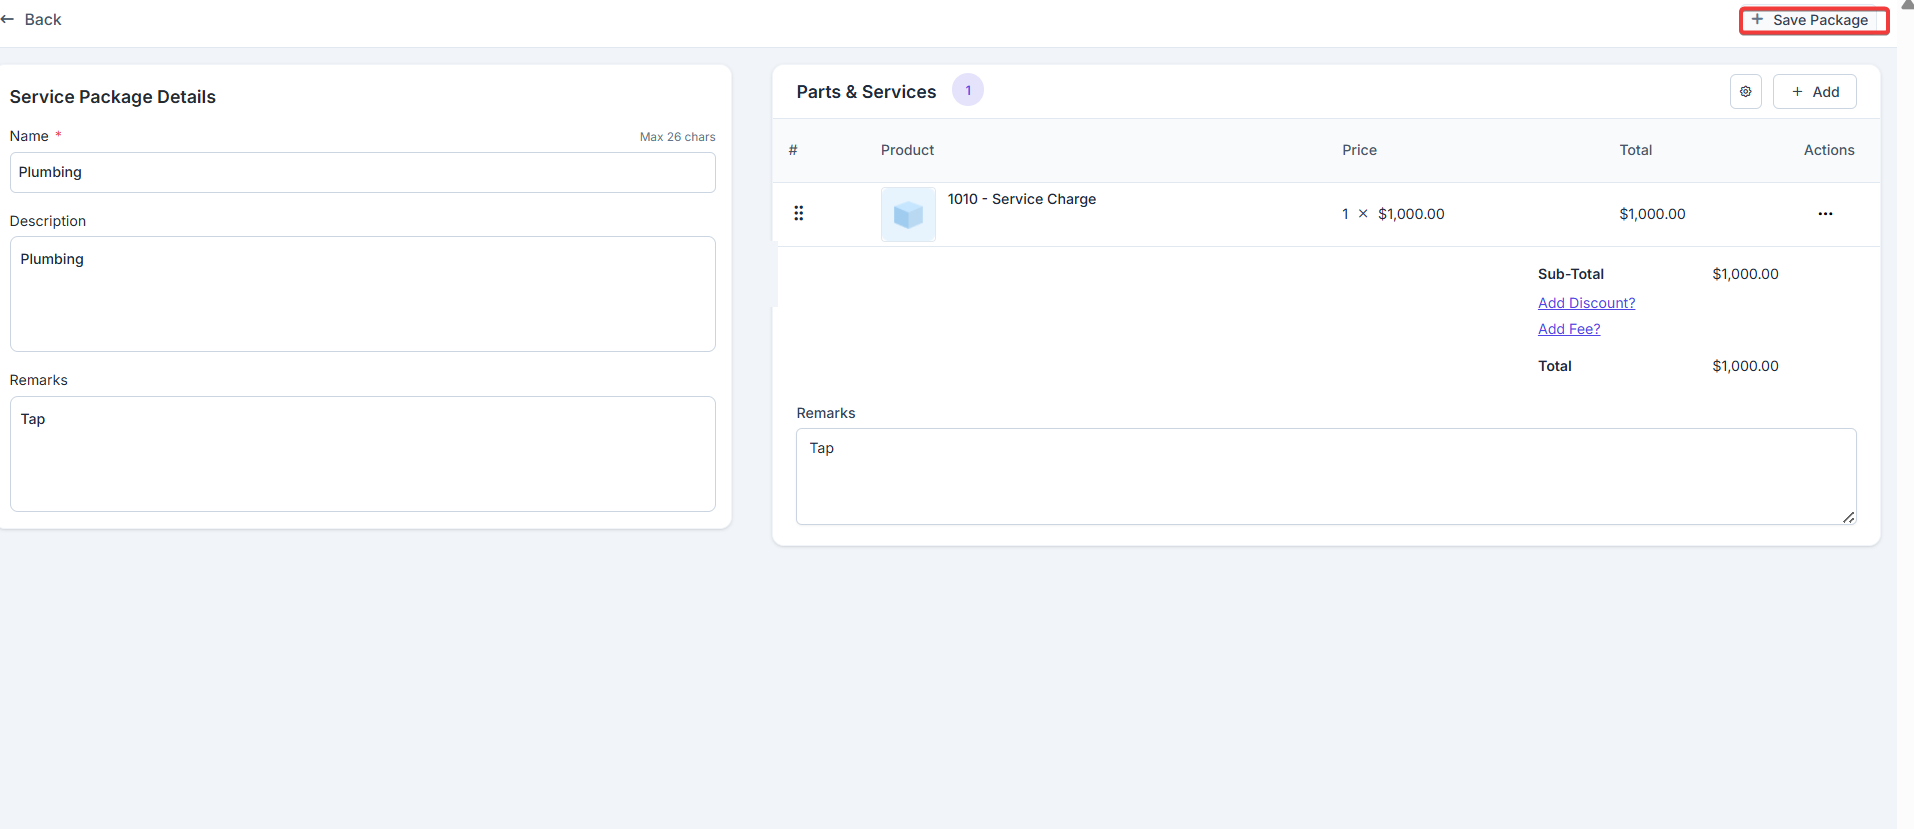 Click “**+ Save Package**” to save the service package.
## **Tax settings**
**Navigation**: *Settings -> Modules -> Quotes and Invoices - > Tax Settings*
1. Select the “**Settings**” module from the left panel. Under the “**Modules**,” choose the “**Quotes & Invoices**.” Select the “**Tax Settings**.”
Click “**+ Save Package**” to save the service package.
## **Tax settings**
**Navigation**: *Settings -> Modules -> Quotes and Invoices - > Tax Settings*
1. Select the “**Settings**” module from the left panel. Under the “**Modules**,” choose the “**Quotes & Invoices**.” Select the “**Tax Settings**.”
 2. Click “**+ New Tax.**”
 a. To add the Tax details:
* Tax Name – Enter the tax name.
* Tax Rate – Enter the %
* Is this a Regional tax – You can choose either “**Yes**” or “**No**” to enable/disable regional tax.
* Associate tax to tax group – Add a checkmark to link tax to the tax groups.
a. To add the Tax details:
* Tax Name – Enter the tax name.
* Tax Rate – Enter the %
* Is this a Regional tax – You can choose either “**Yes**” or “**No**” to enable/disable regional tax.
* Associate tax to tax group – Add a checkmark to link tax to the tax groups.
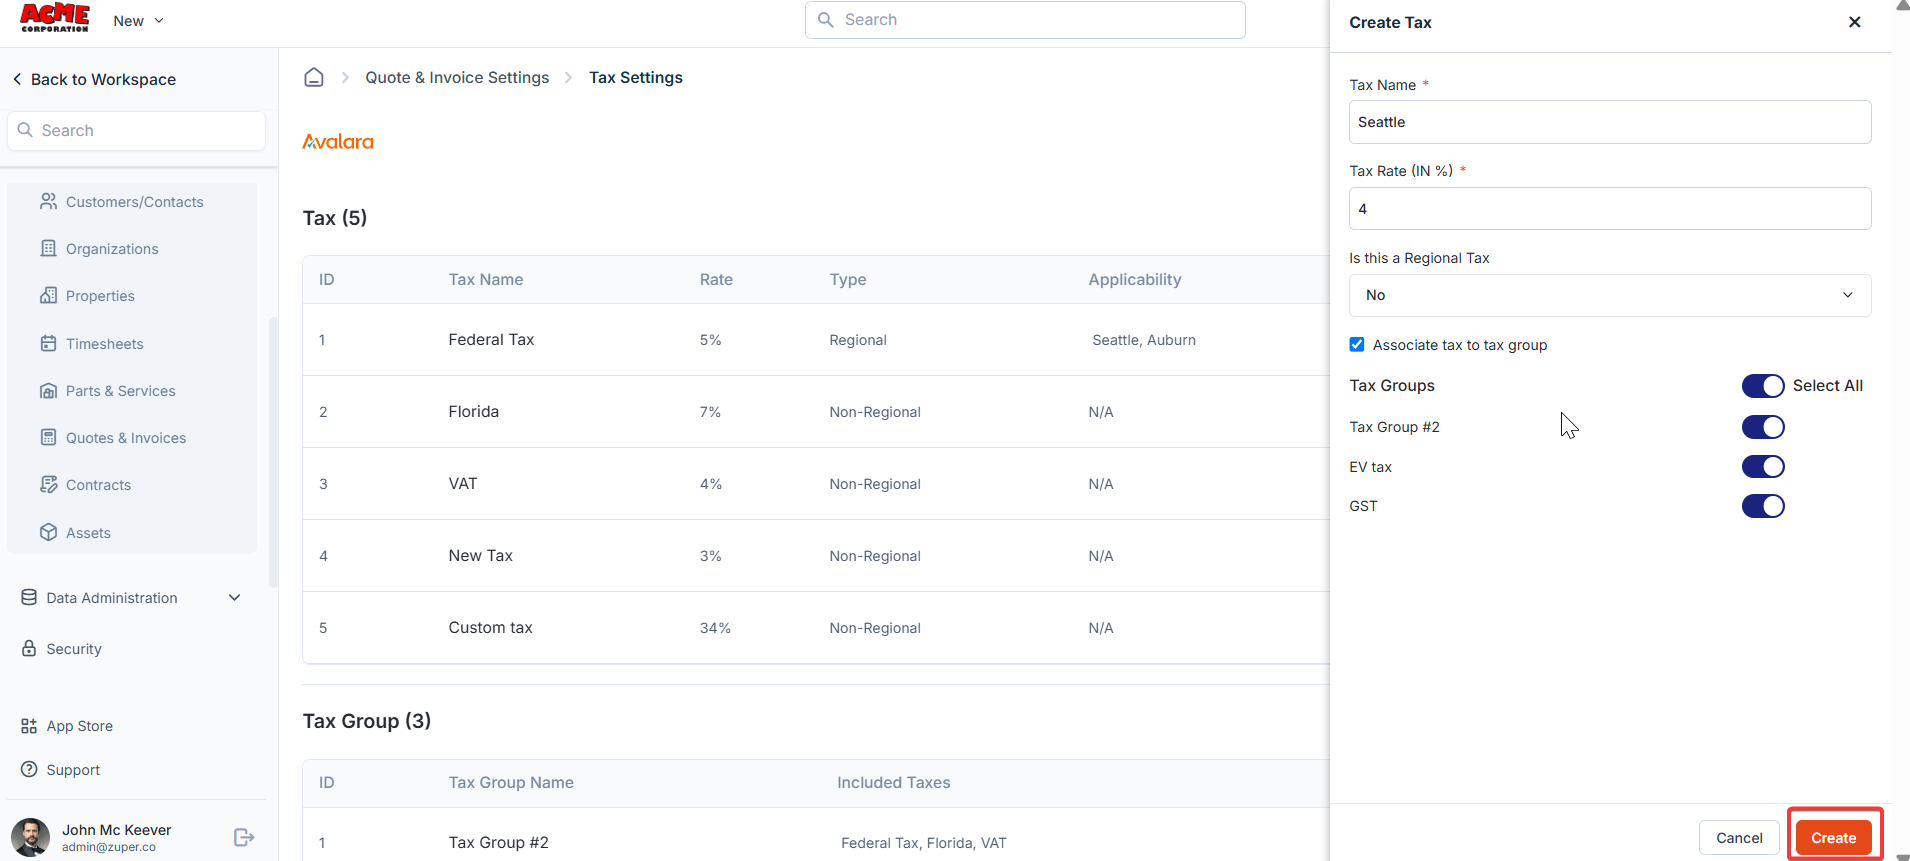 Click “**Create**” to create the new tax.
b. To add the Tax group
Click the "**+ New Tax Group**" option to add the appropriate tax options under a single category.
* Tax Group Name – Enter the tax group name.
* Taxes – Toggle on the required taxes.
Click “**Create**” to create the new tax.
b. To add the Tax group
Click the "**+ New Tax Group**" option to add the appropriate tax options under a single category.
* Tax Group Name – Enter the tax group name.
* Taxes – Toggle on the required taxes.
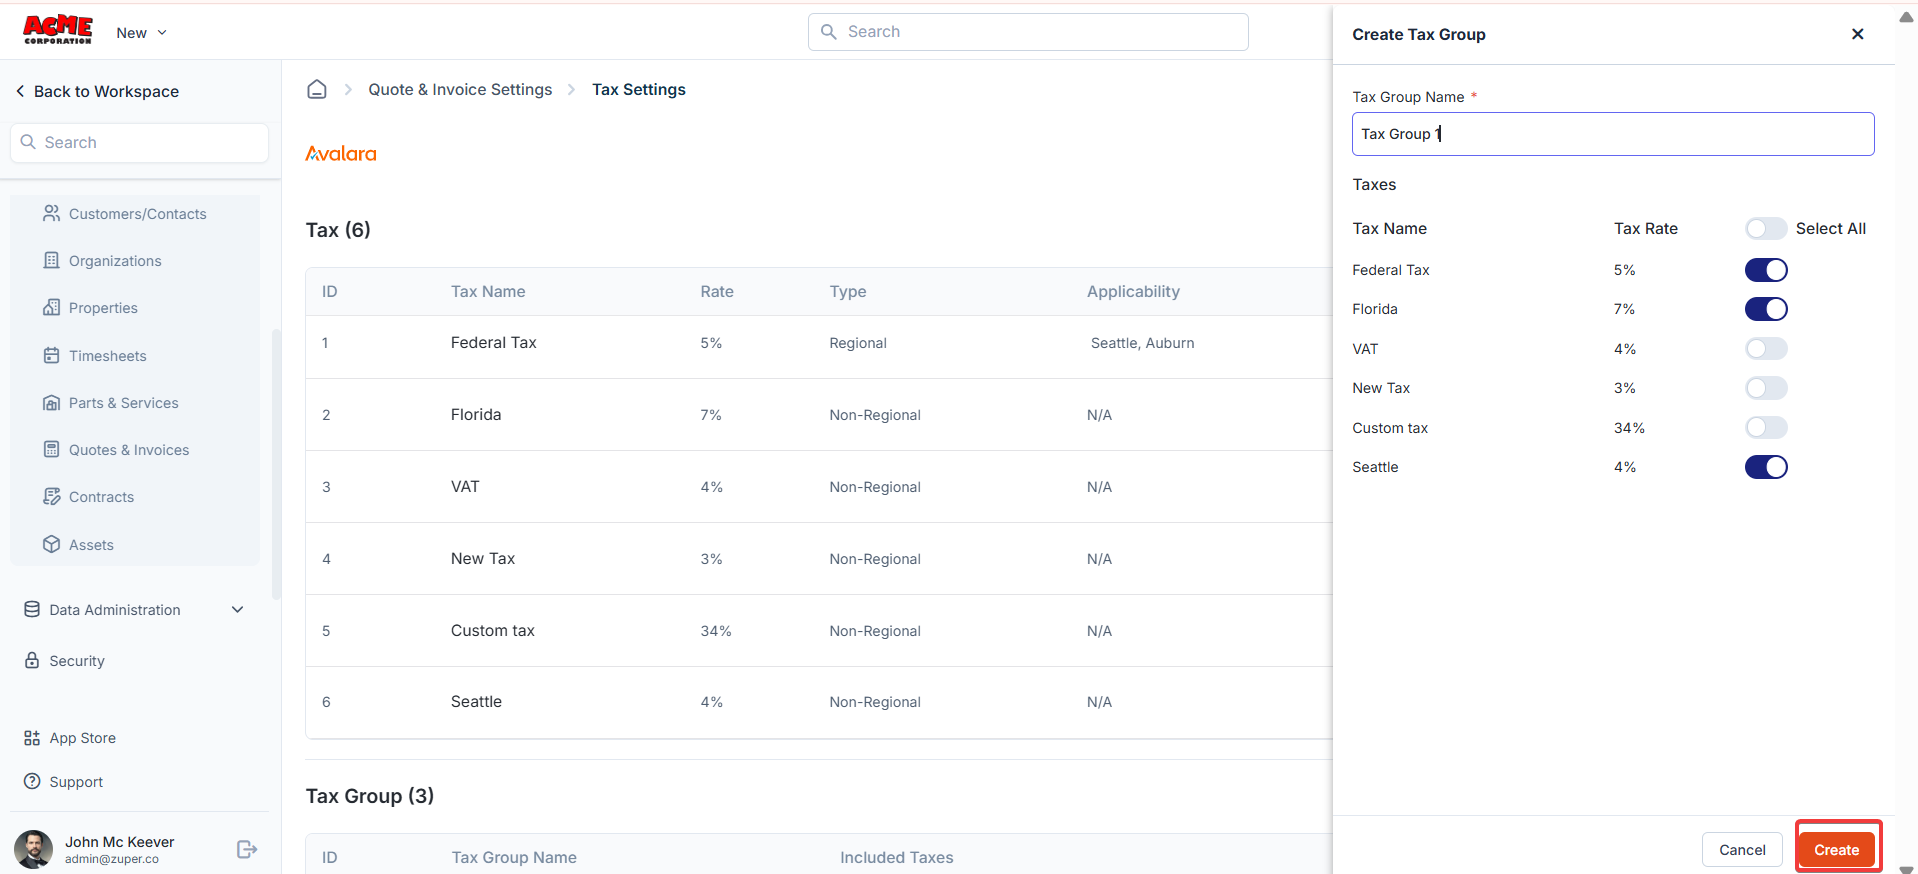 Click “**Create**” to create the new tax group.
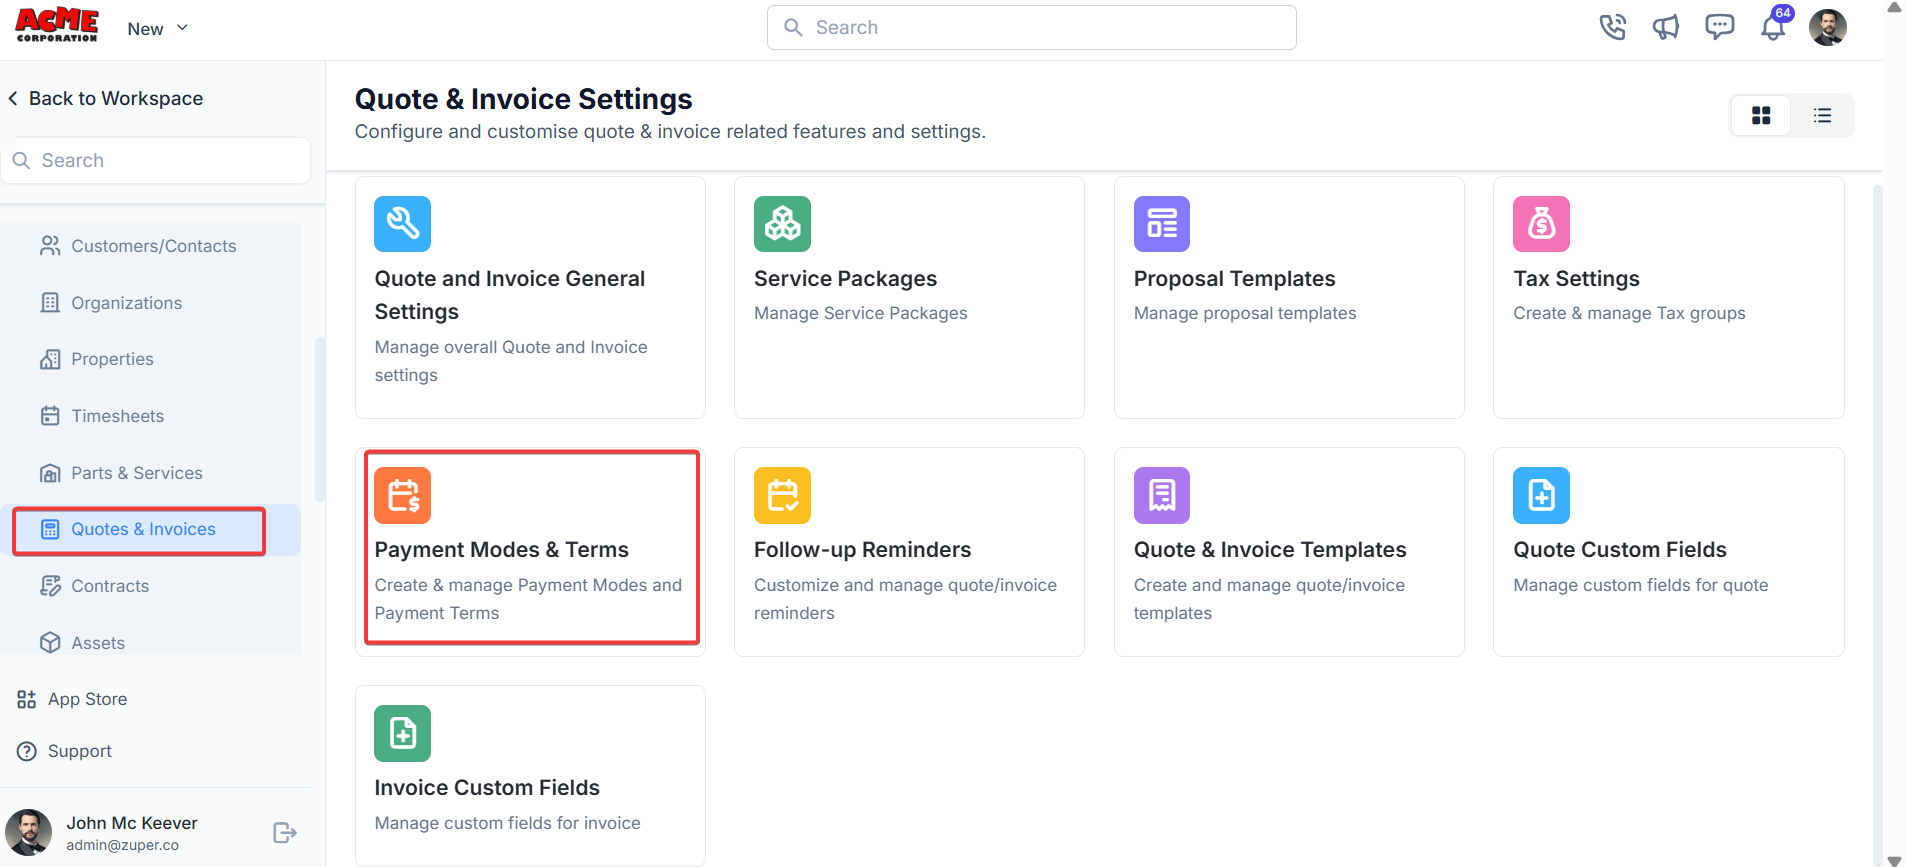
## **Payment modes & terms**
**Navigation**: *Settings -> Modules -> Quotes and Invoices - > Payment Modes & Terms*
1. Select the “**Settings**” module from the left panel. Under the “**Modules**,” choose the “**Quotes & Invoices**.” Select the “**Payment Modes & Terms**.”
2. Under “**Payment Mode**,” click the “**+ New Payment Mode** .”
Click “**Create**” to create the new tax group.
## **Payment modes & terms**
**Navigation**: *Settings -> Modules -> Quotes and Invoices - > Payment Modes & Terms*
1. Select the “**Settings**” module from the left panel. Under the “**Modules**,” choose the “**Quotes & Invoices**.” Select the “**Payment Modes & Terms**.”
2. Under “**Payment Mode**,” click the “**+ New Payment Mode** .”
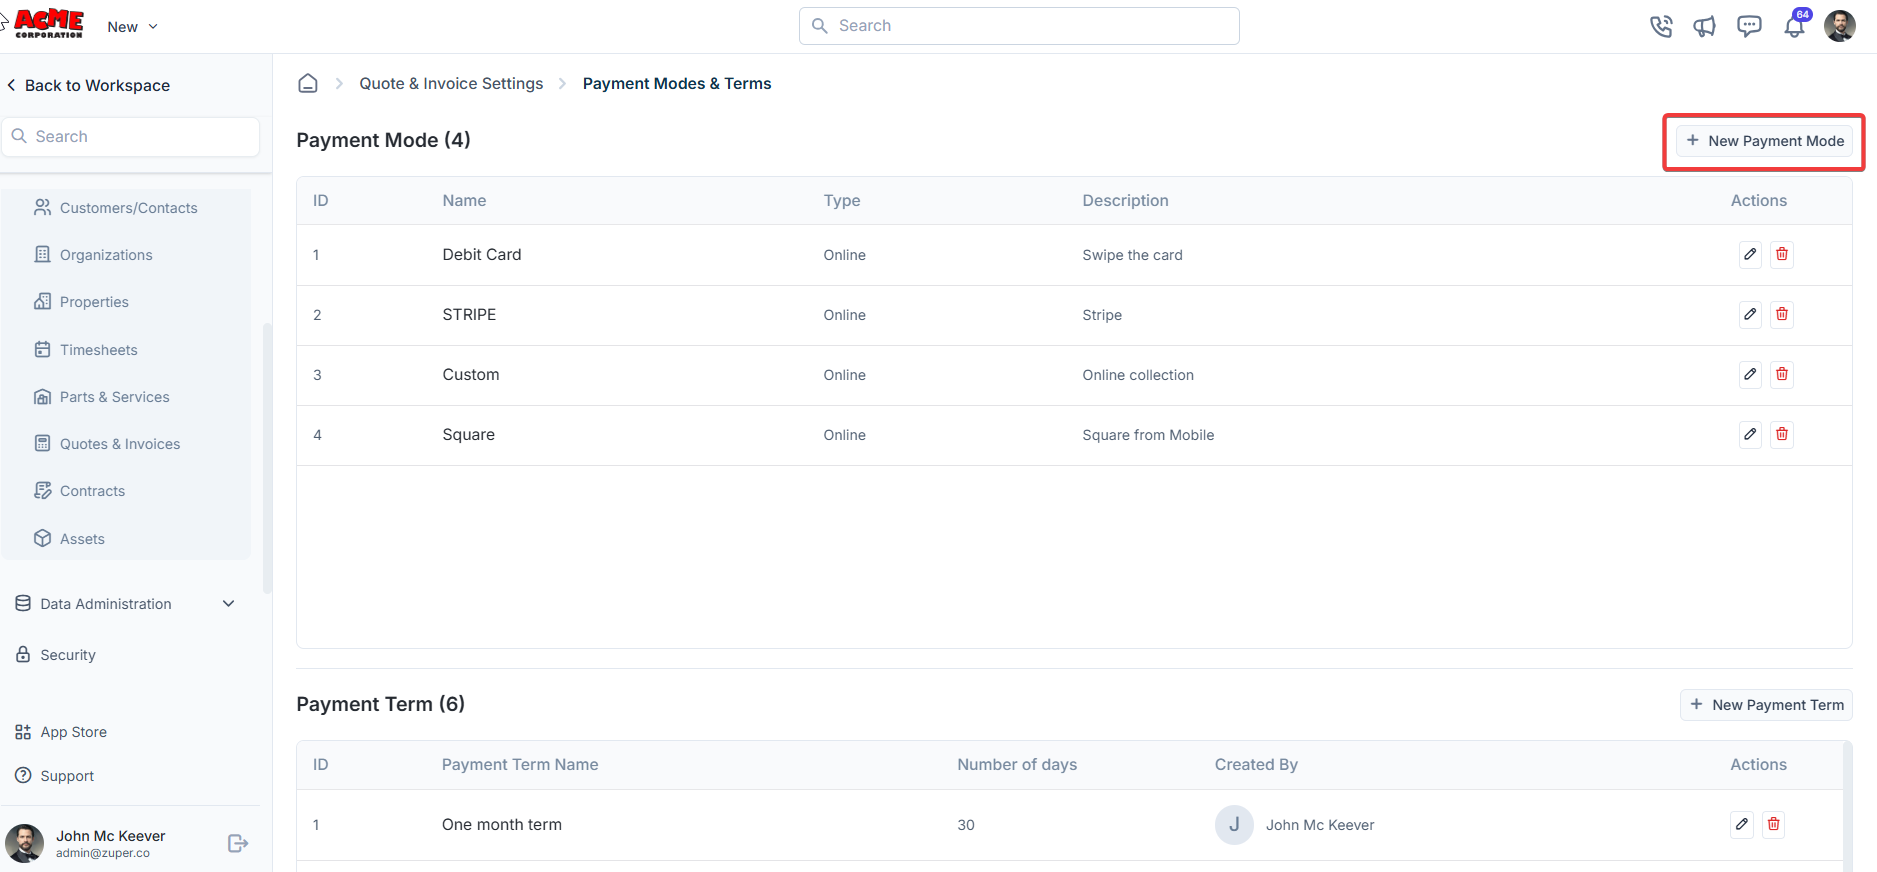 3. A dialog box appears. Enter the payment mode details – Name, Type, and details.
 Click “**Create**” to create the payment mode.
4. Under “ **Payment Term**,” Click “**+ New Payment Term**.”
Click “**Create**” to create the payment mode.
4. Under “ **Payment Term**,” Click “**+ New Payment Term**.”
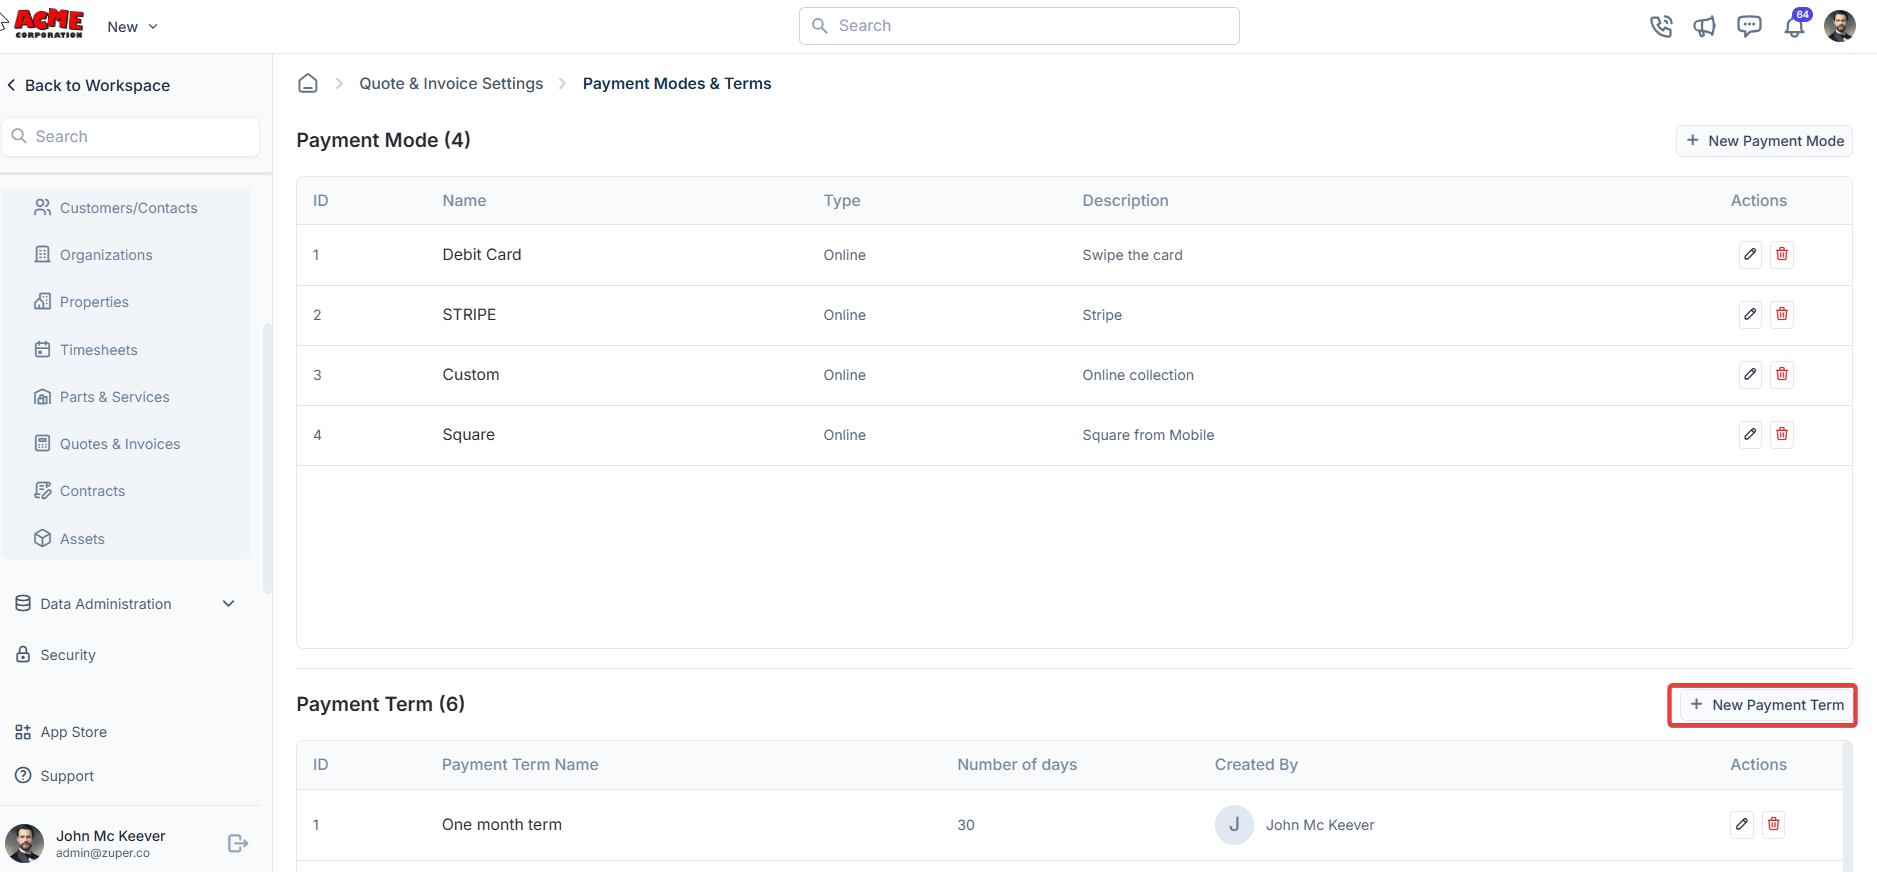 5. Enter the name of the payment term and the number of days.
 Click “**Create**” to create the payment term.
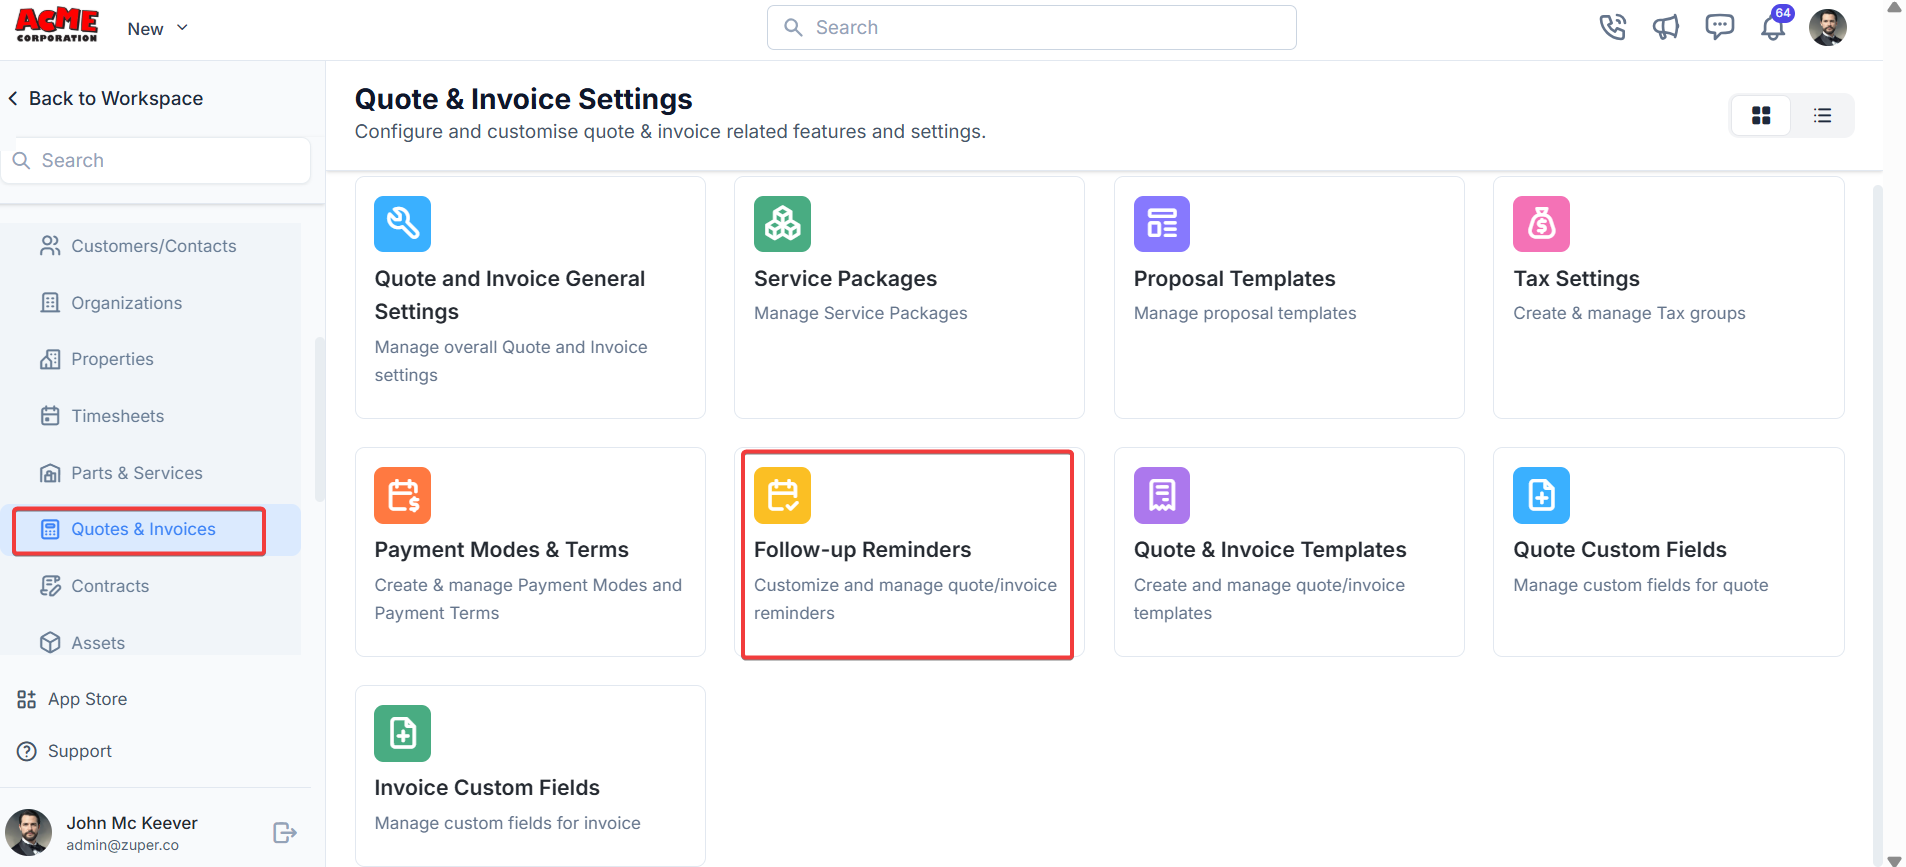
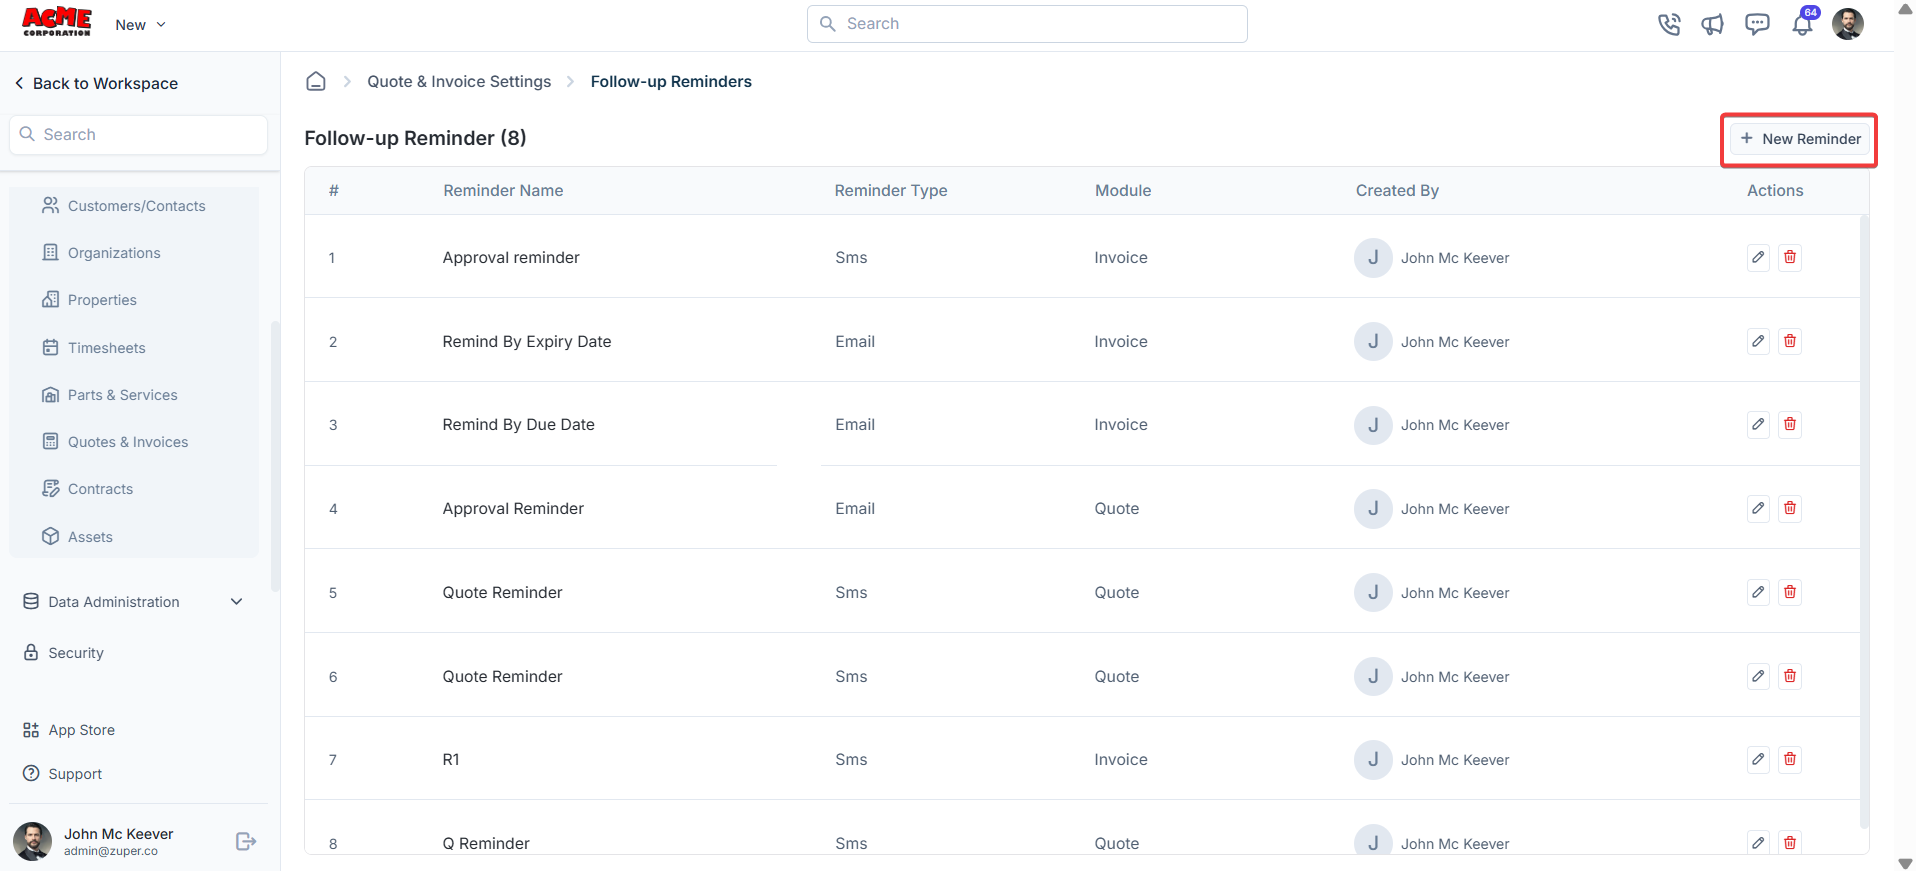
## **Follow up reminders**
The users can instantly send follow-up reminders before or after a particular date via SMS or Email.
**Navigation**: *Settings -> Modules -> Quotes and Invoices -> Follow up reminders*
1. Select the “**Settings**” module from the left panel. Under the “**Modules**,” choose the “**Quotes & Invoices**.” Select the “**Follow-up Reminders** .”
Click “**Create**” to create the payment term.
## **Follow up reminders**
The users can instantly send follow-up reminders before or after a particular date via SMS or Email.
**Navigation**: *Settings -> Modules -> Quotes and Invoices -> Follow up reminders*
1. Select the “**Settings**” module from the left panel. Under the “**Modules**,” choose the “**Quotes & Invoices**.” Select the “**Follow-up Reminders** .”
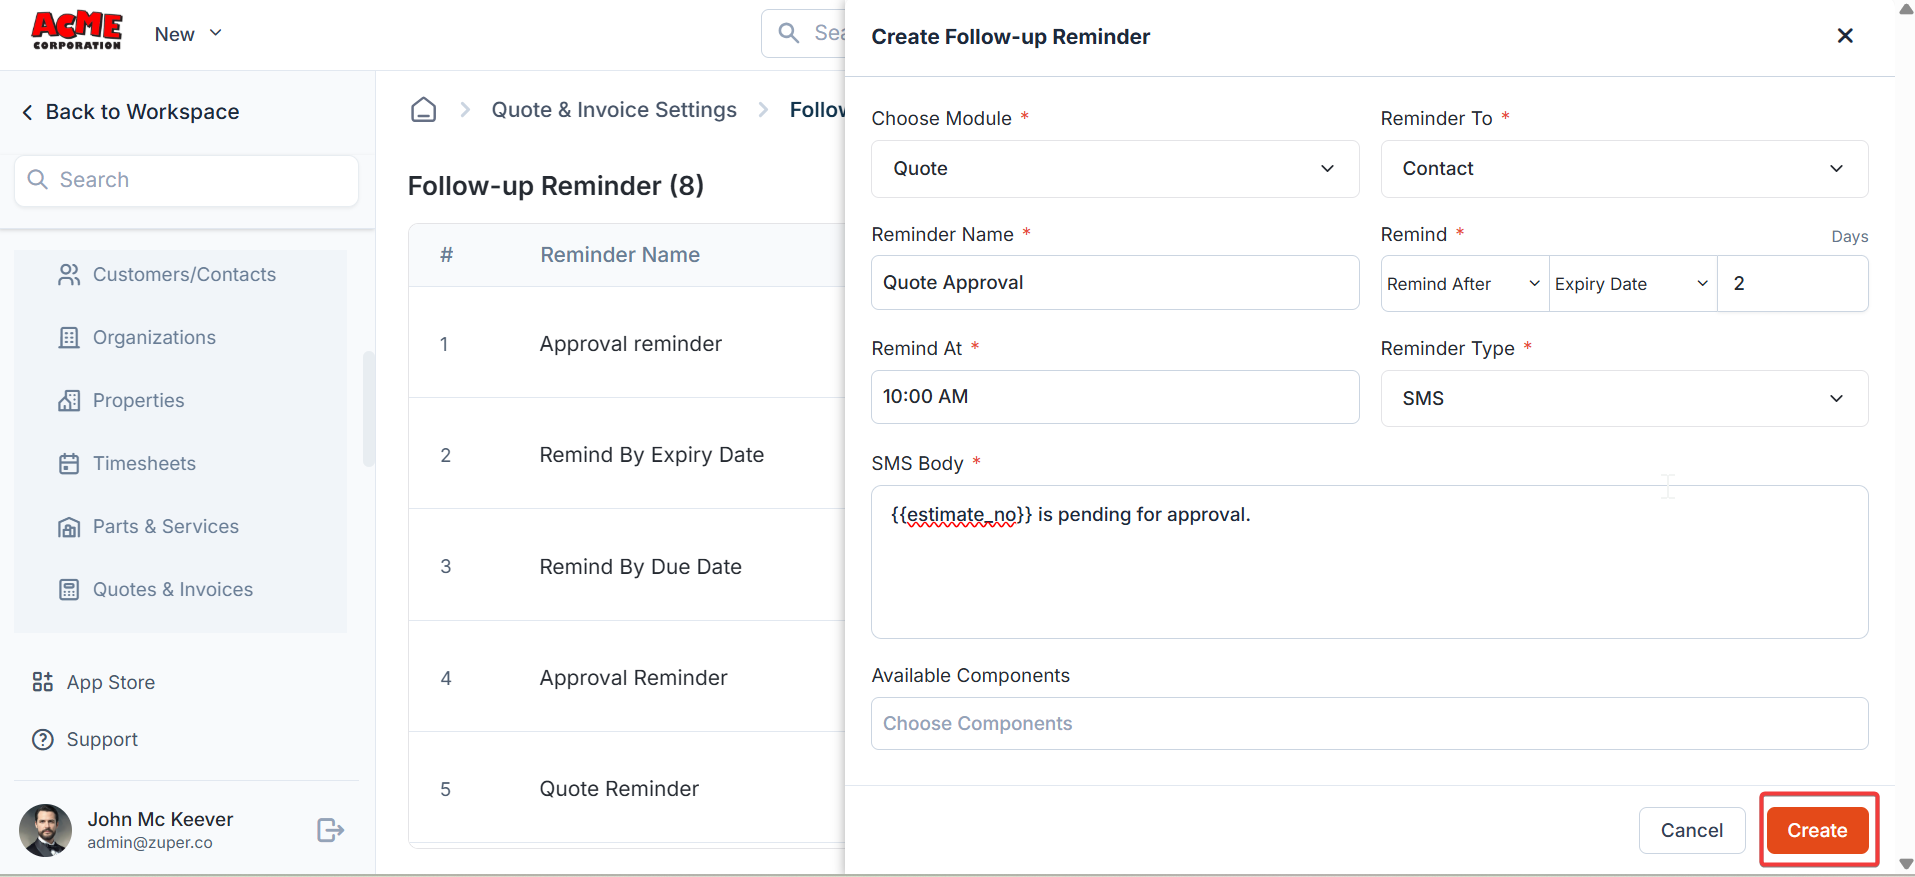
 2. Click “**+ New Reminder**” to create the follow-up reminder.
 3. a) Under Choose Module - Select the Module: Quotes or Invoice.
b) Under “**Remind To**”- The user can send a follow-up reminder to the back office and the customer. The dropdown box list: “**Customer**,” “**Selected Users**,” and “**Selected Teams**.”
c) Under “**Reminder Name**” - Type the name for the reminder.
d) Under “**Remind After / Remind Before**” - The reminder can be sent “**Befor**e” or “**After**.”
e) Under “**Reminder Type**” -The reminder type can be either “**SMS**” or “**Email**.”
f) **SMS Body** & **Available Components** – Choose the available components and create the SMS body.
Click “**Create**” to create the follow-up reminder.
3. a) Under Choose Module - Select the Module: Quotes or Invoice.
b) Under “**Remind To**”- The user can send a follow-up reminder to the back office and the customer. The dropdown box list: “**Customer**,” “**Selected Users**,” and “**Selected Teams**.”
c) Under “**Reminder Name**” - Type the name for the reminder.
d) Under “**Remind After / Remind Before**” - The reminder can be sent “**Befor**e” or “**After**.”
e) Under “**Reminder Type**” -The reminder type can be either “**SMS**” or “**Email**.”
f) **SMS Body** & **Available Components** – Choose the available components and create the SMS body.
Click “**Create**” to create the follow-up reminder.
 ## **Quotes & invoices templates**
The users can instantly send follow-up reminders before or after a particular date via SMS or Email.
**Navigation**: *Settings -> Modules -> Quotes and Invoices -> Quotes & Invoices Templates*
1. Select the “**Settings**” module from the left panel. Under the “**Modules**,” choose the “**Quotes & Invoices**.” Select the “**Quotes & Invoice Templates**.”
## **Quotes & invoices templates**
The users can instantly send follow-up reminders before or after a particular date via SMS or Email.
**Navigation**: *Settings -> Modules -> Quotes and Invoices -> Quotes & Invoices Templates*
1. Select the “**Settings**” module from the left panel. Under the “**Modules**,” choose the “**Quotes & Invoices**.” Select the “**Quotes & Invoice Templates**.”
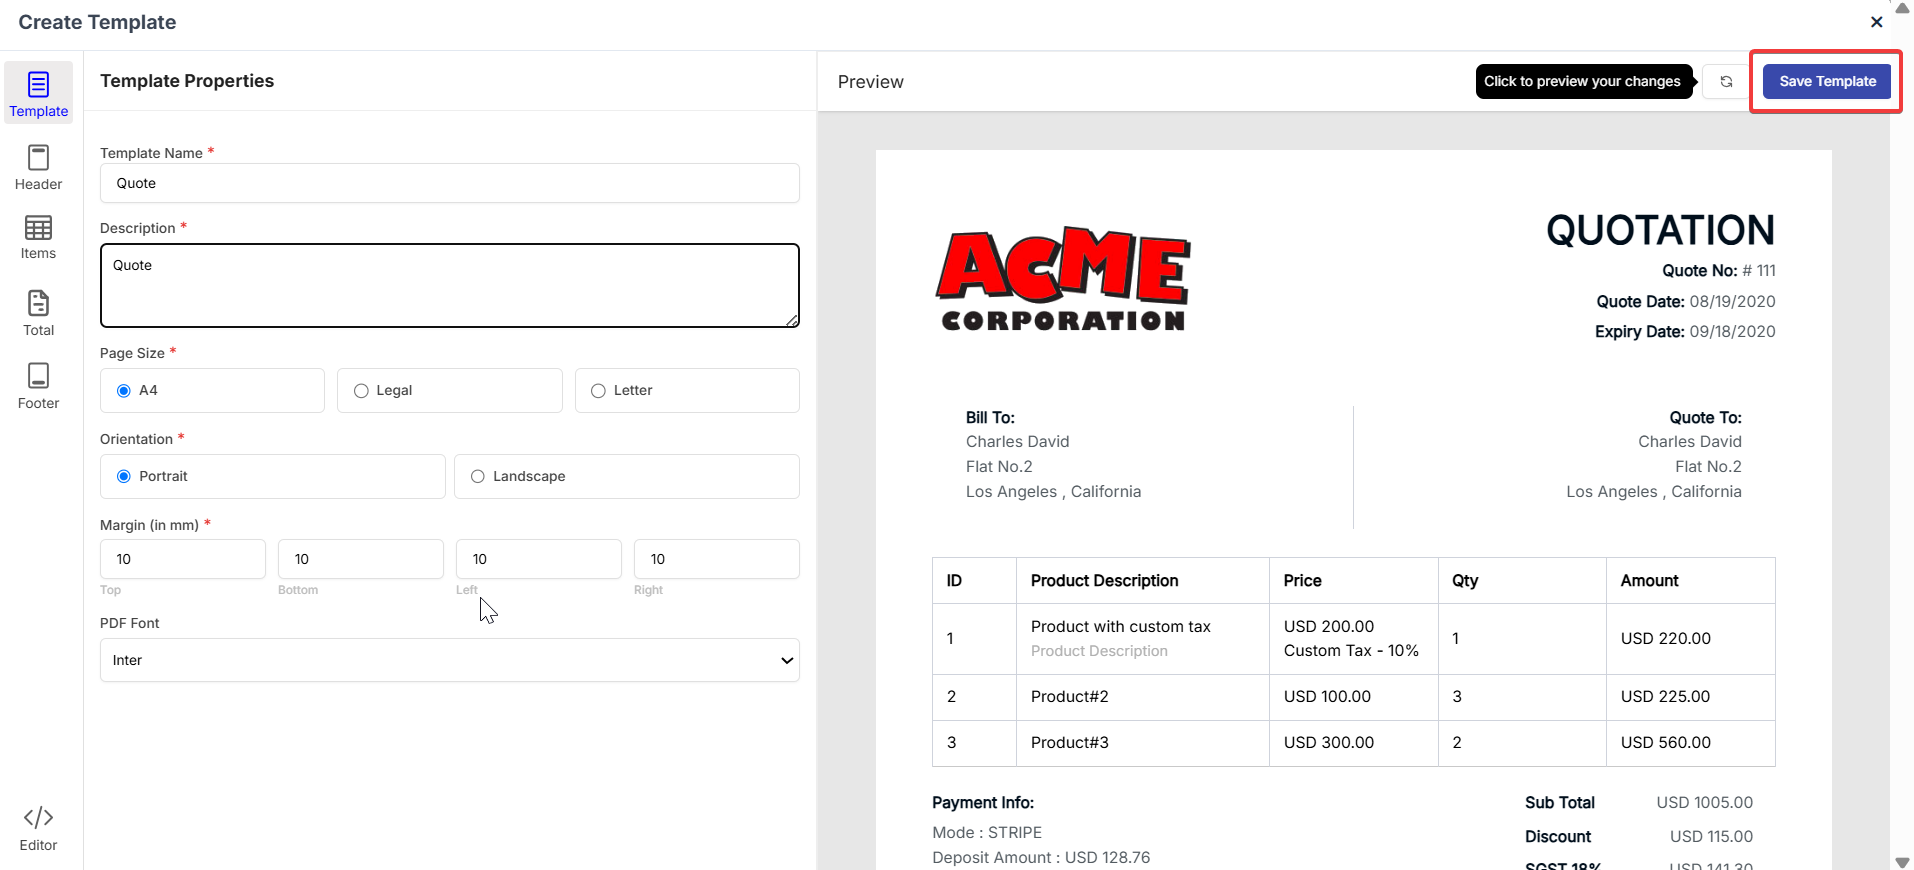
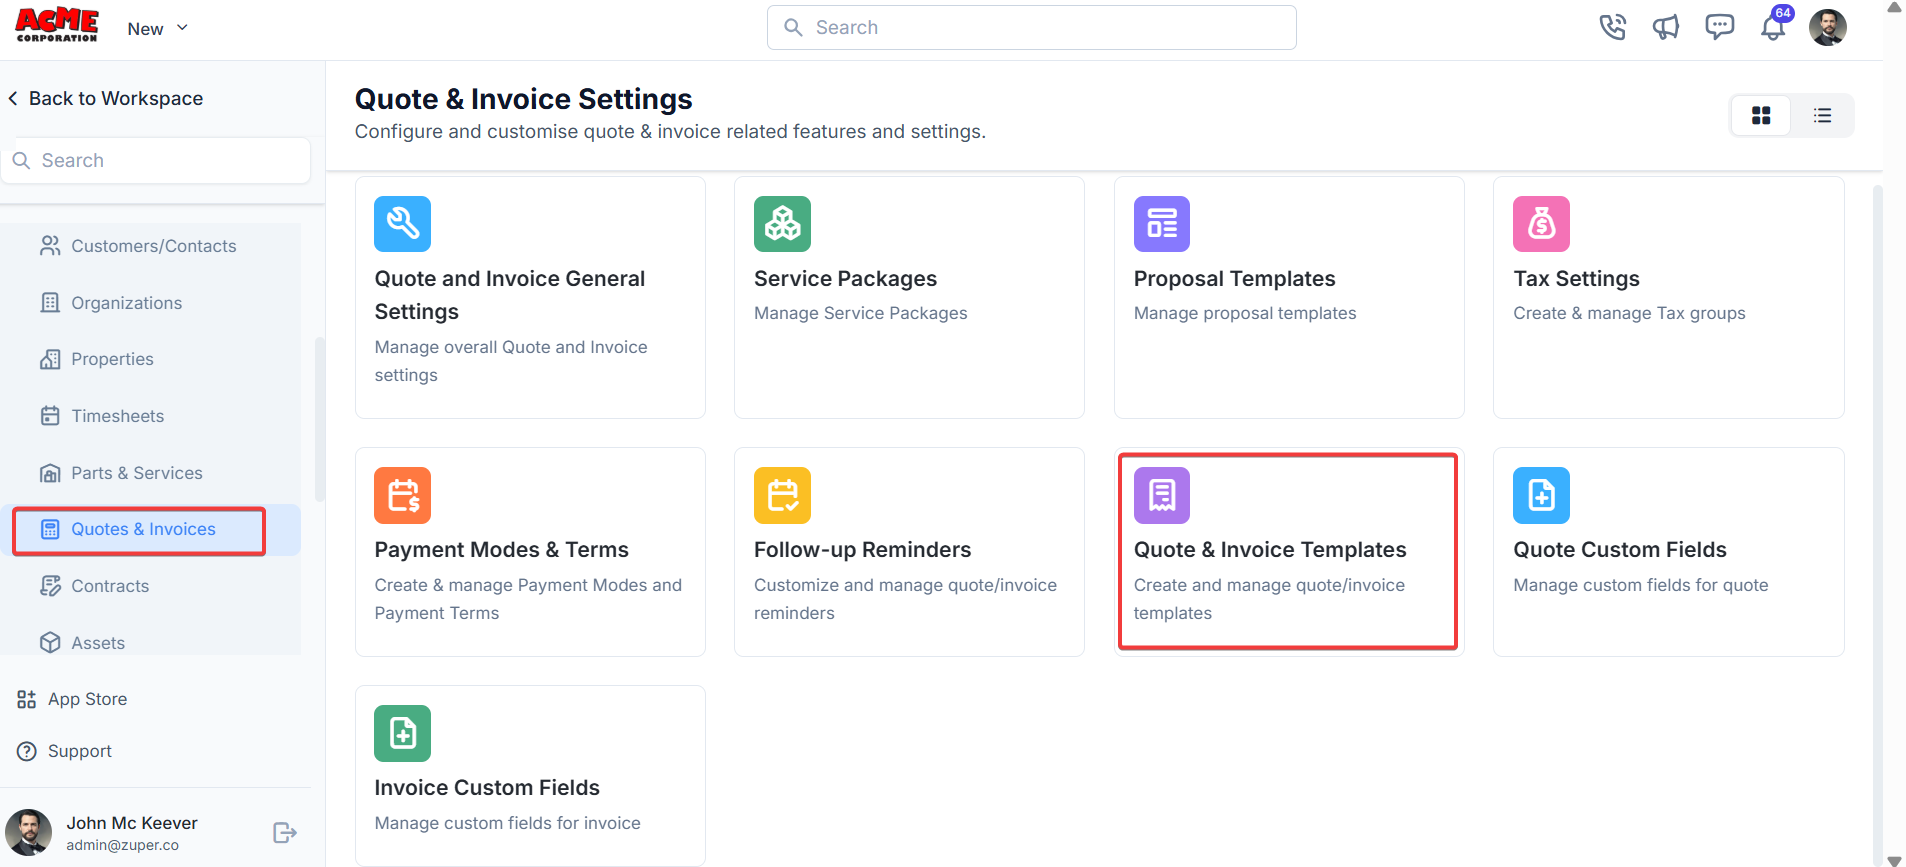 2. Click “**+New Template**” and you can choose either “**Quote**” or “**Invoice** .”
 3. Fill in the template details and click “**Save Template** .”