> ## Documentation Index
> Fetch the complete documentation index at: https://docs.zuper.co/llms.txt
> Use this file to discover all available pages before exploring further.
# Configuring Timesheets
The Timesheets module in Zuper allows you to efficiently manage time tracking, approvals, time-off requests, and shift schedules.
**Navigation**: *Settings -> Modules -> Timesheets - > Timesheet General Settings*
## Timesheet general settings
* Select the “**Settings**” module from the left panel. Under the “**Modules**,” choose the “**Timesheets"**. Select the “**Timesheet General Settings.**”
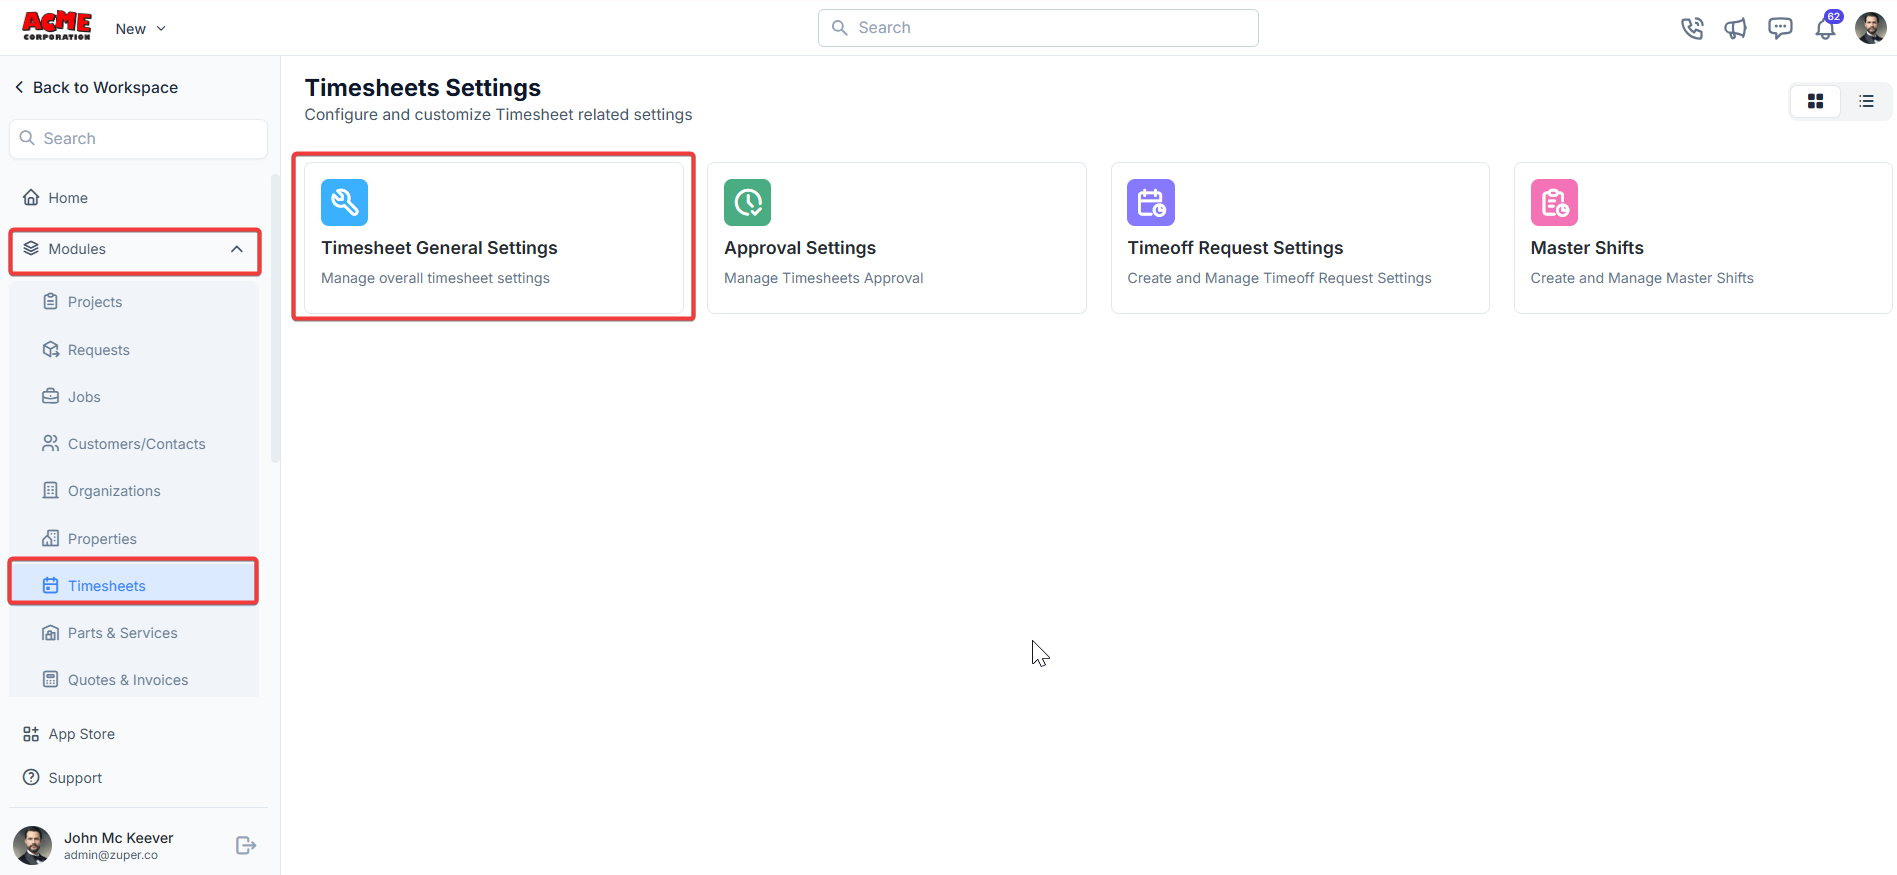 The Timesheet Settings section allows you to configure how timesheets, approvals, and time-off requests are handled.
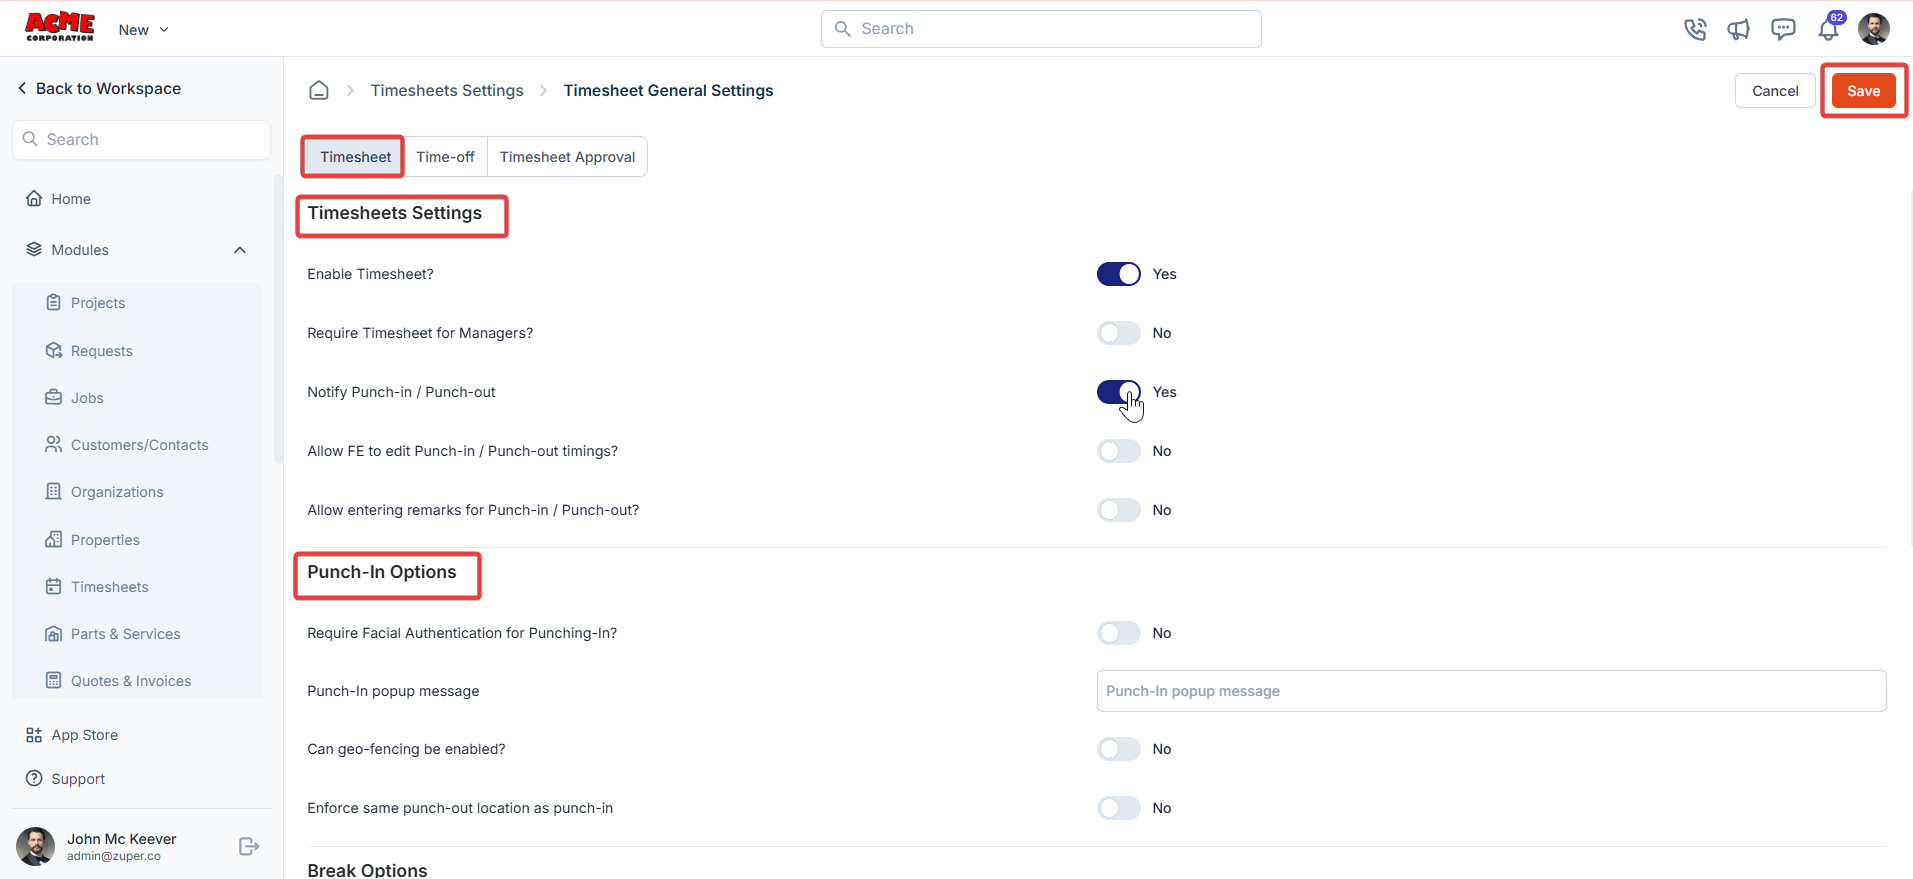
### Timesheet settings
* Enable timesheet?: Toggle to “**Yes**” to allow users to submit timesheets.
* Require Timesheet for Managers: Toggle to “**Yes**" to enable the timesheet for Managers / Admins.
* Notify Punch-in / Punch Out: Notify the supervisors of the user’s punch-in/punch-out.
* Allow FE to edit Punch-in / Punch-out timings? Toggle "**Yes**” to enable FE to edit Punch-in / Punch-out timings. Toggle “**No**” to disable FE to edit Punch-in / Punch-out timings.
* Allow entering remarks for Punch-in / Punch-out: Toggle “**Yes**” to enable FE to enter remarks. Toggle “**No**” to disable FE to enter remarks.
1. **Punch-In options**
* Require facial authentication for Punching-In?: Toggle “ **Yes** ” to enable facial authentication for punching in. Toggle “**No**” to disable facial authentication for punching in.
* Punch-In popup message: Enter a custom message.
* Can Geo-fencing be enabled?: Toggle “**Yes**” to enable geo-fencing. Toggle “ **No** ” to disable geo-fencing.
* Enforce same punch-out location as punch-in: Toggle “**Yes**” to ensure matching locations. Toggle “**No**” to disable matching locations.
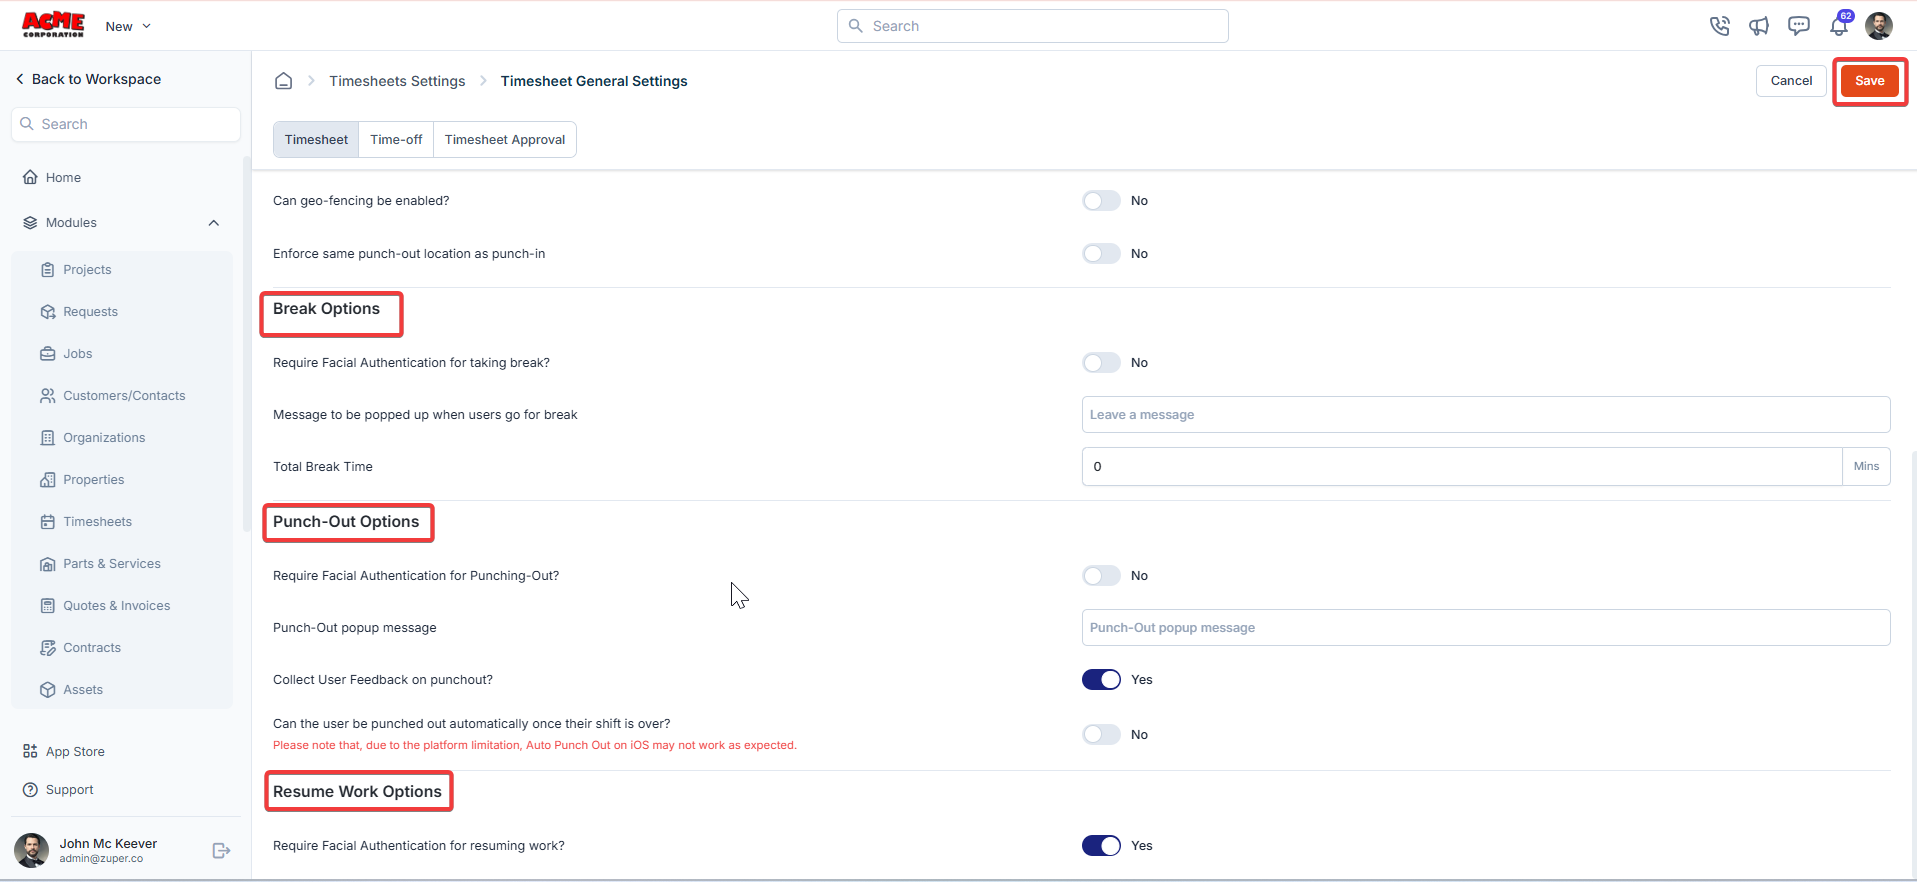
2. **Punch-Out pptions**
* Require facial authentication for Punching-Out?: Toggle “**Yes**” to enable facial authentication for punching out. Toggle “ **No** ” to disable it.
* Punch-Out popup message: Enter a custom message.
* Collect user feedback on punch-out?: Toggle “**Yes**” to collect feedback. Toggle “**No**” to disable feedback collection.
* Can the user be punched out automatically once their shift is over?: Toggle to “**Yes**” for auto punch-out. Toggle “**No**” to disable auto punch-out.
3. **Break Options**
* Require facial authentication for taking a break?: Toggle to “**Yes**” to enable users to use facial verification to take a break. Toggle “**No**” to disable it.
* Message to be popped up when user goes for break: Enter a custom message.
* Total Break Time: Set the allowed break time in minutes
4. **Resume Work Options**
Require facial authentication for resuming work?: Toggle “**Yes**” to facial verification to resume work.
The Timesheet Settings section allows you to configure how timesheets, approvals, and time-off requests are handled.
### Timesheet settings
* Enable timesheet?: Toggle to “**Yes**” to allow users to submit timesheets.
* Require Timesheet for Managers: Toggle to “**Yes**" to enable the timesheet for Managers / Admins.
* Notify Punch-in / Punch Out: Notify the supervisors of the user’s punch-in/punch-out.
* Allow FE to edit Punch-in / Punch-out timings? Toggle "**Yes**” to enable FE to edit Punch-in / Punch-out timings. Toggle “**No**” to disable FE to edit Punch-in / Punch-out timings.
* Allow entering remarks for Punch-in / Punch-out: Toggle “**Yes**” to enable FE to enter remarks. Toggle “**No**” to disable FE to enter remarks.
1. **Punch-In options**
* Require facial authentication for Punching-In?: Toggle “ **Yes** ” to enable facial authentication for punching in. Toggle “**No**” to disable facial authentication for punching in.
* Punch-In popup message: Enter a custom message.
* Can Geo-fencing be enabled?: Toggle “**Yes**” to enable geo-fencing. Toggle “ **No** ” to disable geo-fencing.
* Enforce same punch-out location as punch-in: Toggle “**Yes**” to ensure matching locations. Toggle “**No**” to disable matching locations.
2. **Punch-Out pptions**
* Require facial authentication for Punching-Out?: Toggle “**Yes**” to enable facial authentication for punching out. Toggle “ **No** ” to disable it.
* Punch-Out popup message: Enter a custom message.
* Collect user feedback on punch-out?: Toggle “**Yes**” to collect feedback. Toggle “**No**” to disable feedback collection.
* Can the user be punched out automatically once their shift is over?: Toggle to “**Yes**” for auto punch-out. Toggle “**No**” to disable auto punch-out.
3. **Break Options**
* Require facial authentication for taking a break?: Toggle to “**Yes**” to enable users to use facial verification to take a break. Toggle “**No**” to disable it.
* Message to be popped up when user goes for break: Enter a custom message.
* Total Break Time: Set the allowed break time in minutes
4. **Resume Work Options**
Require facial authentication for resuming work?: Toggle “**Yes**” to facial verification to resume work.
 Click “**Save**” to save the Timesheet settings.
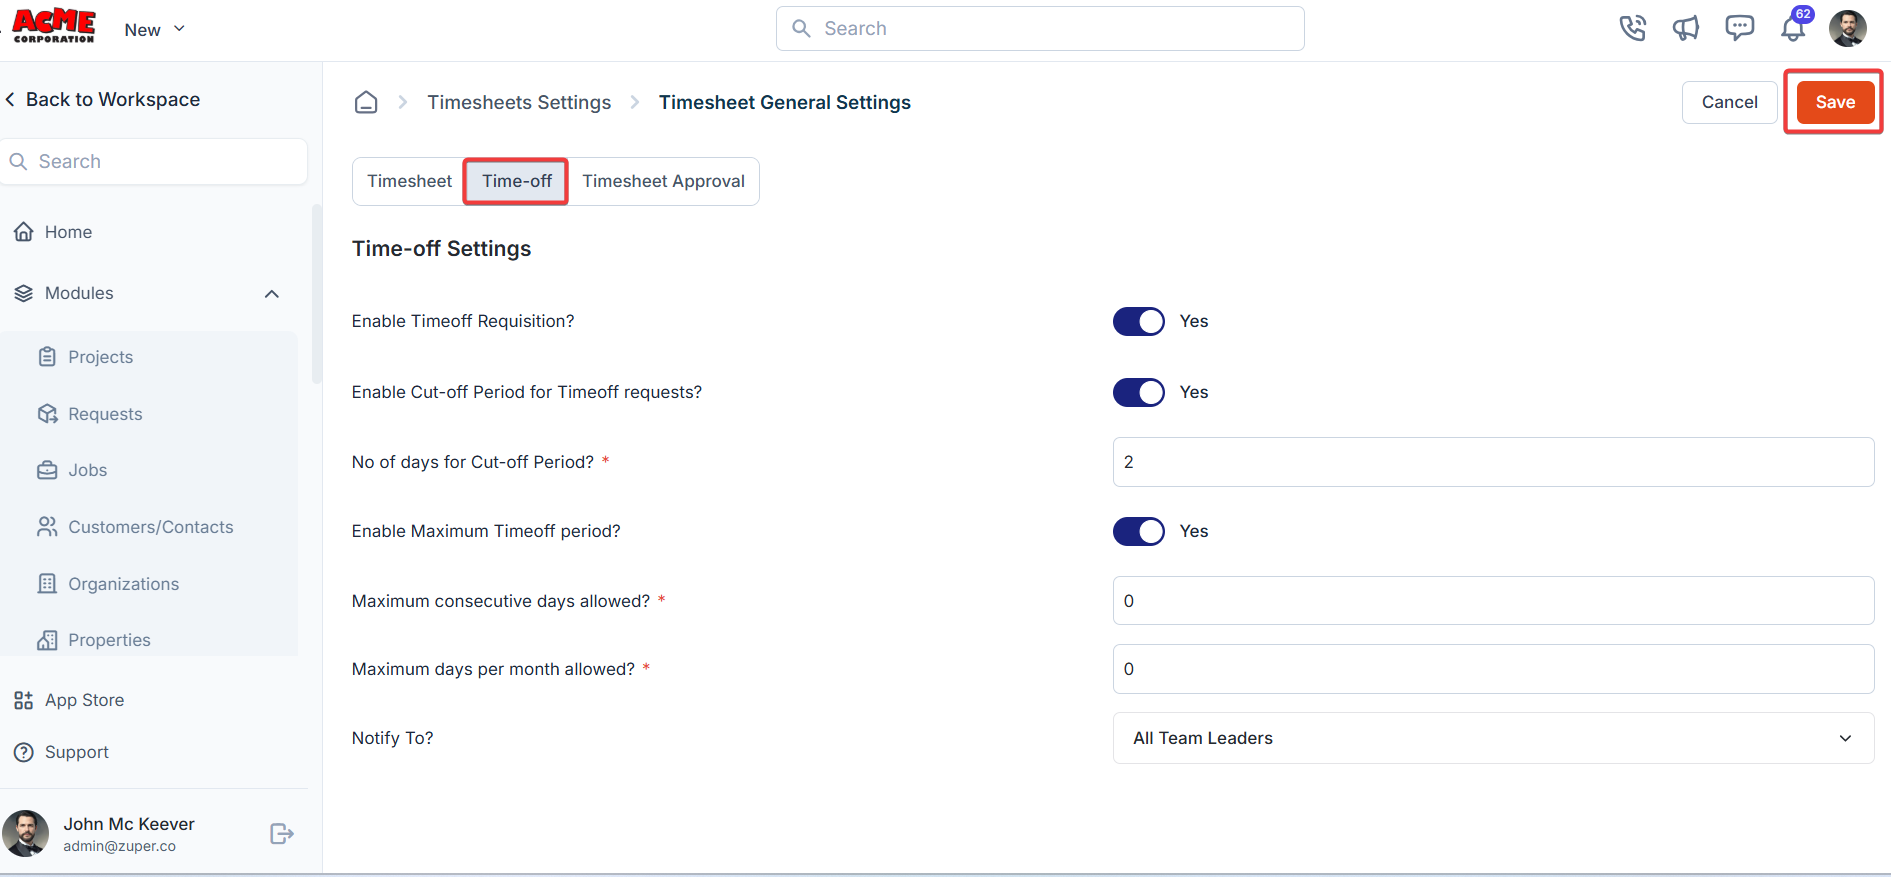
### Time-off settings
* Enable Timeoff Request?: Toggle “**Yes**” to allow time-off requests. Toggle “**No**” to disable time-off requests.
* Enable Cut-off Period for Timeoff requests?: Toggle “**Yes**” to set a cut-off period. Toggle “**No**” to disable the cut-off period
* No of days for Cut-off Period: Specify the number of days.
* Enable Maximum Timeoff period?: Toggle “**Yes**” to set a maximum time-off period. Toggle “**No**” to disable the maximum time-off period
* Maximum consecutive days allowed: Set the maximum number of consecutive days.
* Maximum days per month allowed: Set the monthly limit.
* Notify To: Select who should be notified from the drop-down.
Click “**Save**” to save the Timesheet settings.
### Time-off settings
* Enable Timeoff Request?: Toggle “**Yes**” to allow time-off requests. Toggle “**No**” to disable time-off requests.
* Enable Cut-off Period for Timeoff requests?: Toggle “**Yes**” to set a cut-off period. Toggle “**No**” to disable the cut-off period
* No of days for Cut-off Period: Specify the number of days.
* Enable Maximum Timeoff period?: Toggle “**Yes**” to set a maximum time-off period. Toggle “**No**” to disable the maximum time-off period
* Maximum consecutive days allowed: Set the maximum number of consecutive days.
* Maximum days per month allowed: Set the monthly limit.
* Notify To: Select who should be notified from the drop-down.
 ## Vacation time tracking
**Note**: Zuper does not support vacation time tracking as part of its feature set. To track and manage employee vacation time, you will need to use a dedicated HRMS (Human Resource Management System) software alongside Zuper.
Click “**Save**” to save the settings.
### Timesheet approval settings
* Enable Timesheet Approval?: Toggle “**Yes**” to allow users to submit timesheets. Toggle “**No**” to disable users from submitting timesheets.
* Can timesheet submission be automated?: Toggle “**Yes**” to enable automatic submission. Toggle “**No**” to disable automatic submission.
* Choose timesheet submission frequency: Select from “**Weekly** ,” “**Monthly** ,” or “ **FortNight** .”
* Choose the day on which the timesheet should be submitted: Select a day for submission deadlines.
## Vacation time tracking
**Note**: Zuper does not support vacation time tracking as part of its feature set. To track and manage employee vacation time, you will need to use a dedicated HRMS (Human Resource Management System) software alongside Zuper.
Click “**Save**” to save the settings.
### Timesheet approval settings
* Enable Timesheet Approval?: Toggle “**Yes**” to allow users to submit timesheets. Toggle “**No**” to disable users from submitting timesheets.
* Can timesheet submission be automated?: Toggle “**Yes**” to enable automatic submission. Toggle “**No**” to disable automatic submission.
* Choose timesheet submission frequency: Select from “**Weekly** ,” “**Monthly** ,” or “ **FortNight** .”
* Choose the day on which the timesheet should be submitted: Select a day for submission deadlines.
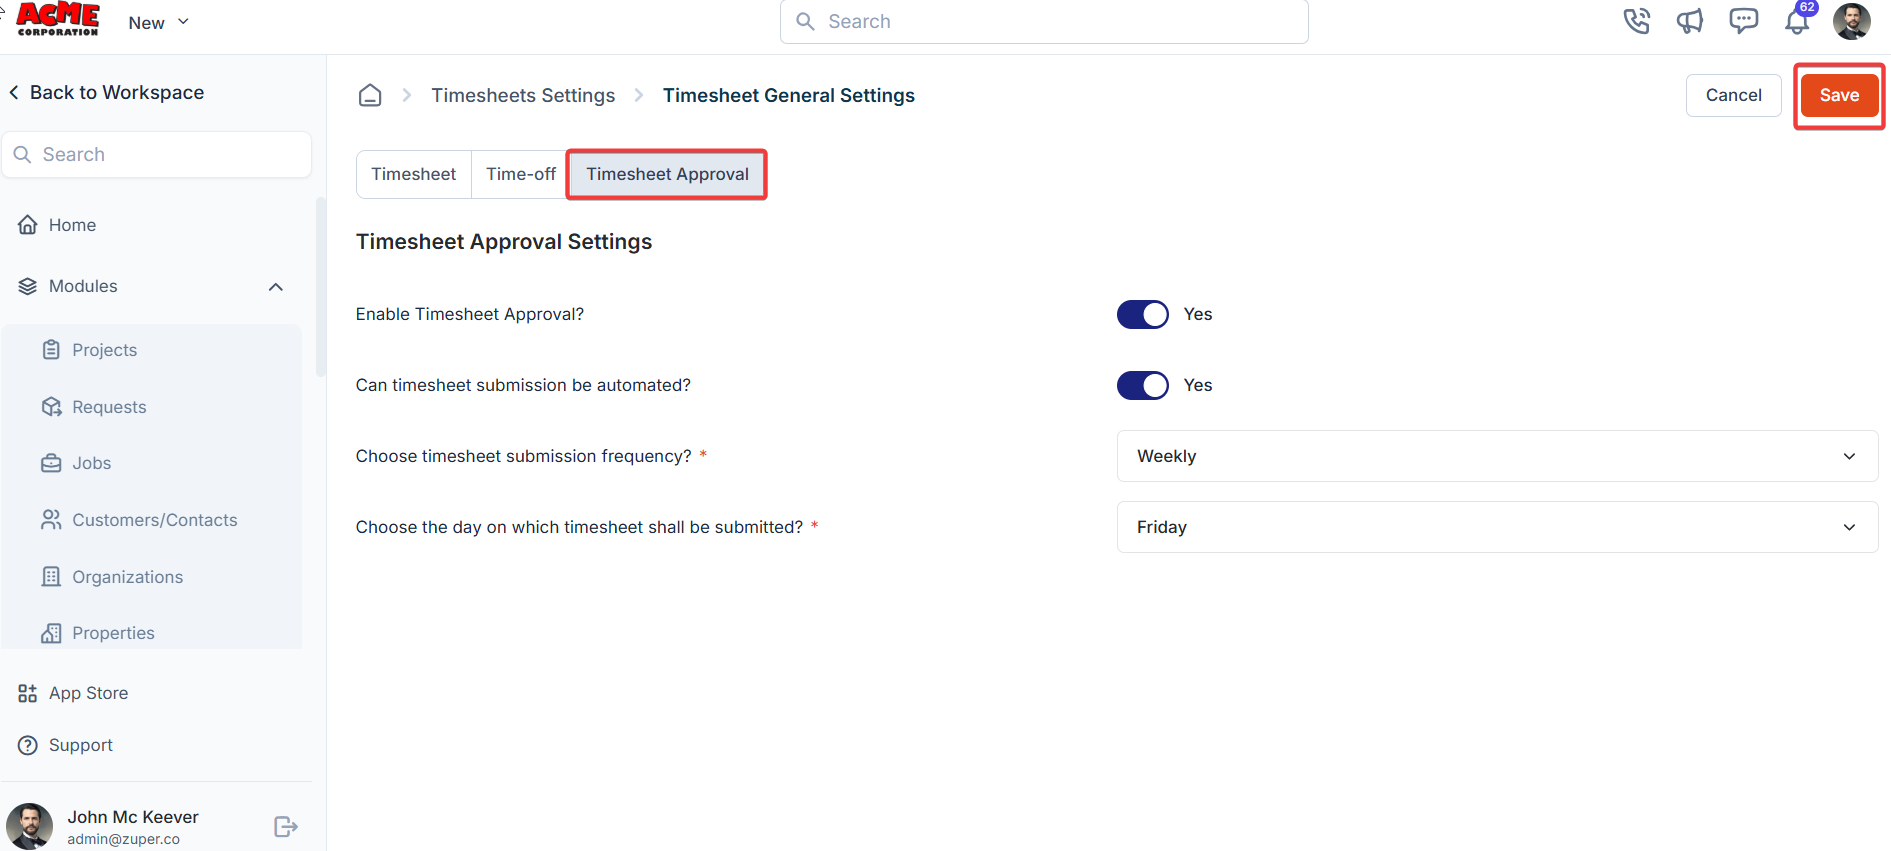 Click “**Save**” to save the settings.
## **Approval settings**
**Navigation**: *Settings -> Modules -> Timesheets - > Approval Settings*
* Select the “**Settings**” module from the left panel. Under the “**Modules**,” choose the “**Timesheets"**. Select the “**Approval Settings.**”
Click “**Save**” to save the settings.
## **Approval settings**
**Navigation**: *Settings -> Modules -> Timesheets - > Approval Settings*
* Select the “**Settings**” module from the left panel. Under the “**Modules**,” choose the “**Timesheets"**. Select the “**Approval Settings.**”
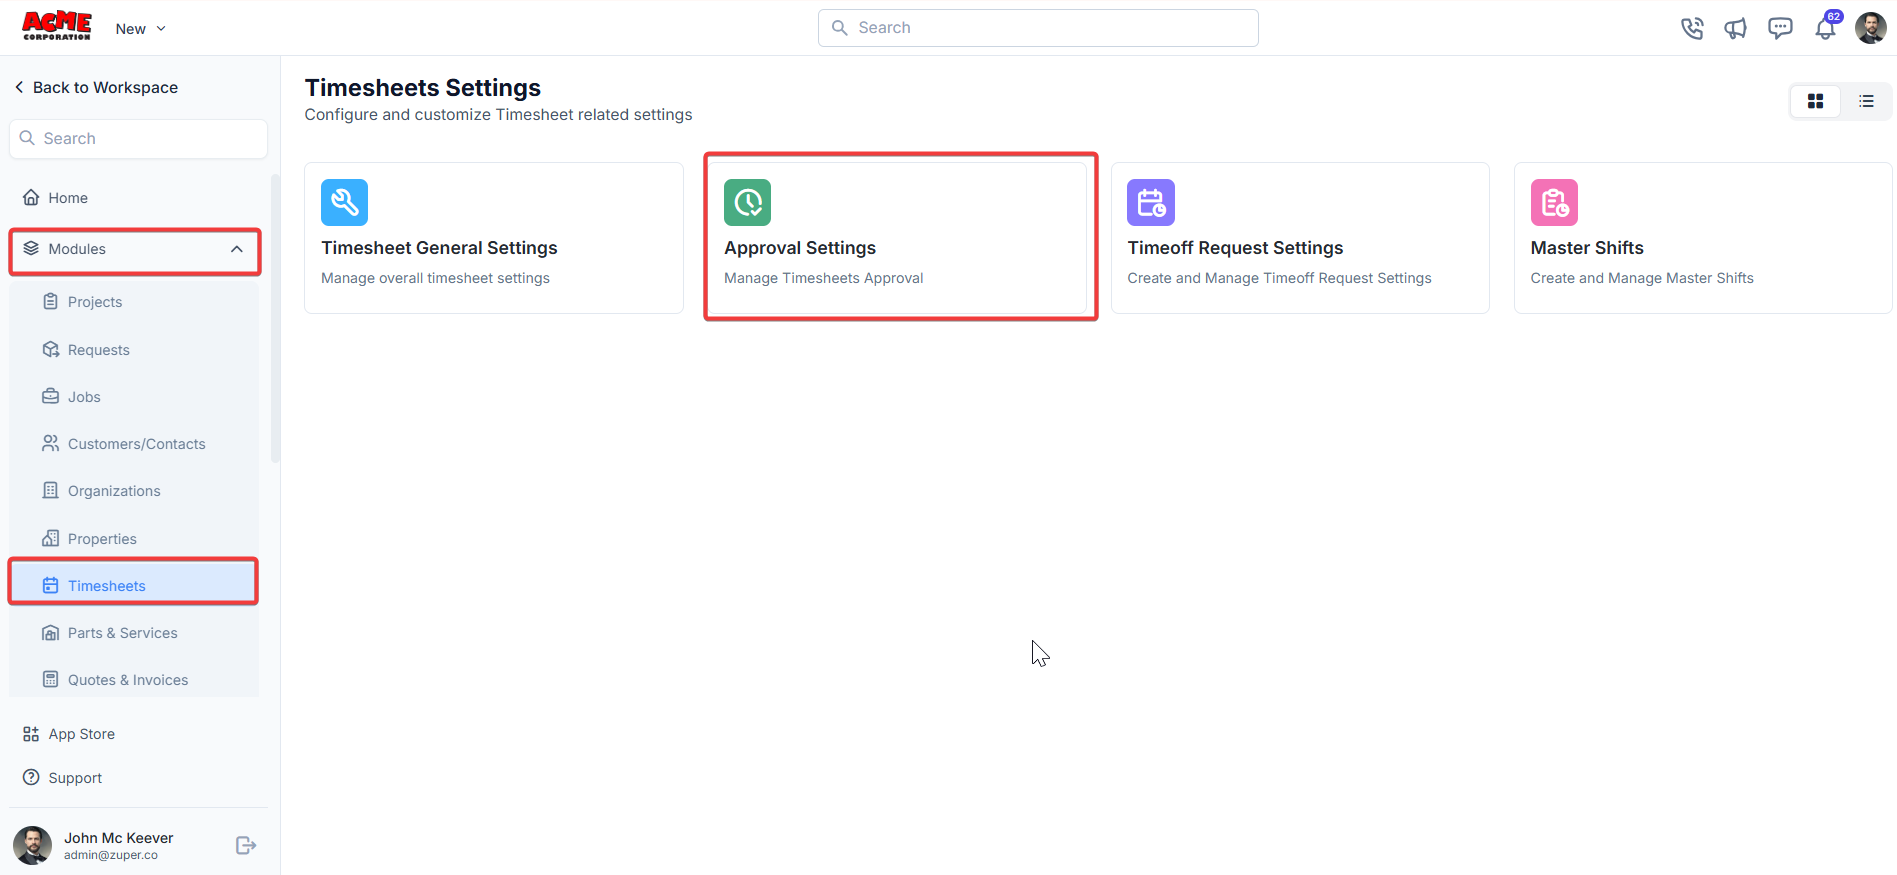 * Add a new hierarchy by clicking + New Hierarchy.
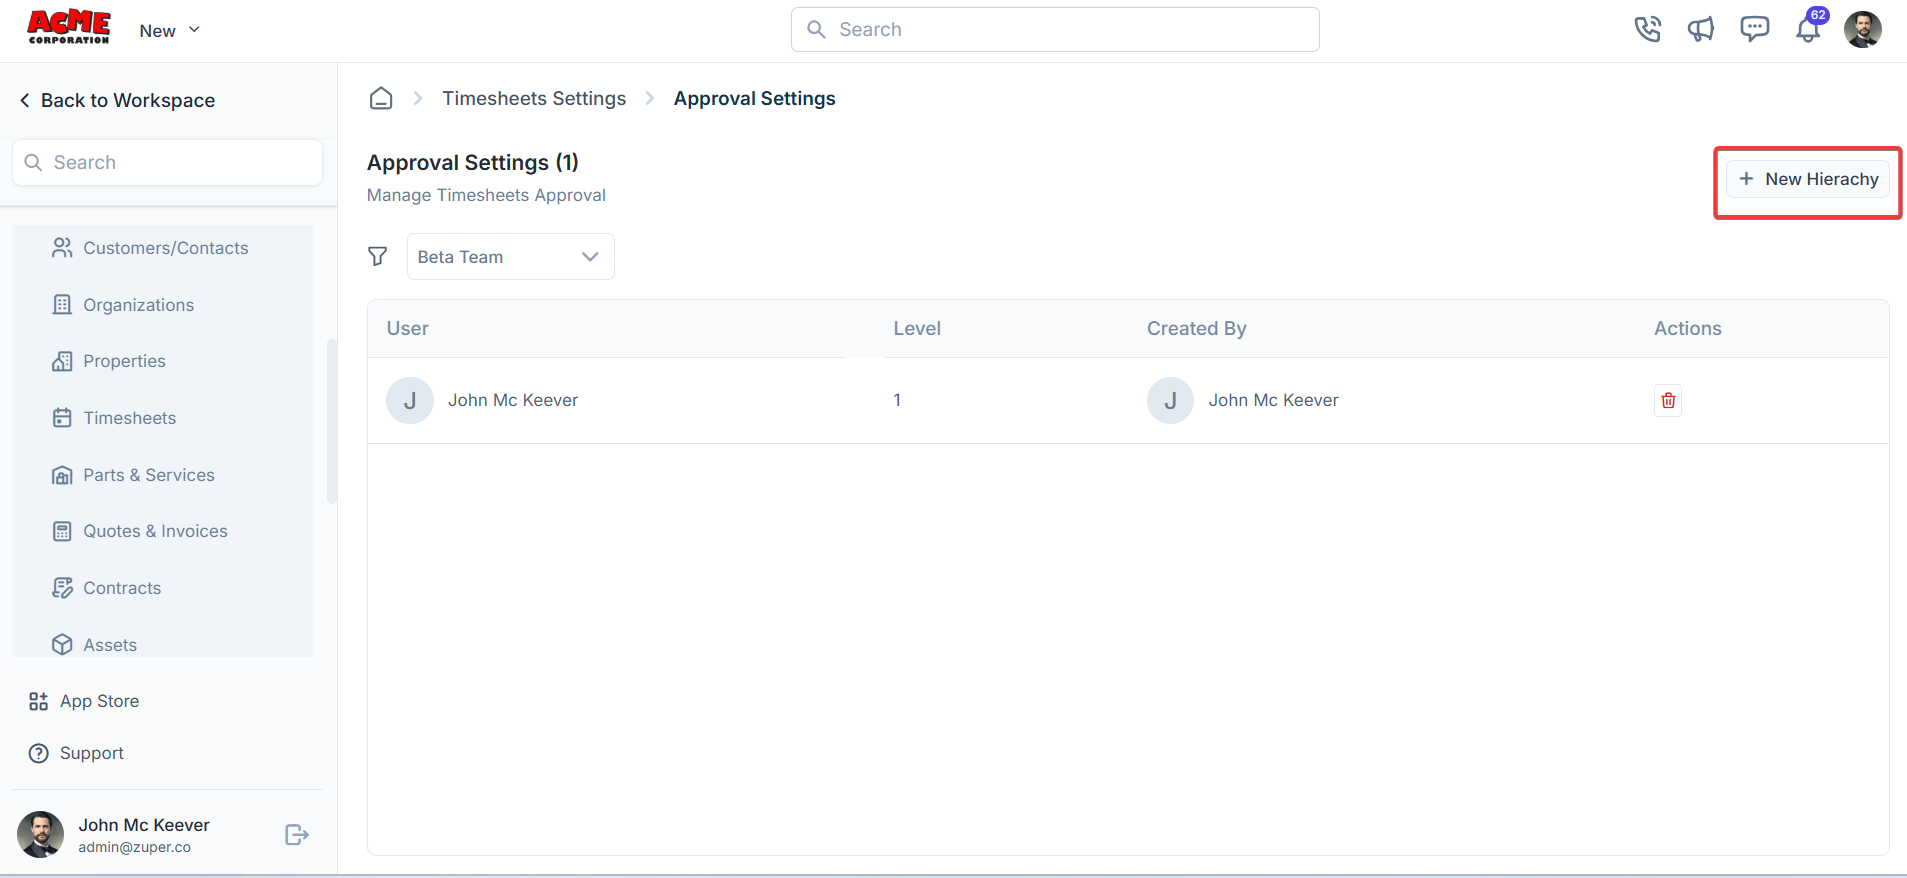 * Assign users and levels for approval (For instance, John McKeever at Level 1).
 ## Time-off Request Settings
**Navigation**: *Settings -> Modules -> Timesheets - > Time off Request Settings*
* Select the “**Settings**” module from the left panel. Under the “**Modules**,” choose “Timesheets.” Then, select “**Timeoff Request Settings.**”
## Time-off Request Settings
**Navigation**: *Settings -> Modules -> Timesheets - > Time off Request Settings*
* Select the “**Settings**” module from the left panel. Under the “**Modules**,” choose “Timesheets.” Then, select “**Timeoff Request Settings.**”
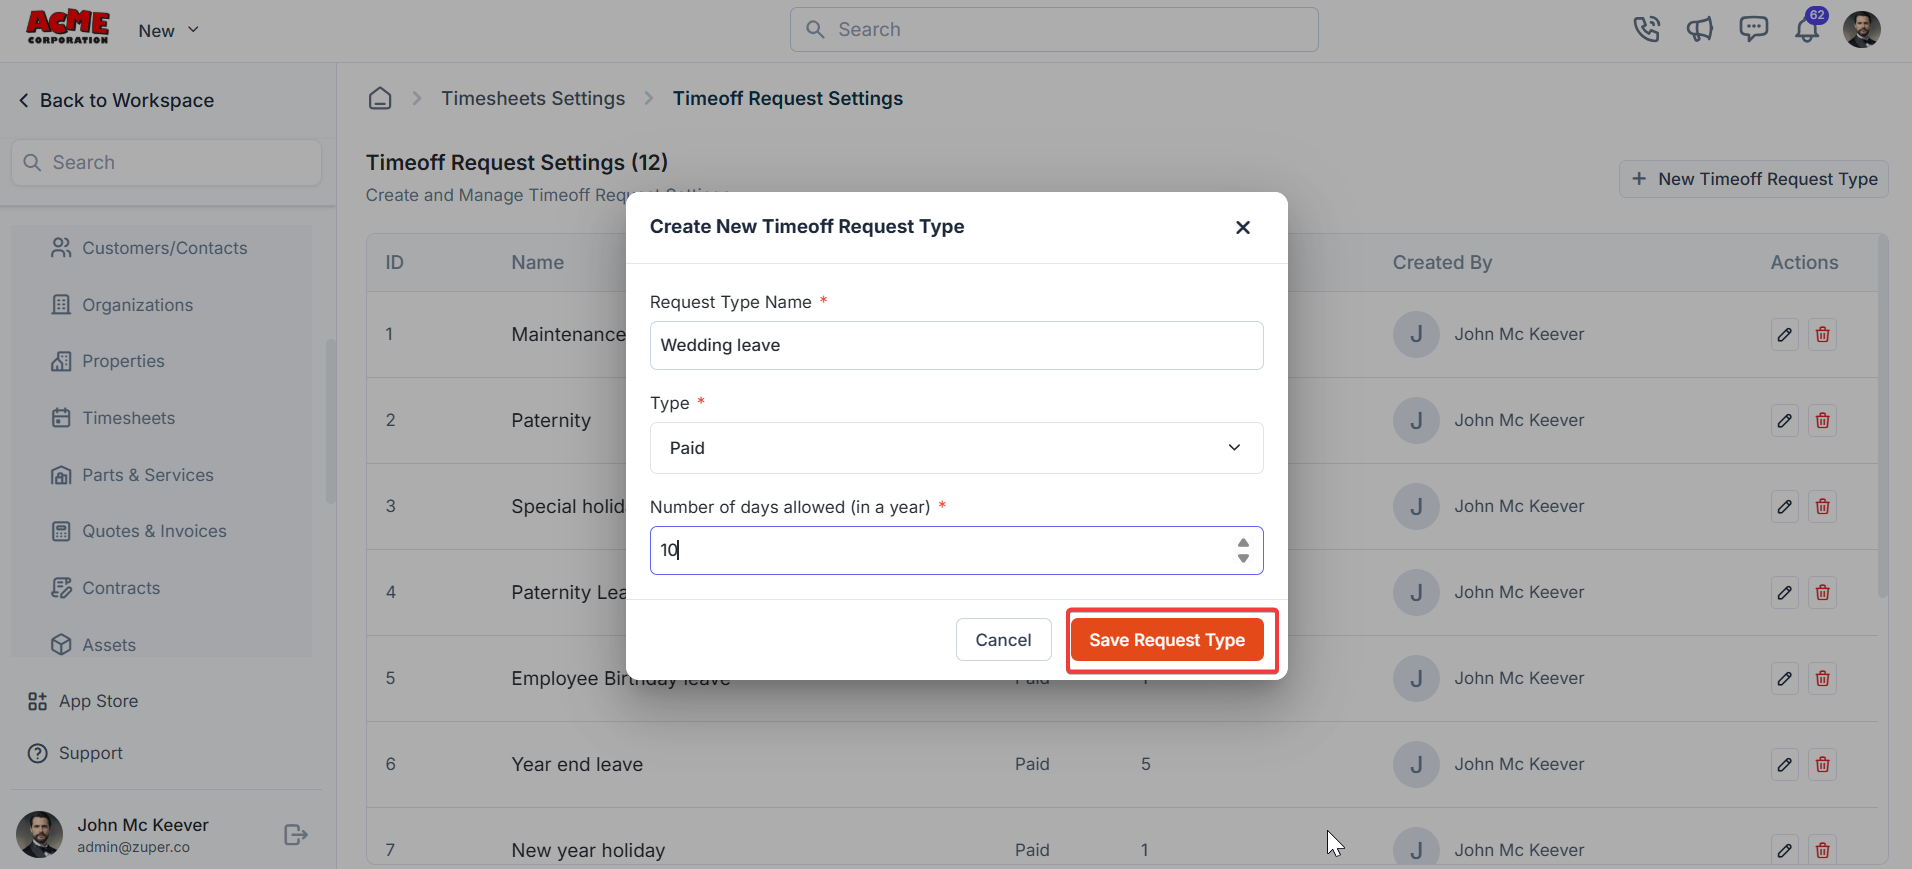
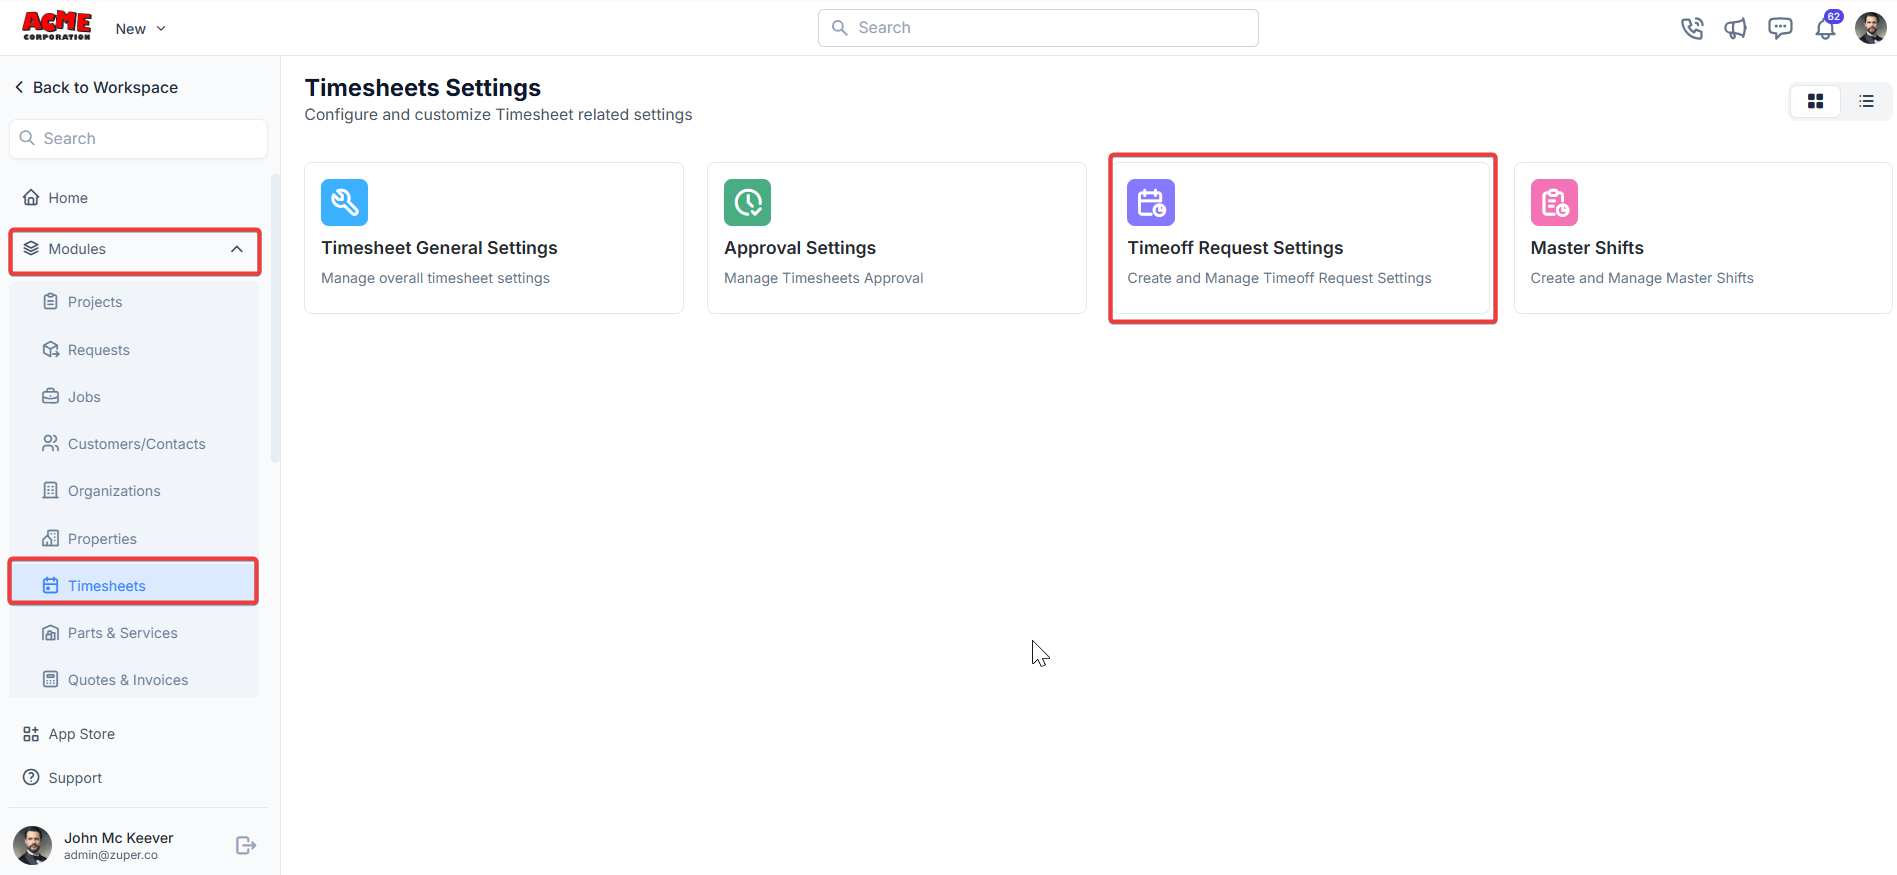 * Click + New Timeoff Request Type to create a new type.
Fill in details:
* Request Type Name: Enter the request type.
* Type: Select “**Paid**” or “**Unpaid**” from the drop-down.
* Number of days allowed (in a year): Enter the days for the custom leave. Click the Save Request Type to save.
## Master Shifts
**Navigation**: *Settings -> Modules -> Timesheets - > Master Shifts*
* Select the “**Settings**” module from the left panel. Under the “**Modules**,” choose “Timesheets.” Then, select “**Master Shifts.**”
* Click + New Timeoff Request Type to create a new type.
Fill in details:
* Request Type Name: Enter the request type.
* Type: Select “**Paid**” or “**Unpaid**” from the drop-down.
* Number of days allowed (in a year): Enter the days for the custom leave. Click the Save Request Type to save.
## Master Shifts
**Navigation**: *Settings -> Modules -> Timesheets - > Master Shifts*
* Select the “**Settings**” module from the left panel. Under the “**Modules**,” choose “Timesheets.” Then, select “**Master Shifts.**”
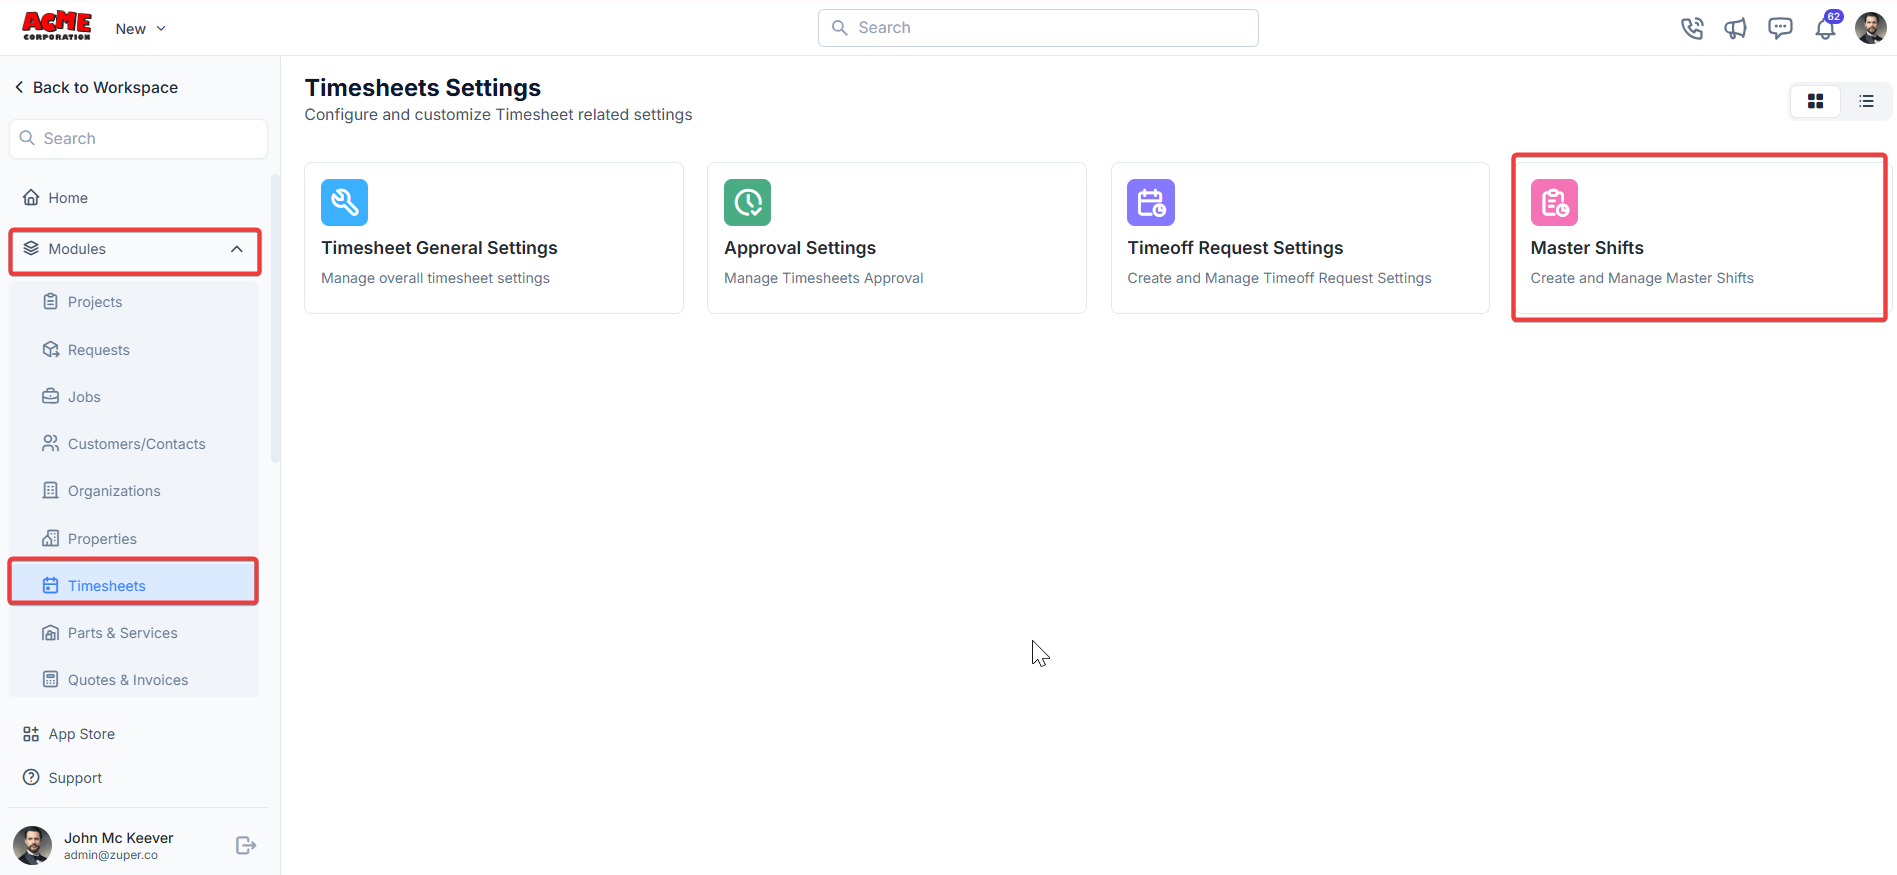 * Click + New Shift to create a new shift.
 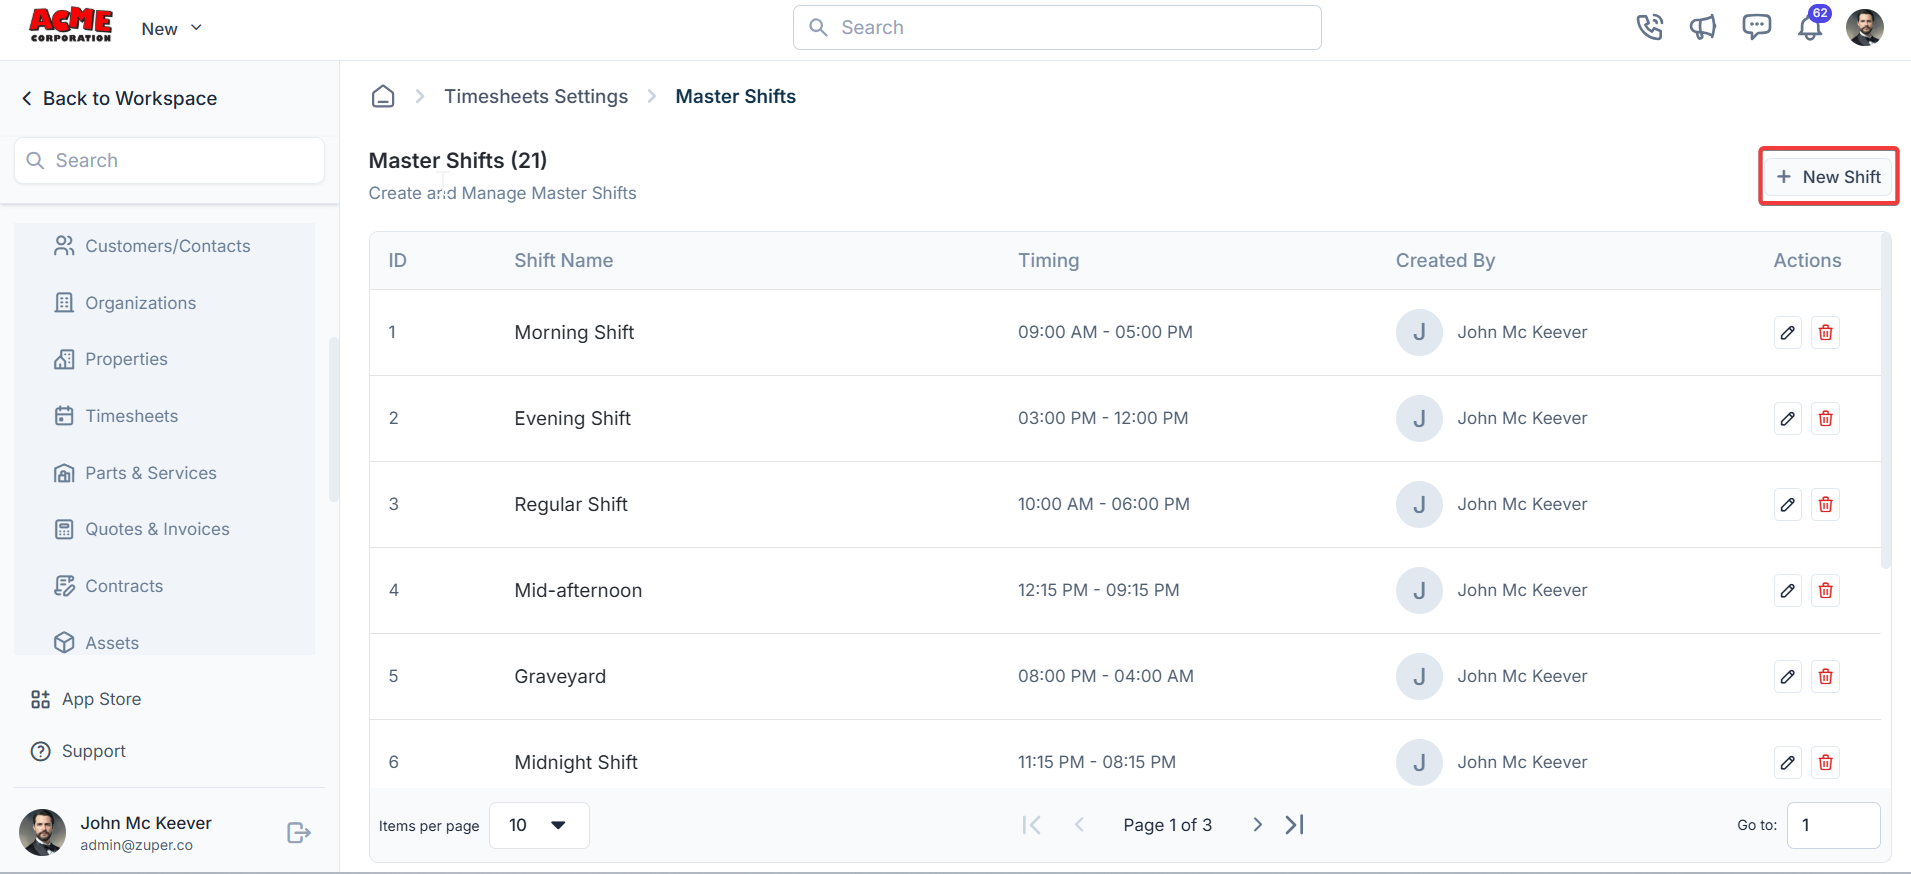 Fill in details:
* Shift Name (**Mandatory**) – Enter the name of the shift.
* From Time (**Mandatory**) – Choose the shift’s start time.
* To Time (**Mandatory**) – Choose the end time of the shift.
* Choose Frequency (**Mandatory**) – Choose the shift frequency range.
* Repeat Every (**Mandatory**) – Enter the number to which the shift can be repeated.
Fill in details:
* Shift Name (**Mandatory**) – Enter the name of the shift.
* From Time (**Mandatory**) – Choose the shift’s start time.
* To Time (**Mandatory**) – Choose the end time of the shift.
* Choose Frequency (**Mandatory**) – Choose the shift frequency range.
* Repeat Every (**Mandatory**) – Enter the number to which the shift can be repeated.
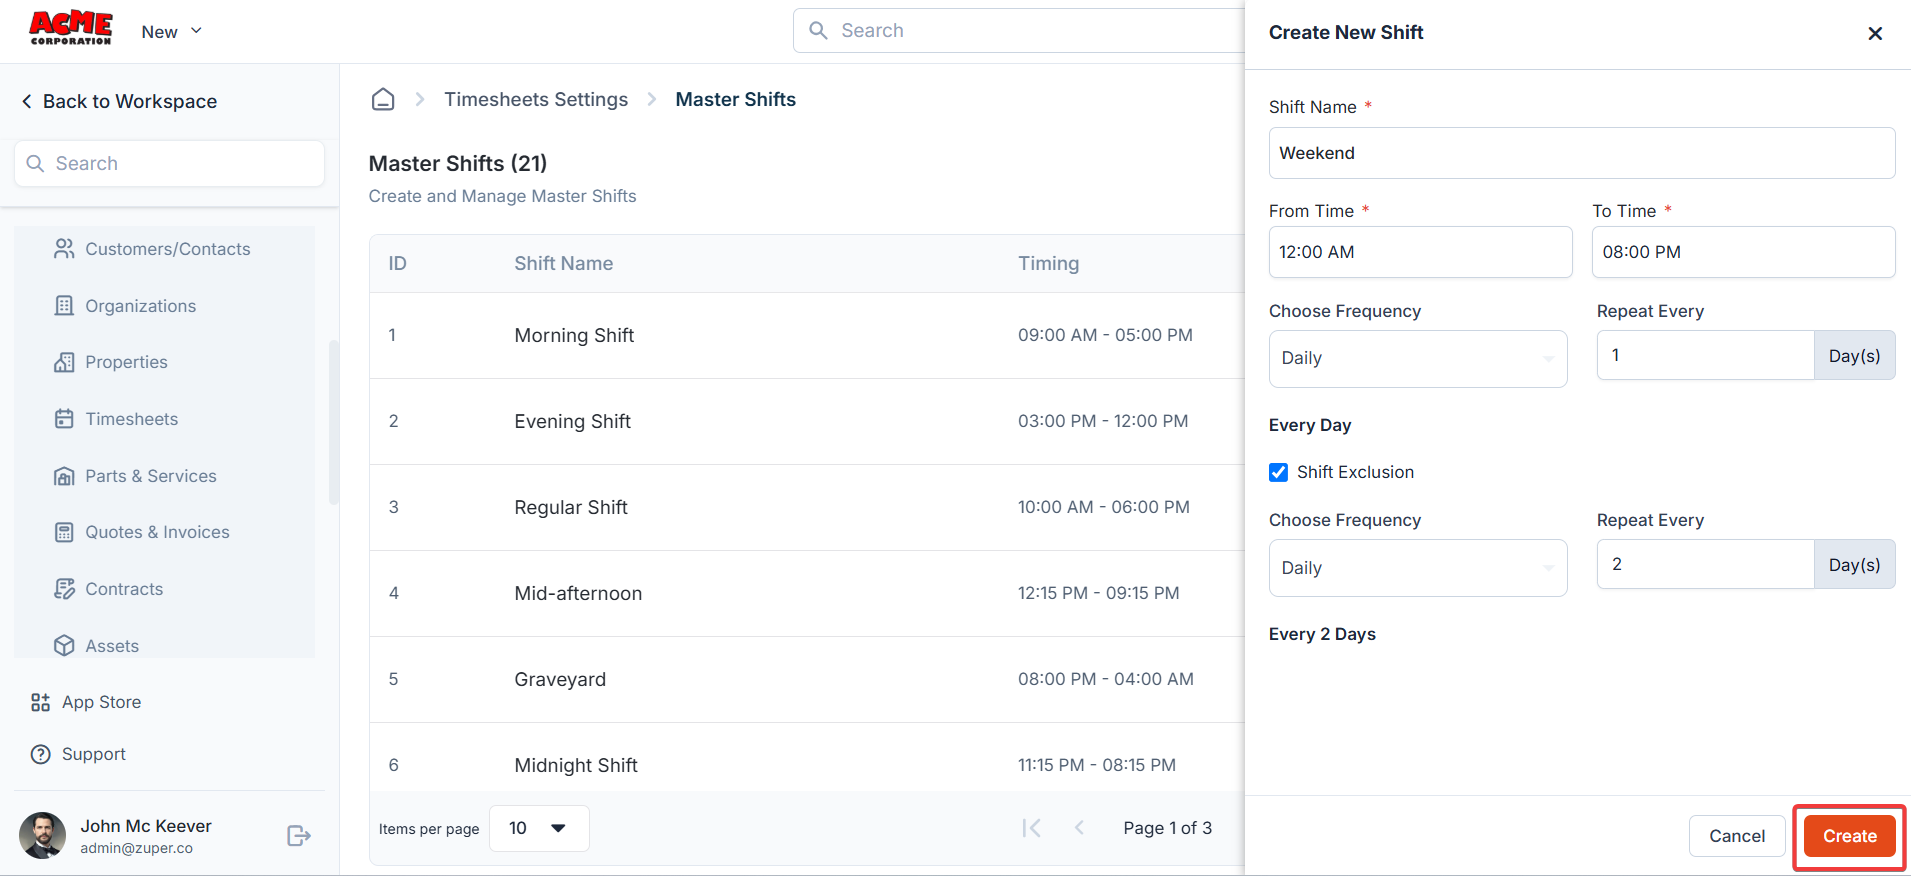 Click "**Create**" to save the shift.
Zuper’s Timesheets module streamlines workforce management by offering robust tools for time tracking, approvals, time-off requests, and shift scheduling, enhancing operational efficiency and productivity.
Click "**Create**" to save the shift.
Zuper’s Timesheets module streamlines workforce management by offering robust tools for time tracking, approvals, time-off requests, and shift scheduling, enhancing operational efficiency and productivity.