> ## Documentation Index
> Fetch the complete documentation index at: https://docs.zuper.co/llms.txt
> Use this file to discover all available pages before exploring further.
# User & Team Settings
**Navigation**: *Settings -> Users - > Users General Settings*
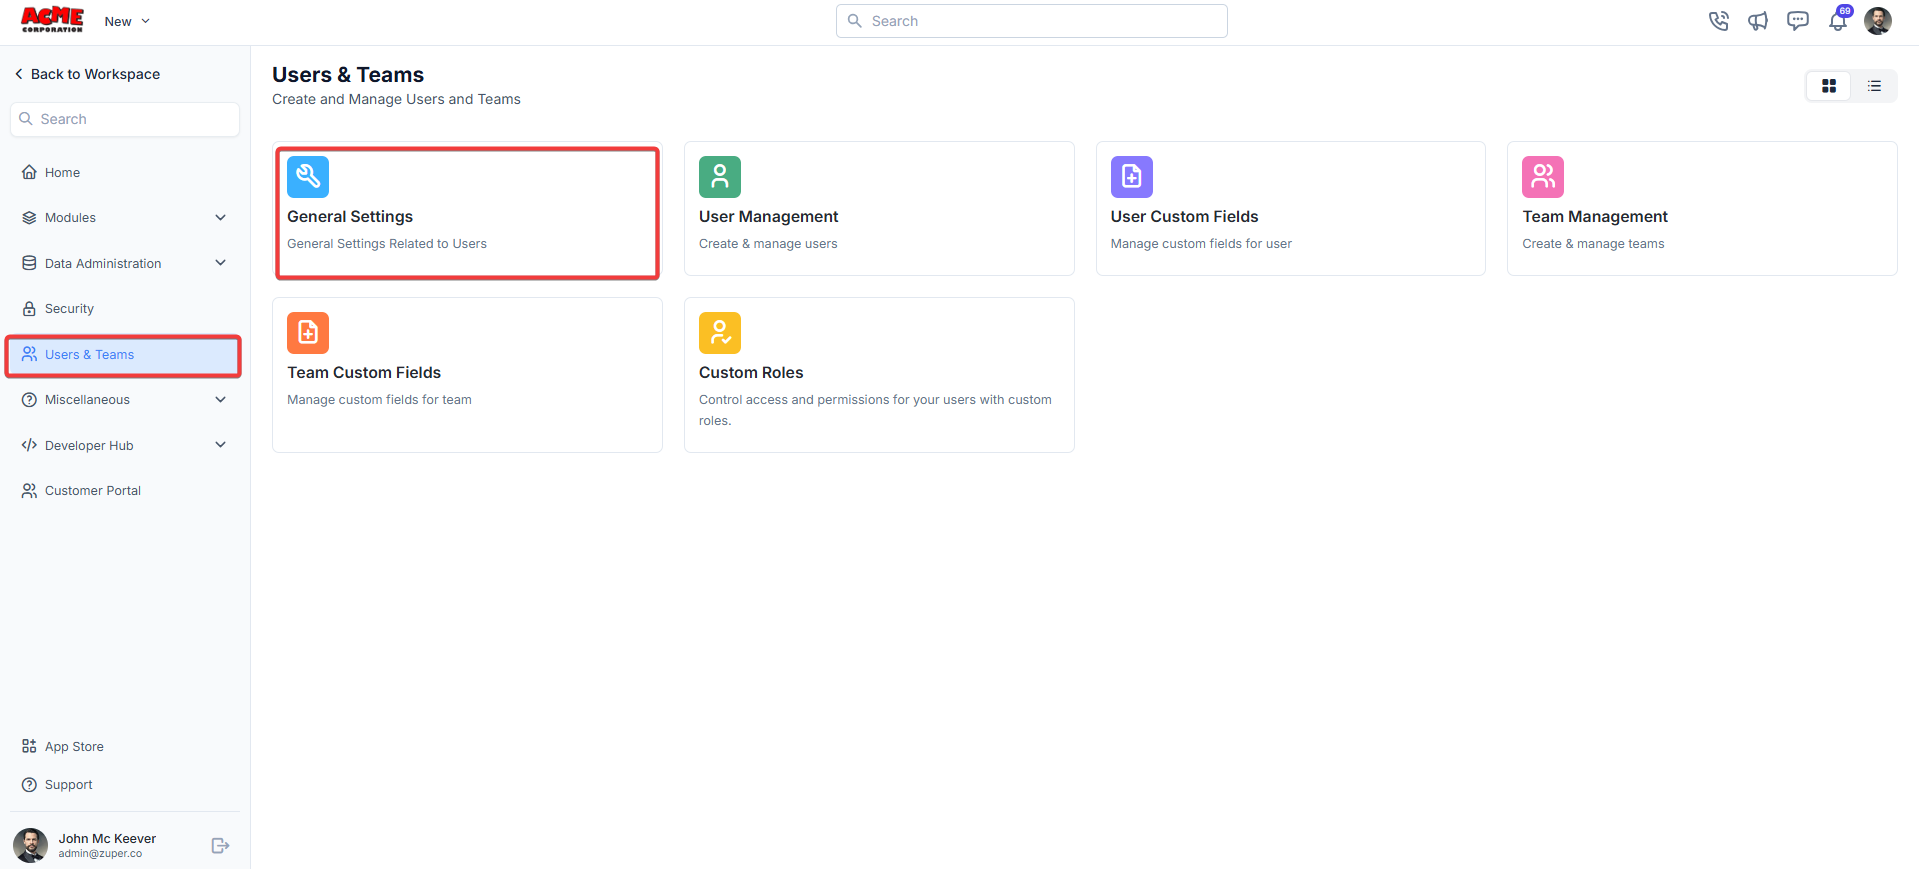
## **Users & Teams general settings**
* Select the "**Settings**" module from the left panel. Choose the "**Users and Teams**." Select the "**Users General Settings**."
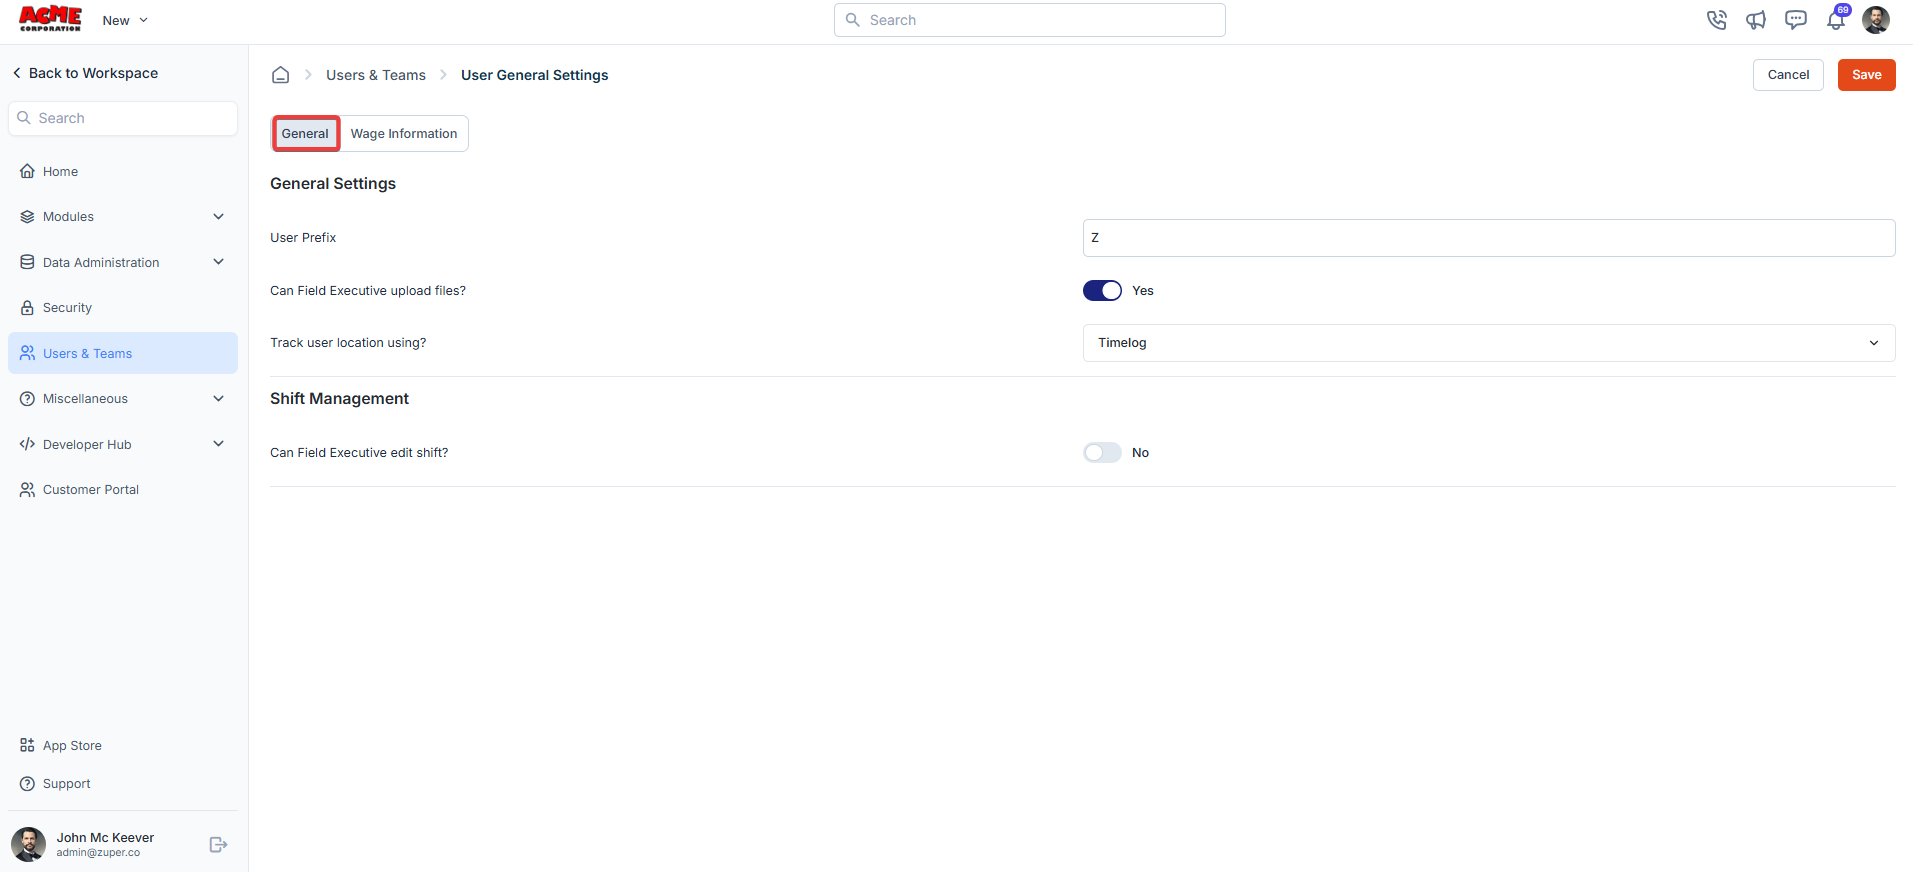
 * User Prefix - Enter the default prefix that needs to be added to the user ID.
* Can Field Executive upload files? - Toggle the switch to **Yes** to permit field executives to upload files or **No** to disable this feature.
* Track user location using? - Select **Timelog** from the dropdown menu to enable location tracking via **Timelog**, or choose Timesheet from the dropdown menu to enable location tracking via **Timesheet**.
### **Shift management**
* Can Field Executive edit Shift? - Toggle the switch to **Yes** to permit field executives to edit shift or **No** to disable this feature.
* User Prefix - Enter the default prefix that needs to be added to the user ID.
* Can Field Executive upload files? - Toggle the switch to **Yes** to permit field executives to upload files or **No** to disable this feature.
* Track user location using? - Select **Timelog** from the dropdown menu to enable location tracking via **Timelog**, or choose Timesheet from the dropdown menu to enable location tracking via **Timesheet**.
### **Shift management**
* Can Field Executive edit Shift? - Toggle the switch to **Yes** to permit field executives to edit shift or **No** to disable this feature.
 ### **Wage information**
* Enable hourly labor charges - Toggle the switch to **Yes** to activate hourly labor charges for your team.
* Default Hourly Labor Charges (**Mandatory**) - Enter the default hourly rate in USD. This rate will apply unless overridden by the Admin or Team Leader at the module level.
* Minimum Roundup Multiple Number (**Mandatory**) - Set the minimum time increment for rounding labor charges.
* Worker Comp Code - Enter the Worker Compensation Code for your team. This field tracks and reports worker compensation details.
* Burden Rate - Input the burden rate and choose the percentage, multiplier or addition from the drop down menu. This rate accounts for additional costs (e.g., benefits, taxes) applied to labor charges.
### **Wage information**
* Enable hourly labor charges - Toggle the switch to **Yes** to activate hourly labor charges for your team.
* Default Hourly Labor Charges (**Mandatory**) - Enter the default hourly rate in USD. This rate will apply unless overridden by the Admin or Team Leader at the module level.
* Minimum Roundup Multiple Number (**Mandatory**) - Set the minimum time increment for rounding labor charges.
* Worker Comp Code - Enter the Worker Compensation Code for your team. This field tracks and reports worker compensation details.
* Burden Rate - Input the burden rate and choose the percentage, multiplier or addition from the drop down menu. This rate accounts for additional costs (e.g., benefits, taxes) applied to labor charges.
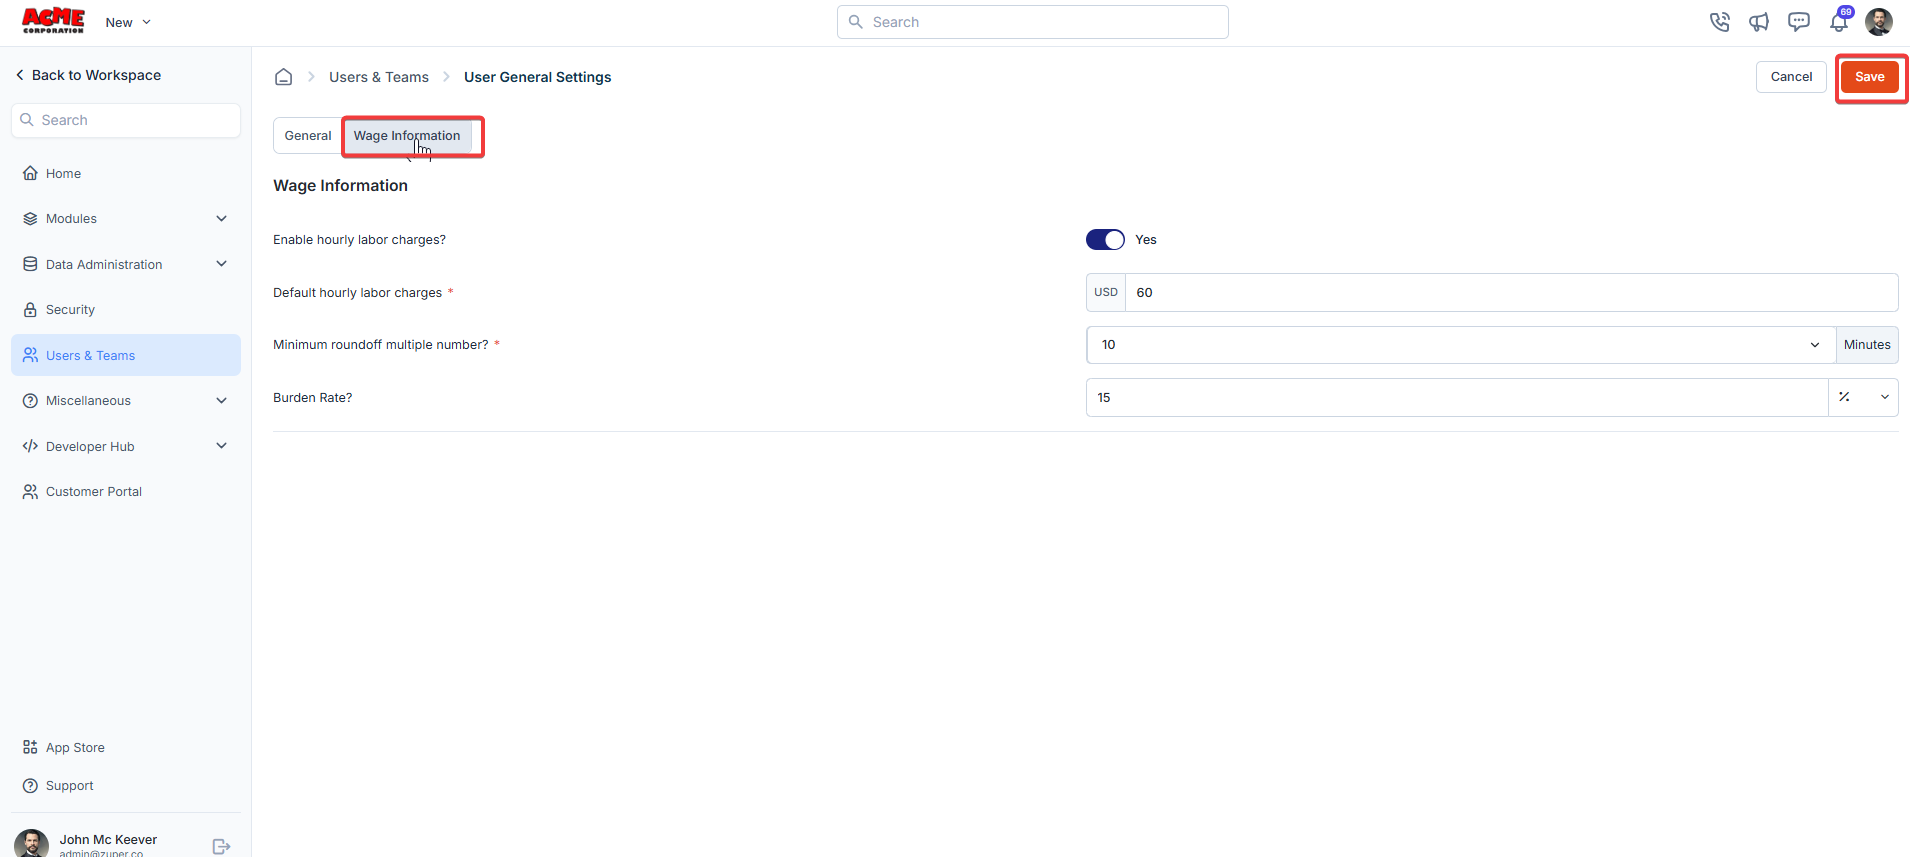 Click the "**Save**" button to save the user's general settings.
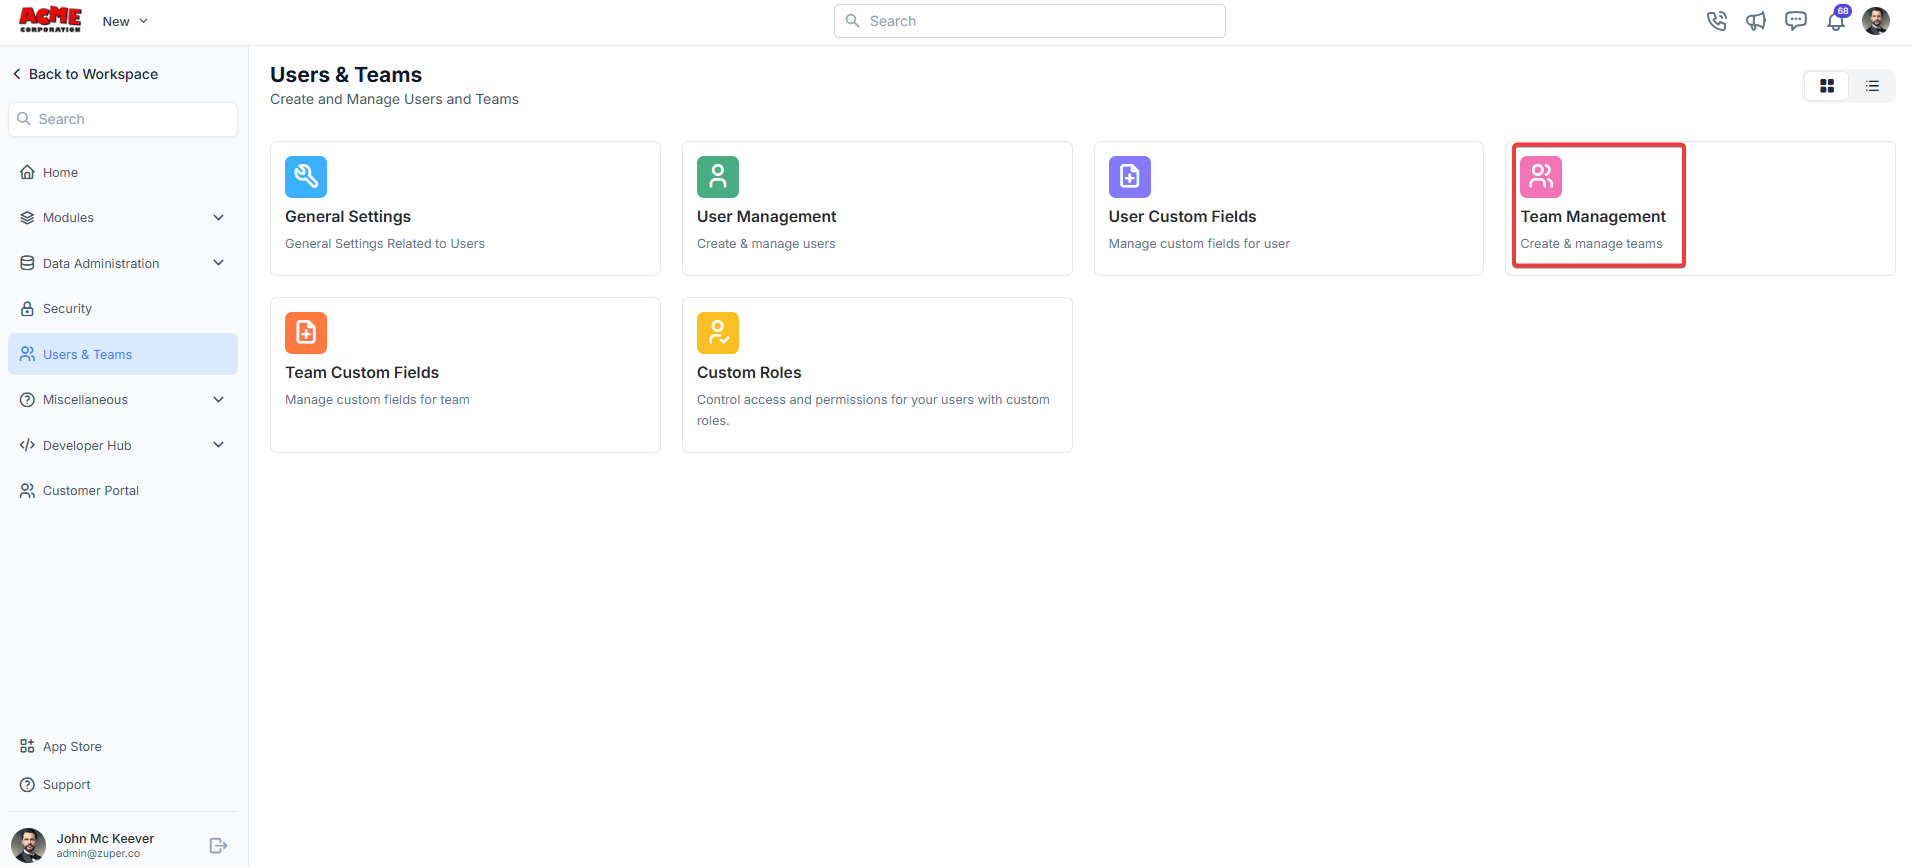
## **Team management**
The Team management allows you to create, view, and manage teams efficiently.
**Navigation**: *Settings -> Modules -> Users - > Team Custom Fields*
1. Select the "**Settings**" module from the left panel. Under the "**Modules**," choose the "**Users and Teams**." Select the "**Team Management**."
Click the "**Save**" button to save the user's general settings.
## **Team management**
The Team management allows you to create, view, and manage teams efficiently.
**Navigation**: *Settings -> Modules -> Users - > Team Custom Fields*
1. Select the "**Settings**" module from the left panel. Under the "**Modules**," choose the "**Users and Teams**." Select the "**Team Management**."
 2. Under "**Team Management**," Click the "**+ Create New Team"** button at the top right corner of the page.
 3. Fill in the details.
* **Team Name (Mandatory)**: Enter a unique name for your team. This field is required.
* **Team Color**: Select a color for your team from the available options. This helps visually distinguish the team in the list.
* **Timezone**: Choose the appropriate timezone for the team.
* **Team Description**: Briefly describe the team’s purpose or role.
* New **Non-Dispatchable**: Select this checkbox to mark a team as non-dispatchable. When selected, the team is hidden from the Dispatch Board team picker, preventing dispatchers from assigning jobs to it.\
This is especially useful in blocking back-office (or) operations teams such as Finance, HR, Warehouse, etc., from being dispatched to. Helps the Dispatch Board focus only on field teams. If the checkbox is left unselected (*which is the default*), the teams will remain visible on the Dispatch Board.
3. Fill in the details.
* **Team Name (Mandatory)**: Enter a unique name for your team. This field is required.
* **Team Color**: Select a color for your team from the available options. This helps visually distinguish the team in the list.
* **Timezone**: Choose the appropriate timezone for the team.
* **Team Description**: Briefly describe the team’s purpose or role.
* New **Non-Dispatchable**: Select this checkbox to mark a team as non-dispatchable. When selected, the team is hidden from the Dispatch Board team picker, preventing dispatchers from assigning jobs to it.\
This is especially useful in blocking back-office (or) operations teams such as Finance, HR, Warehouse, etc., from being dispatched to. Helps the Dispatch Board focus only on field teams. If the checkbox is left unselected (*which is the default*), the teams will remain visible on the Dispatch Board.
 Click "**Create**" to create the new team.
## **Custom roles**
**Navigation**: *Settings -> Modules -> Users - > Custom Roles*
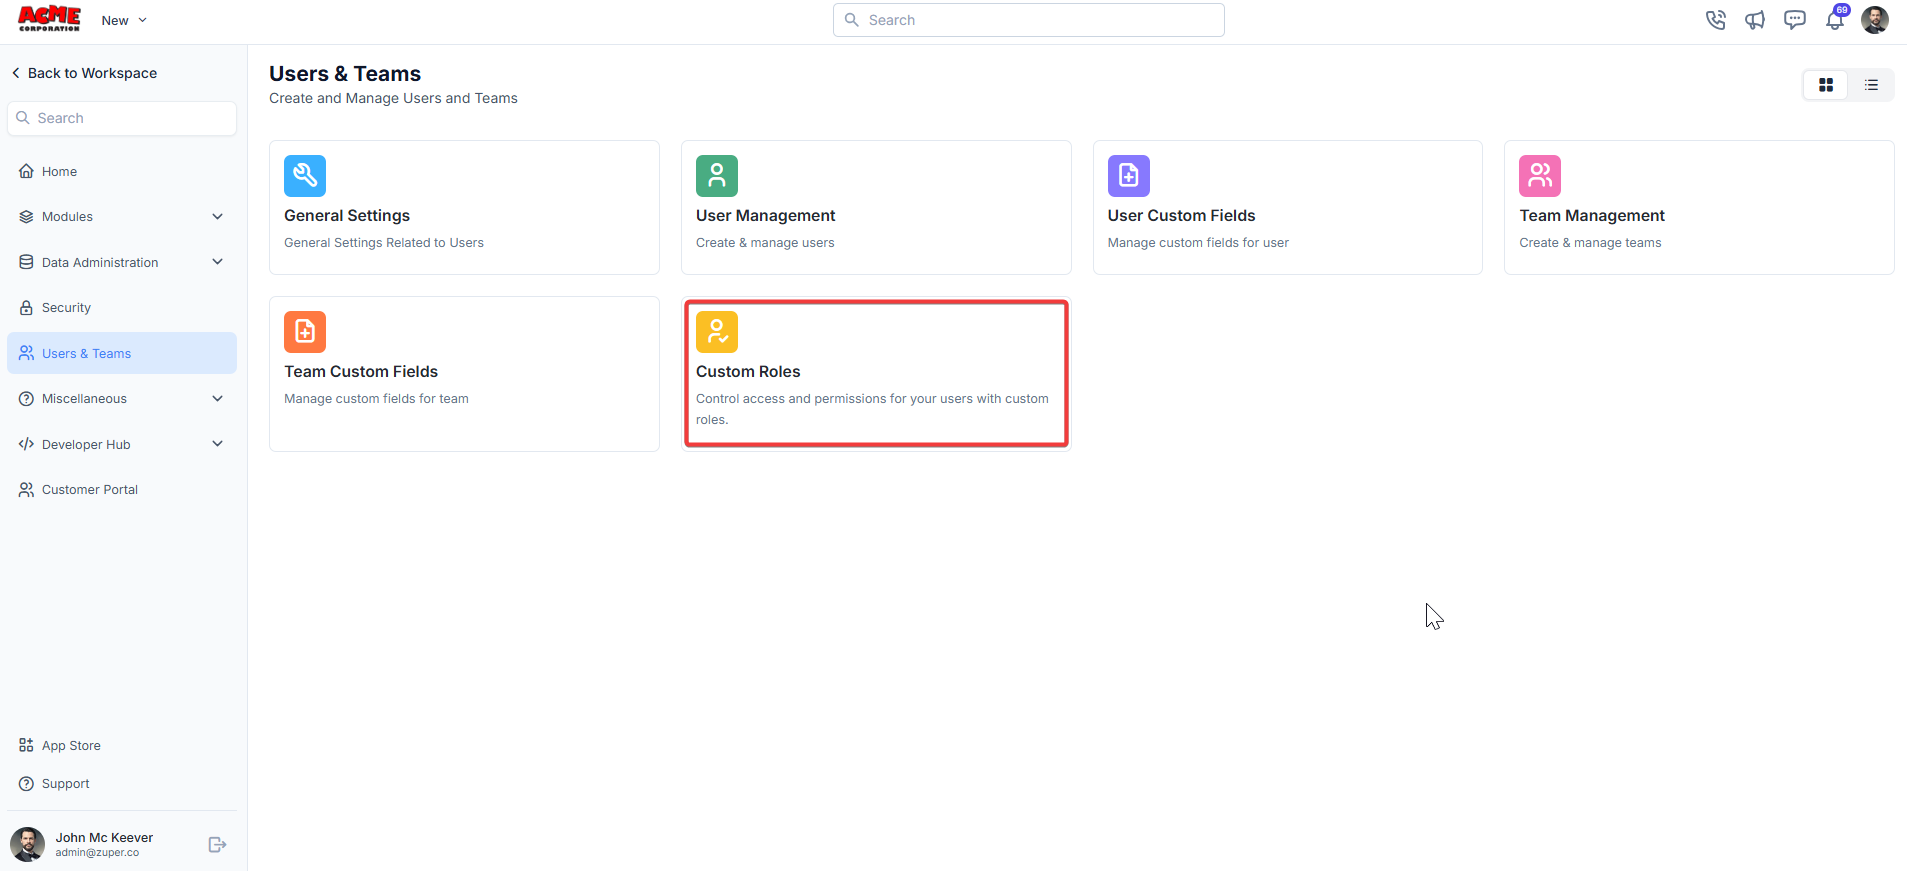
1. Select the "**Settings**" module from the left panel. Under the "**Modules**," choose the "**Users and Teams**." Select the "**Custom Roles**."
Click "**Create**" to create the new team.
## **Custom roles**
**Navigation**: *Settings -> Modules -> Users - > Custom Roles*
1. Select the "**Settings**" module from the left panel. Under the "**Modules**," choose the "**Users and Teams**." Select the "**Custom Roles**."
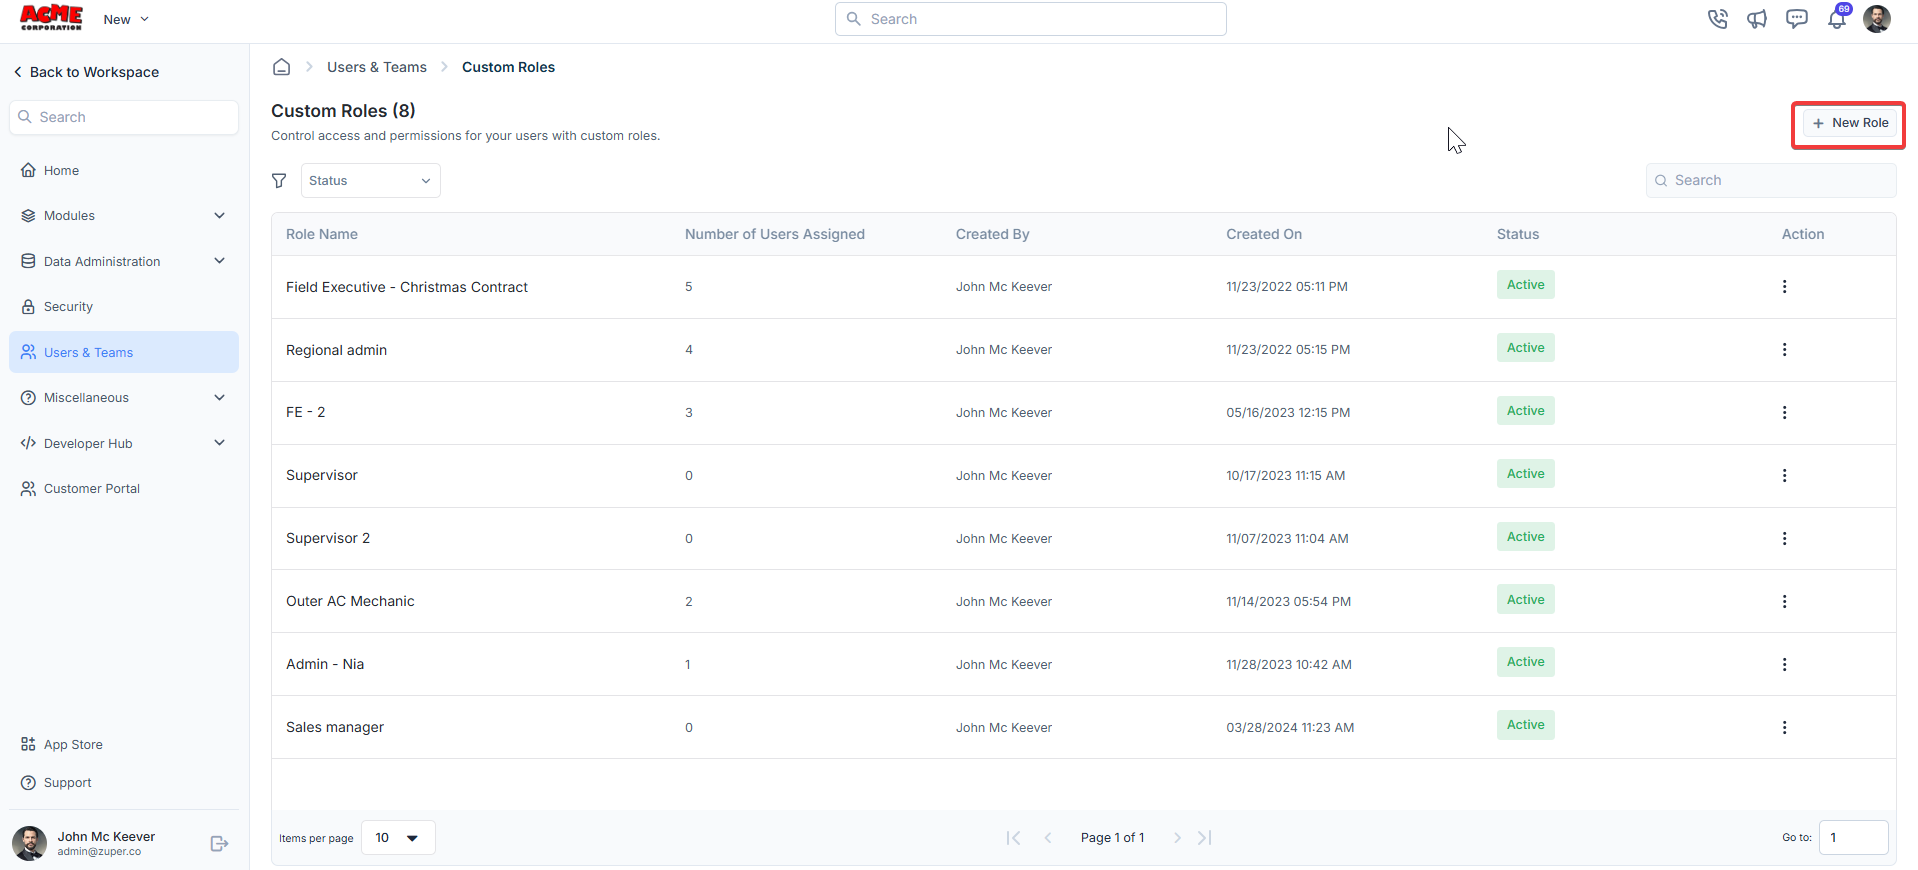
 2. Under the Custom Roles section, click the **+ New Role** button.
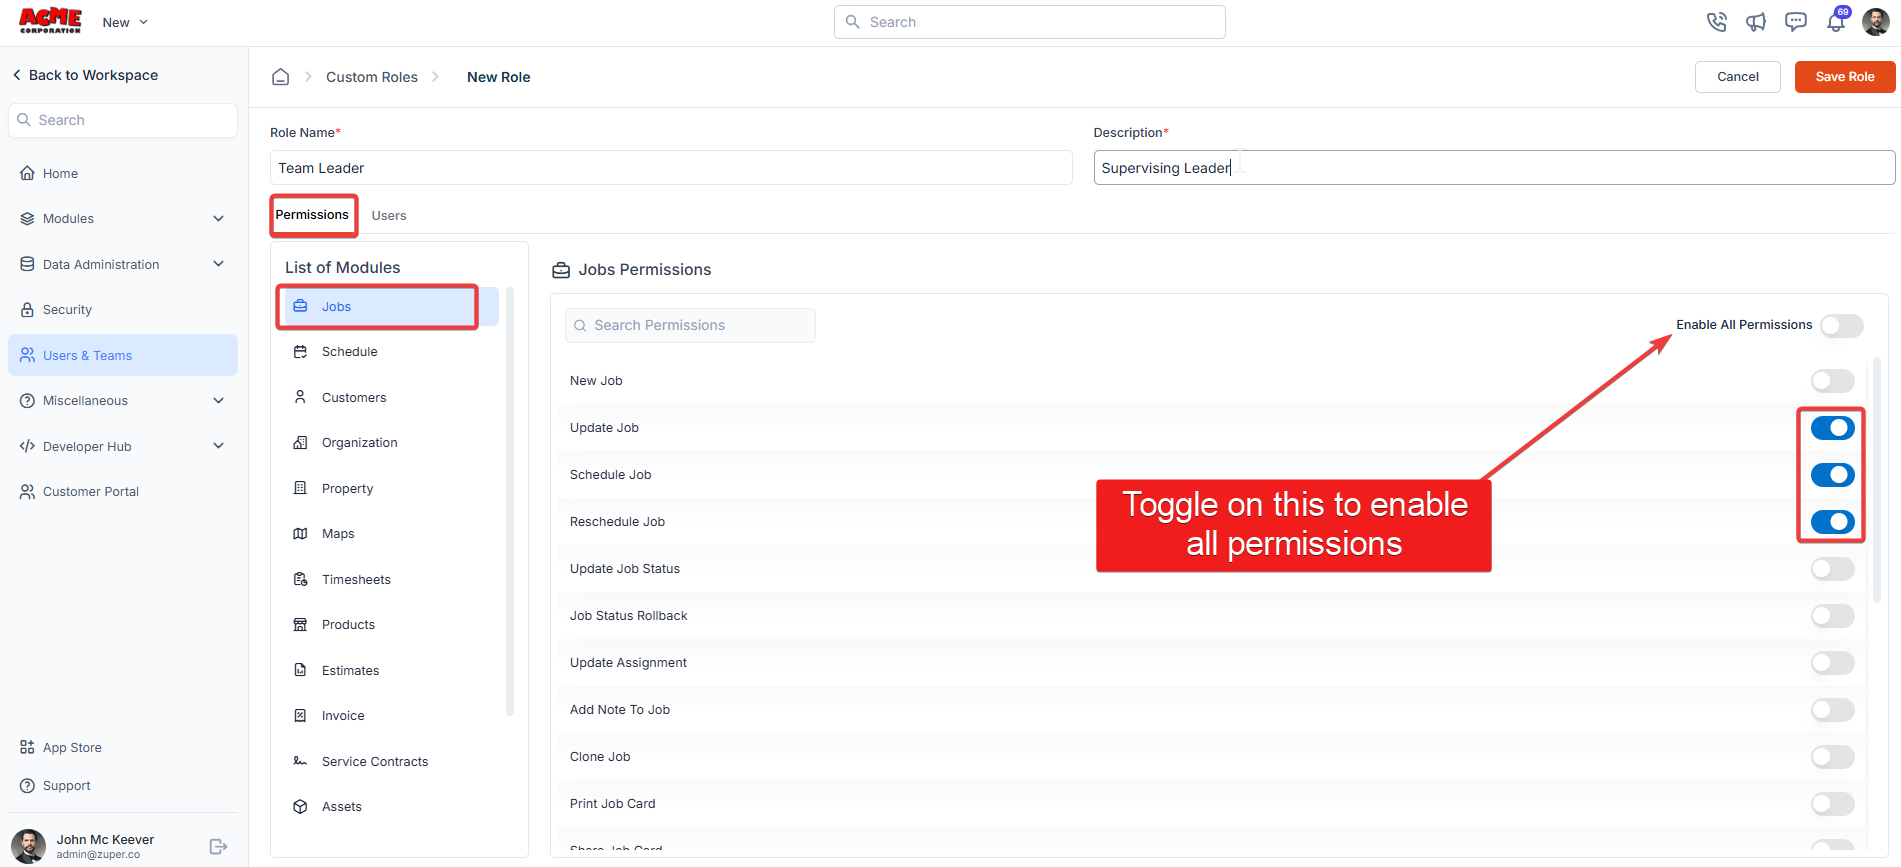
 3. Under the **Permissions** tab, select a module from the **List of Modules** (e.g., Jobs). Toggle the permissions you want to enable for this role. To grant all permissions for a module, toggle the **Enable All Permissions** switch.
 4. Under the **Users** tab, select users to assign to this role from the Available Users list. Users can only have one role at a time, so assigning a new role will unassign their existing role. Selected users will appear in the **Users Assigned** section.
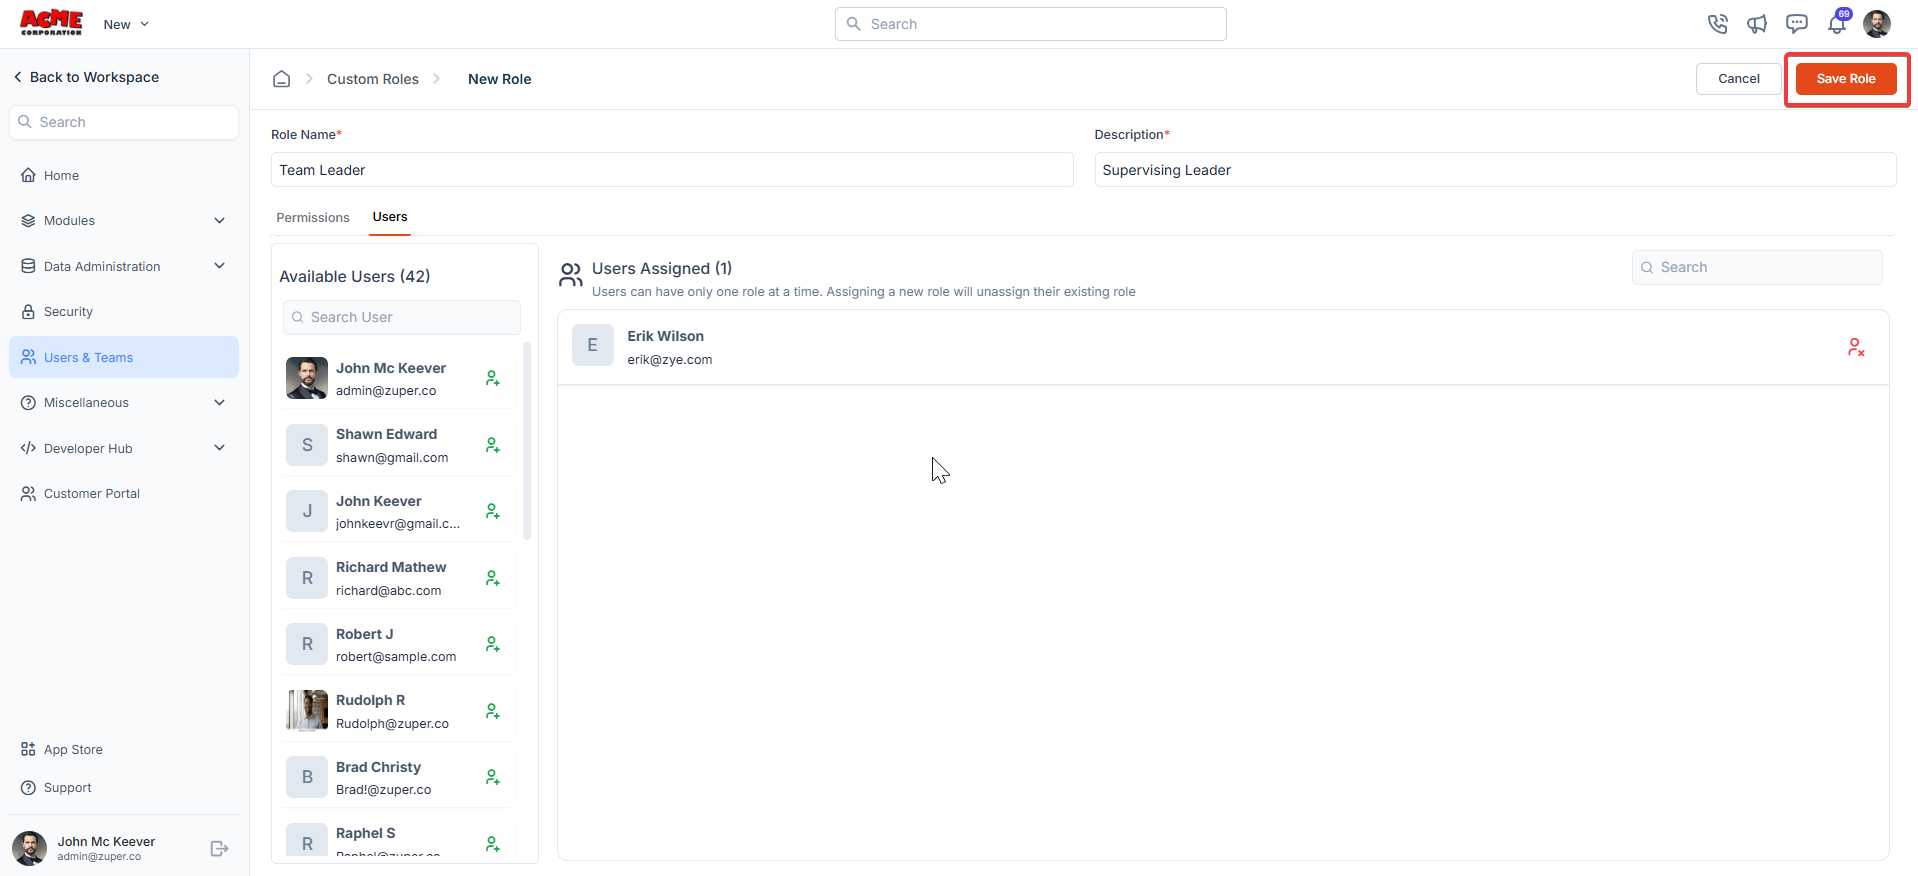 Click "**Save Role**" to create the custom role.
**Note:** Custom Role permissions apply only at the module level. Hiding specific items within a module — such as individual services — based on user roles is not currently supported.
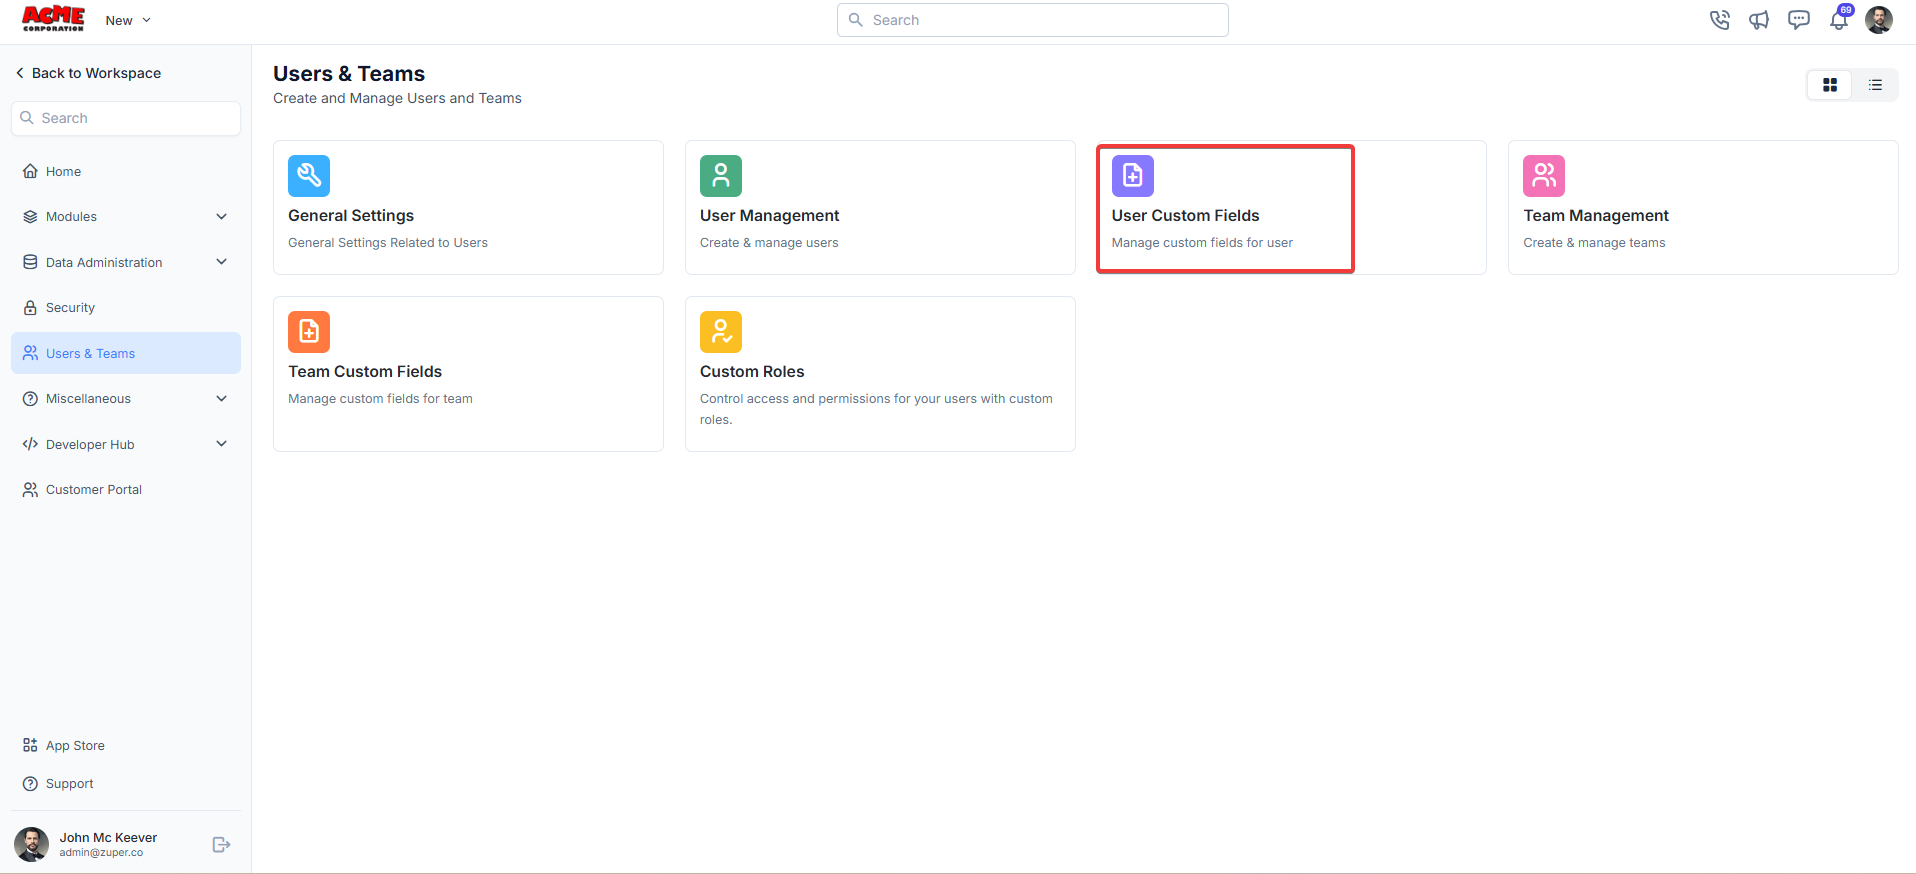
## **User custom fields**
**Navigation**: *Settings -> Modules -> Users - > Users Custom Fields*
1. Select the "**Settings**" module from the left panel. Under the "**Modules**," choose the "**Users and Teams**." Select the "**User Custom Fields**."
Click "**Save Role**" to create the custom role.
**Note:** Custom Role permissions apply only at the module level. Hiding specific items within a module — such as individual services — based on user roles is not currently supported.
## **User custom fields**
**Navigation**: *Settings -> Modules -> Users - > Users Custom Fields*
1. Select the "**Settings**" module from the left panel. Under the "**Modules**," choose the "**Users and Teams**." Select the "**User Custom Fields**."
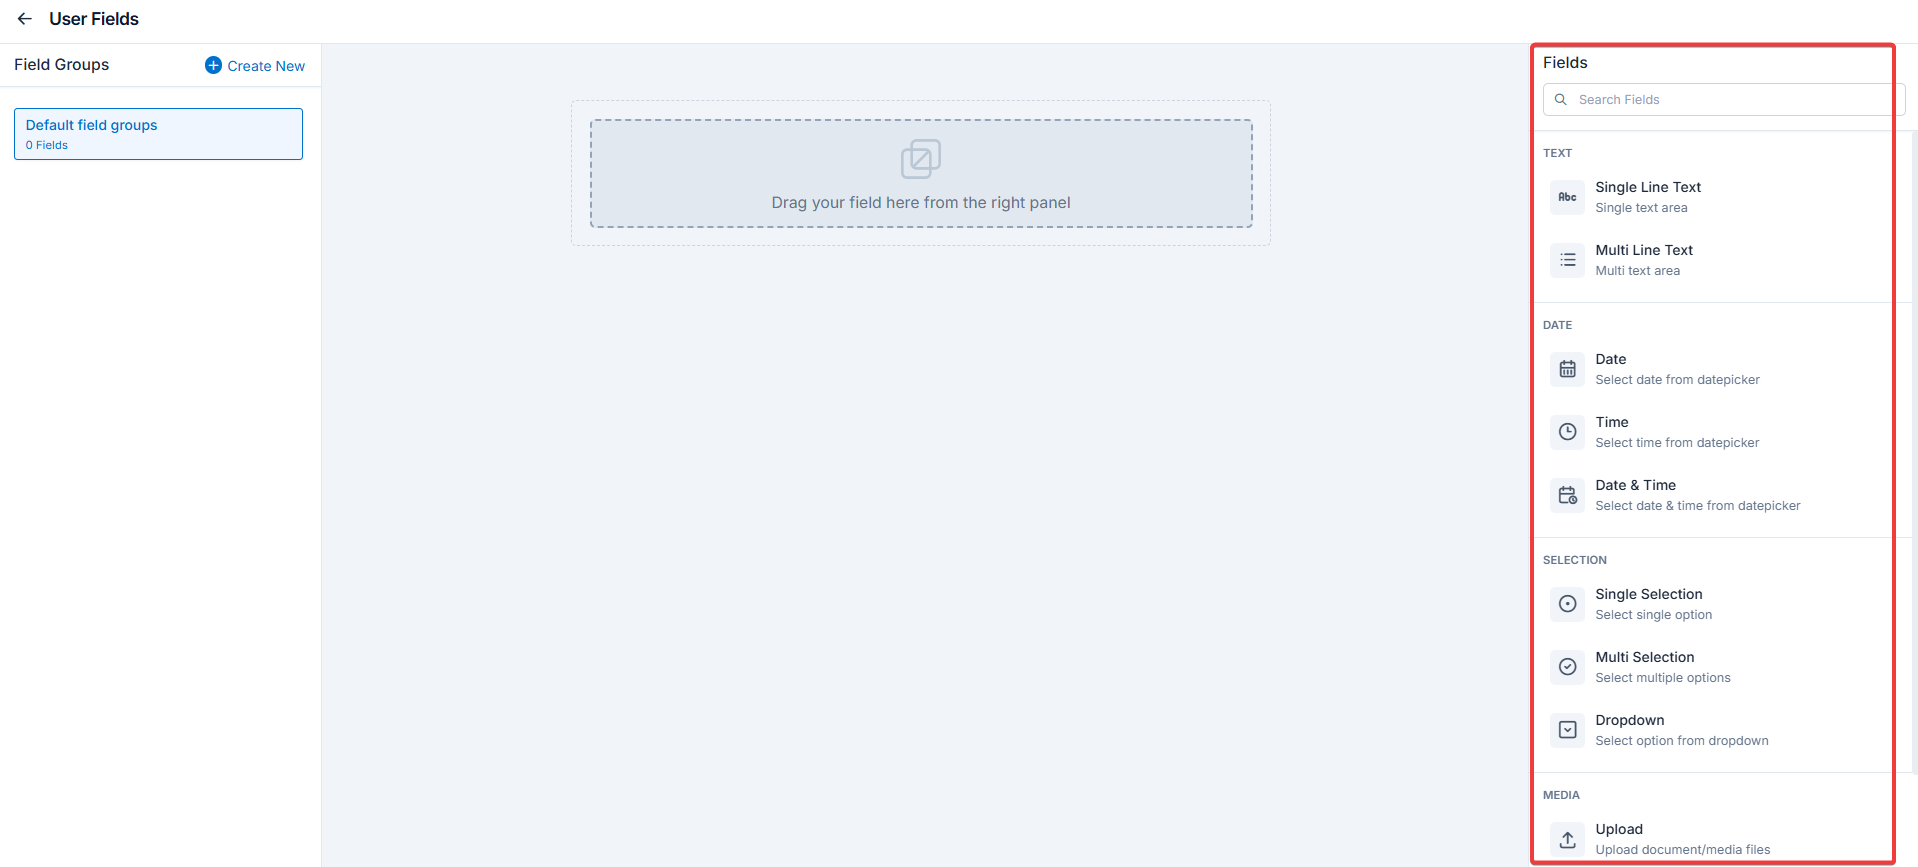
 Text
* Single-Line Input: This allows you to create a field to enter a single line of free text.
* Multi-Line Input: This allows you to create a field to enter multiple lines of free text.
Date
* Date Input: This allows you to create a field to select a specific date from a calendar.
* Time Input: This allows you to create a field where you can select a specific time.
* Date Time Input: This allows you to create a field where both date and time can be selected.
Selection
* Single-Selection: This allows you to create a radio input Field where one of the provided options can be selected.
* Multi-Selection: This allows you to create check boxes where the provided options can be checked.
* Drop-Down: This allows you to create a drop-down field with the required list of options.
Media
* Upload: This allows you to create a file input field to upload files.
Misc
* Look up : This allows you to create a file input field to look up the products from the parts and services module.
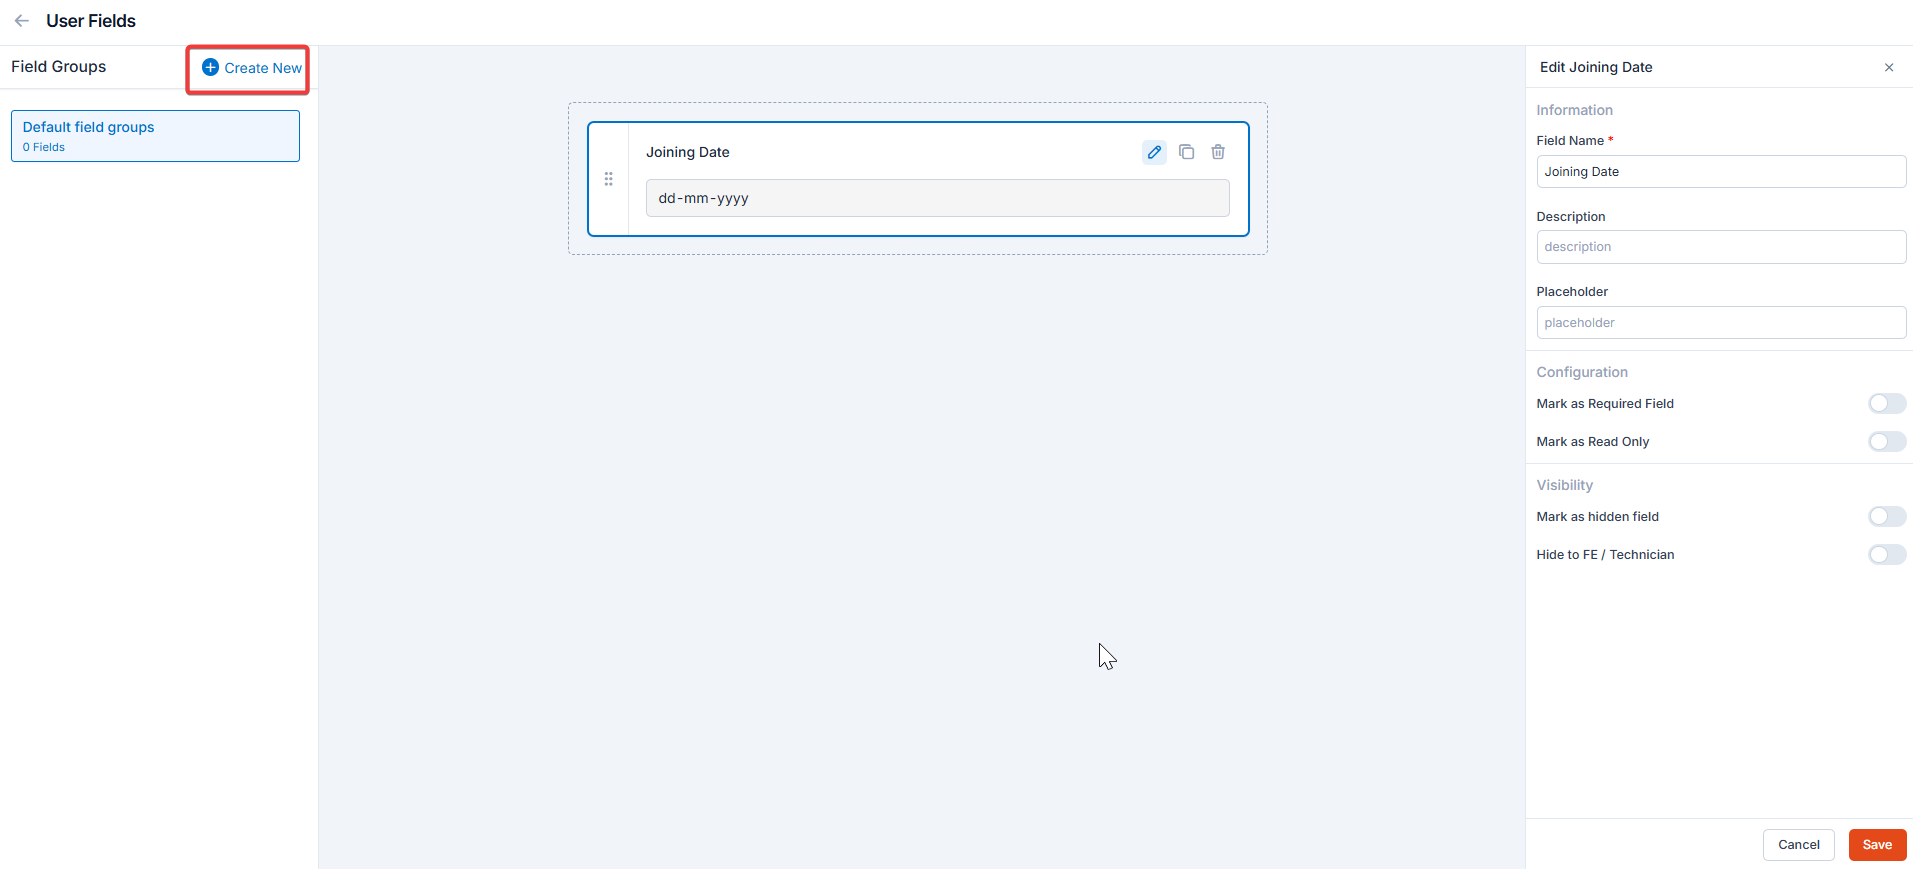
Note: You can also control the behavior and visibility of each field using the following options:
* Mark as Required Field - Makes the field mandatory to fill out before submitting the form.
* Mark as Read Only—This option makes the field non-editable; users can view the value but cannot modify it.
* Mark as hidden field- This hides the field from all users; it will not appear in the form interface.
* Hide to FE/Technician- This option makes the field invisible to technicians or front-end users during form access.
Text
* Single-Line Input: This allows you to create a field to enter a single line of free text.
* Multi-Line Input: This allows you to create a field to enter multiple lines of free text.
Date
* Date Input: This allows you to create a field to select a specific date from a calendar.
* Time Input: This allows you to create a field where you can select a specific time.
* Date Time Input: This allows you to create a field where both date and time can be selected.
Selection
* Single-Selection: This allows you to create a radio input Field where one of the provided options can be selected.
* Multi-Selection: This allows you to create check boxes where the provided options can be checked.
* Drop-Down: This allows you to create a drop-down field with the required list of options.
Media
* Upload: This allows you to create a file input field to upload files.
Misc
* Look up : This allows you to create a file input field to look up the products from the parts and services module.
Note: You can also control the behavior and visibility of each field using the following options:
* Mark as Required Field - Makes the field mandatory to fill out before submitting the form.
* Mark as Read Only—This option makes the field non-editable; users can view the value but cannot modify it.
* Mark as hidden field- This hides the field from all users; it will not appear in the form interface.
* Hide to FE/Technician- This option makes the field invisible to technicians or front-end users during form access.
 Click “**Create New**” to create the “**Custom Field**” group.
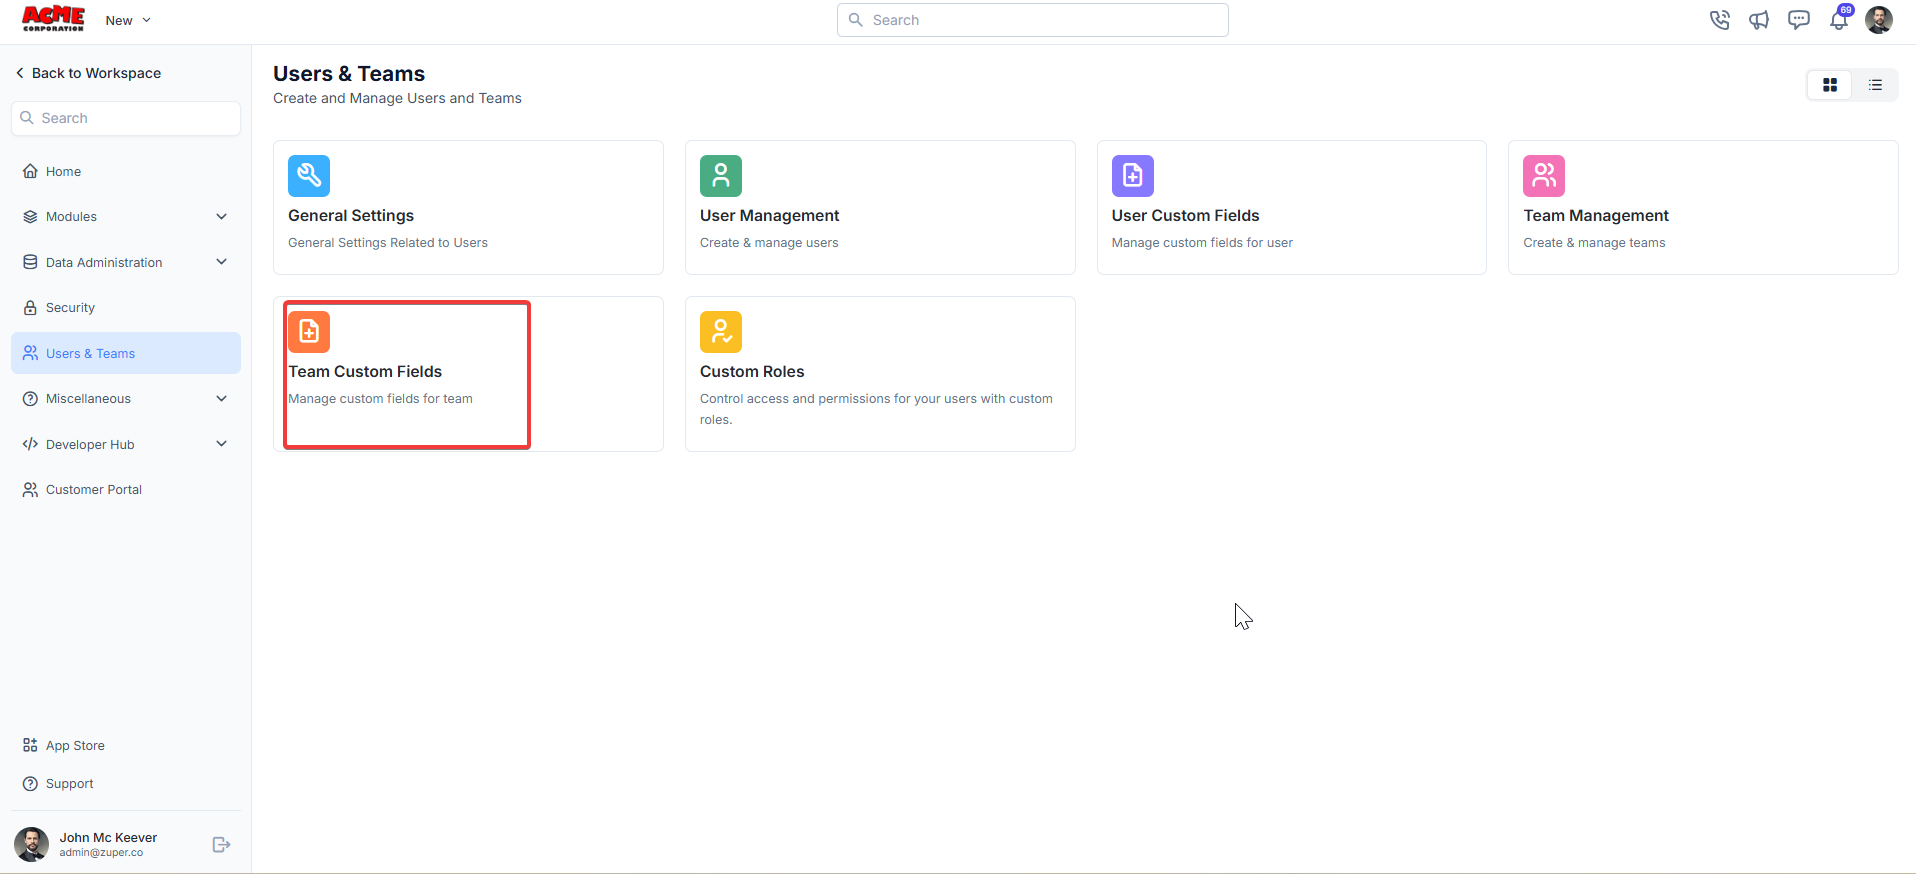
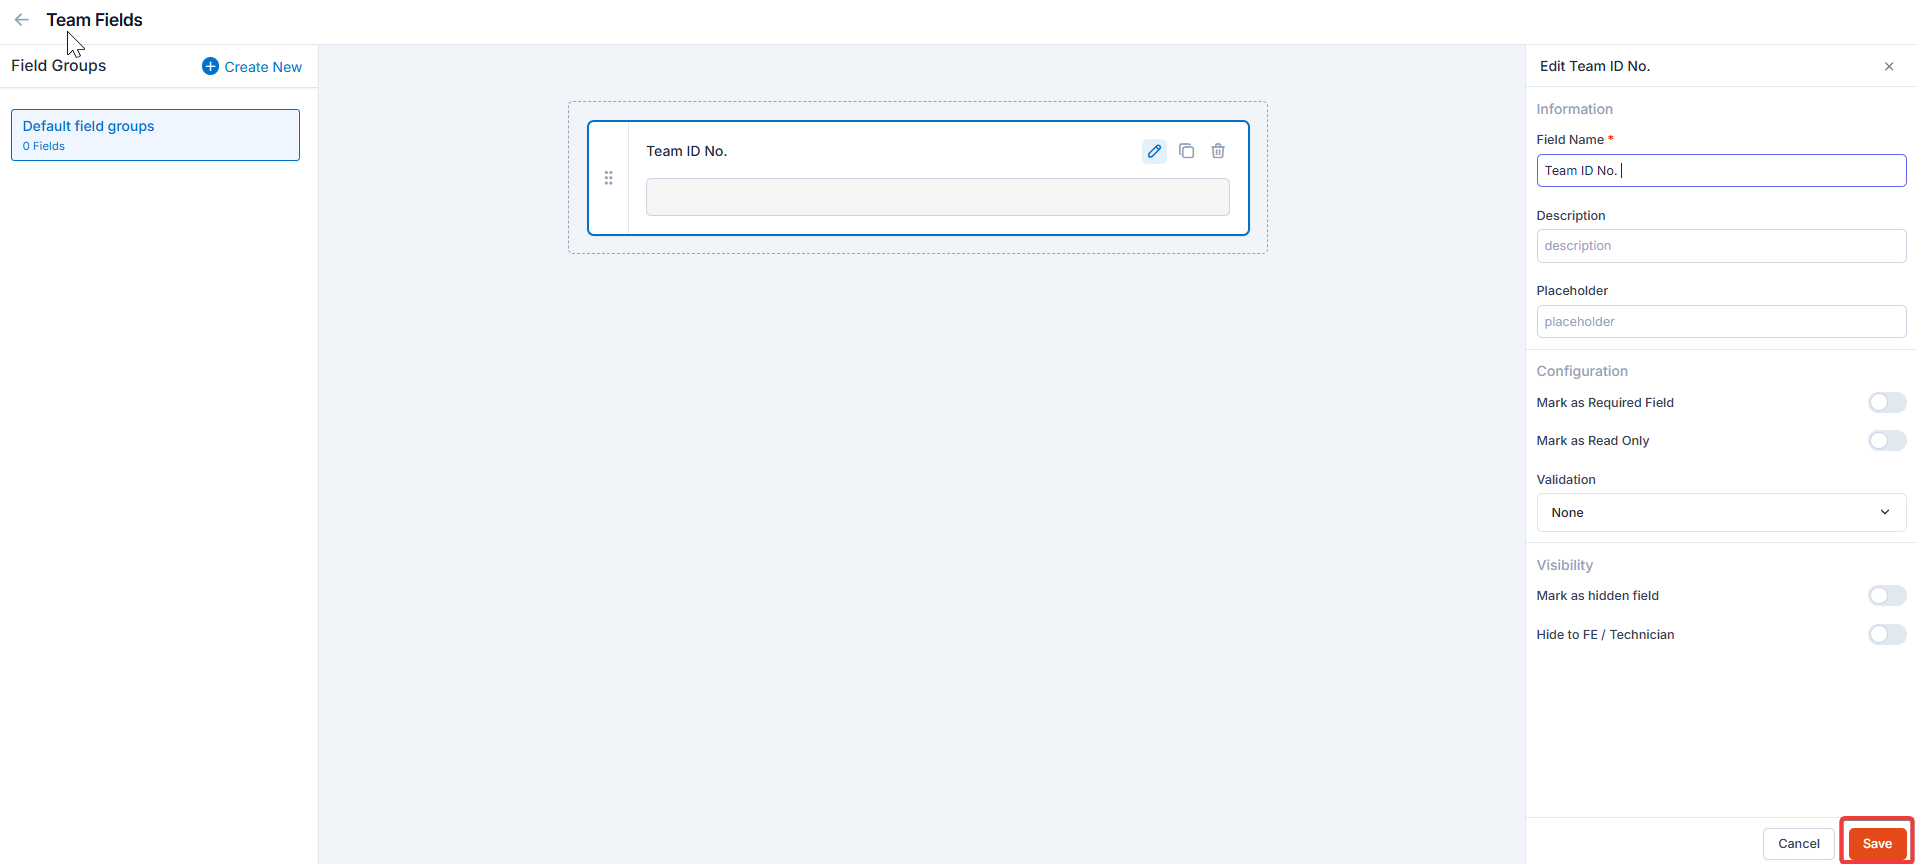
 ## **Team custom fields**
**Navigation**: *Settings -> Modules -> Users - > Team Custom Fields*
1. Select the "**Settings**" module from the left panel. Under the "**Modules**," choose the "**Users and Teams**." Select the "**Team Custom Fields**."
## **Team custom fields**
**Navigation**: *Settings -> Modules -> Users - > Team Custom Fields*
1. Select the "**Settings**" module from the left panel. Under the "**Modules**," choose the "**Users and Teams**." Select the "**Team Custom Fields**."
 Text
* Single-Line Input: This allows you to create a field to enter a single line of free text.
* Multi-Line Input: This allows you to create a field to enter multiple lines of free text.
Date
* Date Input: This allows you to create a field to select a specific date from a calendar.
* Time Input: This allows you to create a field where you can select a specific time.
* Date Time Input: This allows you to create a field where both date and time can be selected.
Selection
* Single-Selection: This allows you to create a radio input Field where one of the provided options can be selected.
* Multi-Selection: This allows you to create check boxes where the provided options can be checked.
* Drop-Down: This allows you to create a drop-down field with the required list of options.
Media
* Upload: This allows you to create a file input field to upload files.
Misc
* Look up: This allows you to create a file input field to look up the products from the parts and services module.
Note: You can also control the behavior and visibility of each field using the following options:
* Mark as Required Field - Makes the field mandatory to fill out before submitting the form.
* Mark as Read Only—This option makes the field non-editable; users can view the value but cannot modify it.
* Mark as hidden field- This hides the field from all users; it will not appear in the form interface.
* Hide to FE/Technician- This option makes the field invisible to technicians or front-end users during form access.
Text
* Single-Line Input: This allows you to create a field to enter a single line of free text.
* Multi-Line Input: This allows you to create a field to enter multiple lines of free text.
Date
* Date Input: This allows you to create a field to select a specific date from a calendar.
* Time Input: This allows you to create a field where you can select a specific time.
* Date Time Input: This allows you to create a field where both date and time can be selected.
Selection
* Single-Selection: This allows you to create a radio input Field where one of the provided options can be selected.
* Multi-Selection: This allows you to create check boxes where the provided options can be checked.
* Drop-Down: This allows you to create a drop-down field with the required list of options.
Media
* Upload: This allows you to create a file input field to upload files.
Misc
* Look up: This allows you to create a file input field to look up the products from the parts and services module.
Note: You can also control the behavior and visibility of each field using the following options:
* Mark as Required Field - Makes the field mandatory to fill out before submitting the form.
* Mark as Read Only—This option makes the field non-editable; users can view the value but cannot modify it.
* Mark as hidden field- This hides the field from all users; it will not appear in the form interface.
* Hide to FE/Technician- This option makes the field invisible to technicians or front-end users during form access.
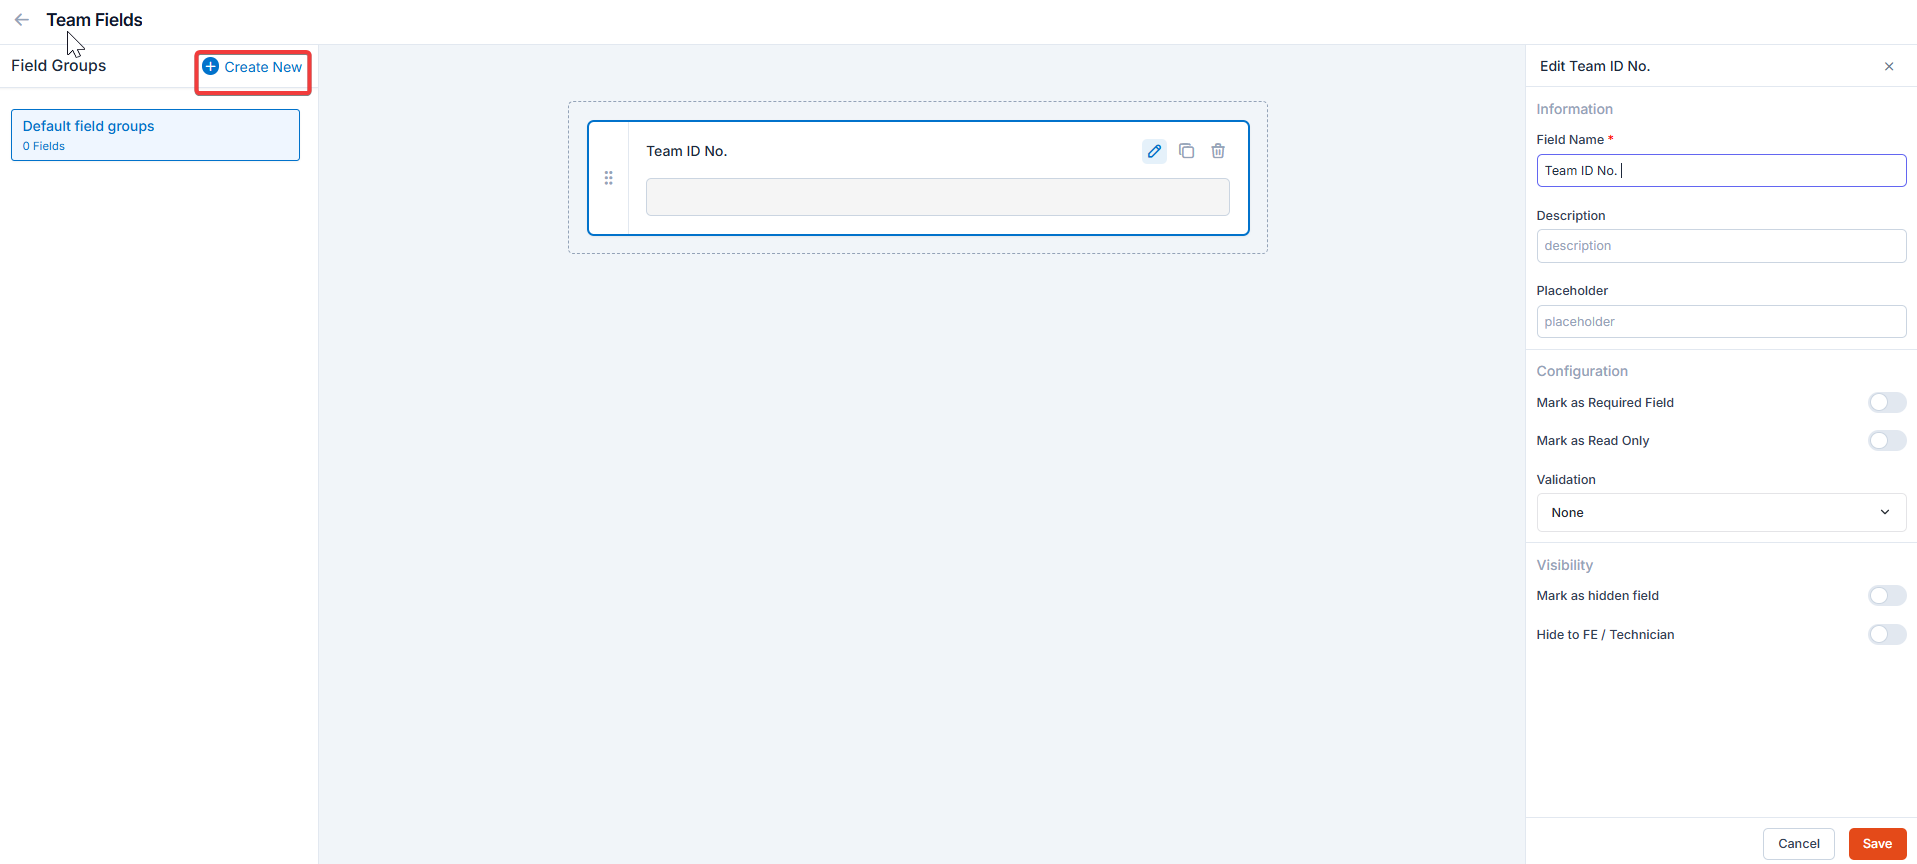
 Click “**Create New**” to create the “**Custom Field**” group.
 The Users and Teams module enables organizations to fine-tune user roles, permissions, and workflows, thereby optimizing field operations and delivering exceptional customer experiences.
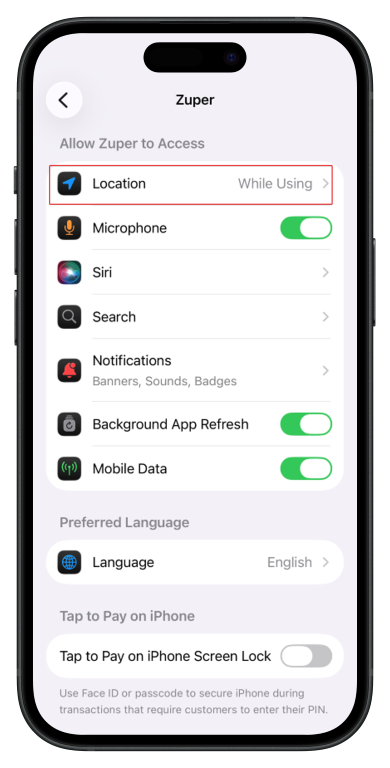
## FAQs
1. **Location Access in the Zuper iOS App**
Location access and tracking are available only when the "**Timesheet**" option is active. The[ work hours ](https://docs.zuper.co/Settings/Users_Teams/Users_Creation#work-hours)and[ location tracking](https://docs.zuper.co/Settings/Users_Teams/Users_Creation#work-hours) should always be set to "On".
### Directly via iPhone Settings
1. Open your iPhone Settings. Tap **Location**.
2. On the Location screen, select **Always**
The Users and Teams module enables organizations to fine-tune user roles, permissions, and workflows, thereby optimizing field operations and delivering exceptional customer experiences.
## FAQs
1. **Location Access in the Zuper iOS App**
Location access and tracking are available only when the "**Timesheet**" option is active. The[ work hours ](https://docs.zuper.co/Settings/Users_Teams/Users_Creation#work-hours)and[ location tracking](https://docs.zuper.co/Settings/Users_Teams/Users_Creation#work-hours) should always be set to "On".
### Directly via iPhone Settings
1. Open your iPhone Settings. Tap **Location**.
2. On the Location screen, select **Always**
 2. It is recommended to use "**Always**" option.
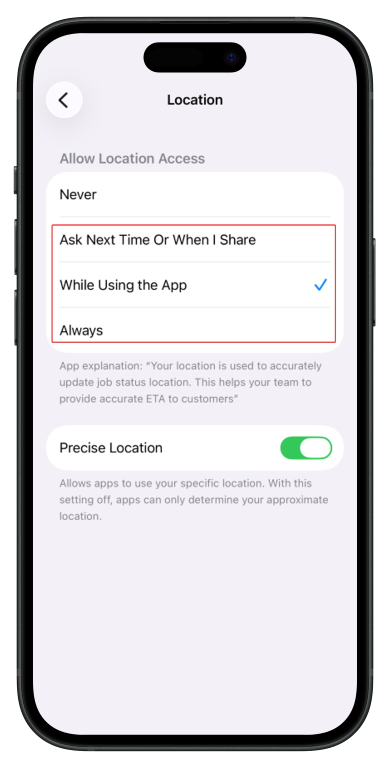
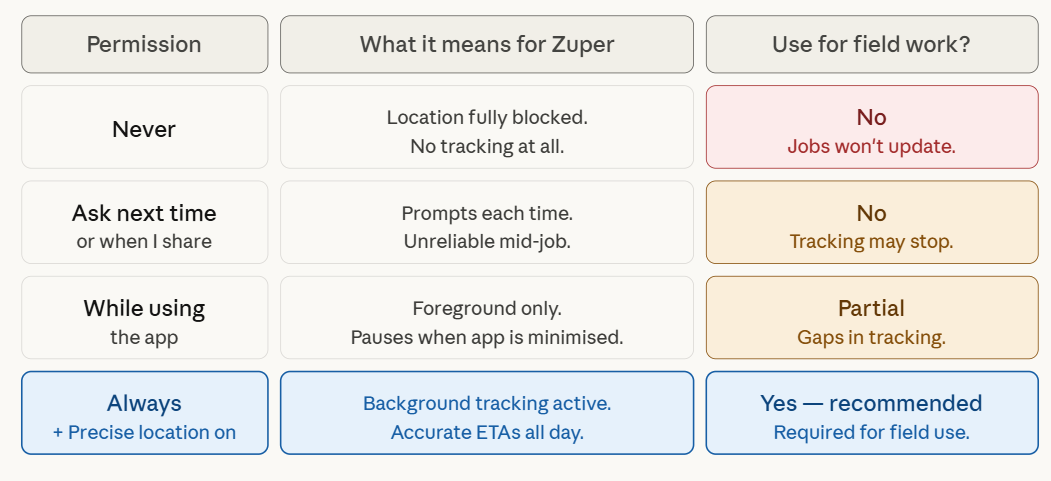 **Note**: Location is used solely for tracking job, user, and customer ETAs — not stored beyond operational needs.
Make sure **Precise Location** is toggled **ON** (green) so Zuper can send accurate GPS coordinates for job status updates and customer ETAs.
2. **Location Access in the Zuper Android App**
Location access and tracking are available only when the "**Timesheet**" option is active. The[ work hours ](https://docs.zuper.co/Settings/Users_Teams/Users_Creation#work-hours)and[ location tracking](https://docs.zuper.co/Settings/Users_Teams/Users_Creation#work-hours) should always be set to "On".
### Directly via Android Settings
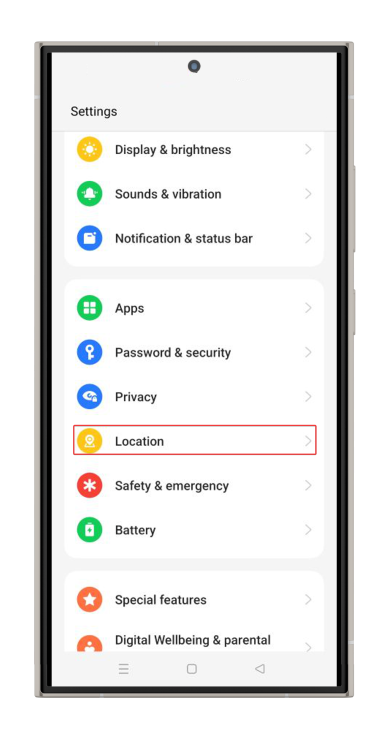
1. Open your Android Settings. Tap **Location**.
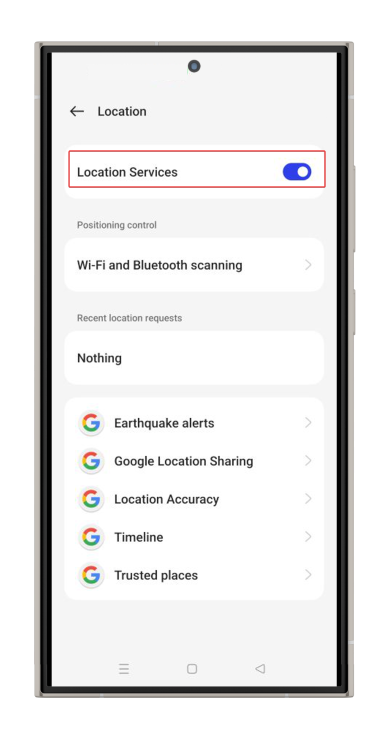
2. On the Location screen, toggle on. It is recommended to use the "**Always**" option.
**Note**: Location is used solely for tracking job, user, and customer ETAs — not stored beyond operational needs.
Make sure **Precise Location** is toggled **ON** (green) so Zuper can send accurate GPS coordinates for job status updates and customer ETAs.
2. **Location Access in the Zuper Android App**
Location access and tracking are available only when the "**Timesheet**" option is active. The[ work hours ](https://docs.zuper.co/Settings/Users_Teams/Users_Creation#work-hours)and[ location tracking](https://docs.zuper.co/Settings/Users_Teams/Users_Creation#work-hours) should always be set to "On".
### Directly via Android Settings
1. Open your Android Settings. Tap **Location**.
2. On the Location screen, toggle on. It is recommended to use the "**Always**" option.
 **Note**: Location is used solely for tracking job, user, and customer ETAs — not stored beyond operational needs.