Before you get started
The initial setup is critical for the integration to function smoothly. Once the integration is successfully set up, the Zuper widget will appear in the right-side pane within the HubSpot Deal and Ticket details page. Please follow the steps below to connect your Zuper Account with your HubSpot ServiceHub and HubSpot Sales account.A. Integrate Zuper and HubSpot (Setup):
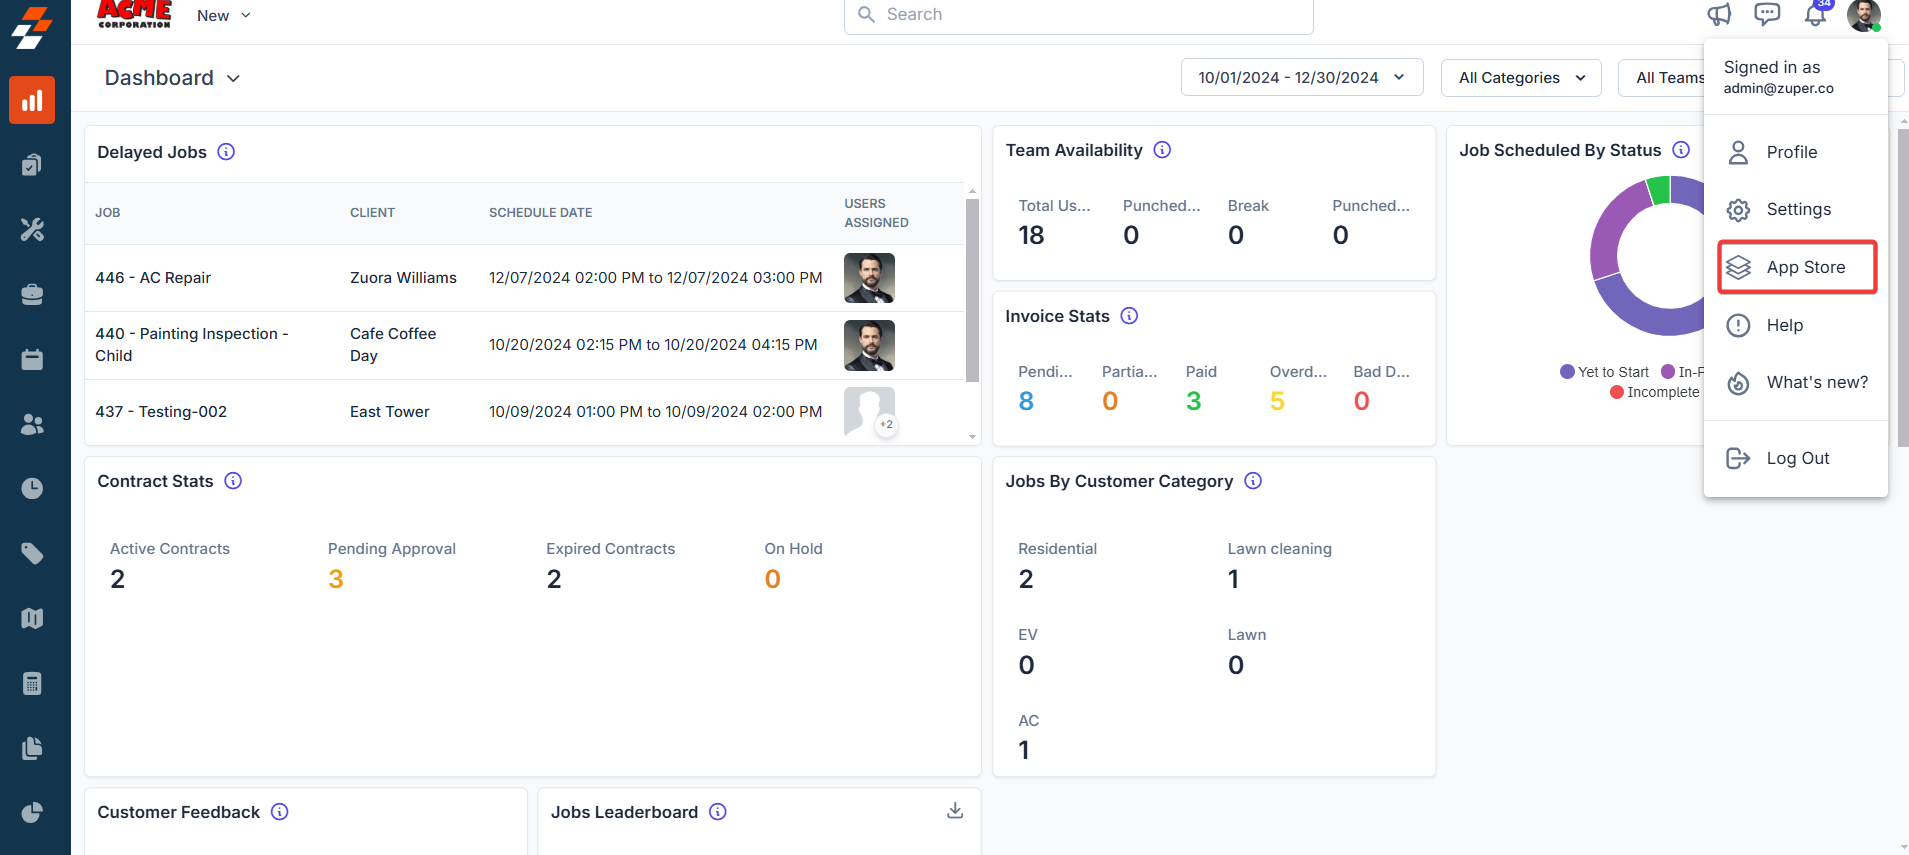
- Once logged in to your Zuper account, click your Profile Picture in the top right corner of the screen and select “App Store.”
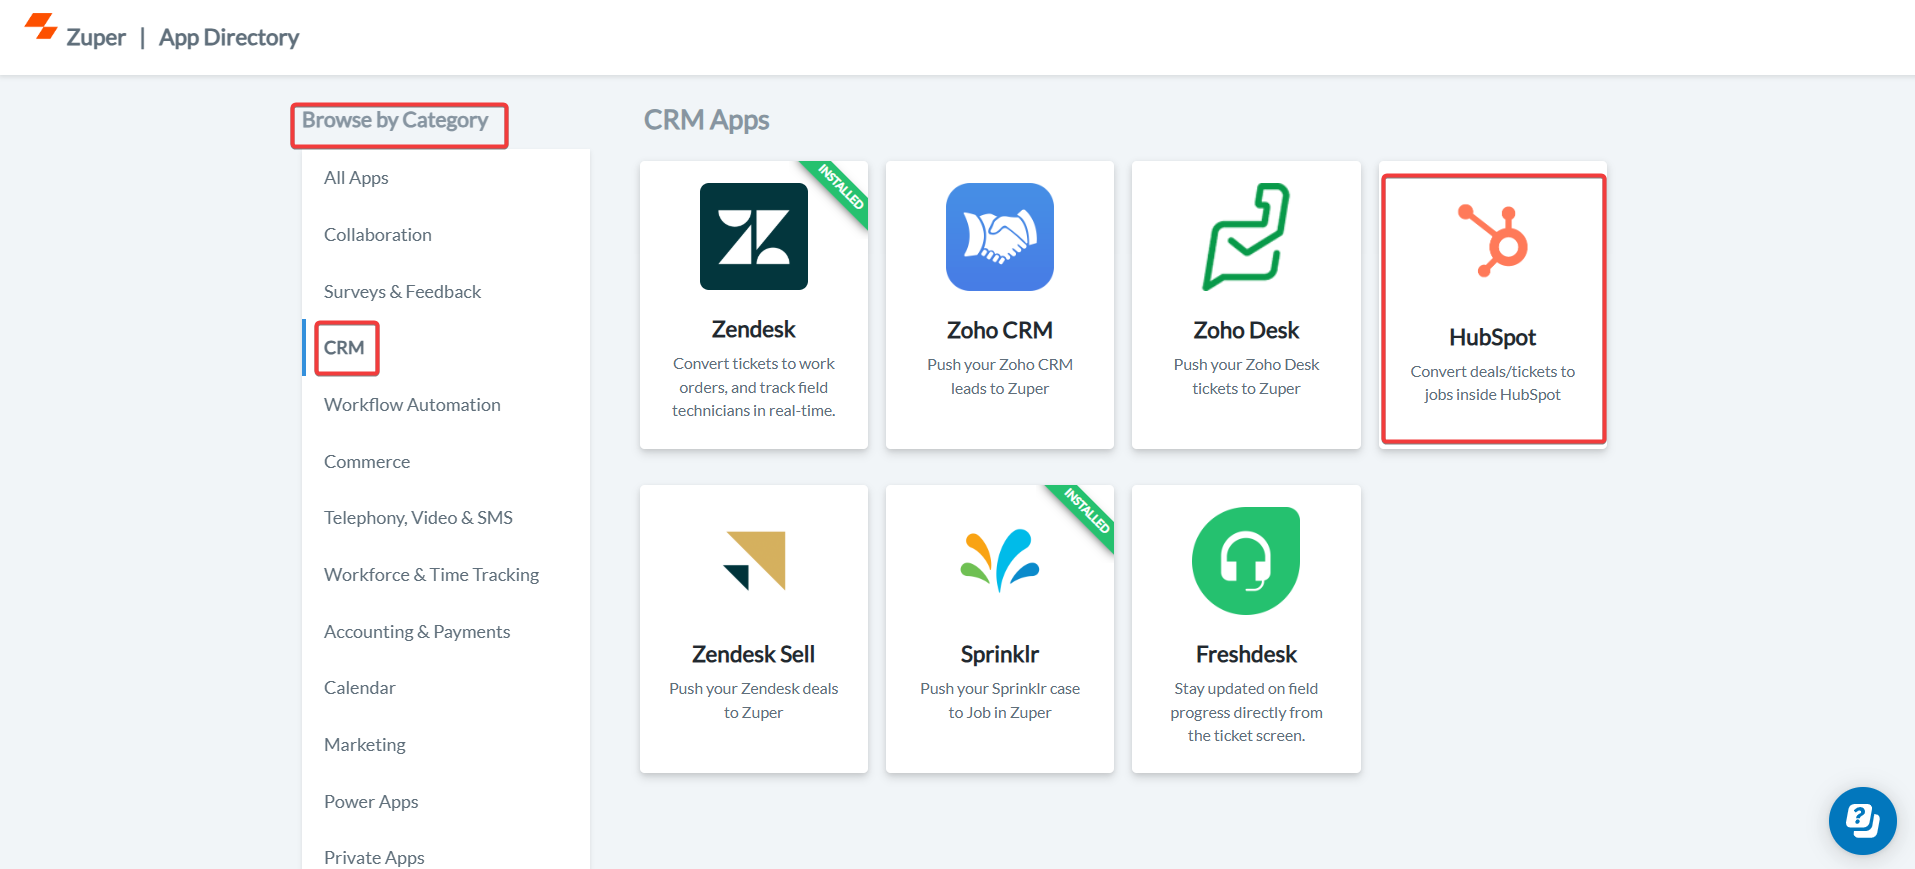
- You will be redirected to the Zuper App Marketplace, where you must choose the “CRM” category and select “HubSpot.”
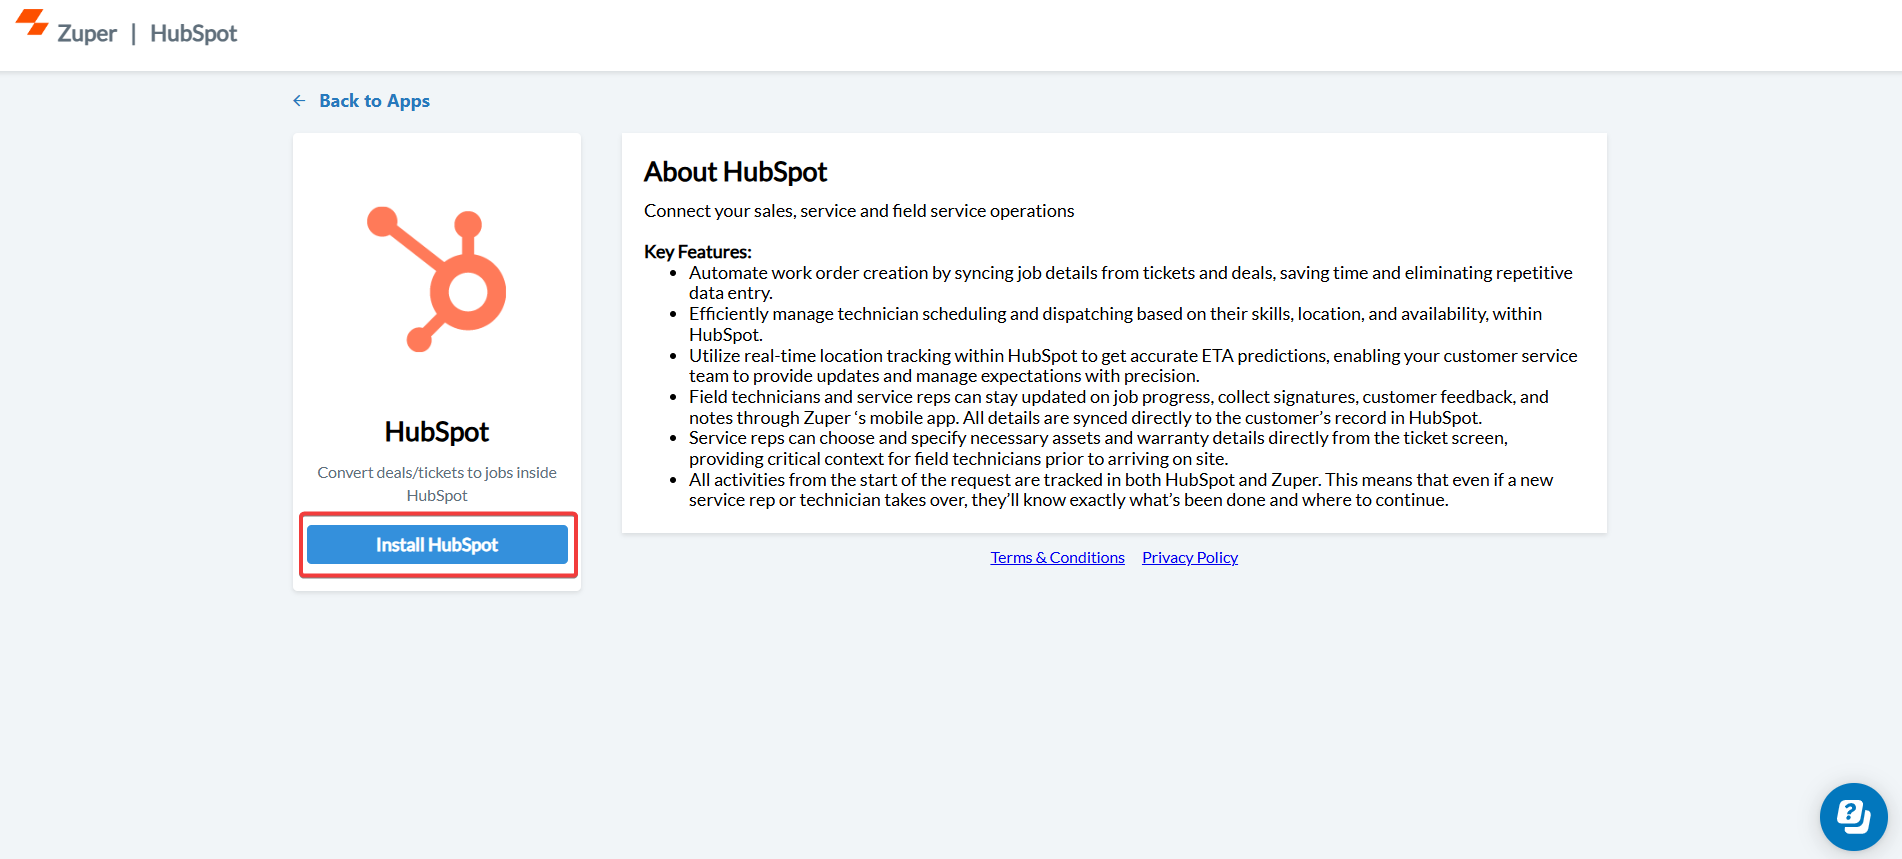
- Click the ” Install HubSpot” button to be redirected to HubSpot.
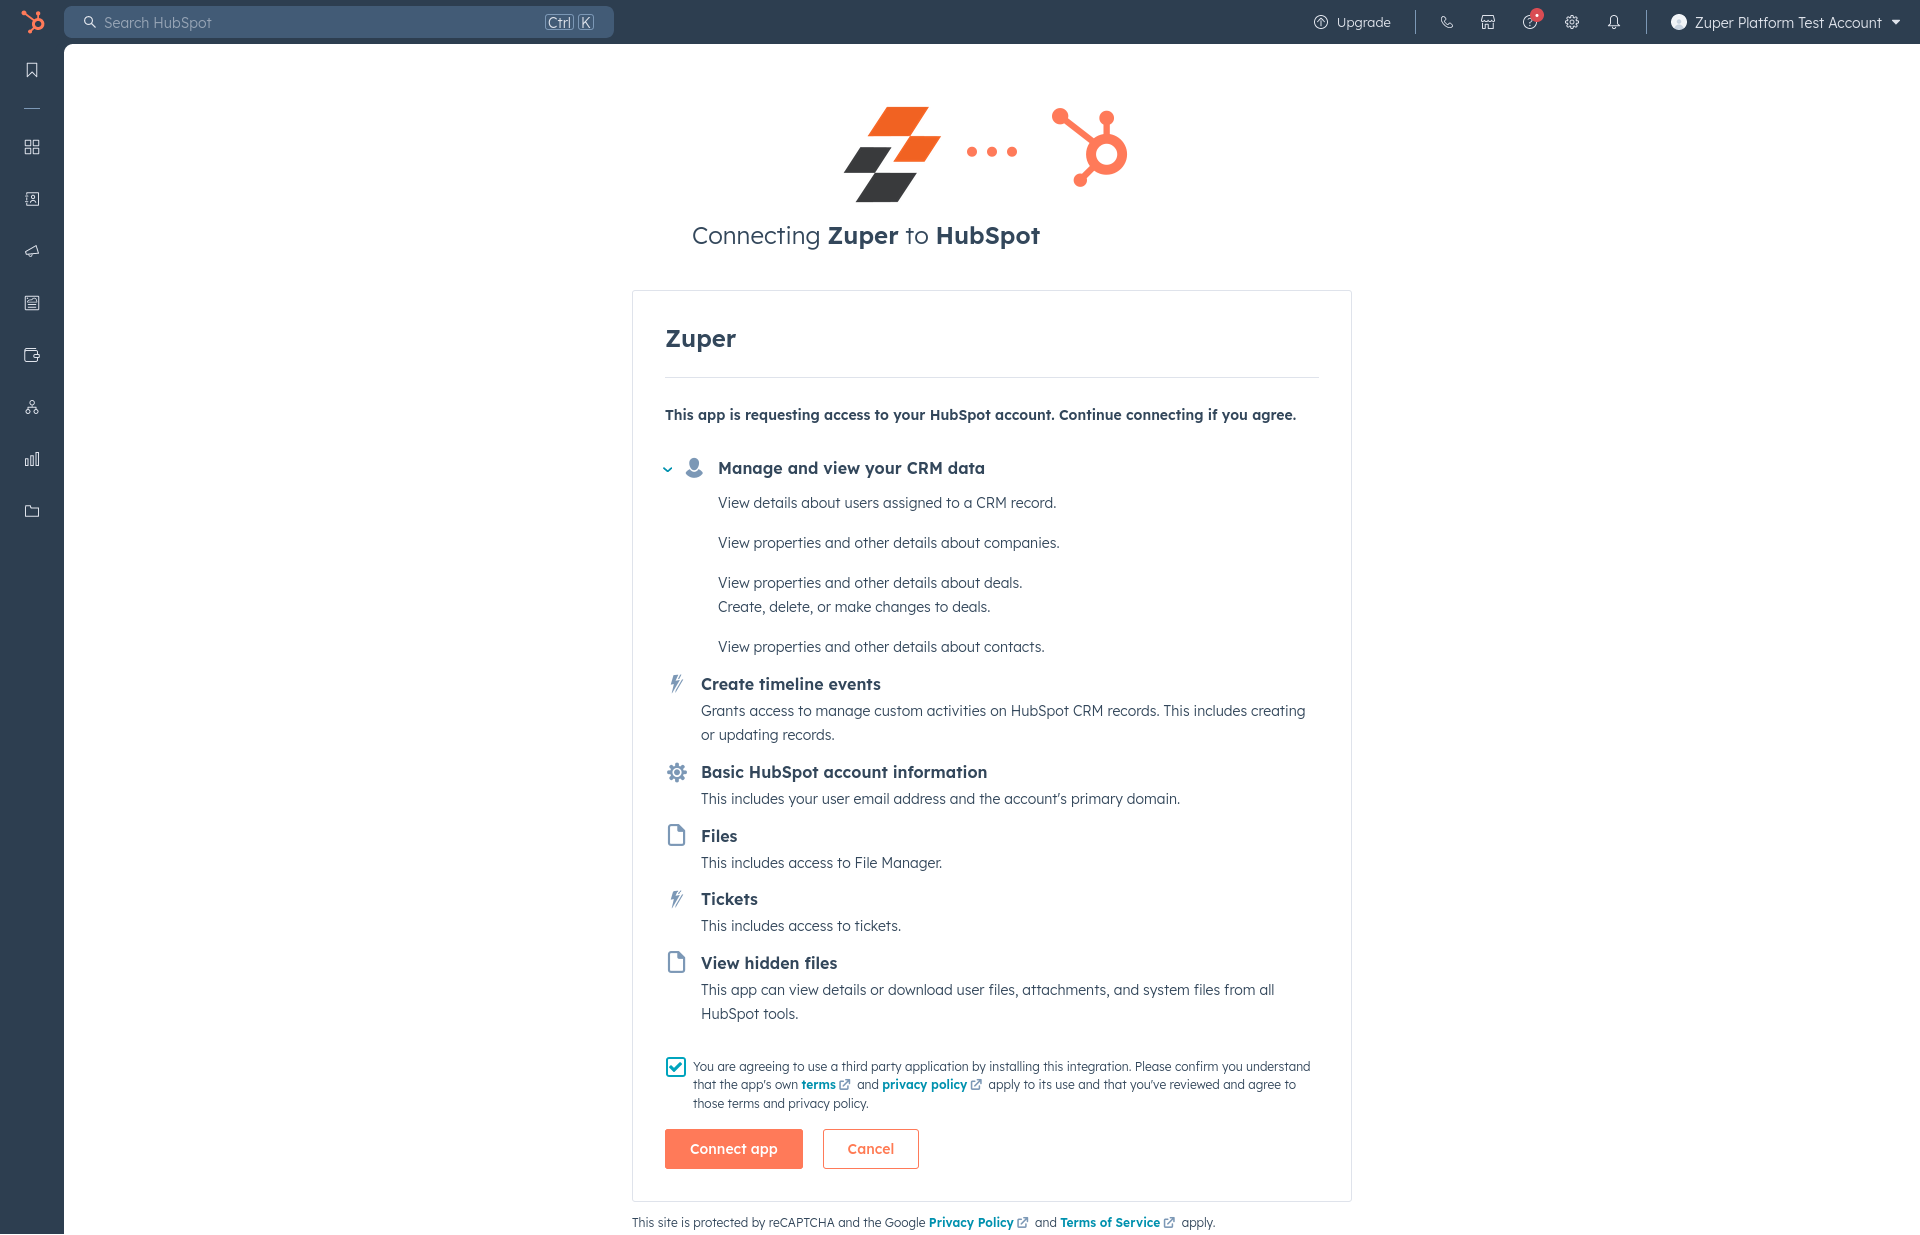
- Choose the HubSpot account to which you would like to link the Zuper account.

- The scope approval access request from HubSpot account screen appears. Check the mark on the terms and conditions and click the “Connect App” button.
- Now, you can enable “Update HubSpot Settings” by entering the following details.
- Zuper API Key (Mandatory Field): - Enter the Zuper API key
- To create the Zuper API, refer to the below steps:
API Key
API Key
If you are trying to integrate Zuper with any external systems, you will need an API key to access the Zuper APIs. To generate API (Application Programming Interface) Key, please follow the below steps.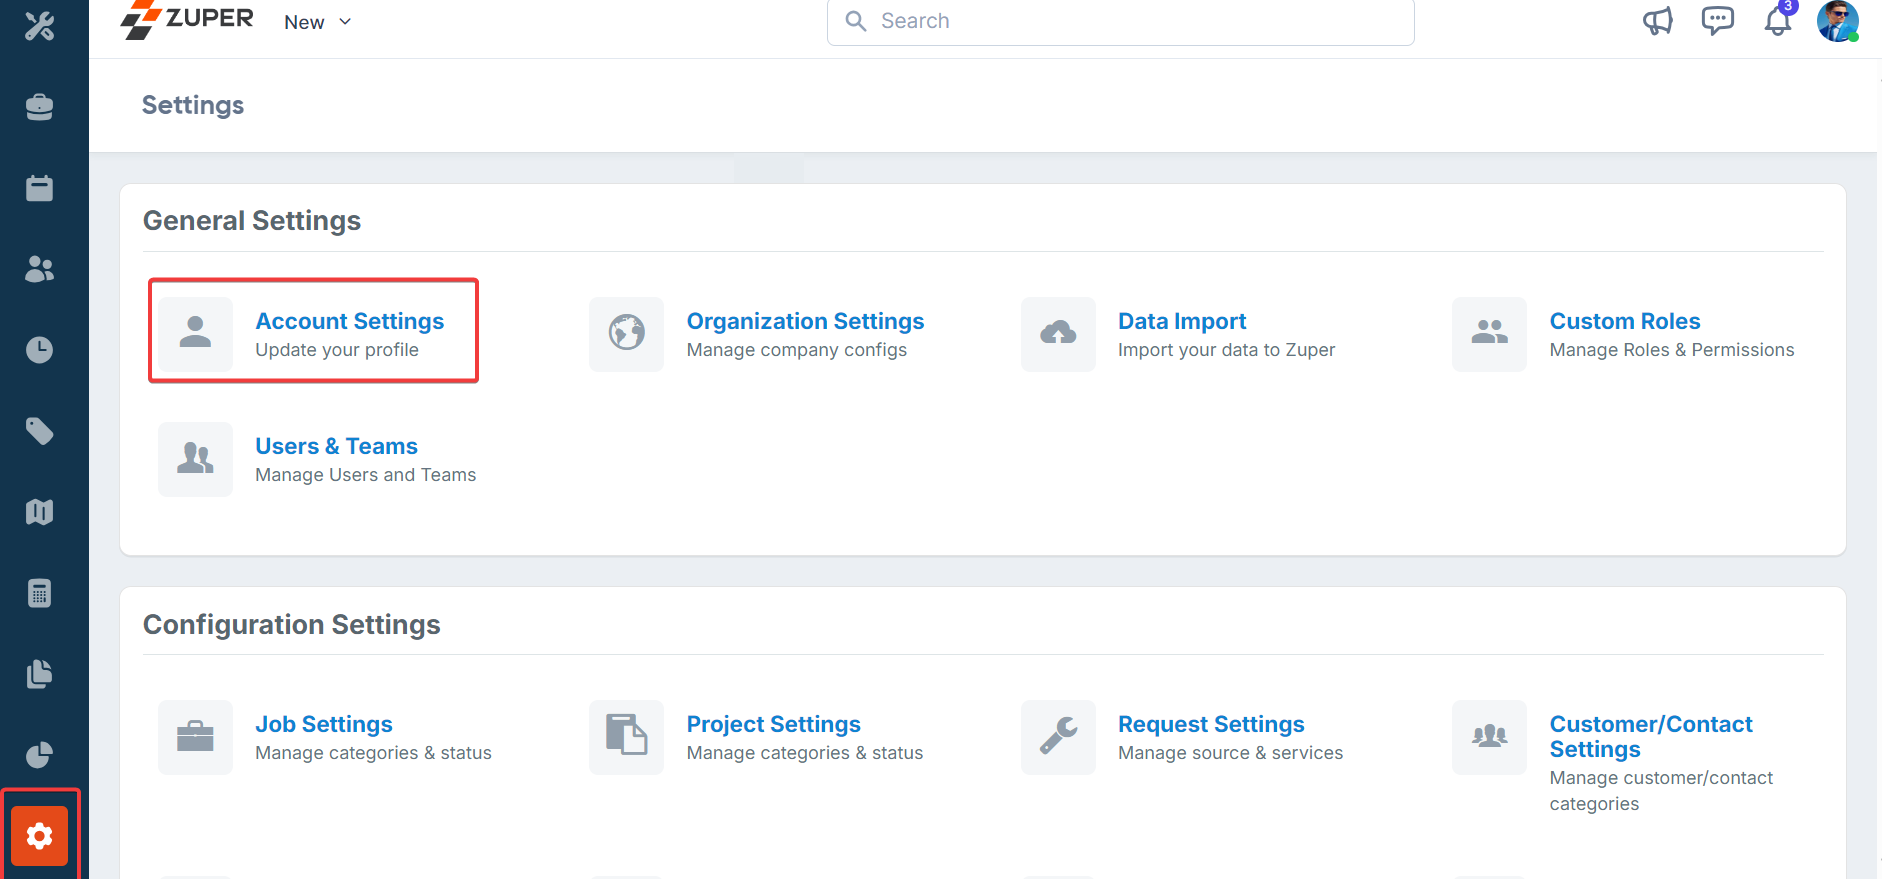

- Log in to Zuper with an admin account.
- Scroll down the menu bar on the left and select the “Settings” icon key.
- Under the “General Settings” category, select “Account Settings.”
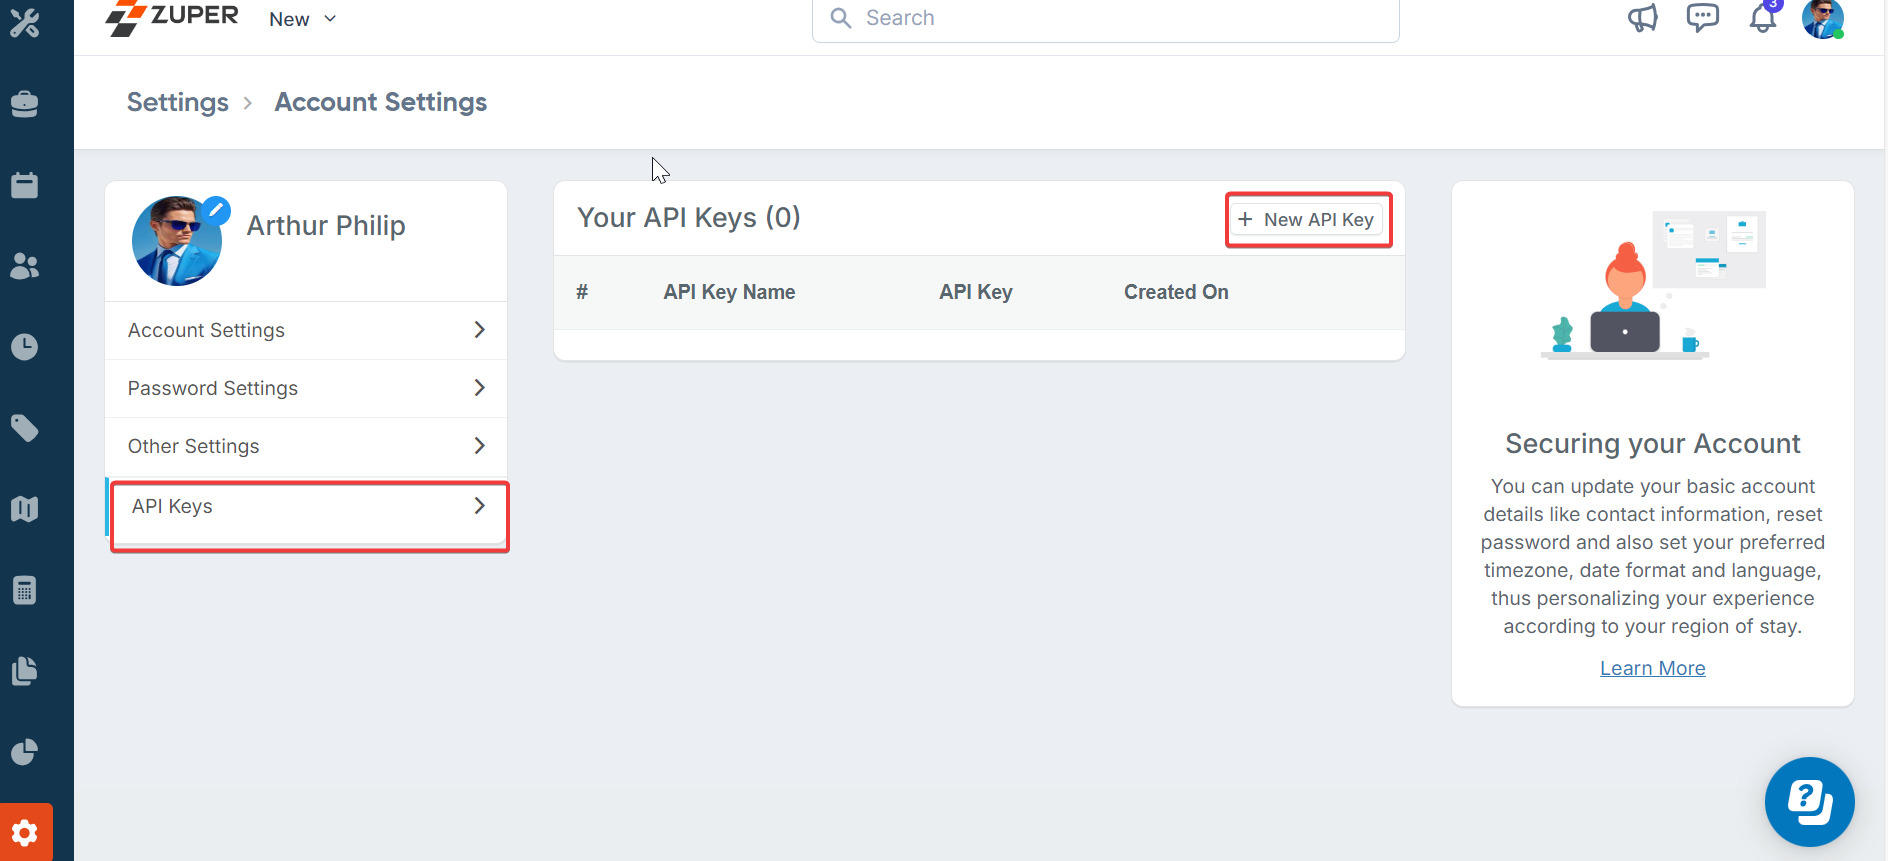
- On the account settings page, select “API Keys.”
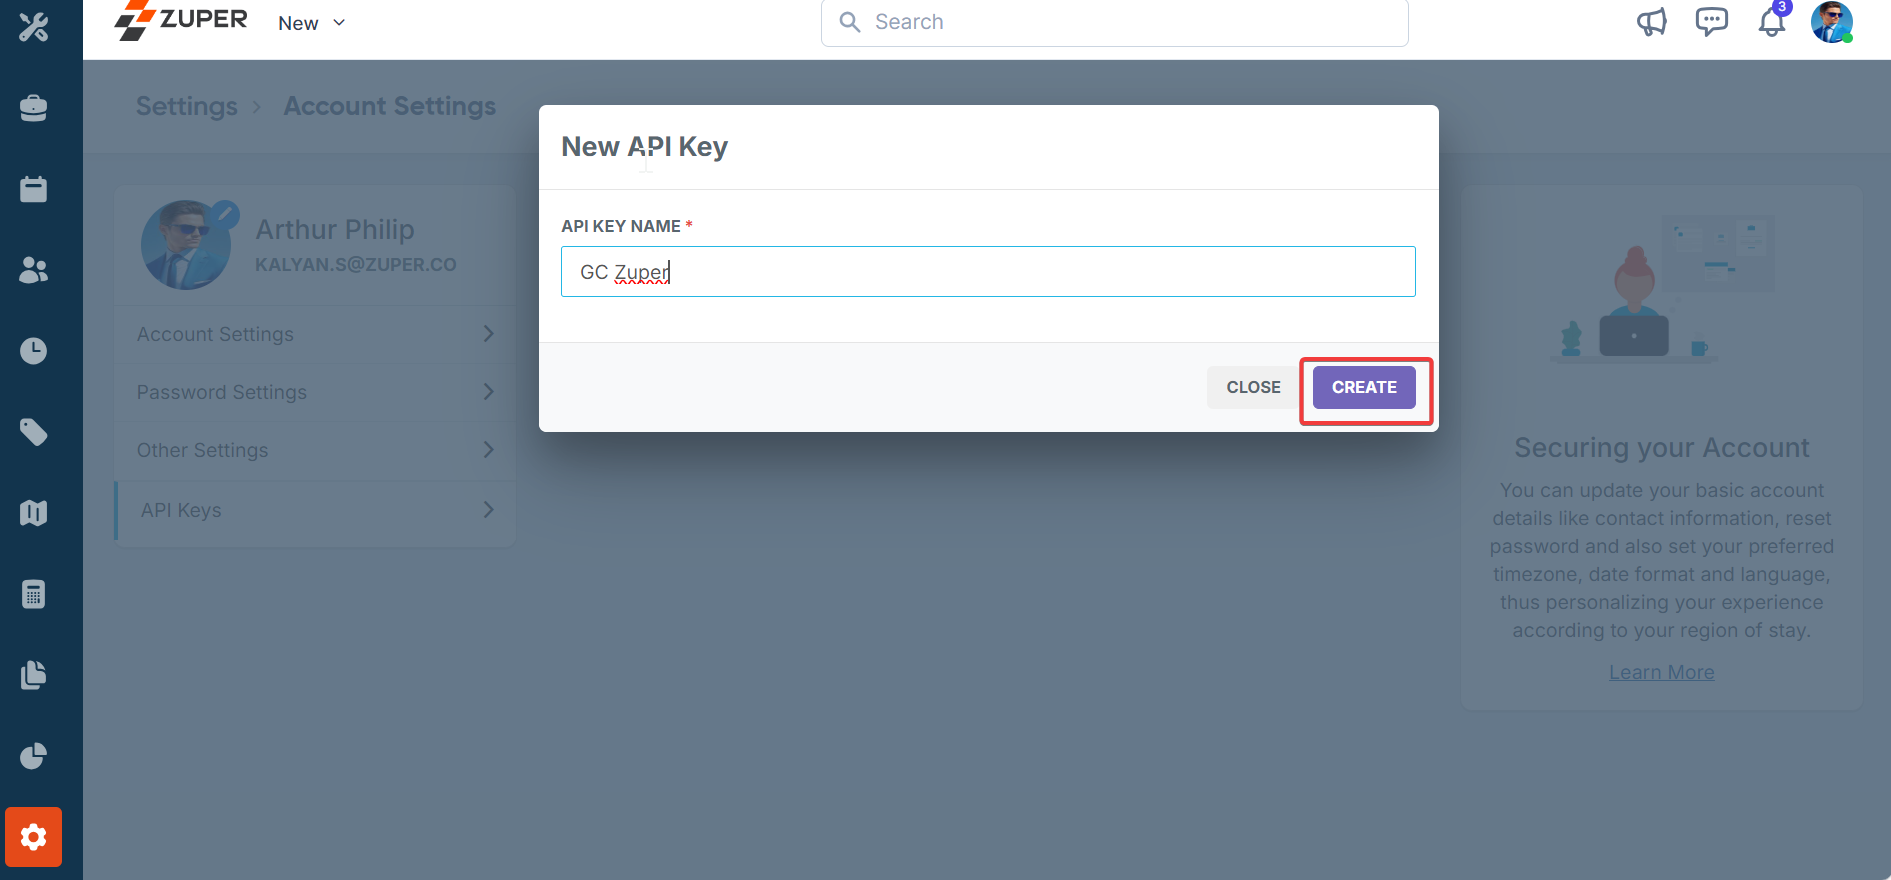
- Click on “New API Key” and enter the name of the API key in the pop-up windows.
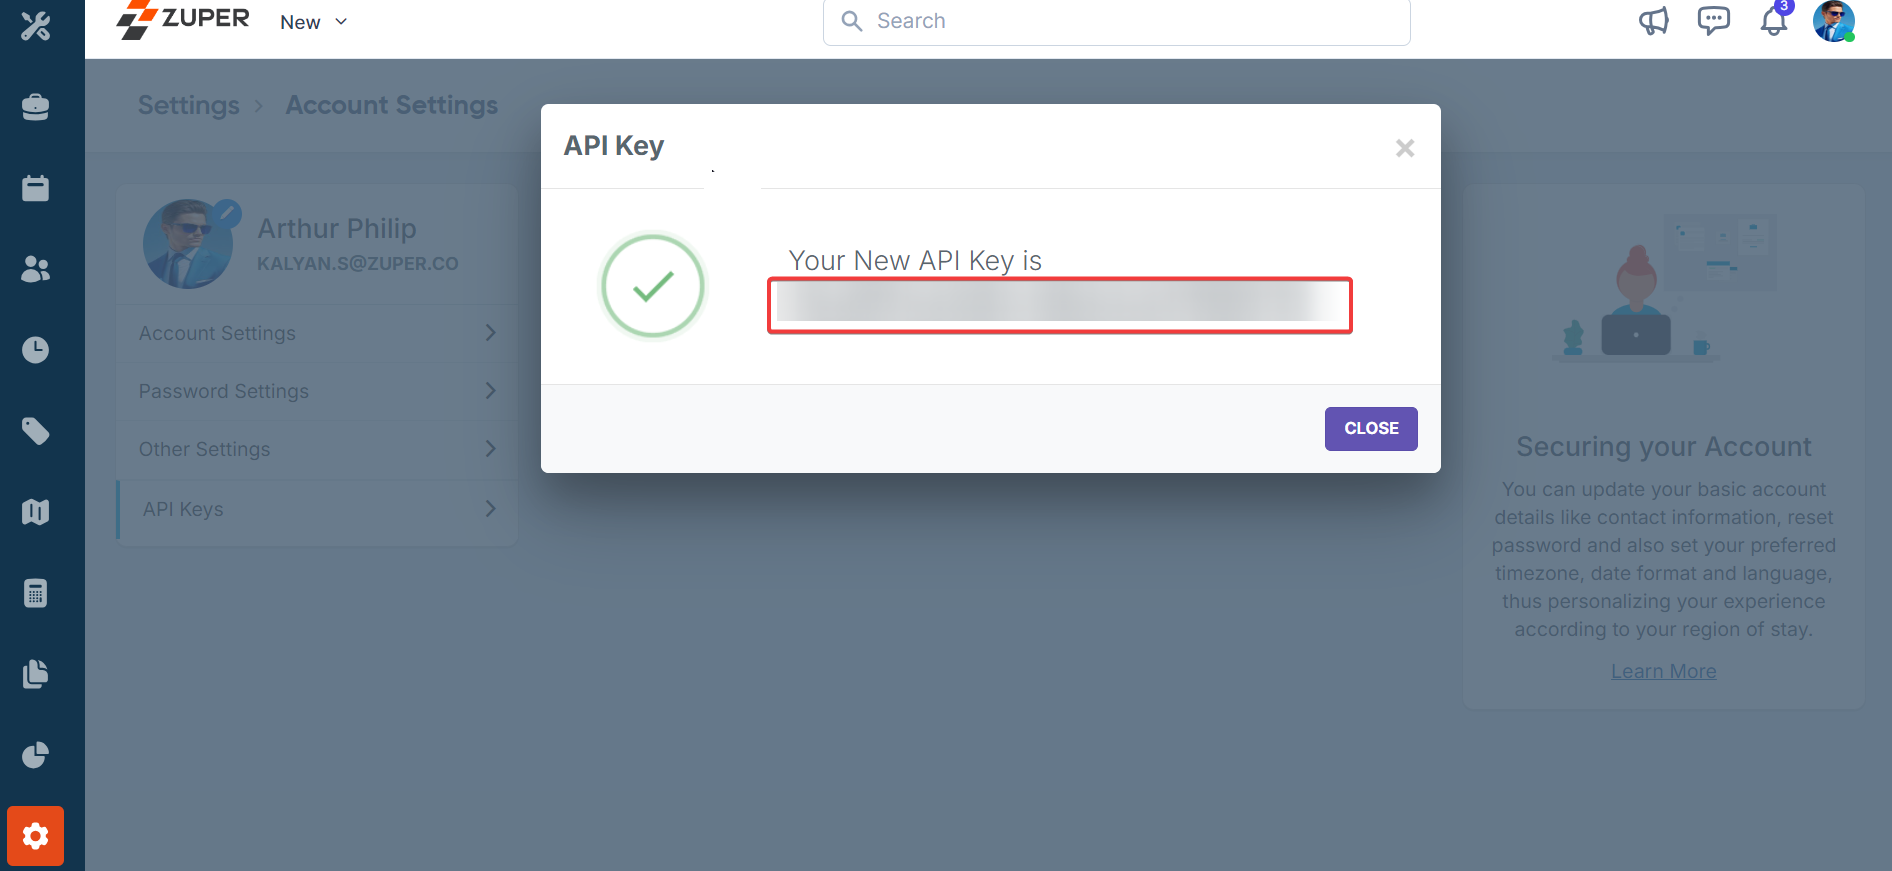
- Click on “Create” to generate the API key. (Once created, the API key can be viewed by clicking on the “View API Key” hyperlink.)
- To delete/deactivate an existing API, click on the “Delete API Key” (x) next to the respective API.
Note: The API key generated will provide full permission & access to the user whocreated this key. Please ensure to store this key securely.
Note: It is mandatory to enter the Zuper API Key for Integration to perform smoothly.
- Sync Zuper Status Updates (Mandatory Field): - Choose “Yes” to enable the sync of Zuper’s current job status updates with HubSpot.
- Sync Zuper Job Notes (Mandatory Field): - Choose “Yes” to enable the sync of Zuper Job Notes’ current job status updates with HubSpot.
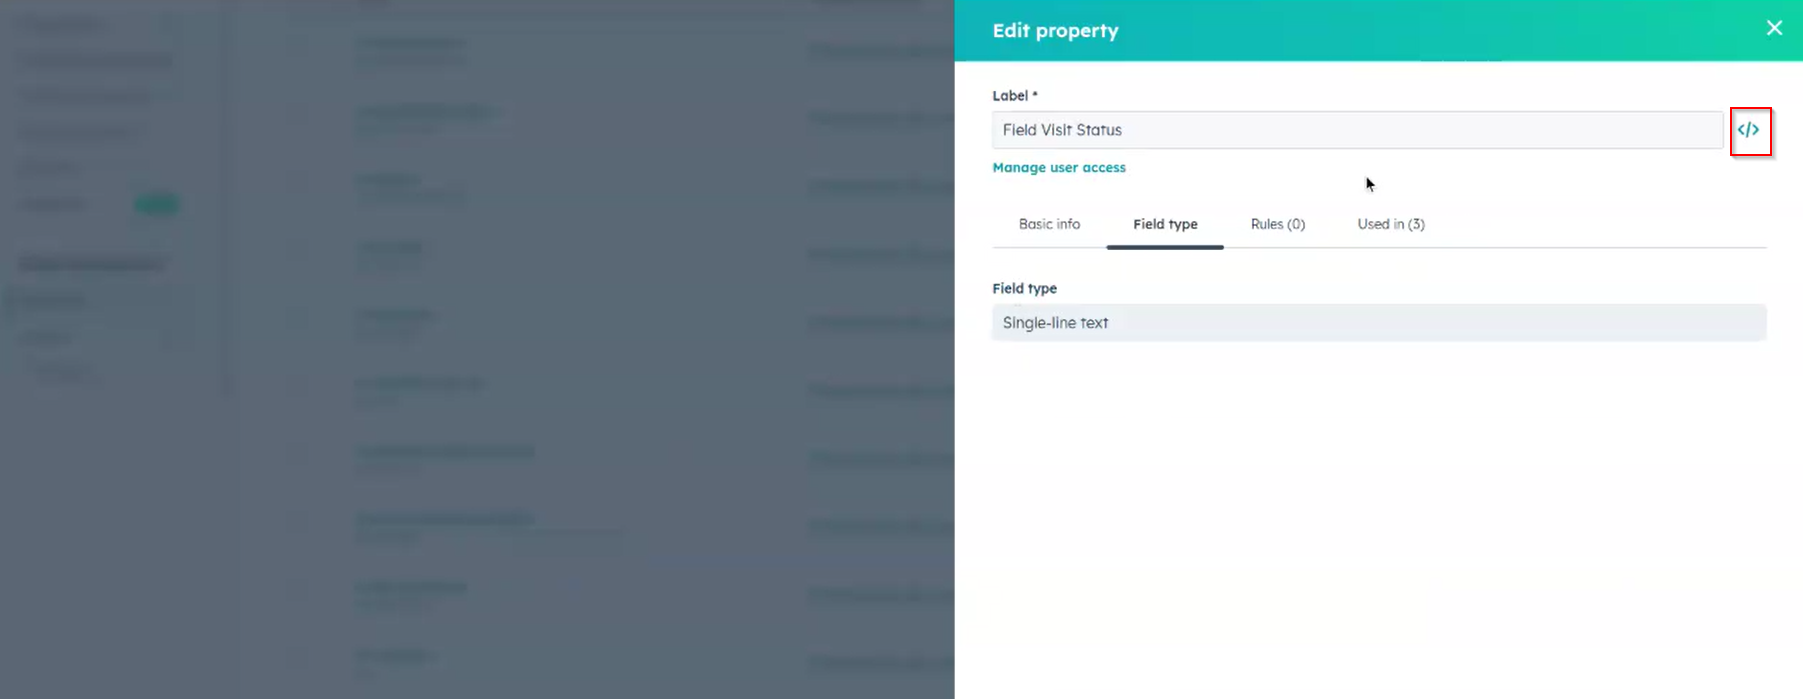
- HubSpot Status Field Name (Mandatory Field): Enter the “Status” field API name of Zuper from where the current status is fetched and reflected in HubSpot.
- HubSpot Assignees Field Name: Enter the “Assignees” field API name of Zuper, from which where the current status is fetched and reflected in HubSpot.
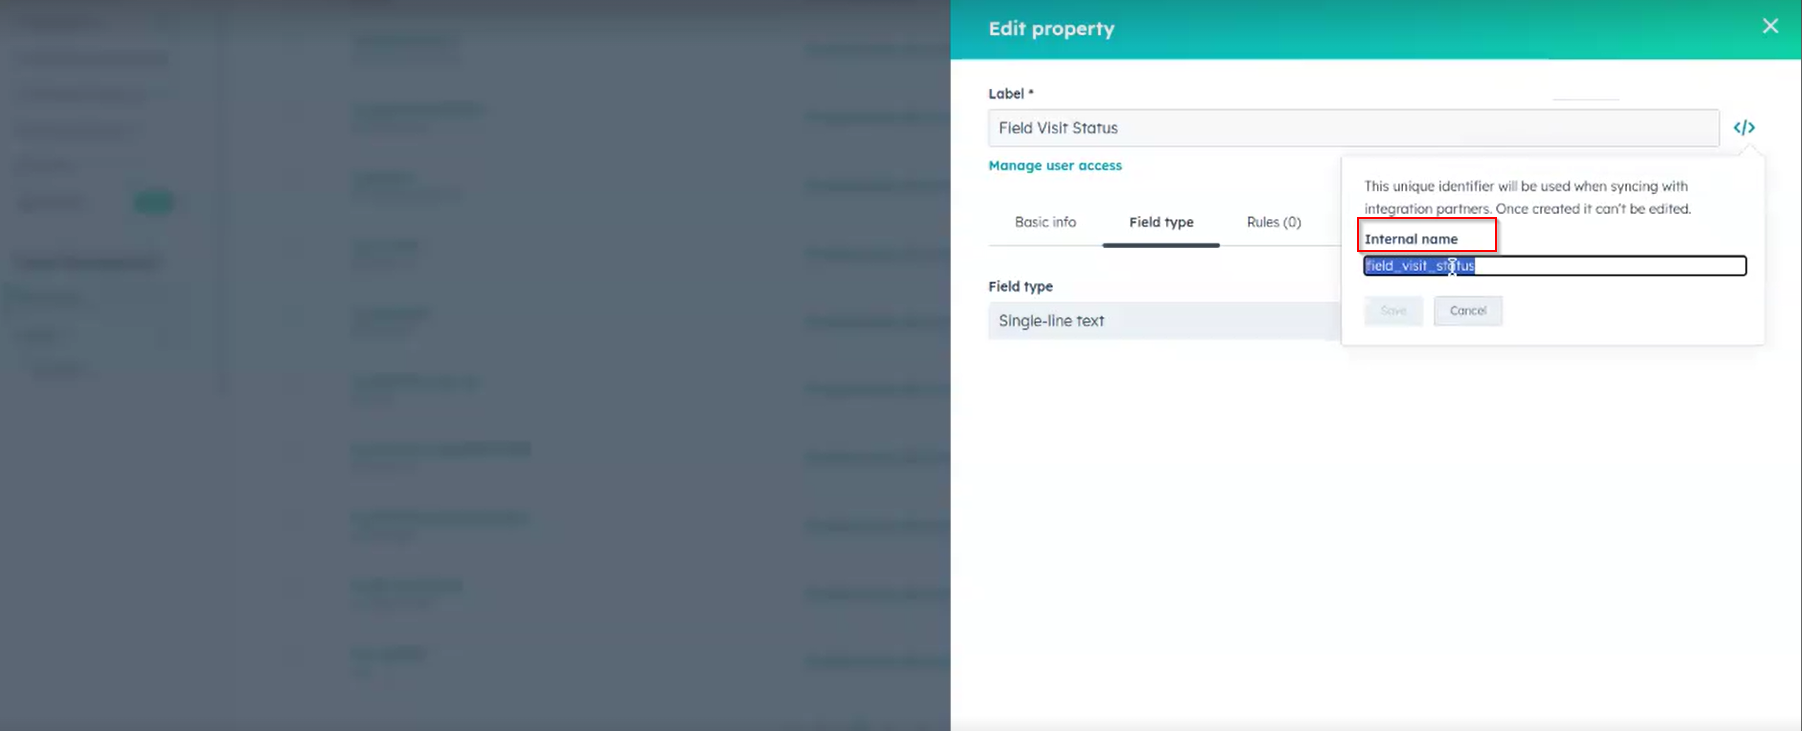
- To get the Assignees field name: Login to your HubSpot account, and under settings, choose Tickets → Manage ticket Properties → All Properties → choose Assigned Technician property → Select the “Backslash” link under field type.
- You must copy the API label from the “Internal Name” option and paste it under “HubSpot Assignees Field Name.”
- HubSpot Completed Date Field Name - Enter the internal name of the completed date field in HubSpot to which the Zuper status-completed or closed date will be synced.
- HubSpot Customer Feedback Field Name - Enter the internal name of the customer feedback field in HubSpot, to which the Customer Signature will be synced from Zuper.
- Sync HubSpot Job Notes (Mandatory Field) - Choose “Yes” to enable the sync of HubSpot Job Notes updates with Zuper.
- HubSpot to Custom Fields Mapping - Enter the custom fields API field name of HubSpot followed by Zuper’s custom API field name separated by commas, from which the current status is fetched and reflected from Zuper.
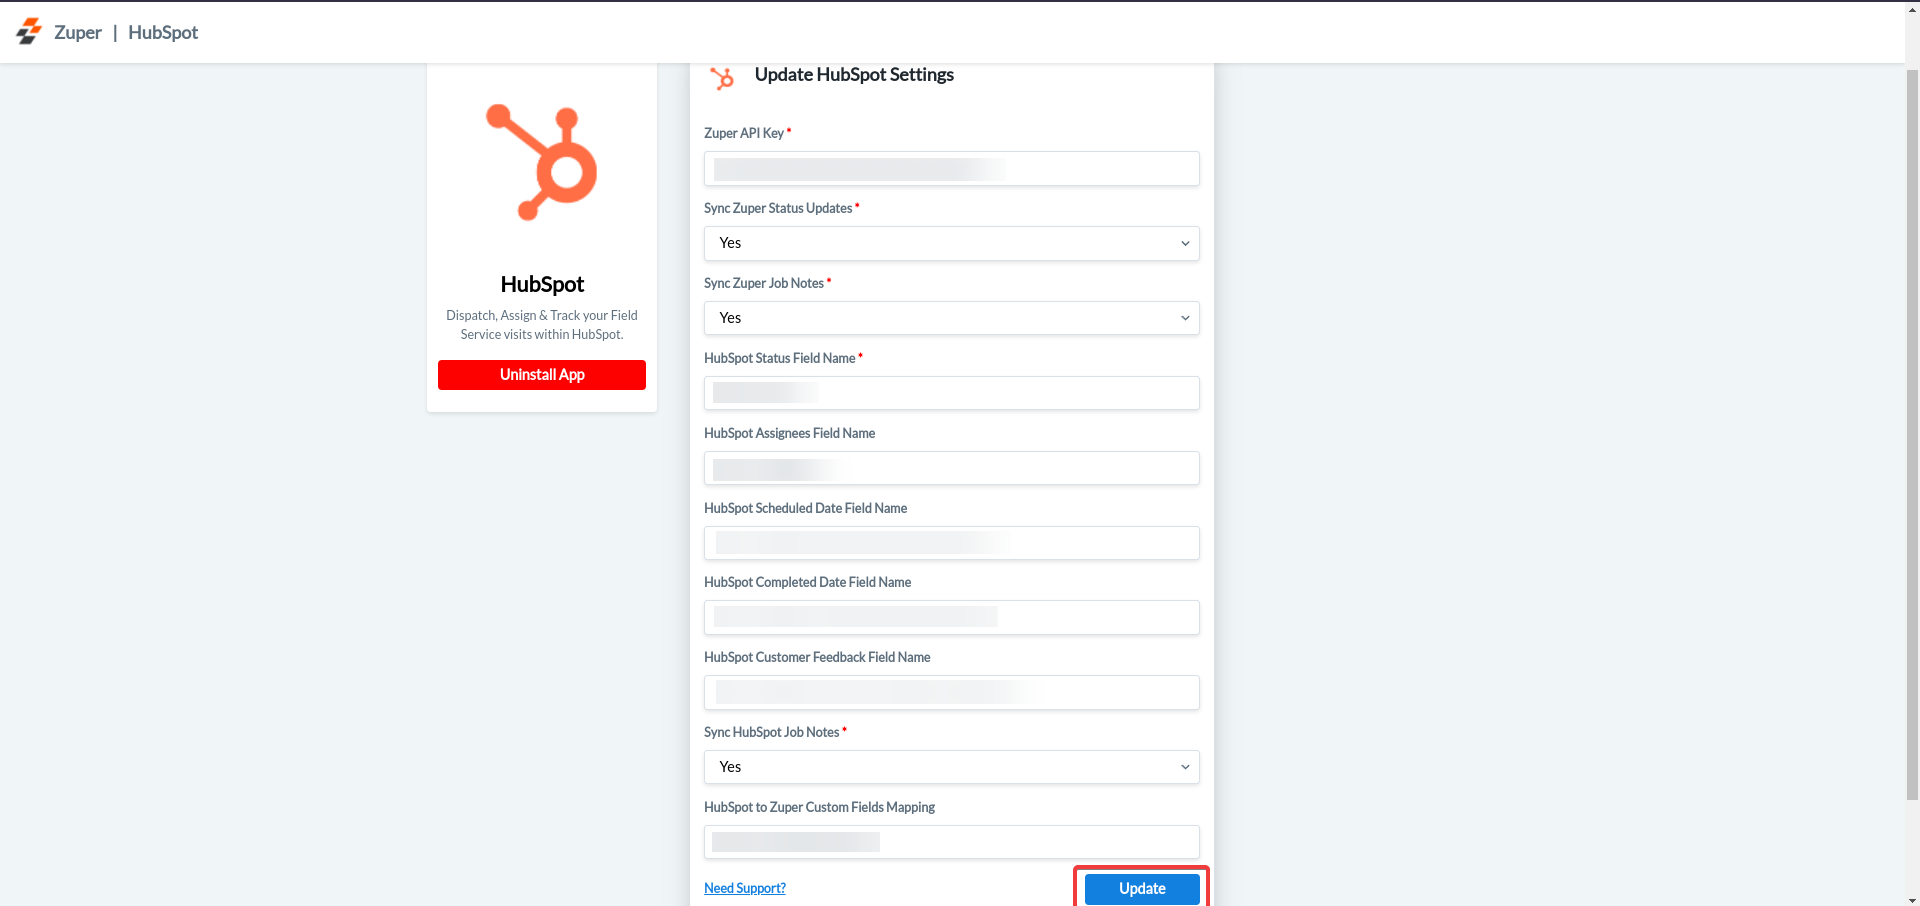
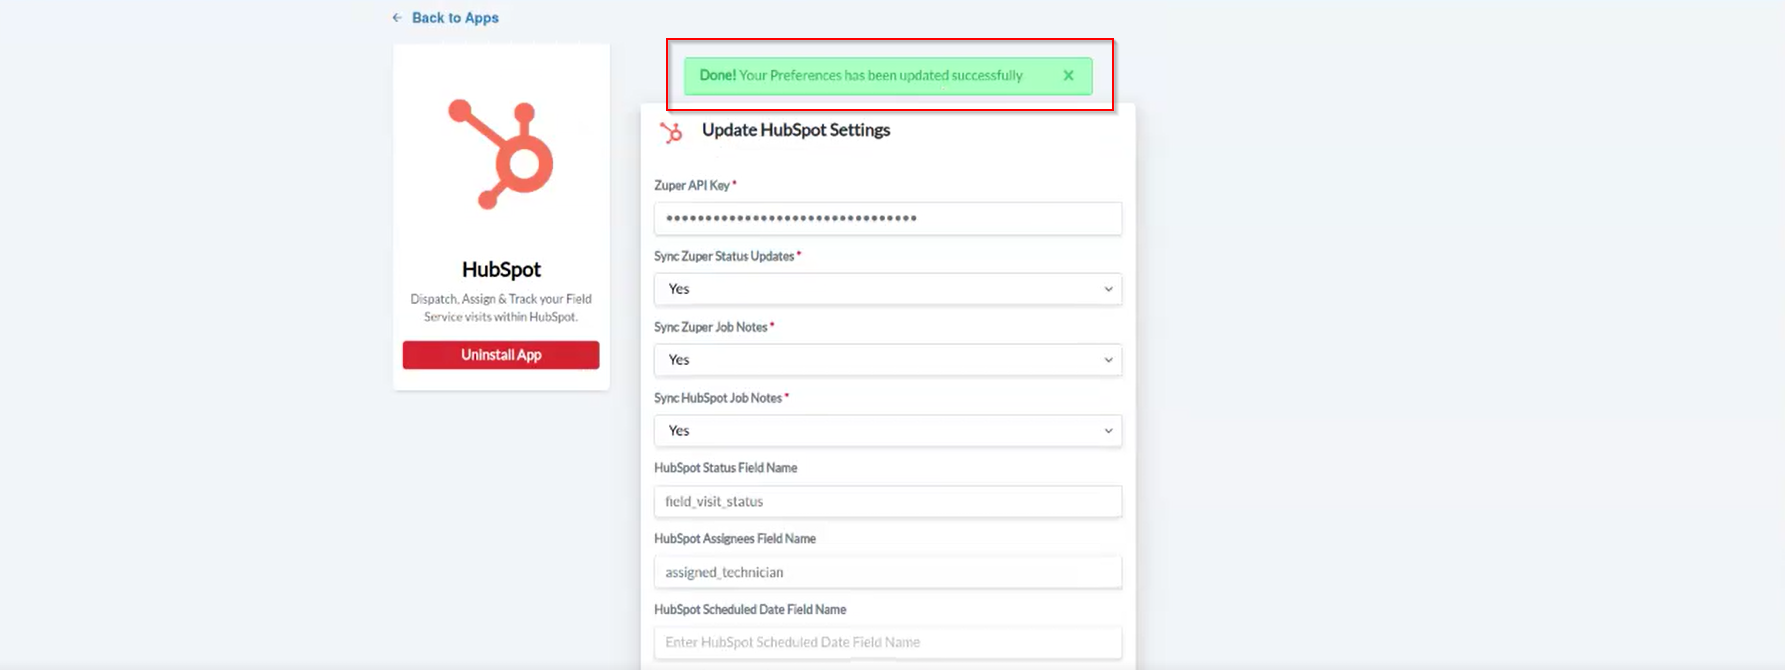
- Once you have filled in all the information, click the “Update” button. Your preference will be updated successfully.
Add Job widget to HubSpot views
HubSpot has introduced App Cards — a newer, more reliable way for external apps to display data inside HubSpot records. Zuper now supports an App Cards-based Jobs widget that replaces the older CRM Cards-based widget. App Cards load faster, receive direct support from HubSpot, and are less prone to performance issues. The older CRM Cards have been deprecated by HubSpot and will receive limited support going forward. Zuper recommends that all new customers use the App Cards widget and that existing customers plan a transition at a time that works for them.Notes: This migration applies only to Deals, Tickets, Contacts, and Company records.

- Select Card Library.
- In the search field, enter Zuper.
- Under Apps, locate the Zuper Jobs Card.
- Select the card to add to the layout.
.png?fit=max&auto=format&n=bMcfoPsnX4A_4PNI&q=85&s=bd239c370b457a5124e9df87d803235c)
- Close the sidebar modal.
- Select Save and exit to apply the updated layout.
- Deals
- Tickets
- Contacts
- Companies
Note: Once you complete this process for all four record types, the new App Cards widget is active.Jobs created with the old CRM Cards widget will also appear in the new widget — no data is lost during the transition.
Removing a Job from the Schedule Without Deleting the HubSpot Record
Removing a Job from the Schedule Without Deleting the HubSpot Record
If you need to remove a booking from the Job Calendar or Dispatch Board while keeping the job record intact in both Zuper and HubSpot, clear the scheduled dates instead of deleting the job.This action must be performed in the webapp.
Clear the Scheduled Dates
In the job details, remove the Scheduled Start Date and Scheduled End Date fields. Leave the Due Date unchanged.
Save the Job
Click Update to save. The job will no longer appear on the Job Calendar or Dispatch Board but will remain in Zuper and HubSpot.
Clear the Scheduled Dates
In the job details, remove the Scheduled Start Date and Scheduled End Date fields. Leave the Due Date unchanged.
Clearing the scheduled dates only removes the booking from the Zuper schedule view. The job record, its status, and its HubSpot association are fully preserved.
B. Create Zuper Jobs within HubSpot
You can create jobs in Zuper through the widget in HubSpot’s right-hand panel of the Deal or Ticket Object. The HubSpot Deal & Ticket sidebar will display the Zuper Jobs widget which will list the associated Zuper’s jobs. Zuper lets you have one or multiple jobs for a single deal or ticket.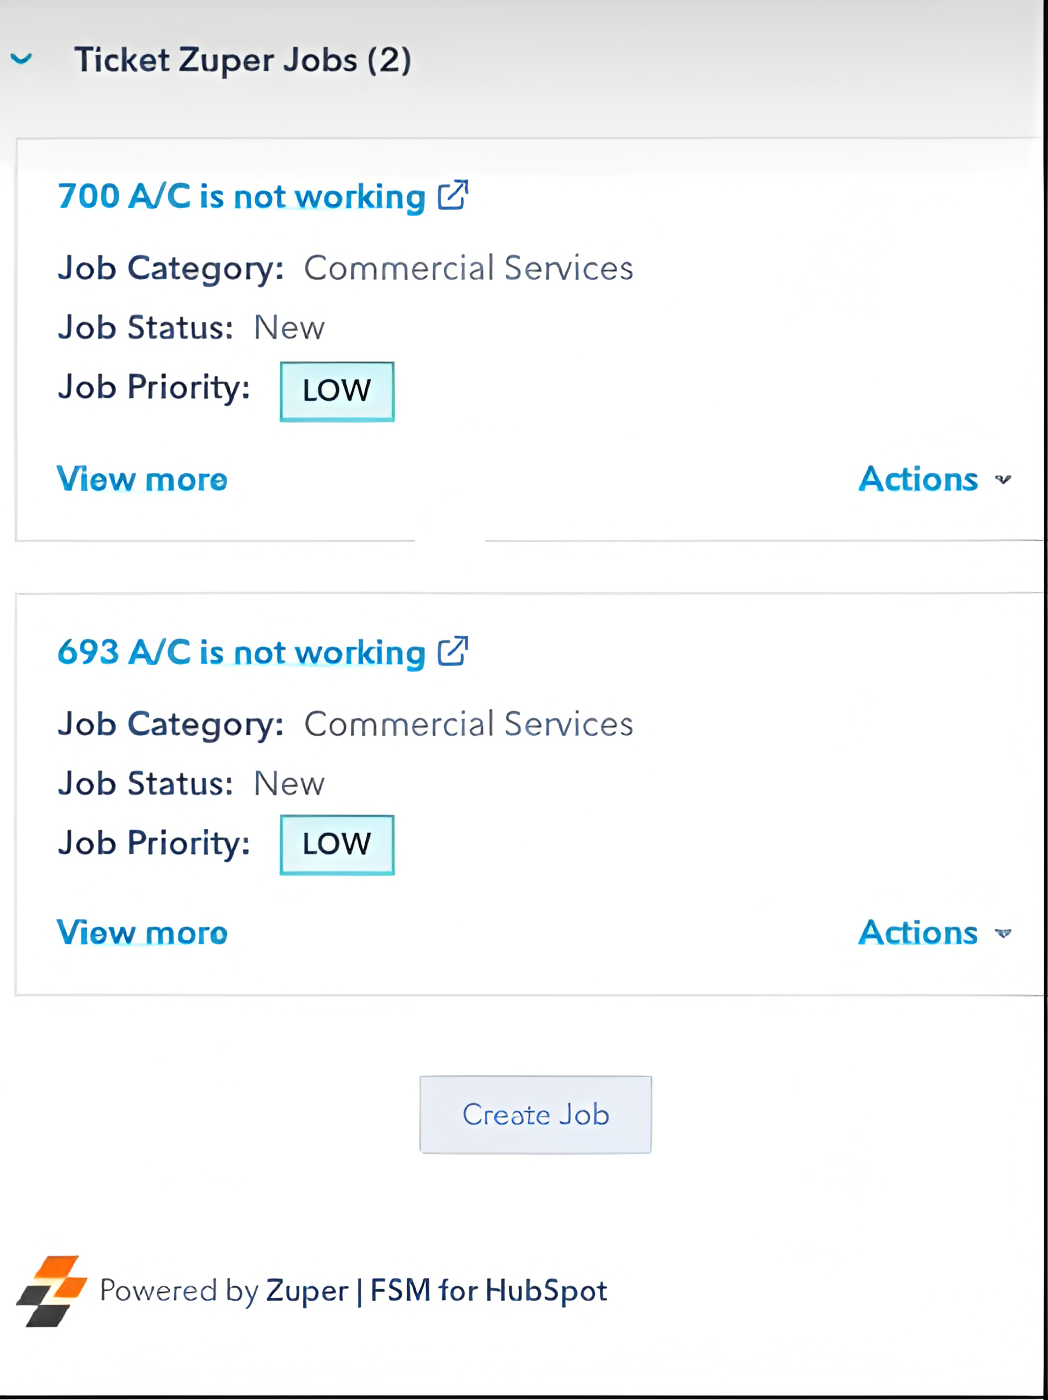
| Zuper Fields | HubSpot’s Equivalent Fields for Zuper |
|---|---|
| Customer | Contacts |
| Organization | Company |
| Assets | Same (Display as per Zuper master) |
| Parts | Same (Display as per Zuper master) |

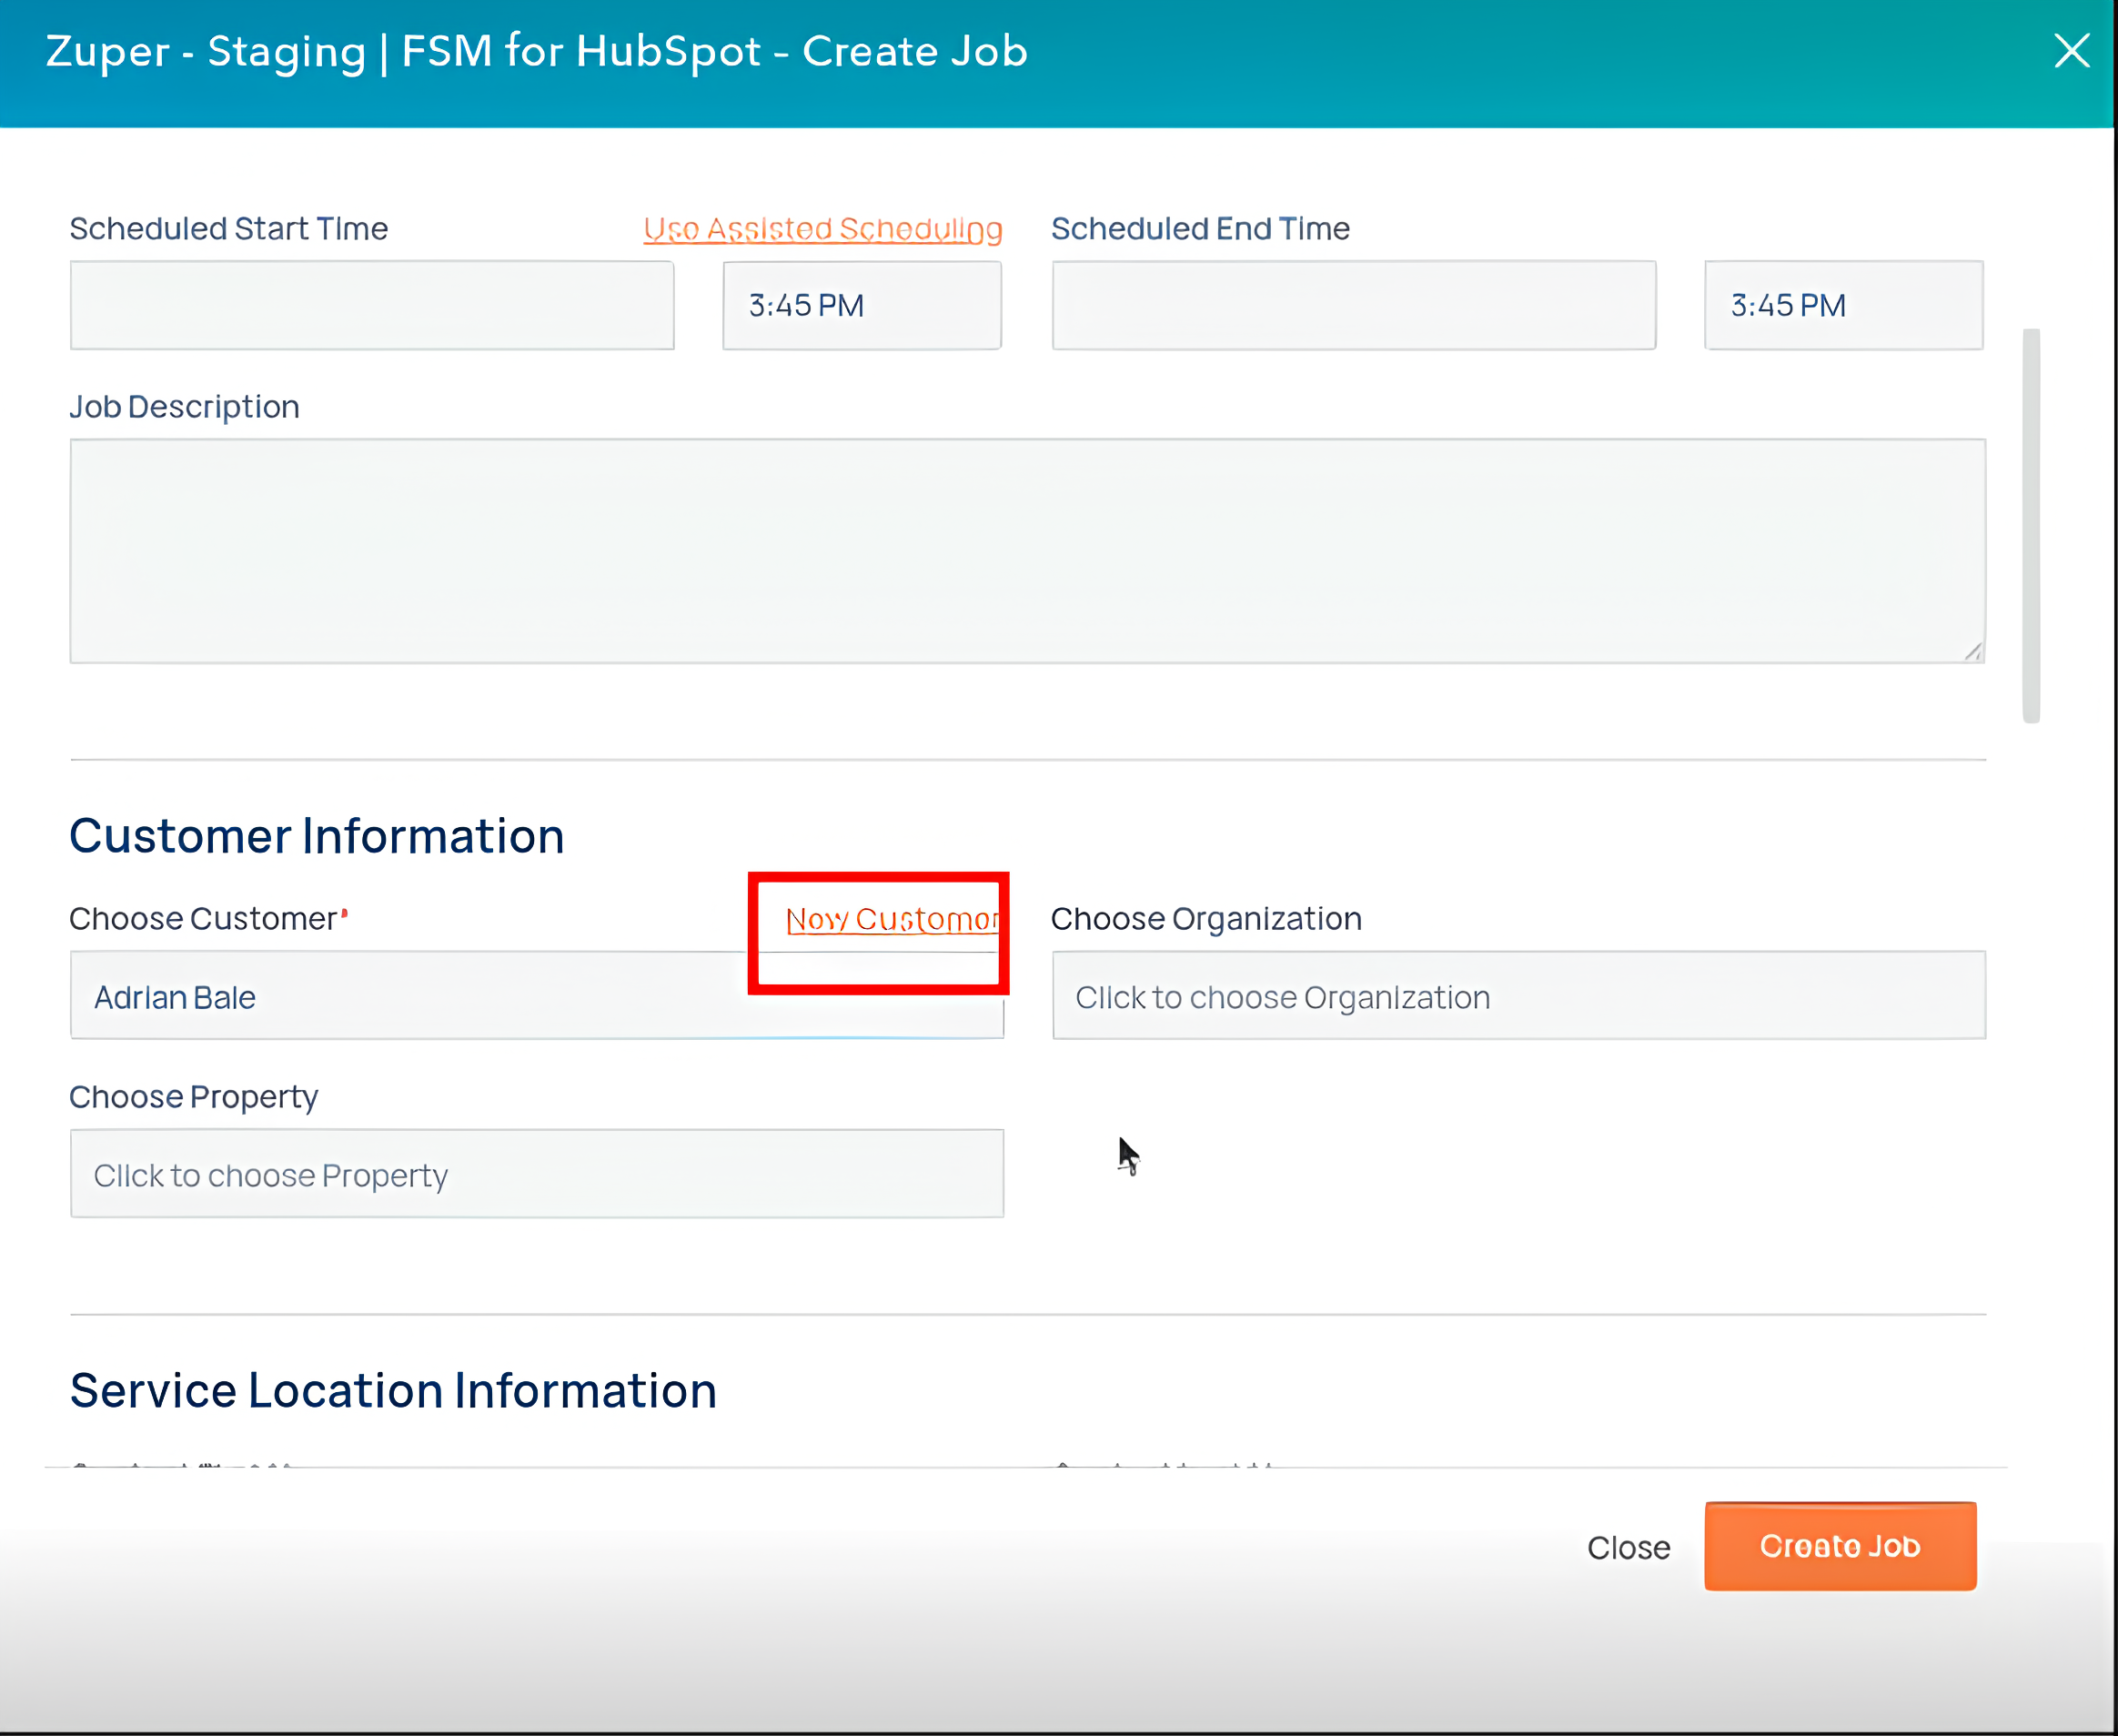
- While creating a job from the HubSpot widget, an existing Zuper customer can be chosen from HubSpot, or a new customer can be created ad hoc in the widget and linked to Zuper.
- To associate an existing customer, you can choose them from a dialog box based on the available list by searching for their name in the widget’s search bar.
- To add and associate a new customer with this job, click the “New Customer” option in the widget and provide the necessary details to create a customer. The customer will be associated with the job.
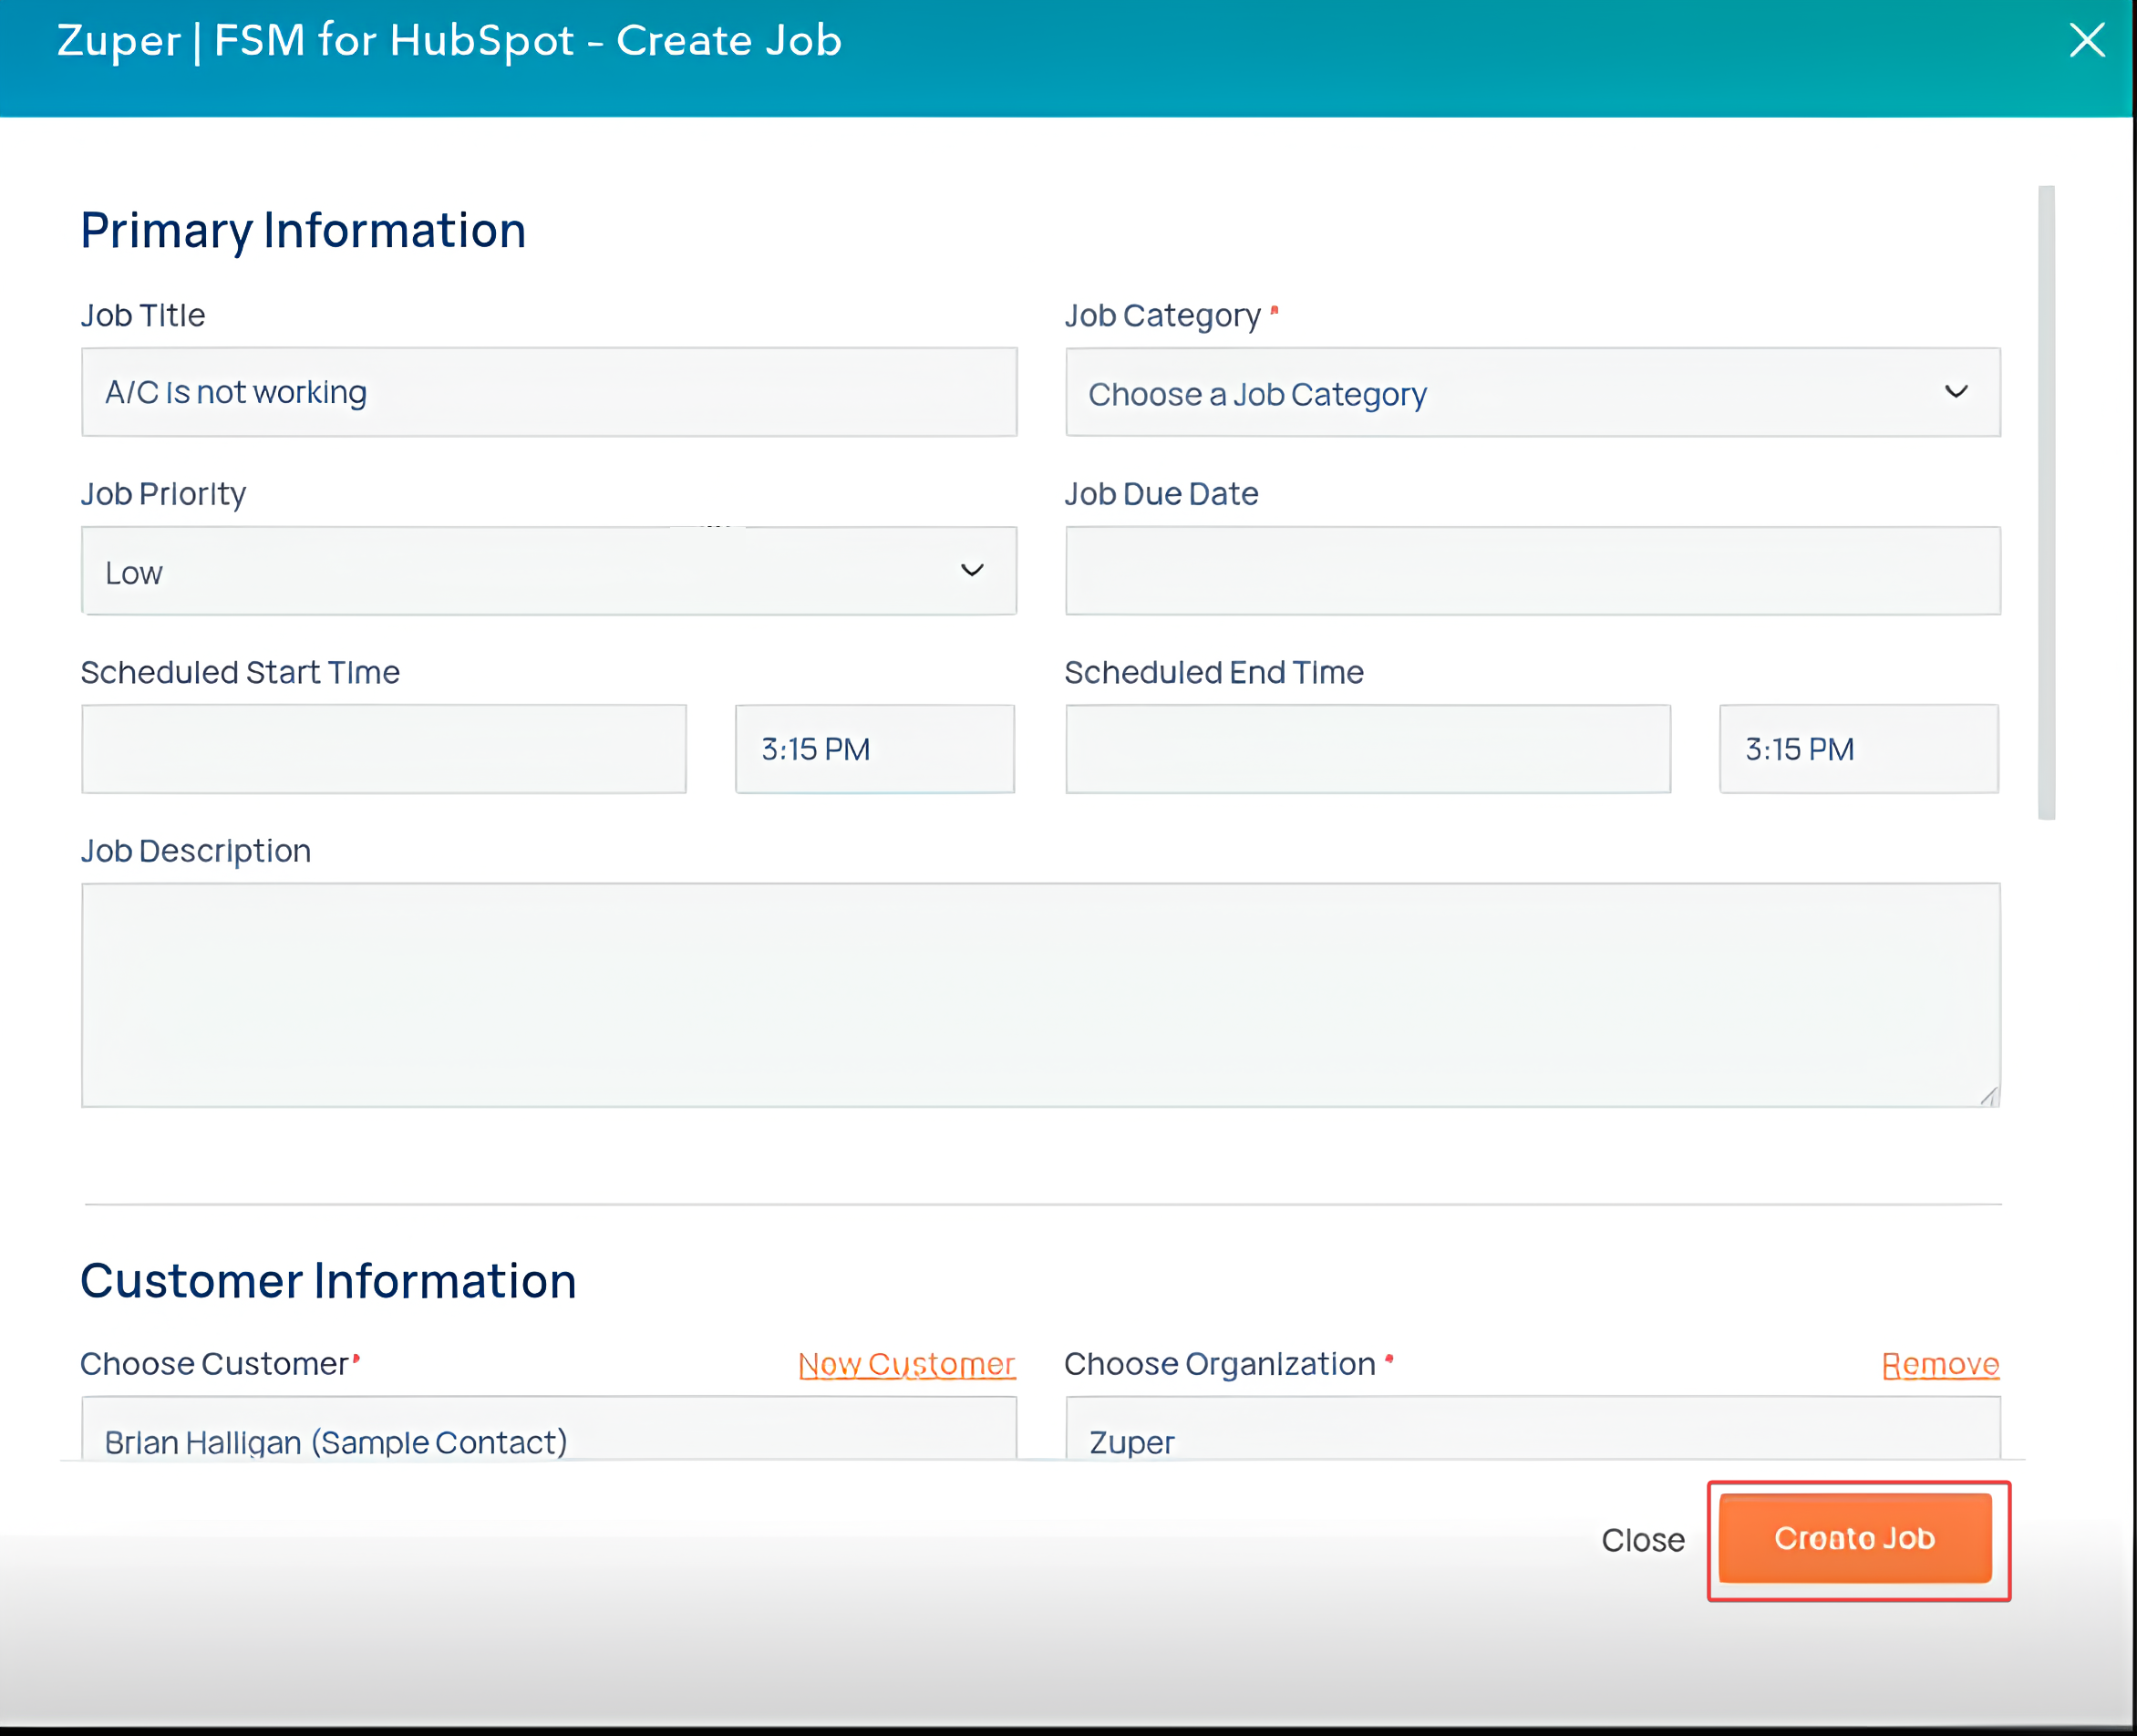
Notes for Job Creation
- A Customer (Contact) or an Organization (Company) is mandatory when creating a new Job.
- The HubSpot widget allows you to create recurring jobs with the following recurrence schedules: .
- Assets, parts, and services related to the job can be picked for the service.
- If custom fields are present in a Job based on the Job category, they will be available to fill in HubSpot. All custom field types are supported except lookup and File Upload.
- Notes added to HubSpot Deal/Ticket will sync to Zuper Job as soon as they are created.
- Attachments were added to the HubSpot Deal/Ticket. Also, create a note in HubSpot, which will be synced to the Zuper Job.
- Notes added to Zuper job will sync directly to the associated Hubspot Deal/Ticket’s notes instead of to a section on the widget.
HubSpot App Cards
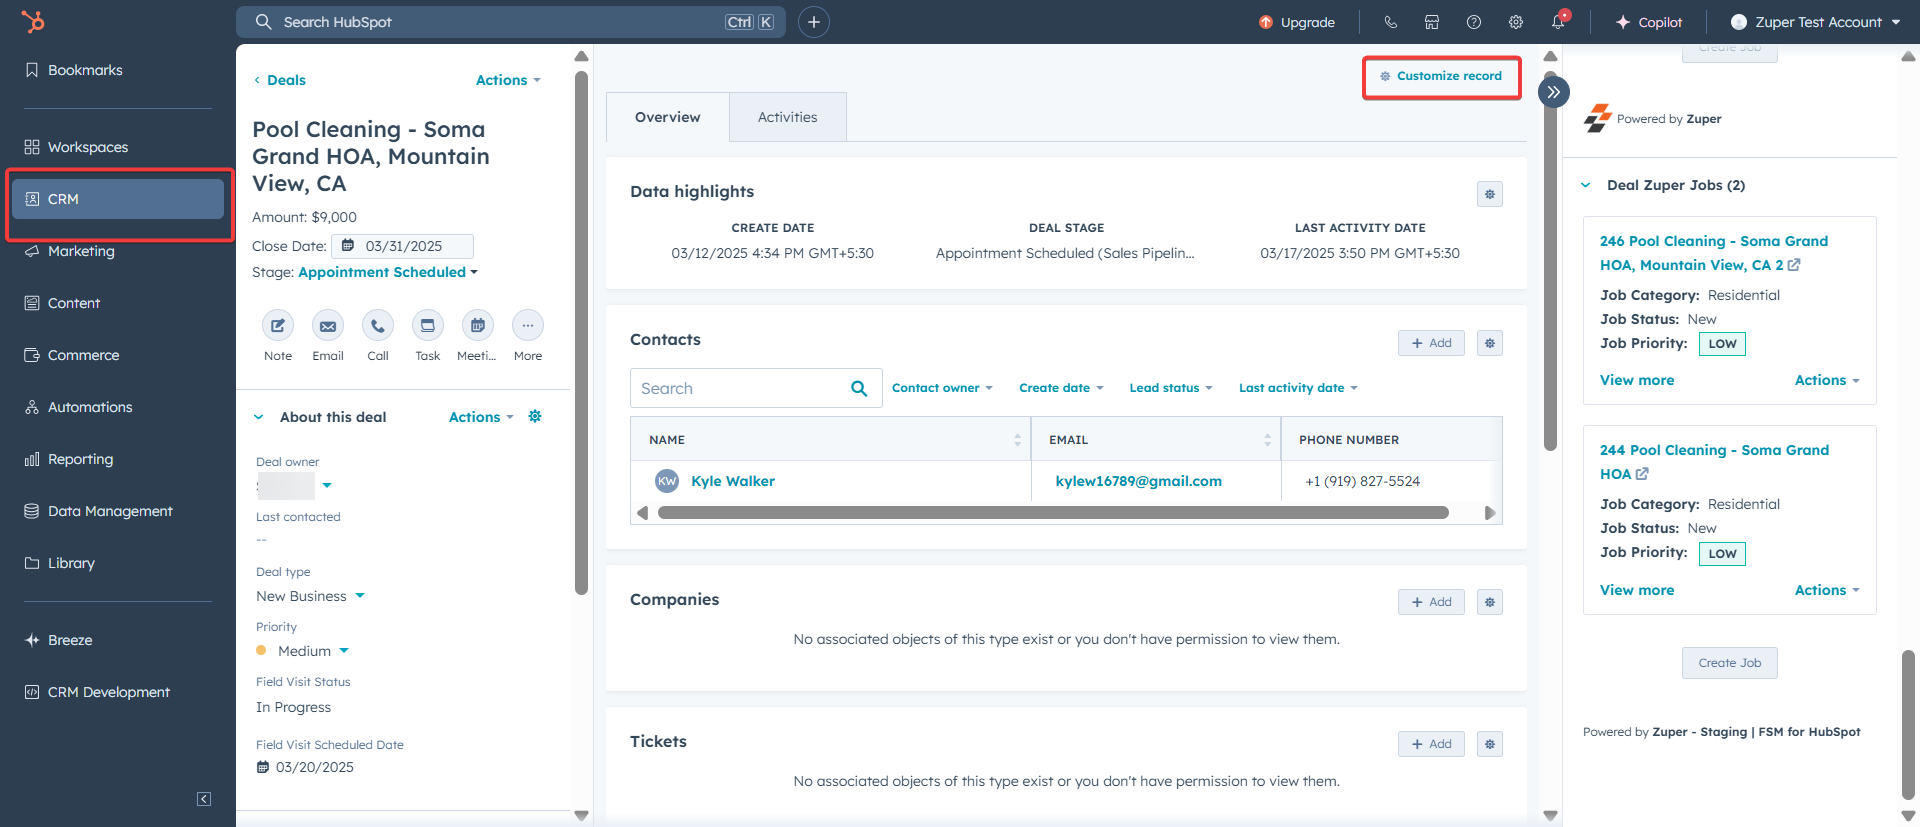
The new Job Gallery feature brings all your job-related media into one seamless, unified view on Zuper. For Staff using HubSpot to create jobs, the Gallery feature in HubSpot’s Details page brings all your job-related photos and videos into a single view within HubSpot - no more digging through Checklists, Notes, or Attachments! This provides crucial context and information that agents may need to respond to customers or take action on the Deal/Ticket. How do you set up the Gallery Feature in HubSpot Deal?- Under the “Deals” page, click the “Customize Card” to add the gallery.
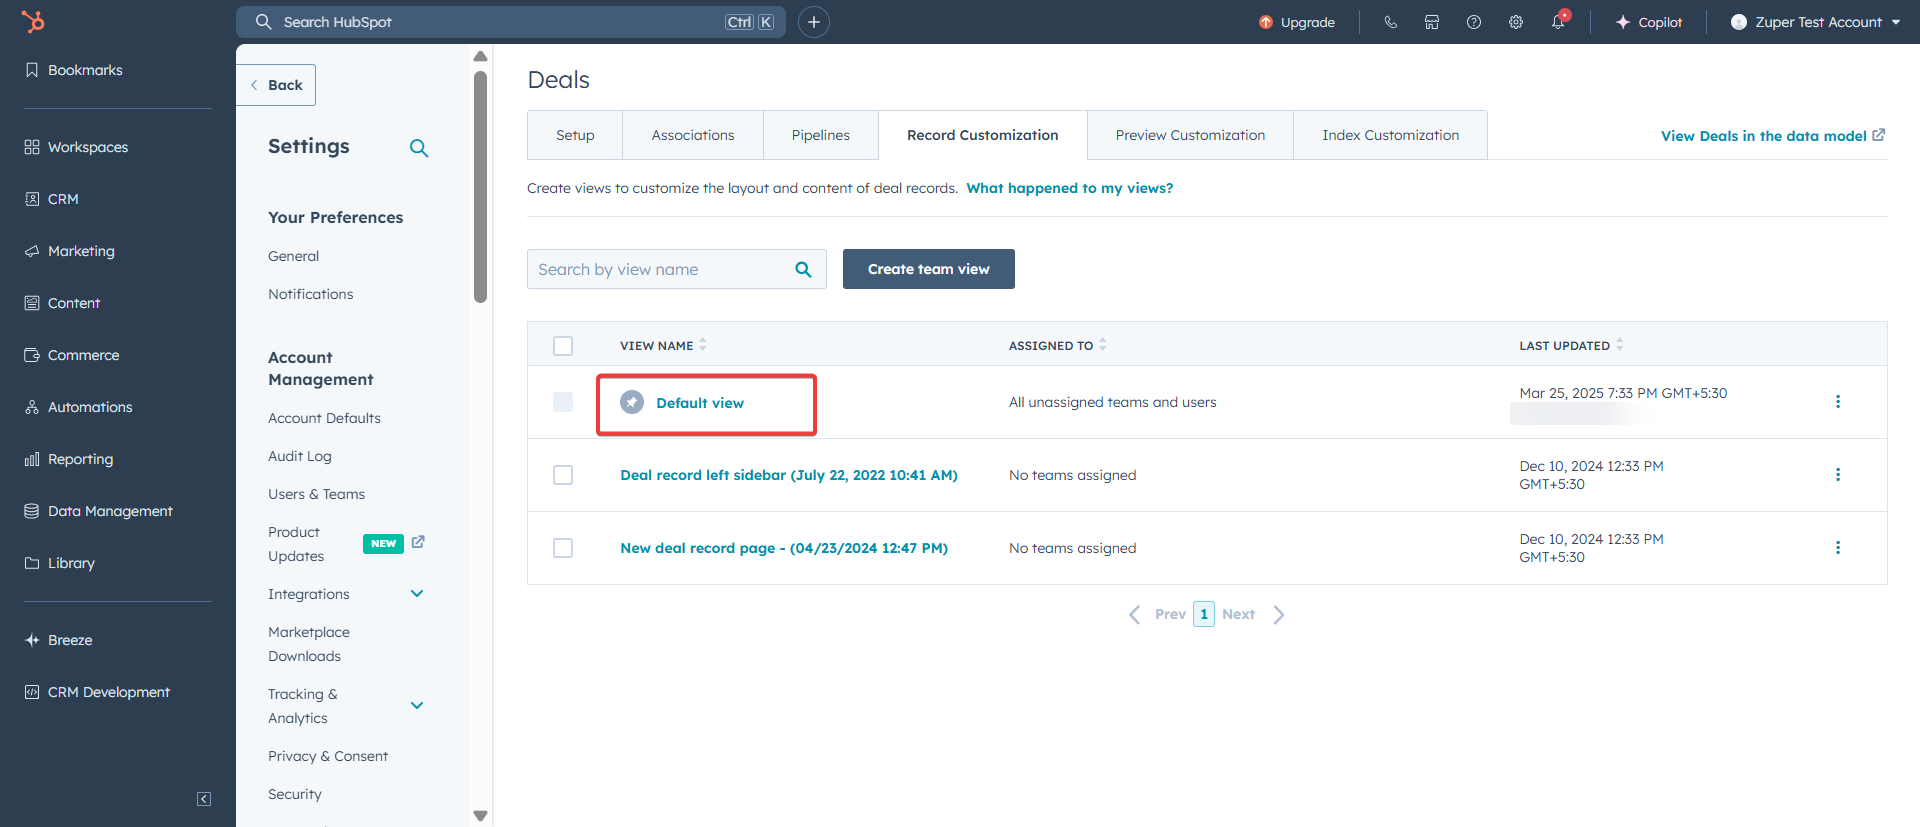
- Select the view you regularly use in the record (deal/ticket) you wish to enable for App Card.
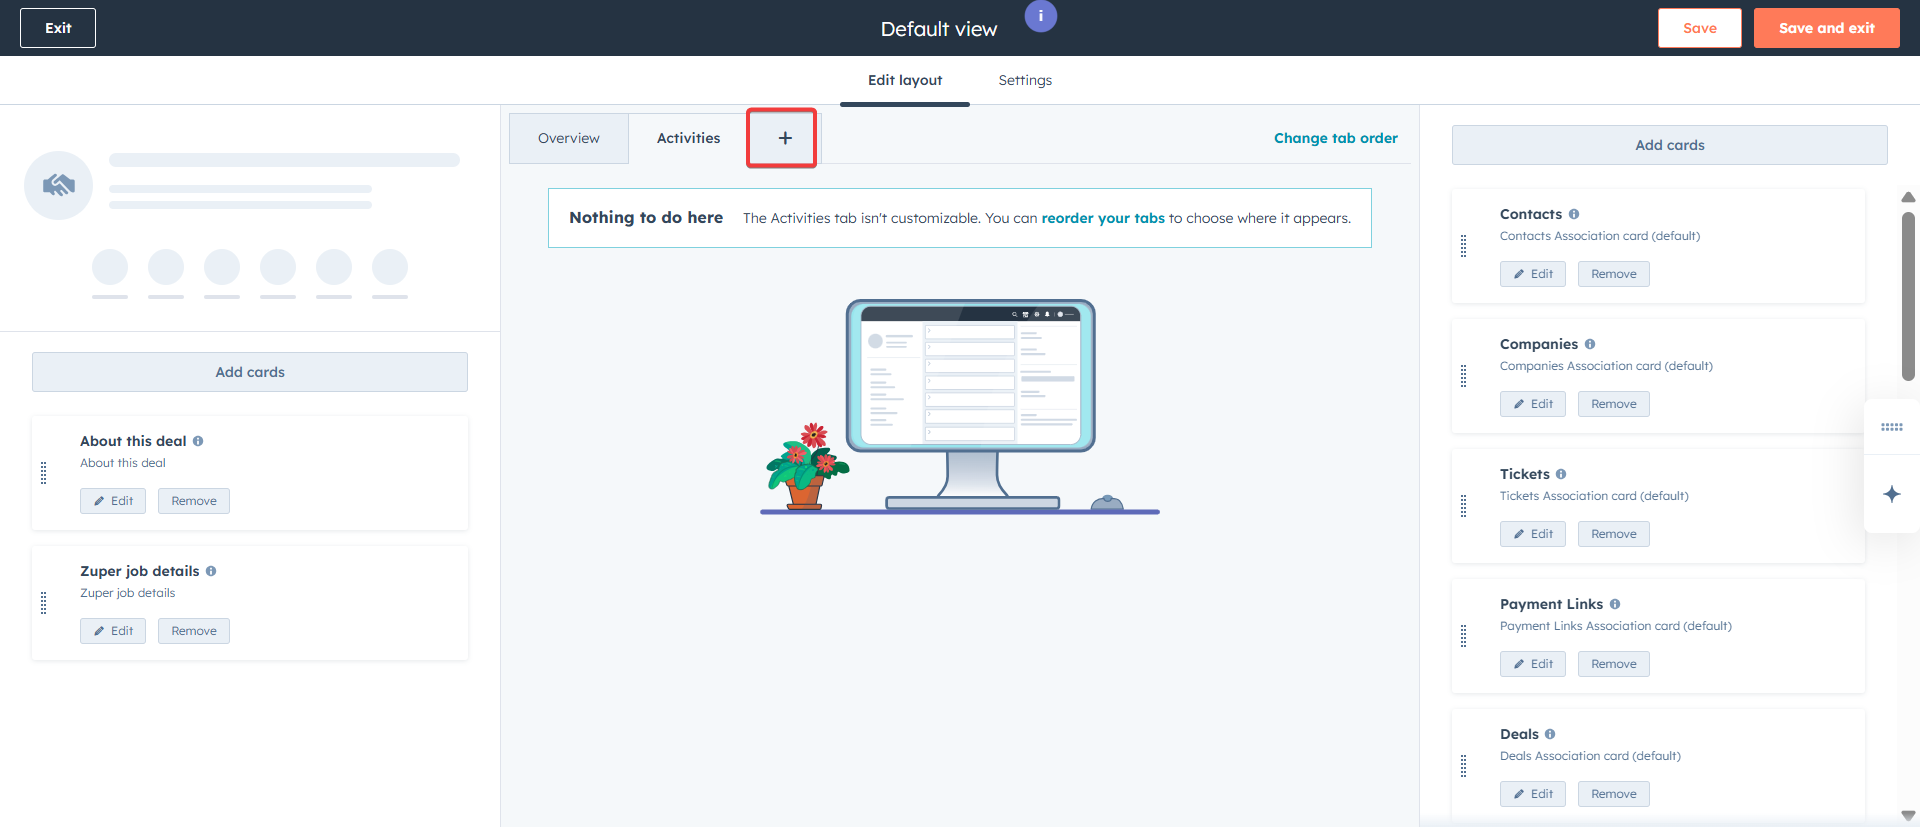
- Click “+” to add the new tab. (applicable only for enterprise plans).
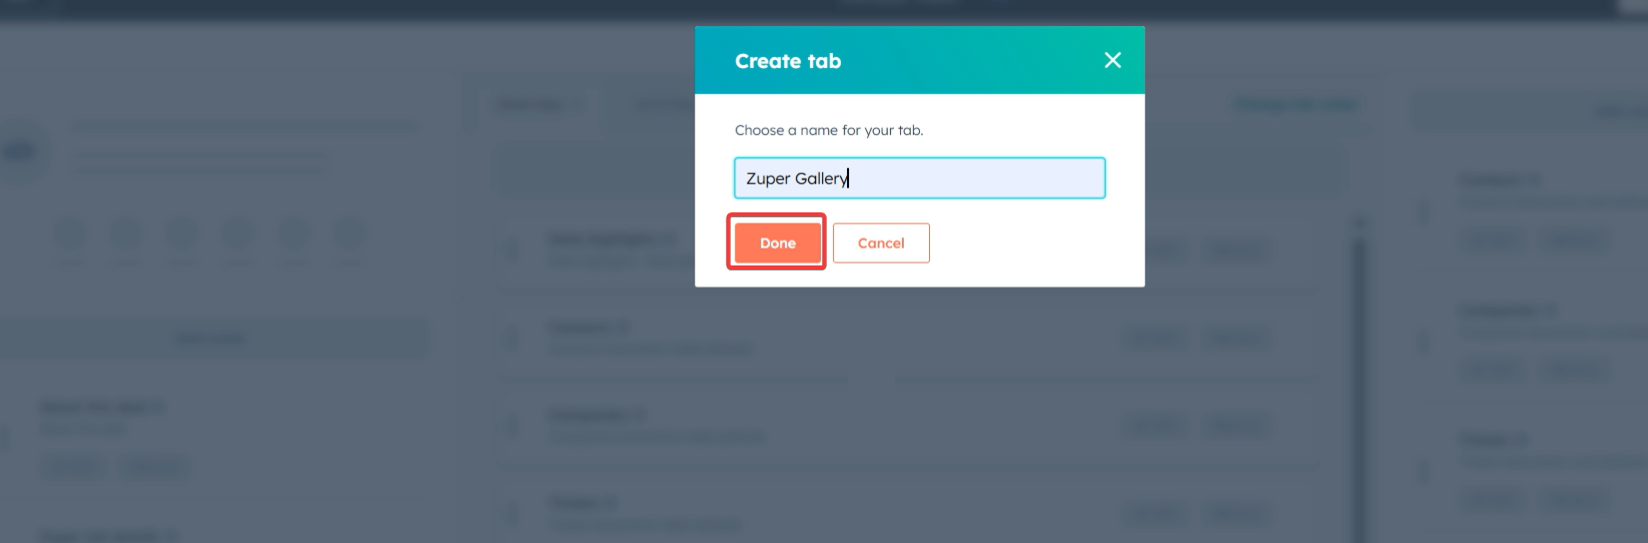
- A dialog box will appear. Enter the tab name. Click the “Done” button.
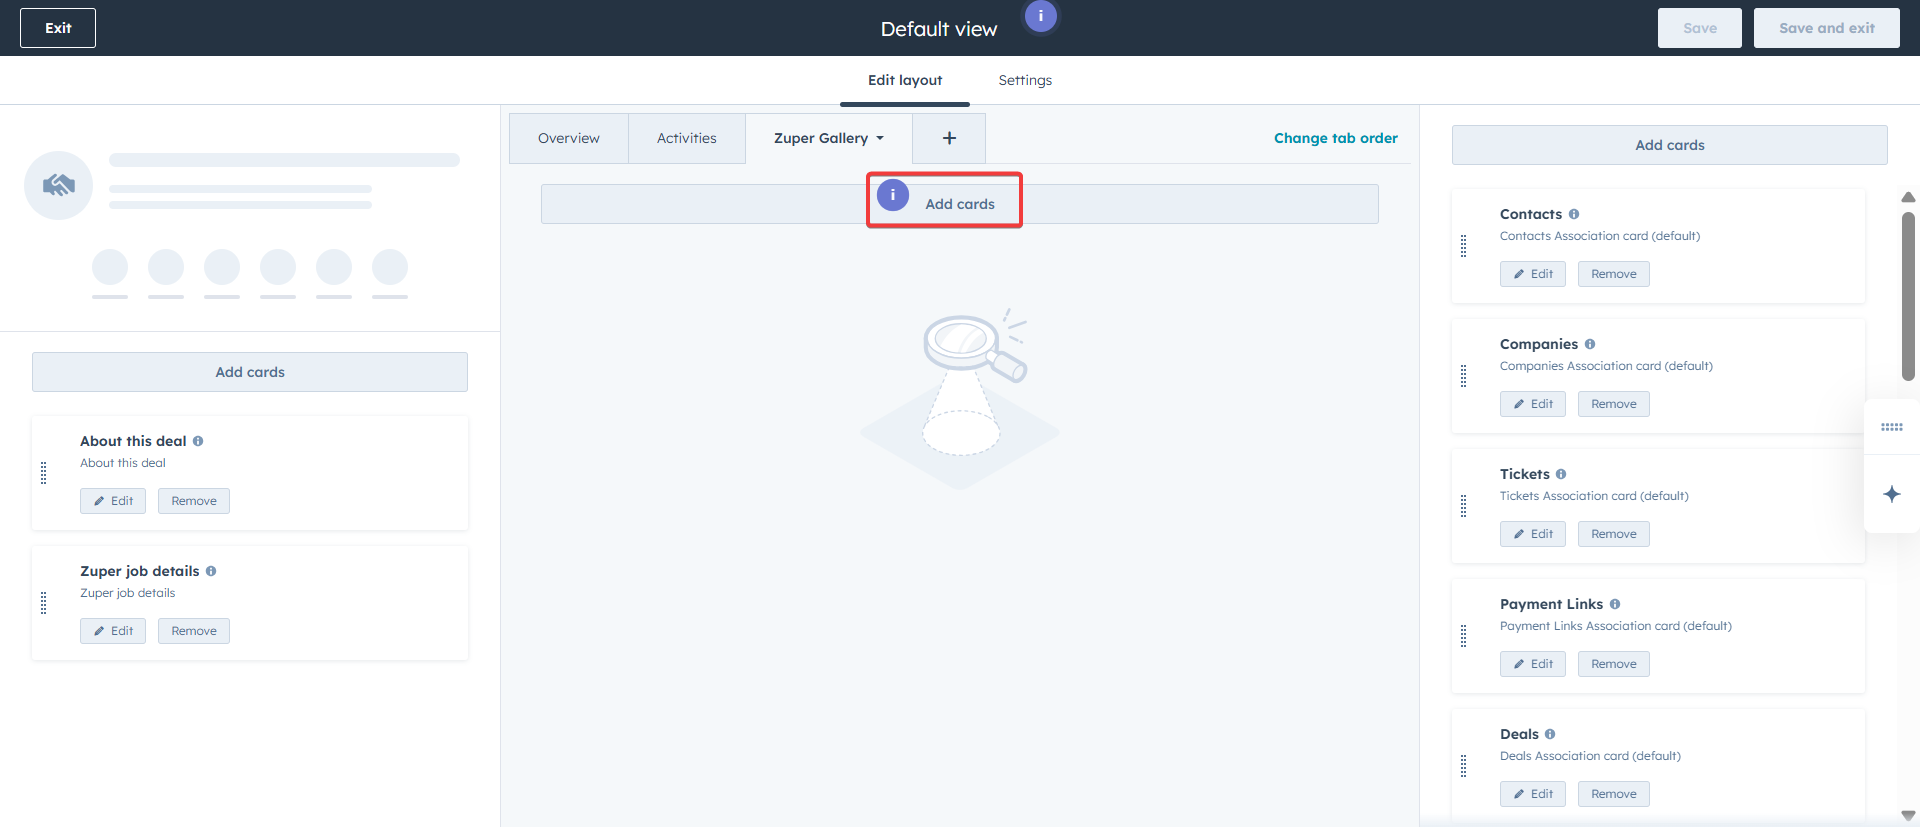
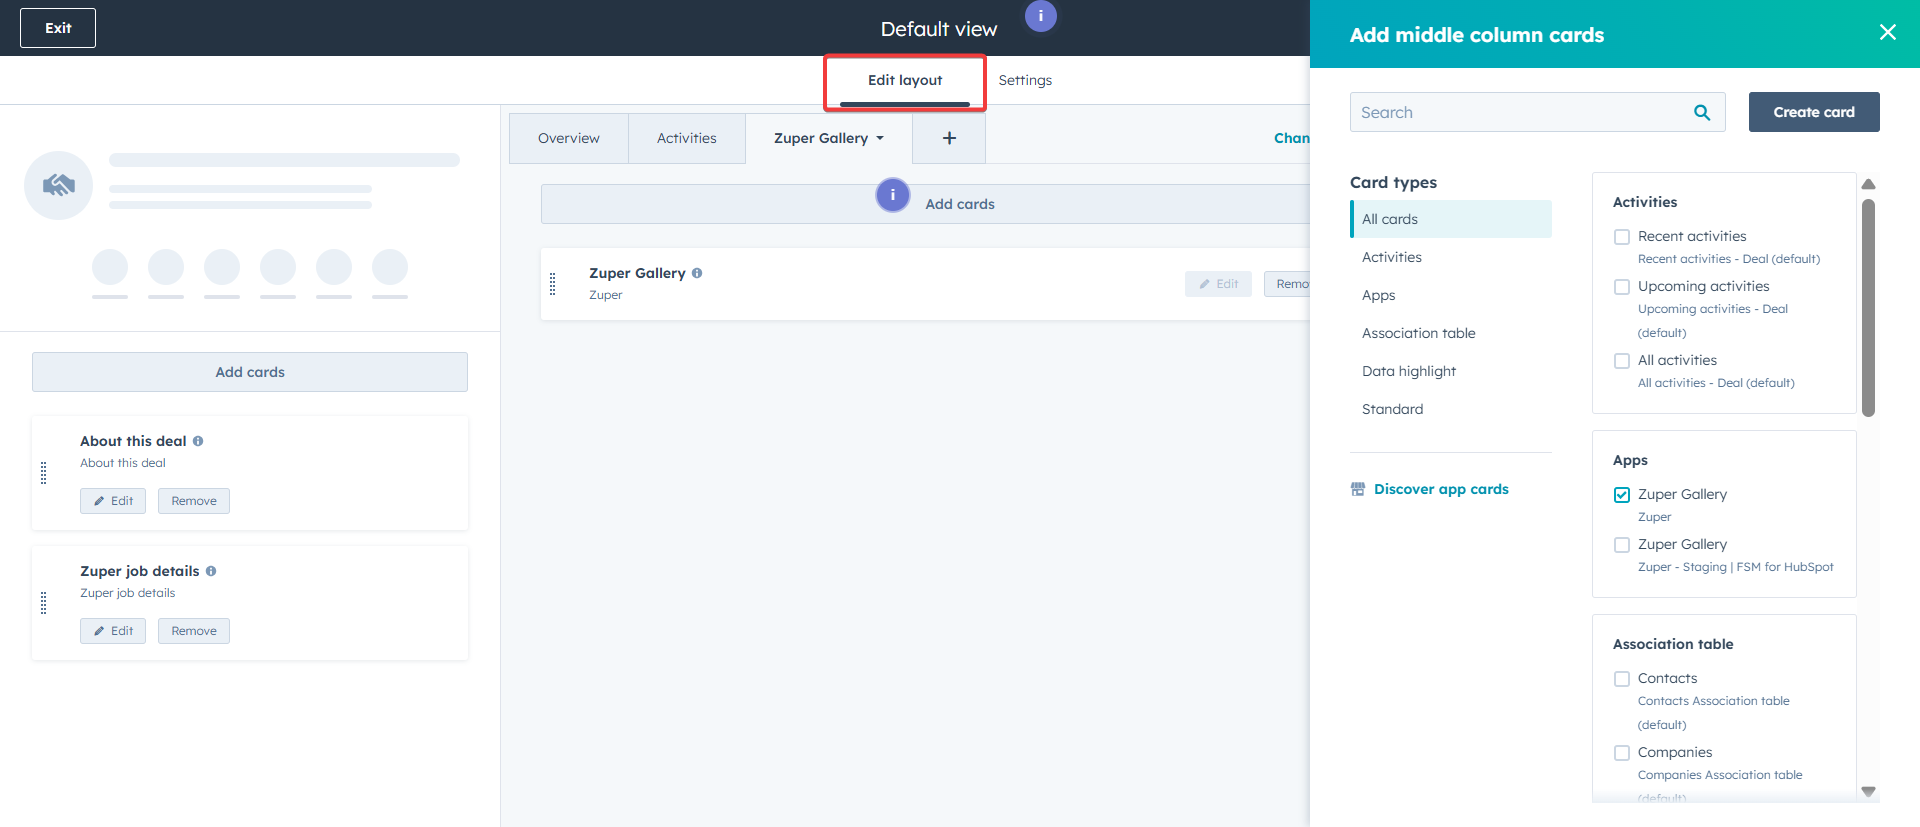
- Click the “Add Cards” button.
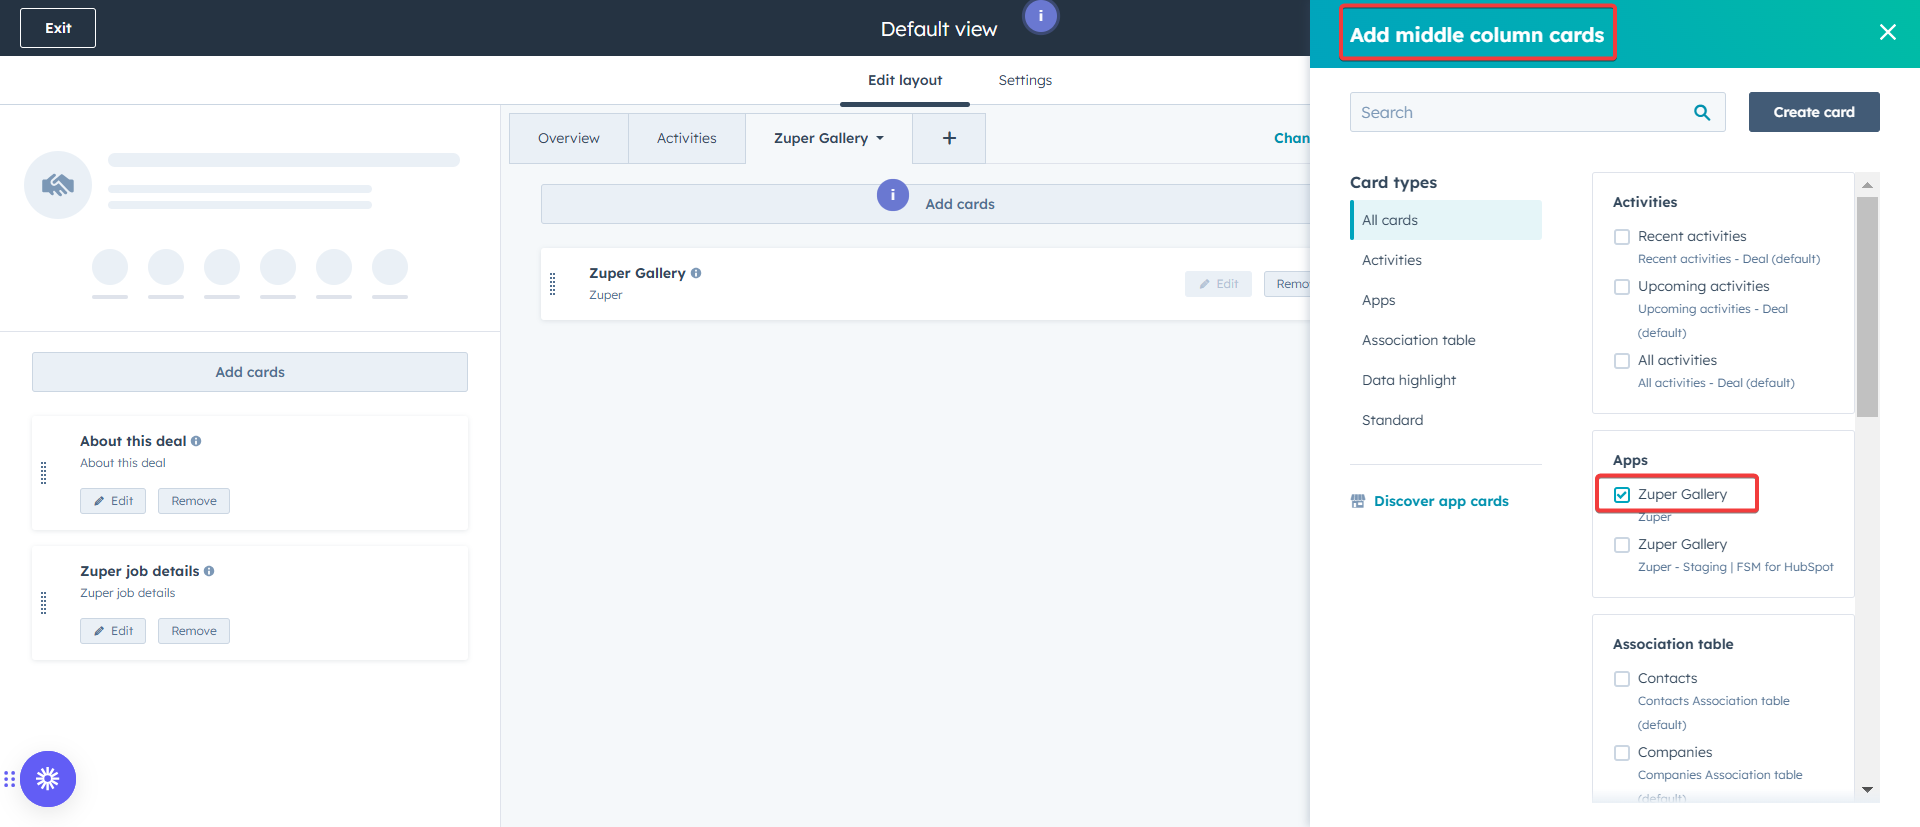
- An “Add middle column cards” side panel appears. Under “Apps,” check the “Zuper Gallery” check box.
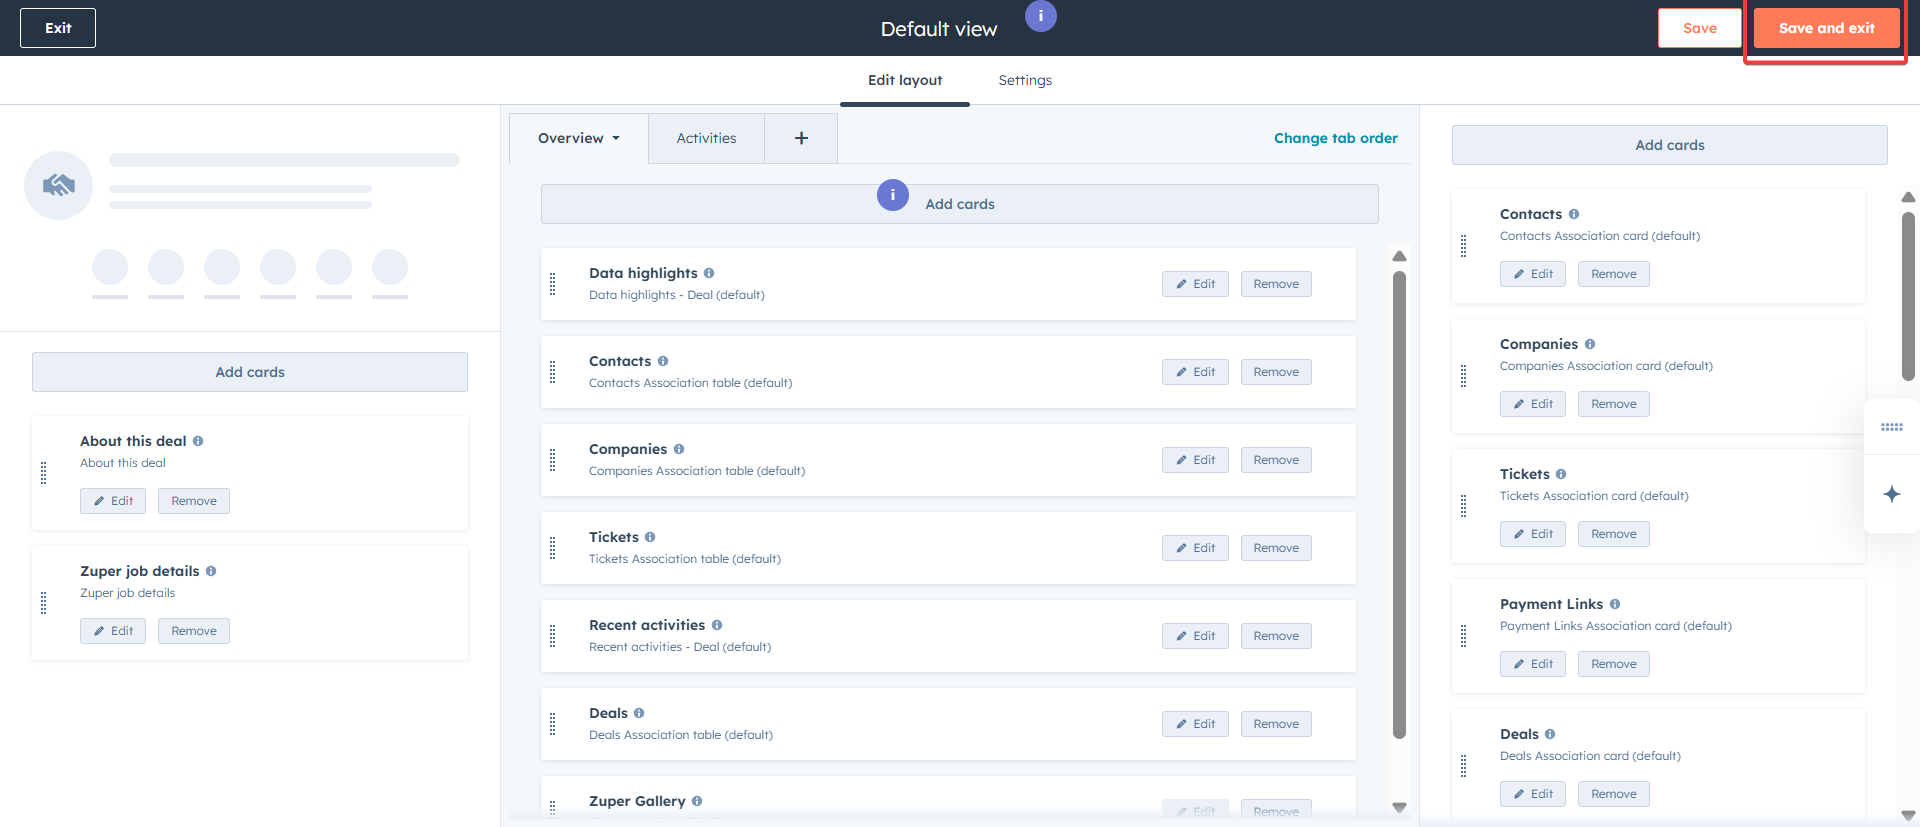
- Click the “Save and Exit” button to save the card.
- The App gallery is loaded successfully.
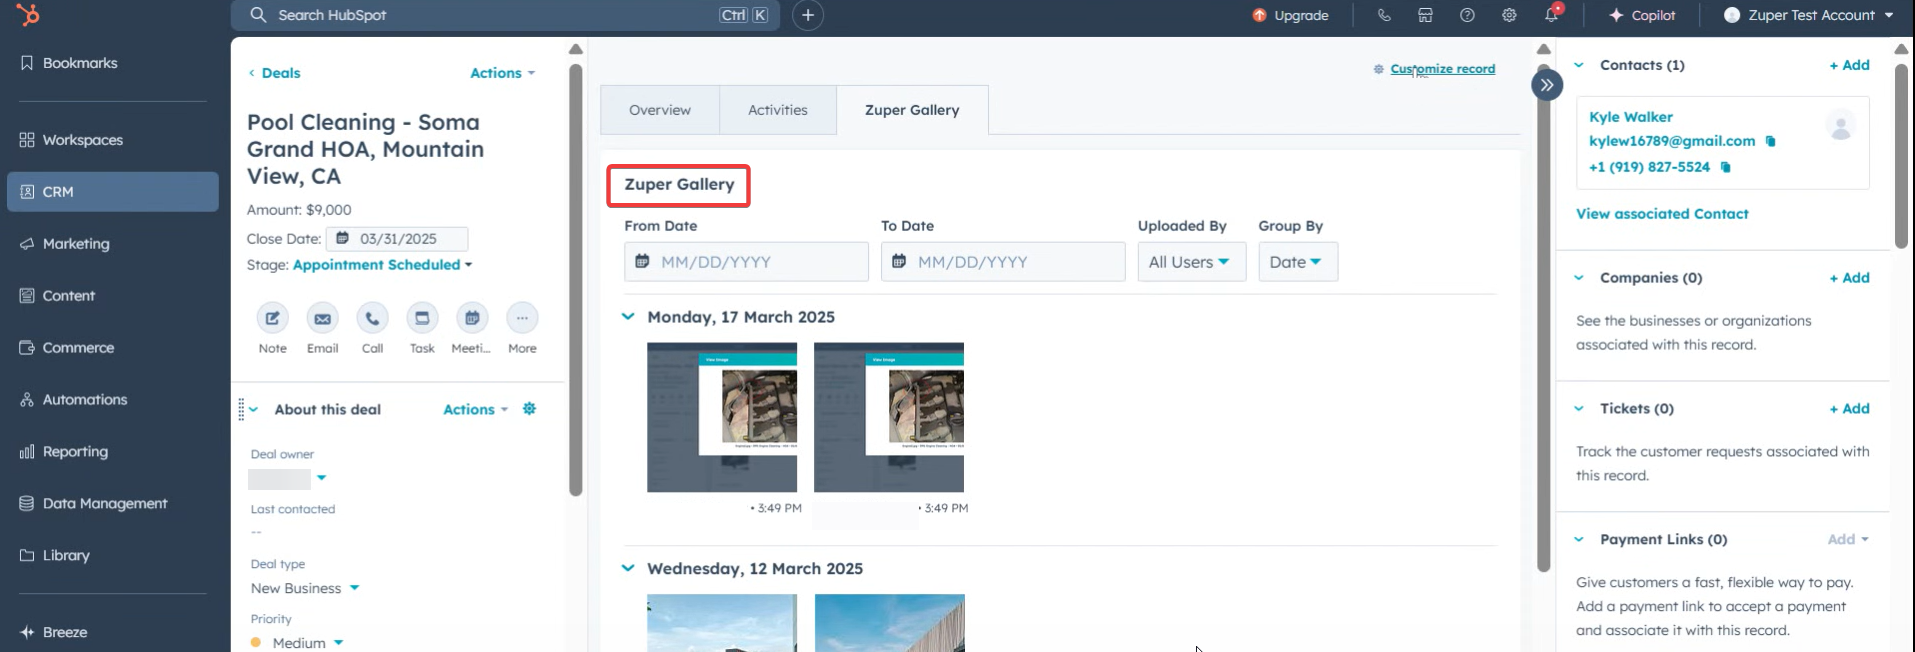
- Click the “Overview” tab to view the app gallery for CRM Tickets. Click the “Edit Layout” to modify the gallery view.
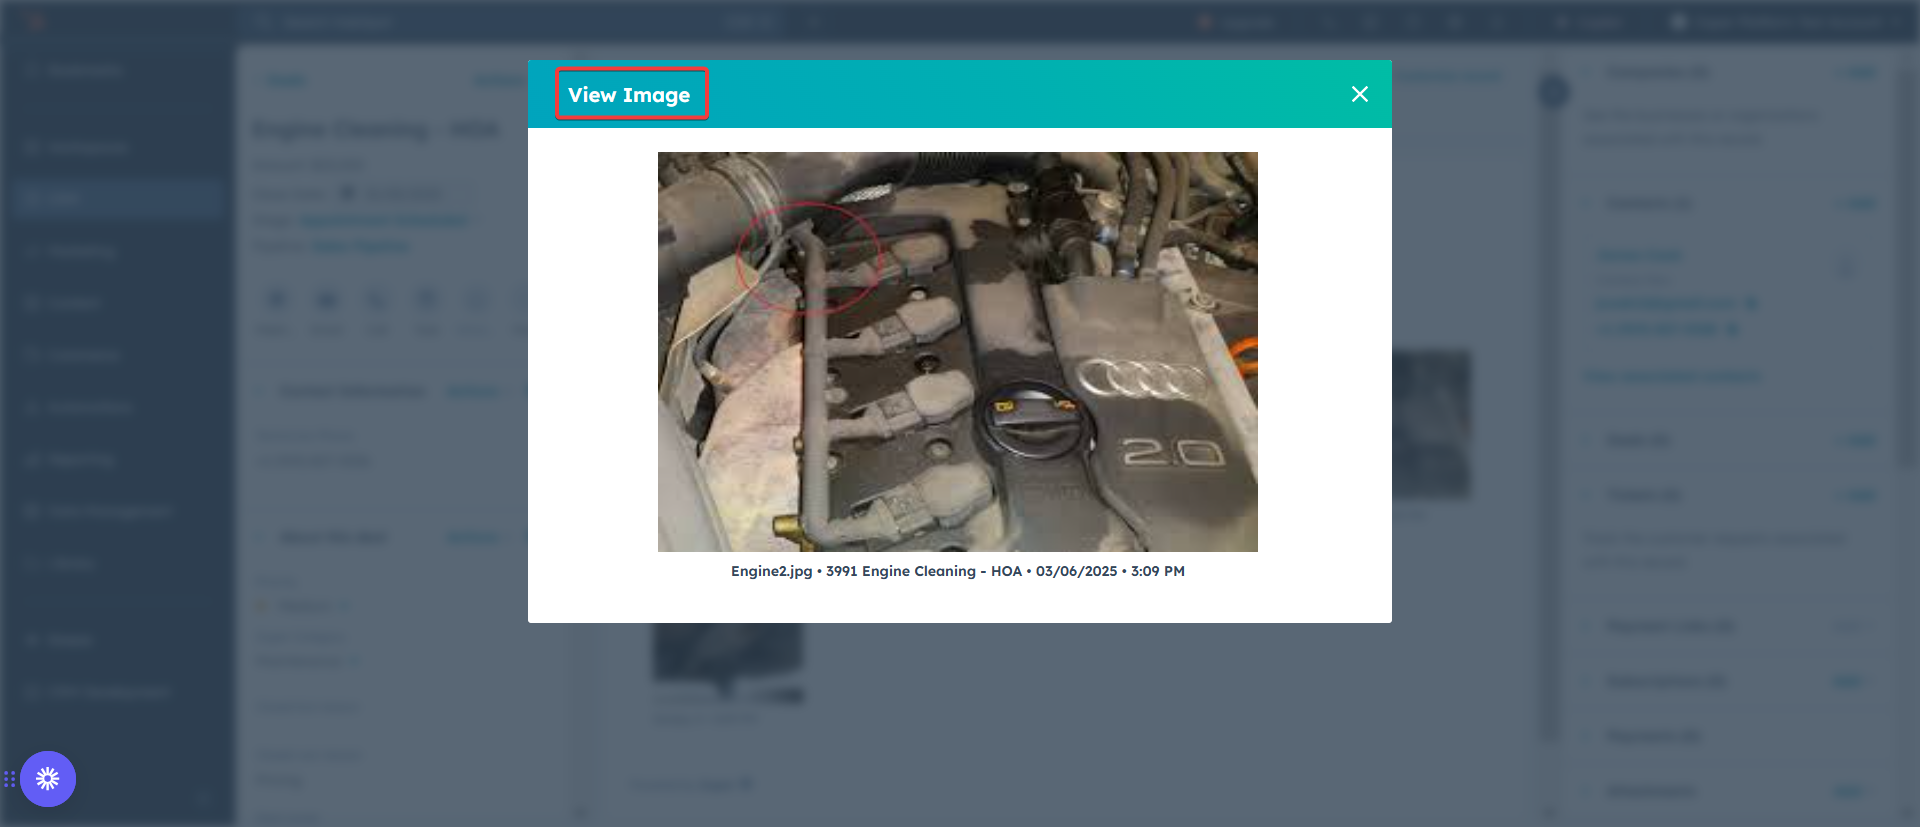
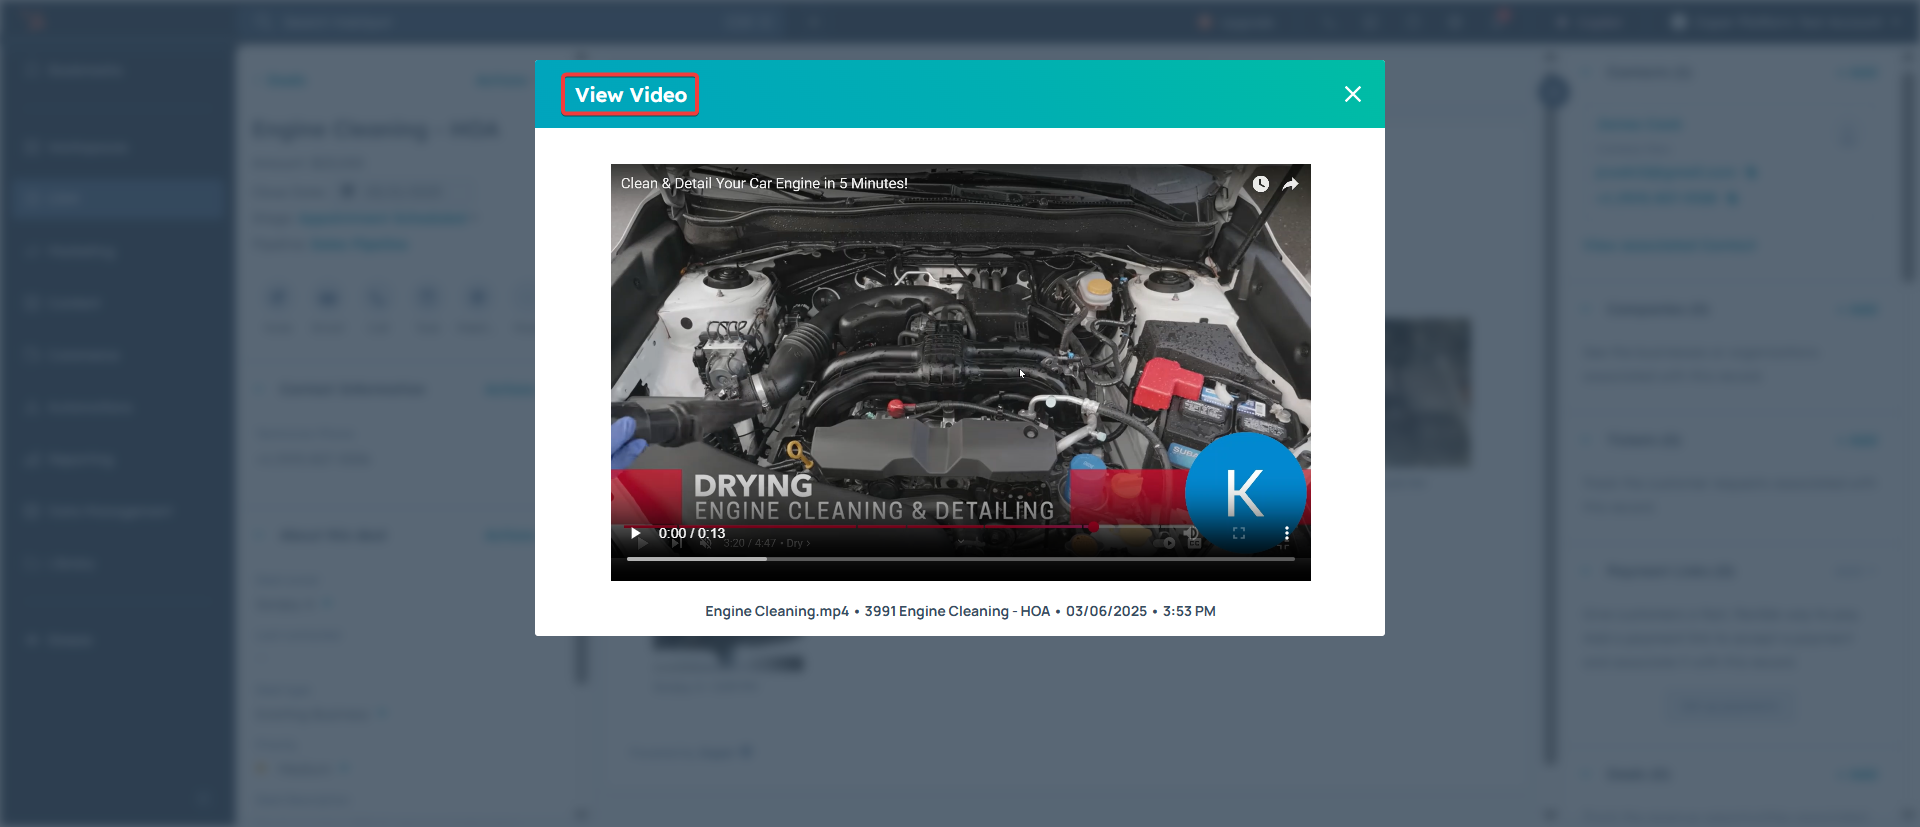
- Click any one of the images from the “Job Gallery.” Click the “View Image” button to see the gallery picture. Click the “View Video” button to see the video.
Note: Once you “Uninstall” Zuper from HubSpot, the previous data synced between HubSpot and Zuper is retained in Zuper, and the ongoing data sync is disconnected between Zuper and HubSpot.
HubSpot Zuper Workflow Automation
With the HubSpot – Zuper Integration, you can currently create a job in Zuper from HubSpot using the Zuper widget on the right-side pane. This provides flexibility in creating a job to suit your different needs. You can specify the job details in the form and create a job. But this will involve some manual effort. HubSpot Workflow Automation allows you to set up the automatic creation of jobs from deals and tickets from HubSpot to Zuper. You will have greater control over when data from HubSpot is pushed using triggers and how the data is pushed to Zuper with the mapping table. You can push a deal or a ticket to a job and sync customers’ and organizations’ data.Pre-requisites
- It would be best if you were in the HubSpot Professional or Enterprise plans.
- Ensure HubSpot Zuper Integration is set up (Use this link to set up).
How to install and use Zuper - HubSpot integration
Install HubSpot
- Log in to your “HubSpot” account and go to the app marketplace.
- From the app marketplace, navigate to Customer Service, then Field Service Management, and select “Zuper.”
Data Flow
With workflow automation, we can define how data flows between Hubspot and Zuper. Currently, Data flows from the following Hubspot to Zuper modules are supported:HubSpot Zuper
| HubSpot’s Equivalent Fields for Zuper | Zuper Fields |
|---|---|
| Deal | Job |
| Ticket | Job |
| Deal | Project |
| Contact | Customer |
| Company | Organization |
Field Pairing
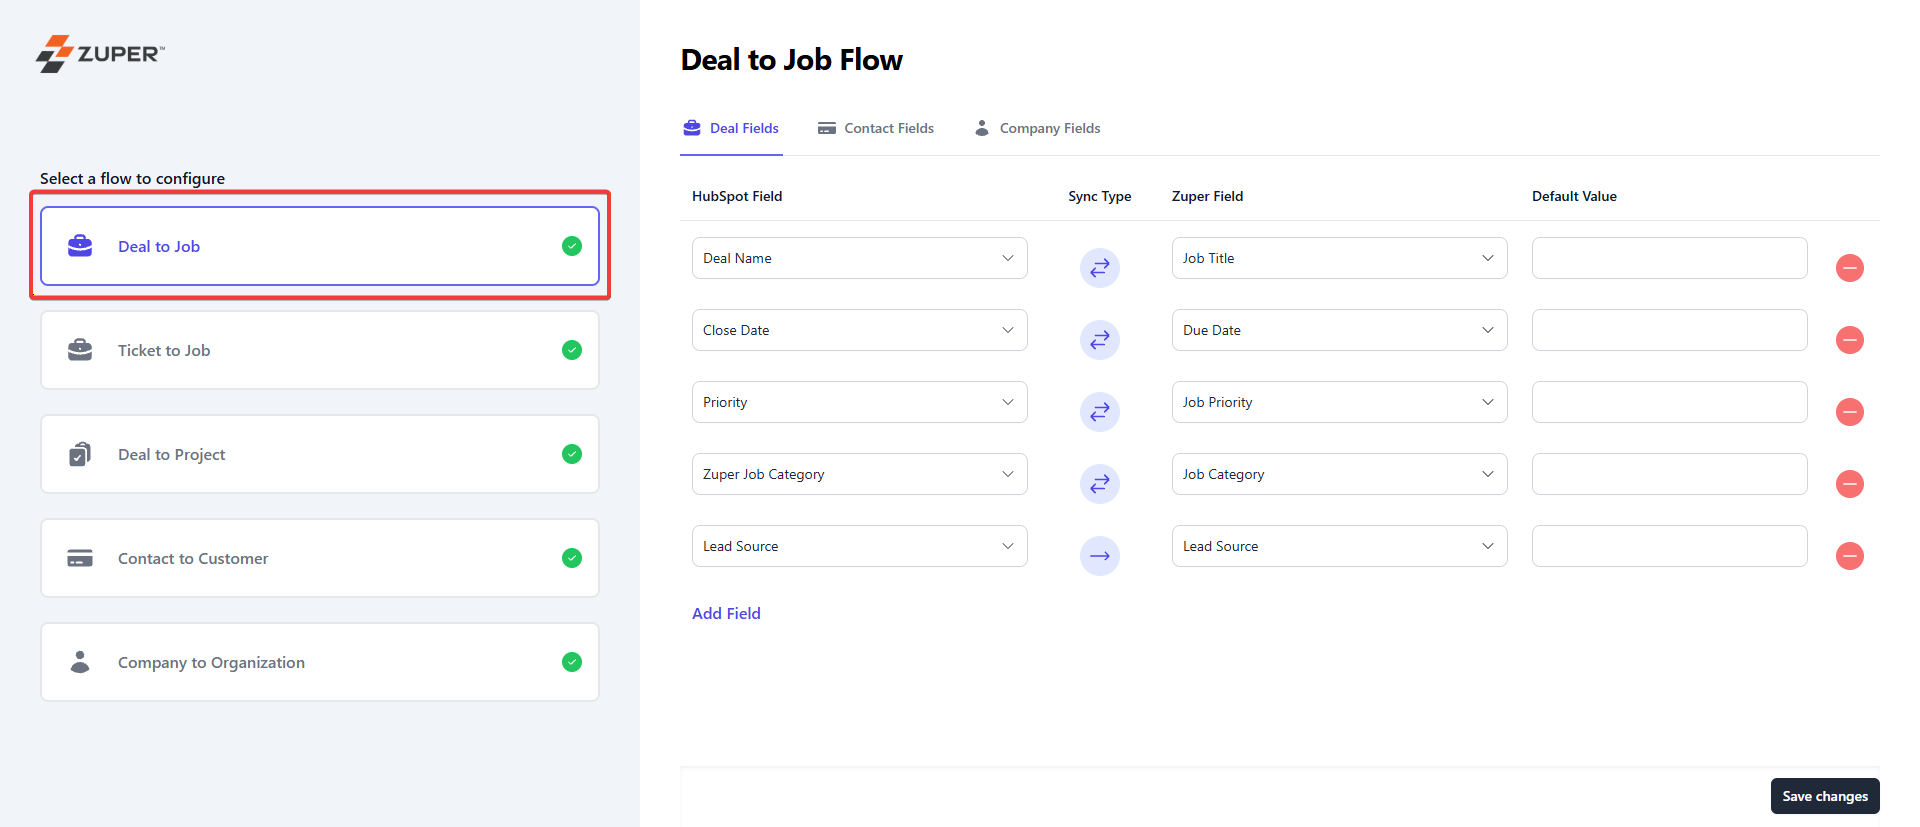
In the integration between Zuper and HubSpot, field pairing is used to specify how the fields in Hubspot are connected to those in Zuper. This process guarantees that data is accurately moved and interpreted between the two systems.- Map the “Deal to Job” fields. HubSpot’s fields get synced with Zuper field. a. The Deals field in HubSpot will be synced with the Job fields in Zuper. b. The Contacts field in HubSpot will sync with the Customer fields in Zuper Company fields in HubSpot get synced with Organization fields in Zuper.
Note: Click the “Add Field” button to add the additional fields for mapping.
Note: The default value column lets you define the default value to be used if it is empty in Zuper or HubSpot.
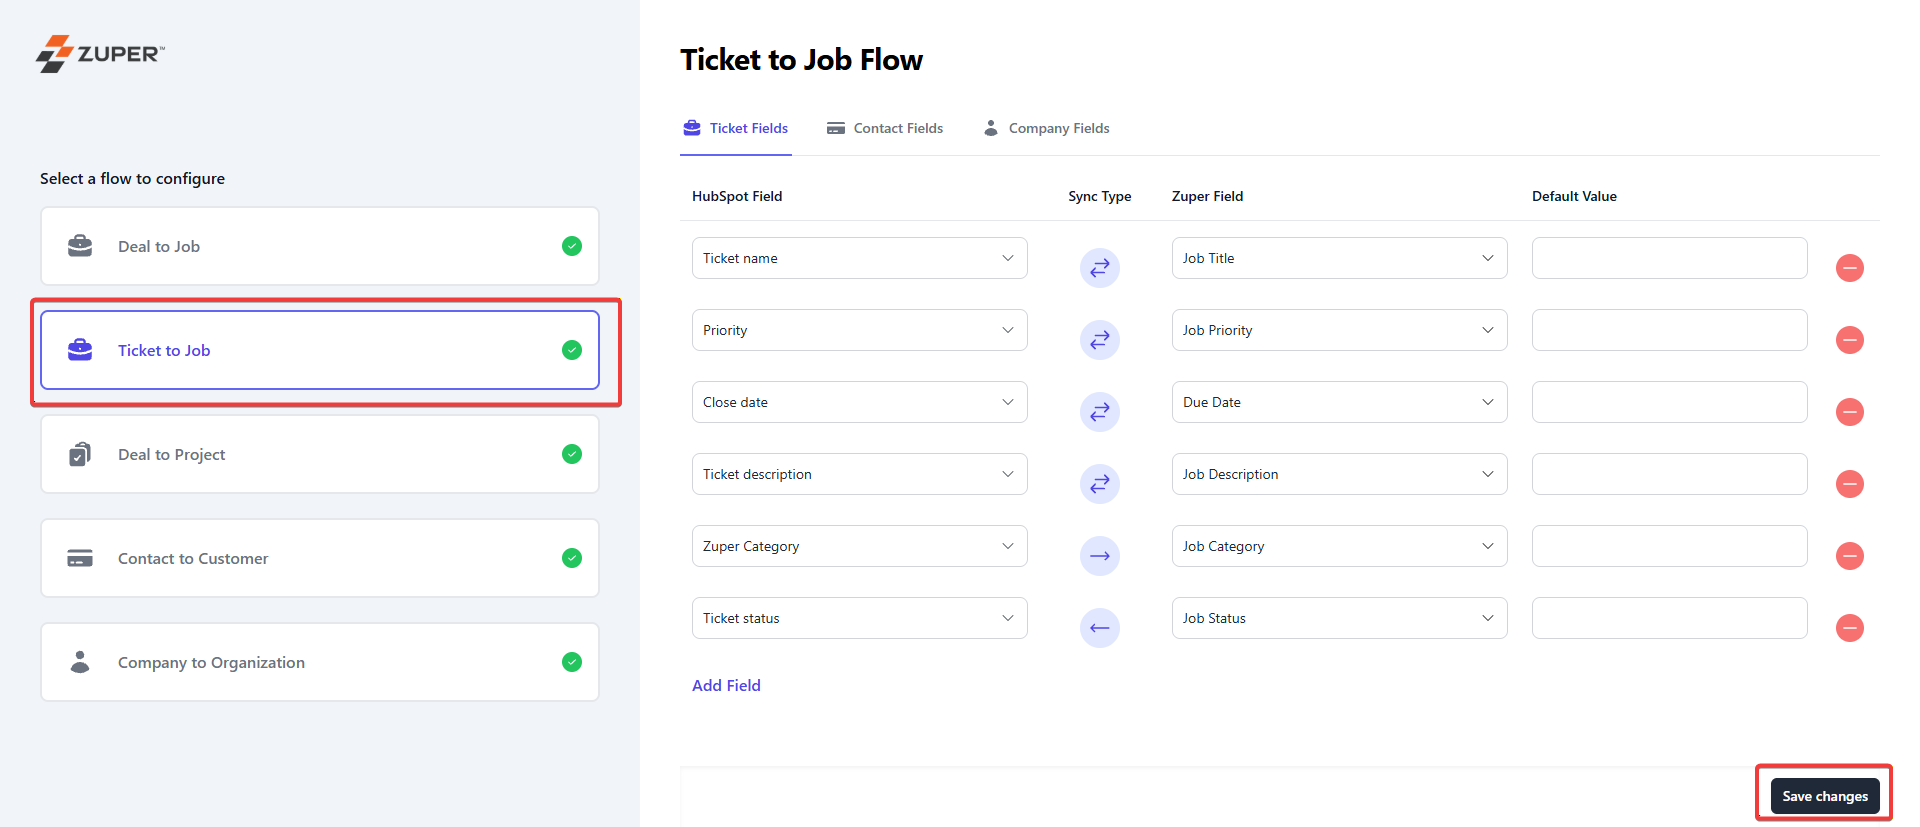
- Map the “Ticket to Job” fields. HubSpot’s fields get synced with the Zuper field. Click the “Save Changes” button to save and configure the workflow.
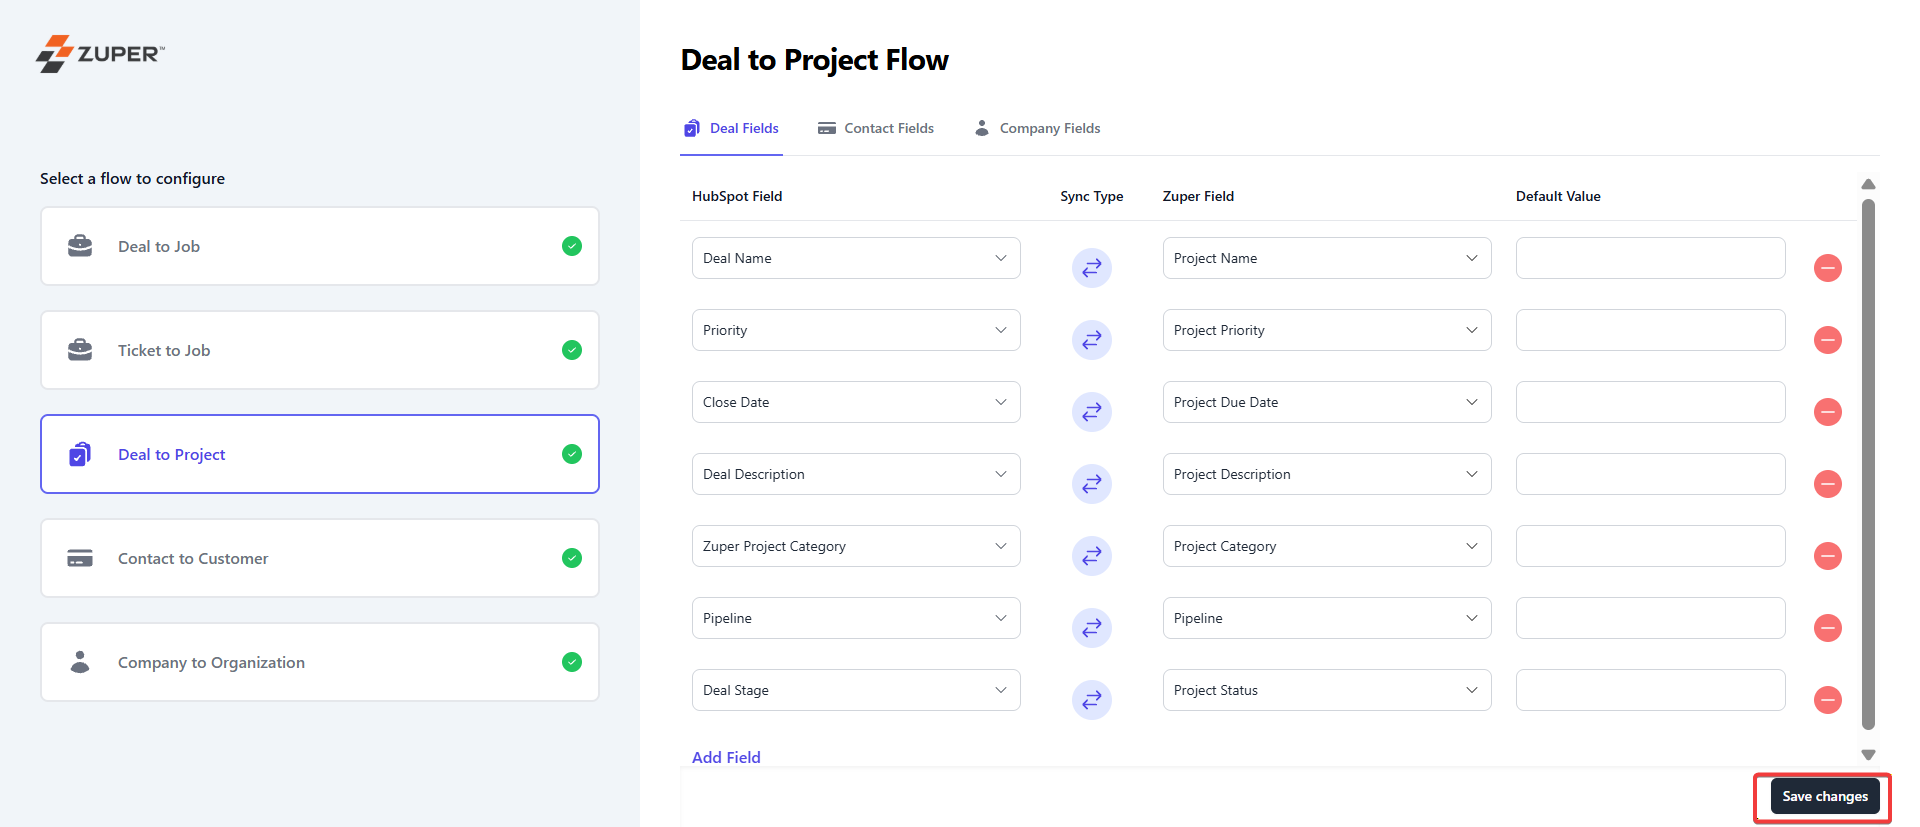
- Map the “Deal to Project” fields. HubSpot’s fields get synced with the Zuper field. Click the “Save Changes” button to save and configure the workflow.
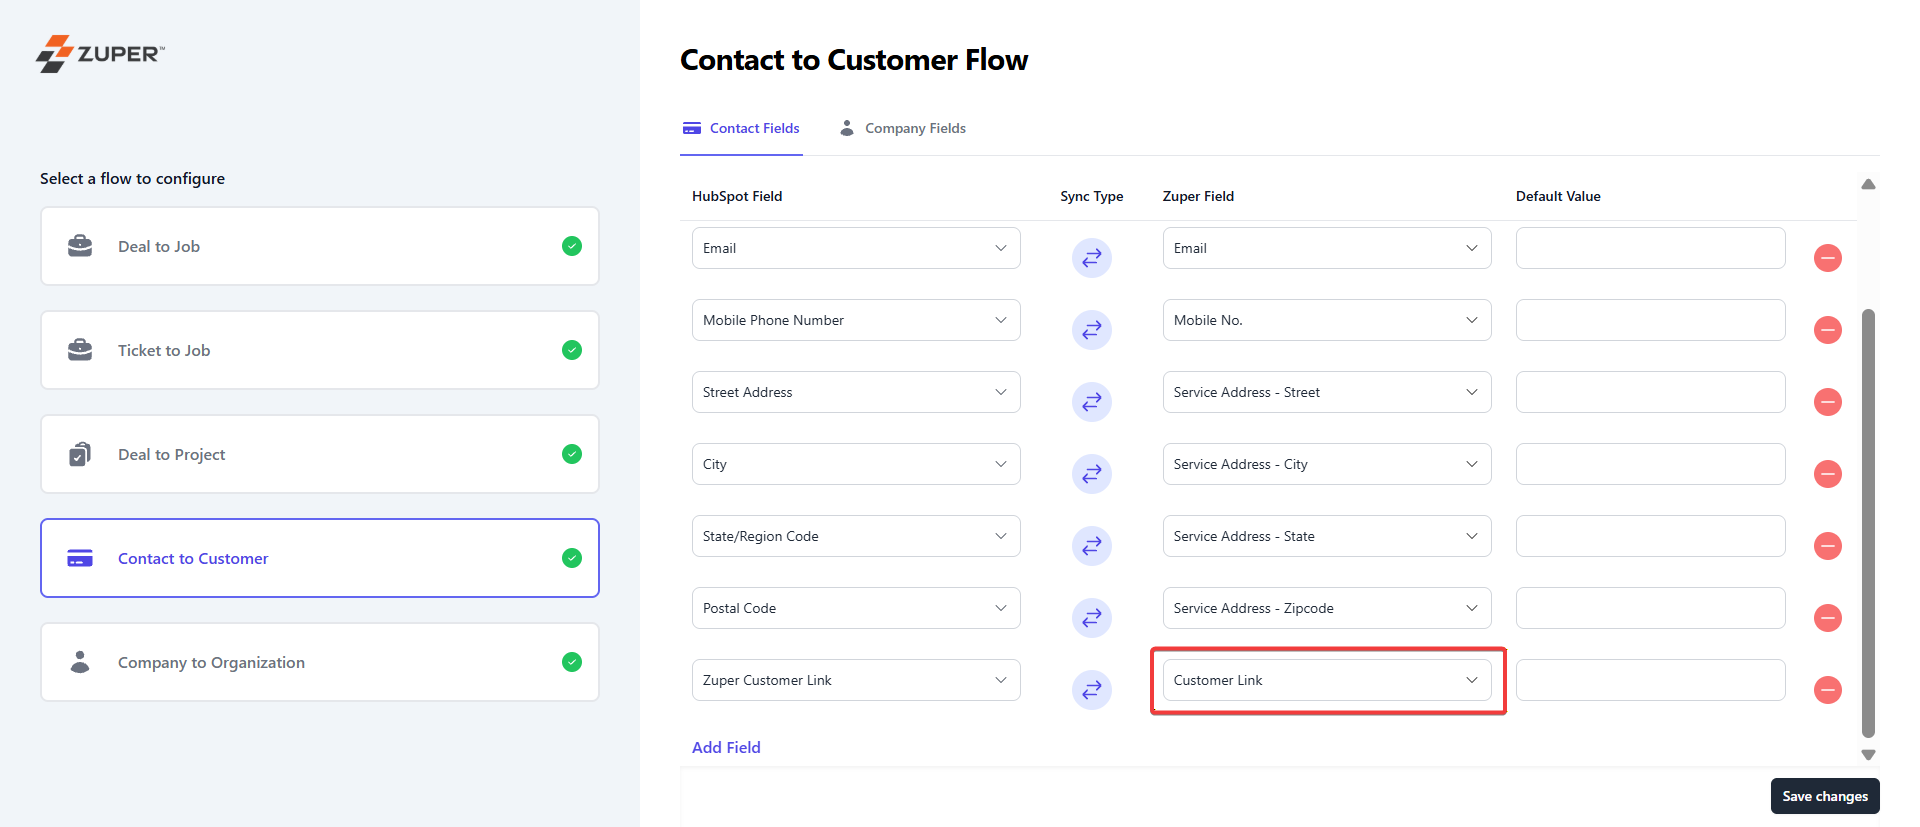
- Map the “Contact to Customer” fields. HubSpot’s fields get synced with the Zuper field. Click the “Save Changes” button to save and configure the workflow. Here, the Zuper Field – “Customer Link” is available by default and can be mapped to any field in the HubSpot Contact record where you wish to populate the URL of the connected Zuper Customer.
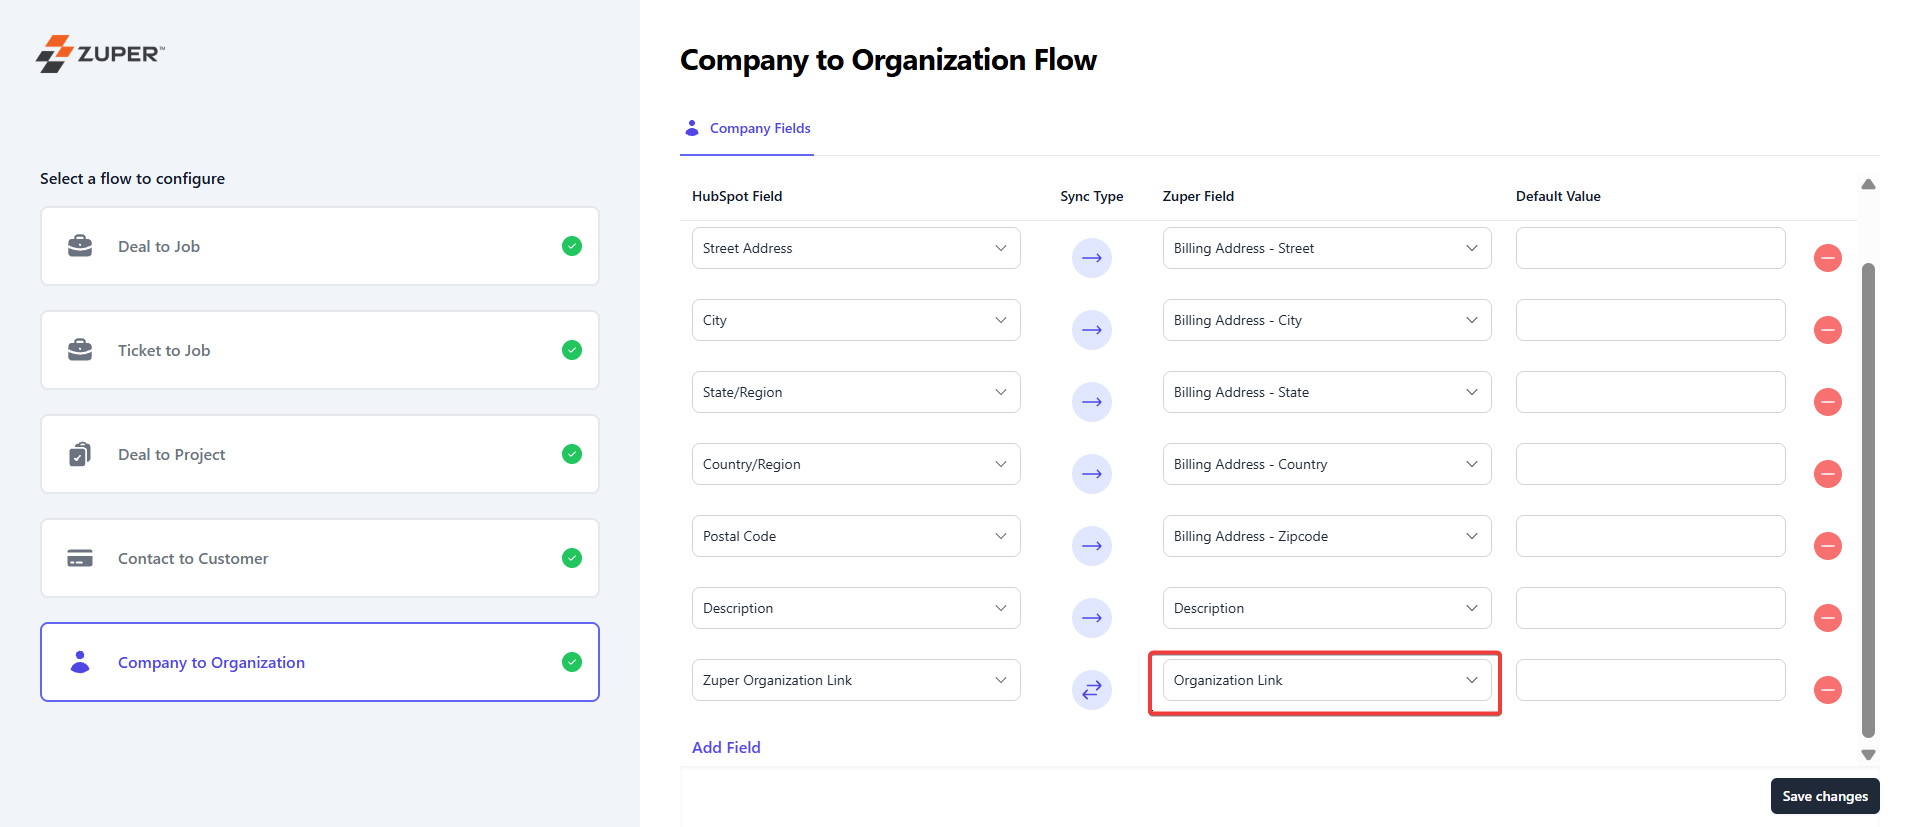
- Map the “Company to Organization” fields. HubSpot’s fields get synced with the Zuper field. Click the “Save Changes” button to save and configure the workflow. Org Link is available to be mapped to a HubSpot field in the Company record. This will push the URL of the connected Zuper Organization to that field.
Note: The sync type in the field mapping must always be set to bi-directional when mapping the Customer/Organization Link to any field in HubSpot.
Setup automated workflow
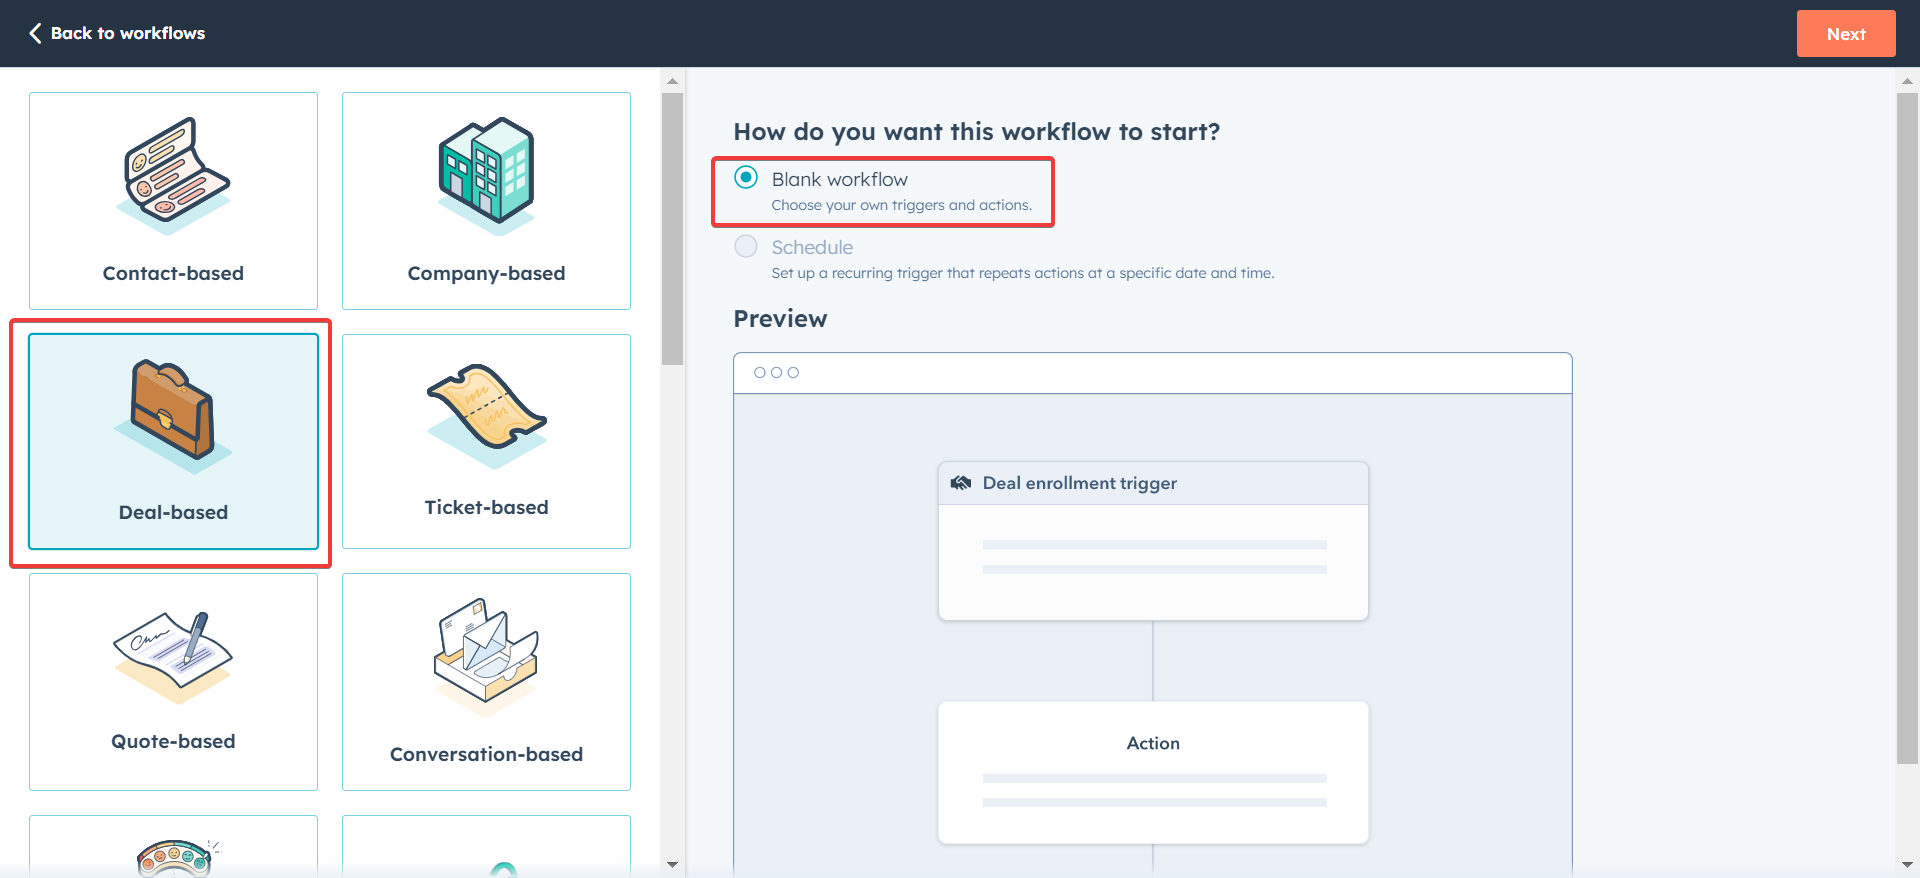
After field mapping is done, you can set up the workflow to act in an automated process. Trigger workflow in HubSpot, and you can see the action in Zuper.- Go to Settings -> Automation and click the “+New Workflow.” Select Deal-based or Ticket-based workflow.
- The initial step is enrollment.
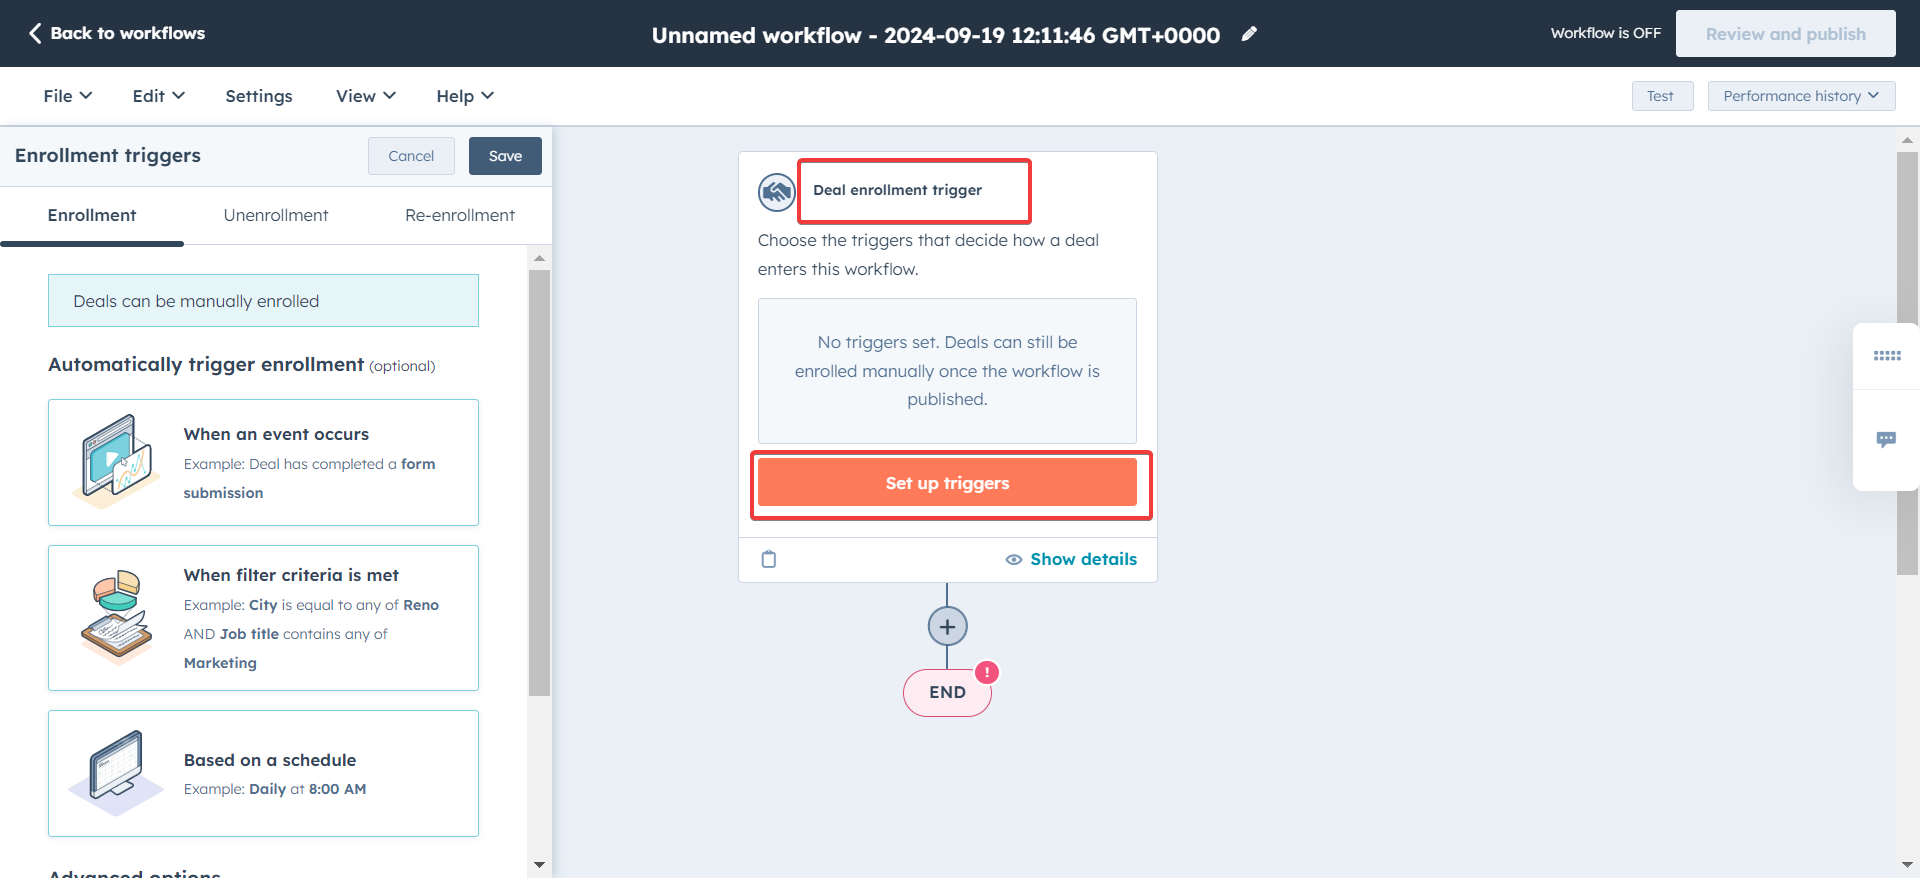
- You can set up the conditions for the trigger to happen.
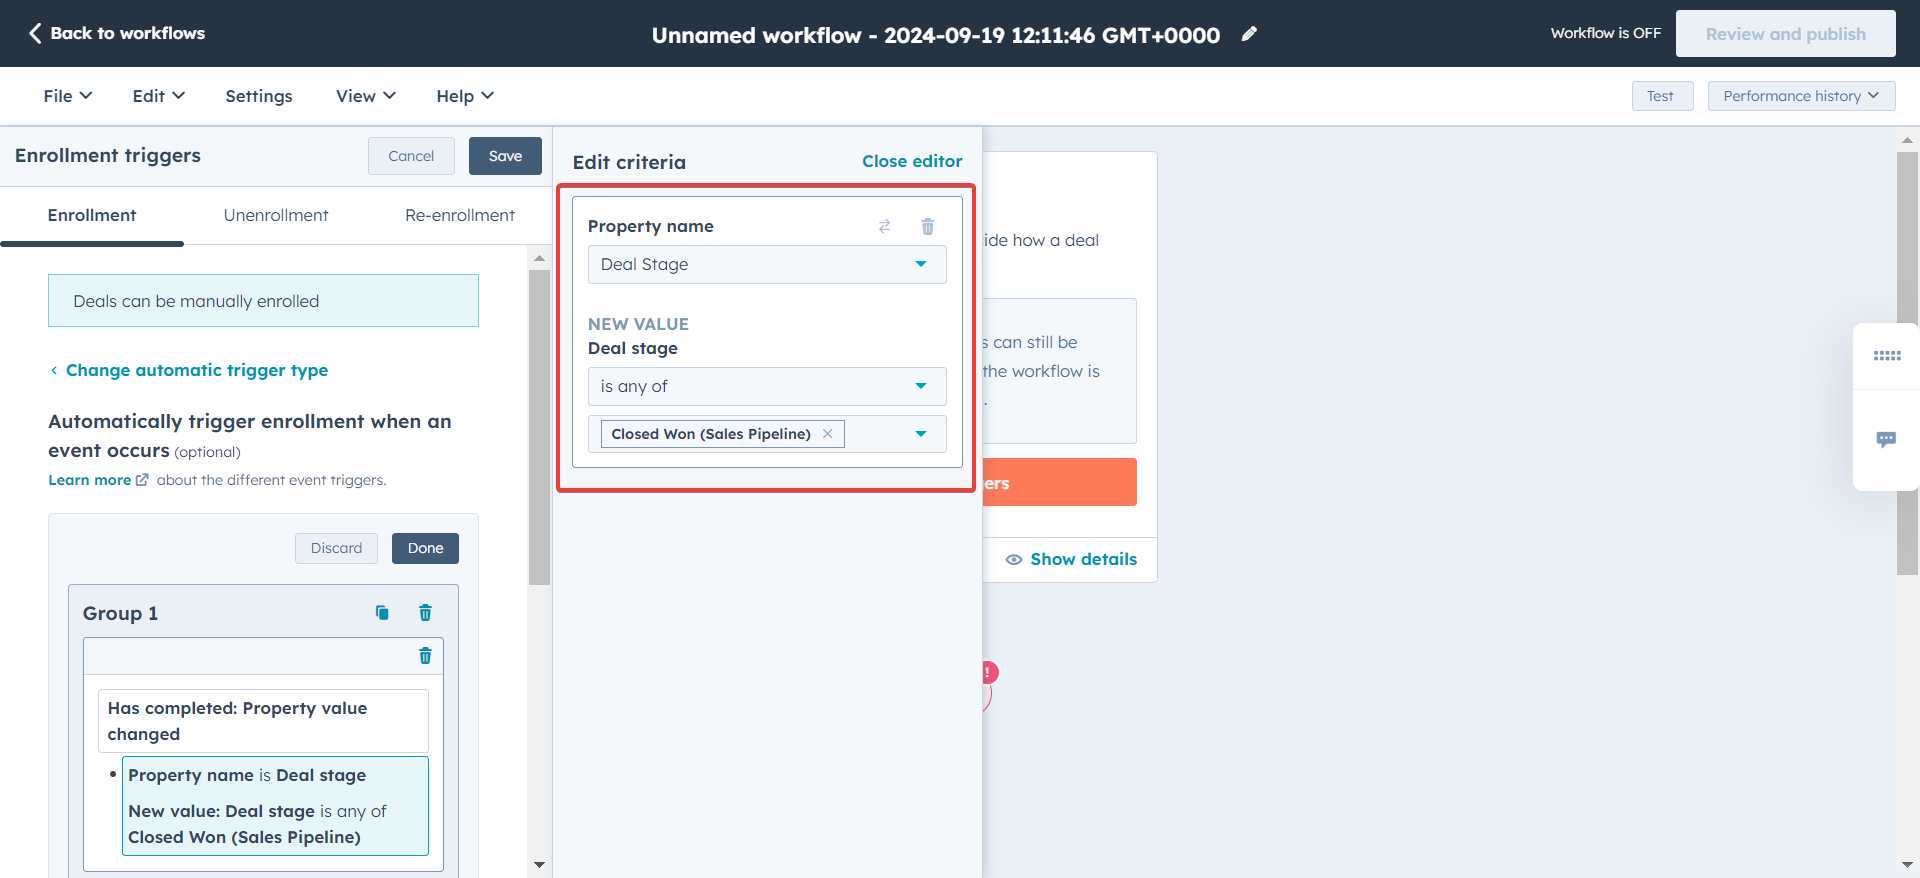
- The event is successfully selected.

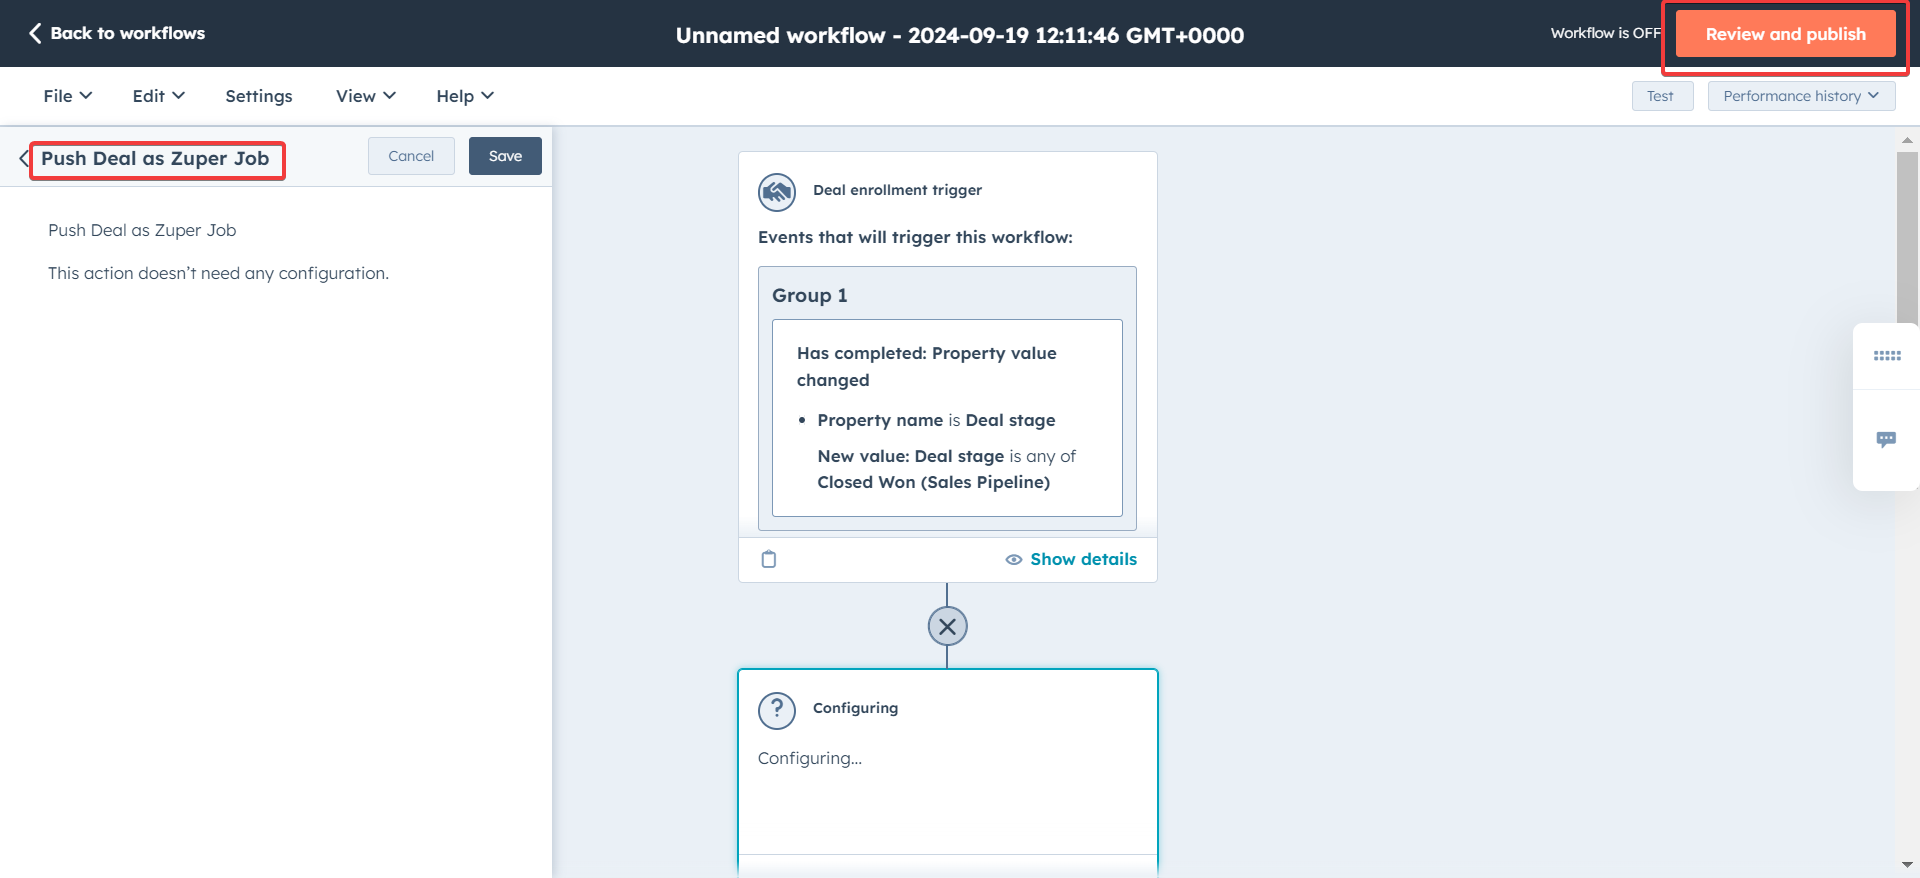
- Here, the relevant Zuper action will be available and can be set.
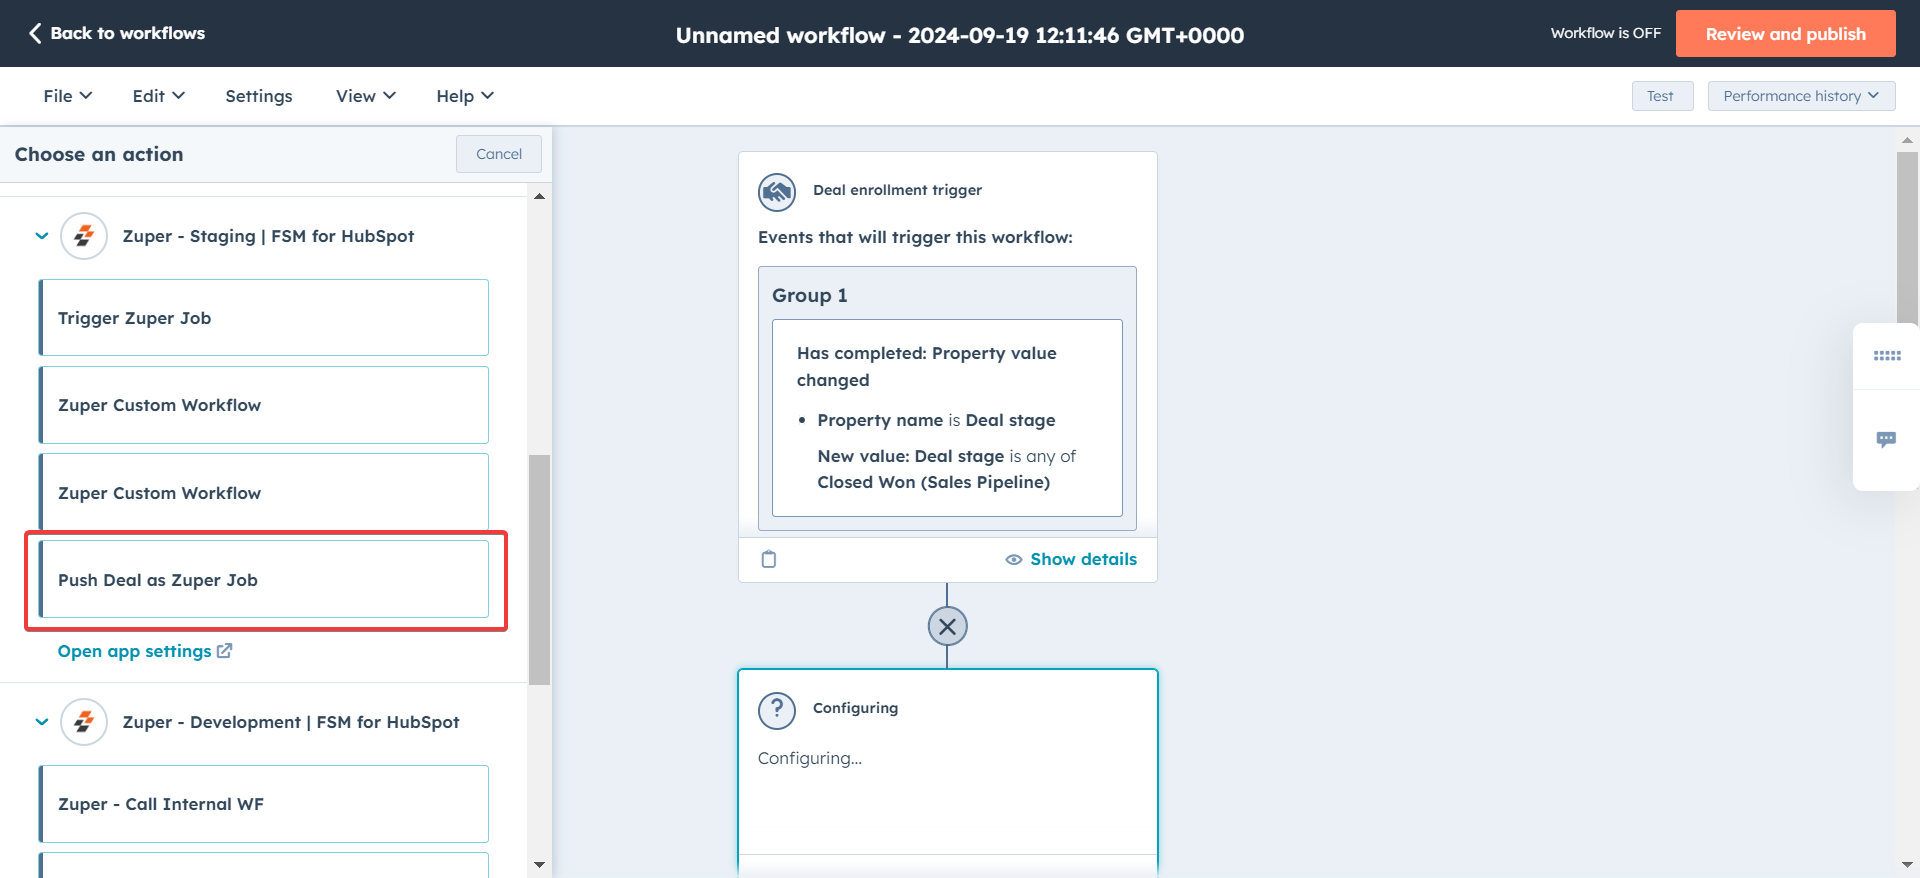
- The deal from HubSpot will be pushed as a Job in Zuper. Click the “Review and publish” button.
- You can review the configurations set and turn on the workflow.
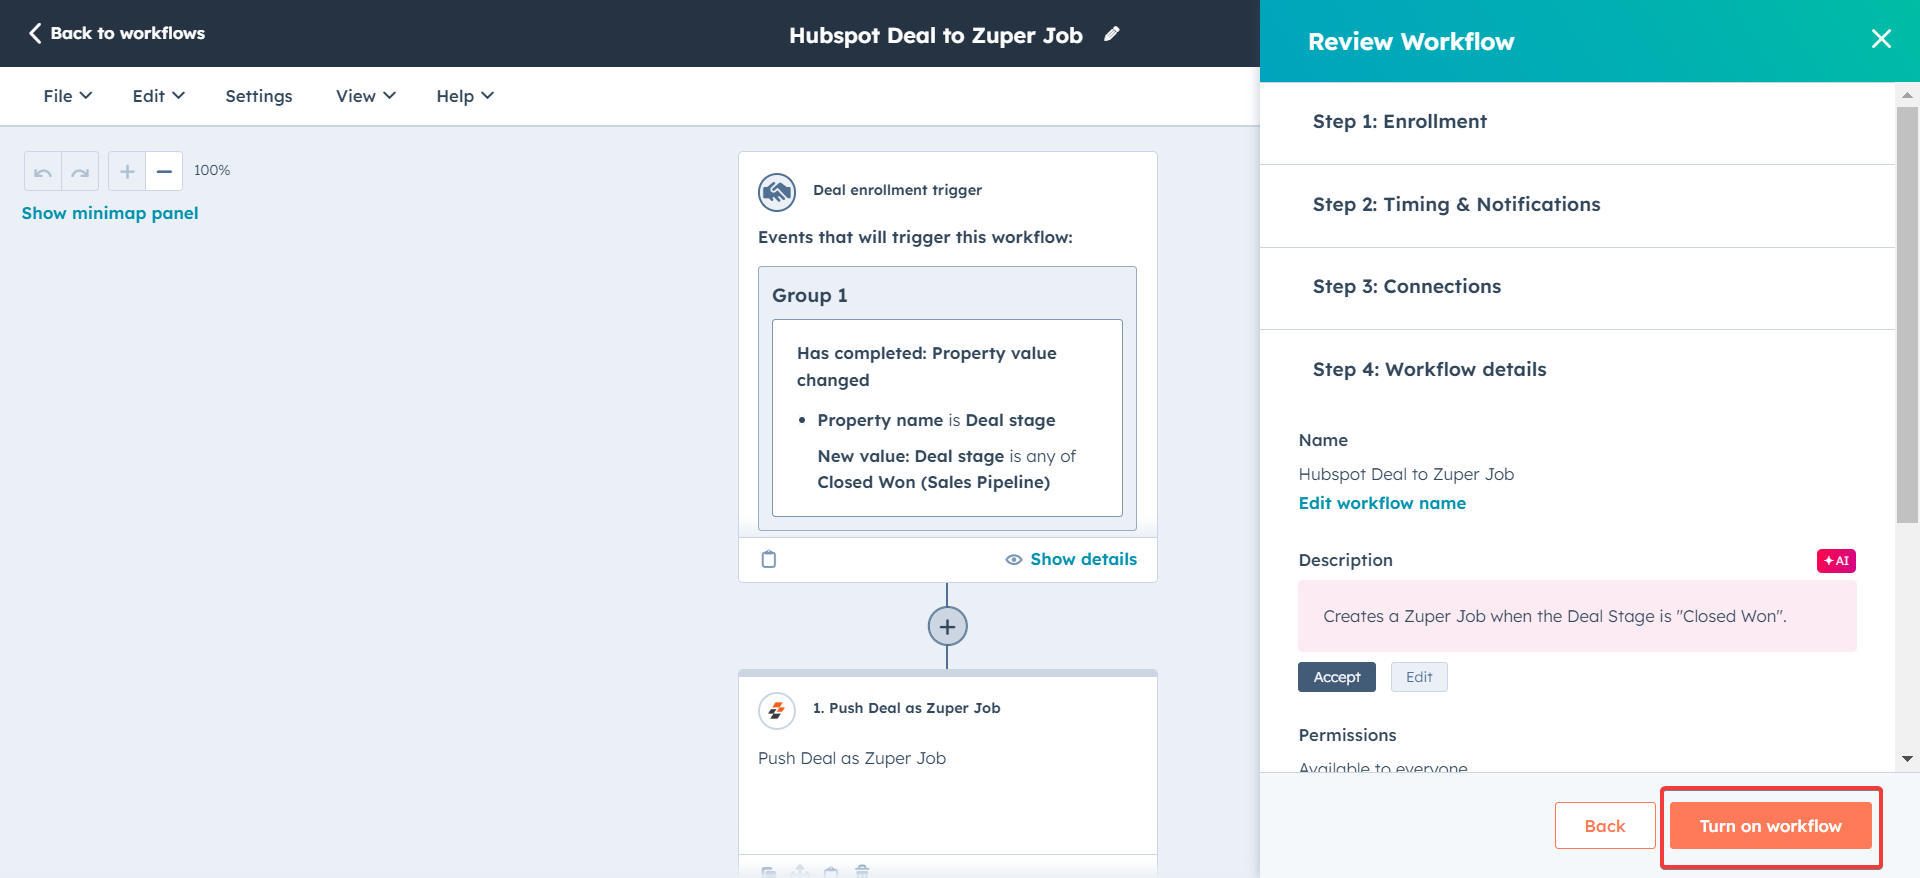
Note: Once the workflow is set up, a new Deal or Ticket that satisfies the corresponding job will be created on Zuper with the specified field mapping. When a field value is updated in Zuper, it will correspondingly update in HubSpot when the direction of sync is Zuper to HubSpot and vice versa.The fields set to sync bidirectionally will update their values whenever the update happens on either system.
- The automation has now been set up and is live. Once a Deal or Ticket meets the configured trigger criteria, the object data will be pushed to a Zuper job according to the field mapping specified. The fields will also be kept in sync according to the sync direction specified.
- Relevant workflows need to be set up for data flow between other modules. For example, a ticket-based workflow with the relevant Zuper action needs to be set up for data to flow between Ticket and Job.
Important Points:
- It is recommended that only one workflow be set up for each Zuper module sync. For example, only one deal-based workflow using a Zuper action should be created when moving data from a deal to a job.
- For Certain Fields, e.g., calculated fields, the sync direction can only be unidirectional; here, the source field is HubSpot.
- When transferring a large number of deals or tickets from HubSpot to Zuper, expect a 30-minute delay for all records to fully sync. Please wait until the sync is complete before proceeding.
- By default, HubSpot enrolls a record in a workflow only once. To make it trigger every time “Push to Zuper” is set to Yes, enable re-enrollment: open the workflow → Enrollment trigger → Re-enrollment tab → select “Push to Zuper = Yes.”
- Avoid changing “Push to Zuper” and the pipeline stage at the same time. HubSpot may miss the trigger if both fields are saved together. Instead, use “Push to Zuper = Yes” as the enrollment trigger and add the pipeline stage as a filter condition inside the workflow.
- If a job wasn’t created, check Settings → Sync Activity in Zuper before reaching out to support.
Deactivate / Uninstall HubSpot
- Once logged in to your Zuper account, click your Profile Picture in the top right corner of the screen and select “App Store.”
- Under “Browse by Category,” select the “CRM” option and choose “HubSpot.” Click “Configure Settings.”
- Deactivate (pause) the integration (recommended before uninstalling)
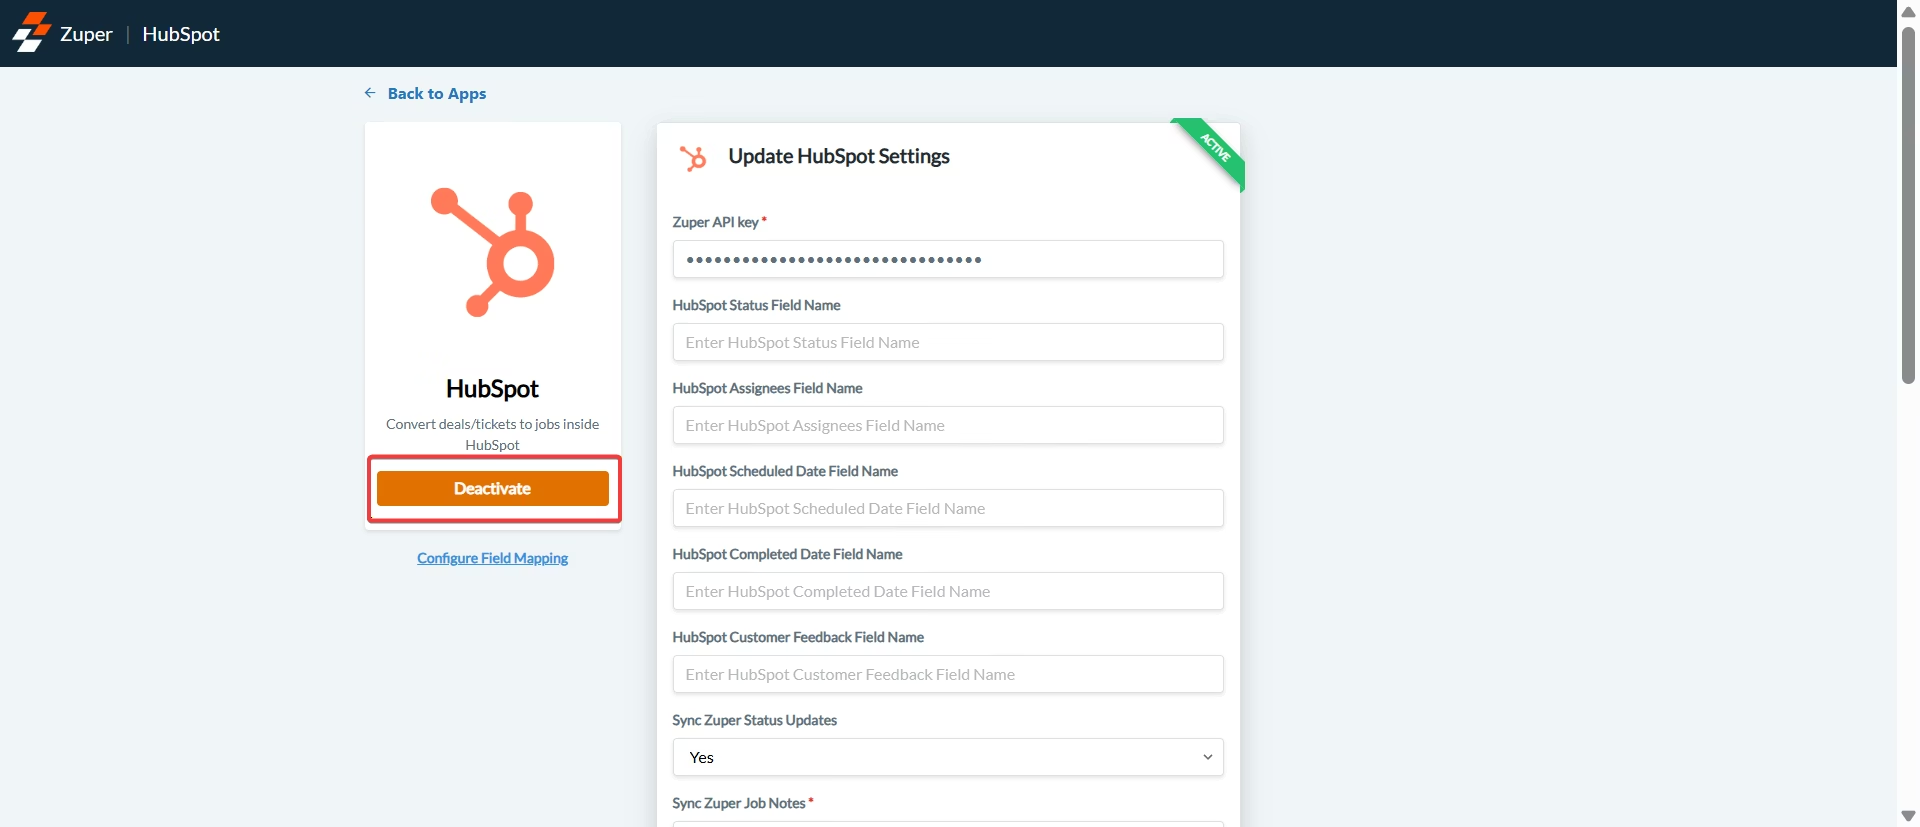
- In the confirmation dialog (Deactivate App), click Deactivate again to confirm.

What happens when the HubSpot App is Inactive?
1. Your Configuration Is RetainedYour existing HubSpot configuration — including API key, field mappings, and sync preferences — remains saved. You don’t need to reconfigure anything when you reactivate the app. 2. Data Sync from Zuper Is Paused
Any sync configured from Zuper to HubSpot will stop while the app is inactive. For example:
- Automatic creation or updates of records in HubSpot based on your sync settings (such as “Push Zuper Job as HubSpot Deal”) will not occur.
Actions initiated from HubSpot will still work:
- Job creation from the HubSpot widget will continue to function.
- Jobs, customers, projects, and other records can still be created in Zuper through HubSpot Workflows, if triggered.
- Call and SMS activities from Zuper Connect will not be pushed to HubSpot.
- However, the Zuper Connect Dialer within HubSpot will remain active and fully operational.

HubSpot Sync History
Customers who use the HubSpot integration to create jobs from Zuper to HubSpot sometimes encounter errors. The Sync history feature allows you to troubleshoot these issues. To help troubleshoot Zuper-HubSpot sync issues, Zuper provides a sync history log of the Jobs and Projects module that tracks data transfers between the two systems Jobs and Projects. This allows you to determine the root cause of errors, resolve them, and resync for smooth integration.Sync History
- Select the “Settings” module from the left navigation menu. Under the “Other Settings,” select the “Sync Activity.”
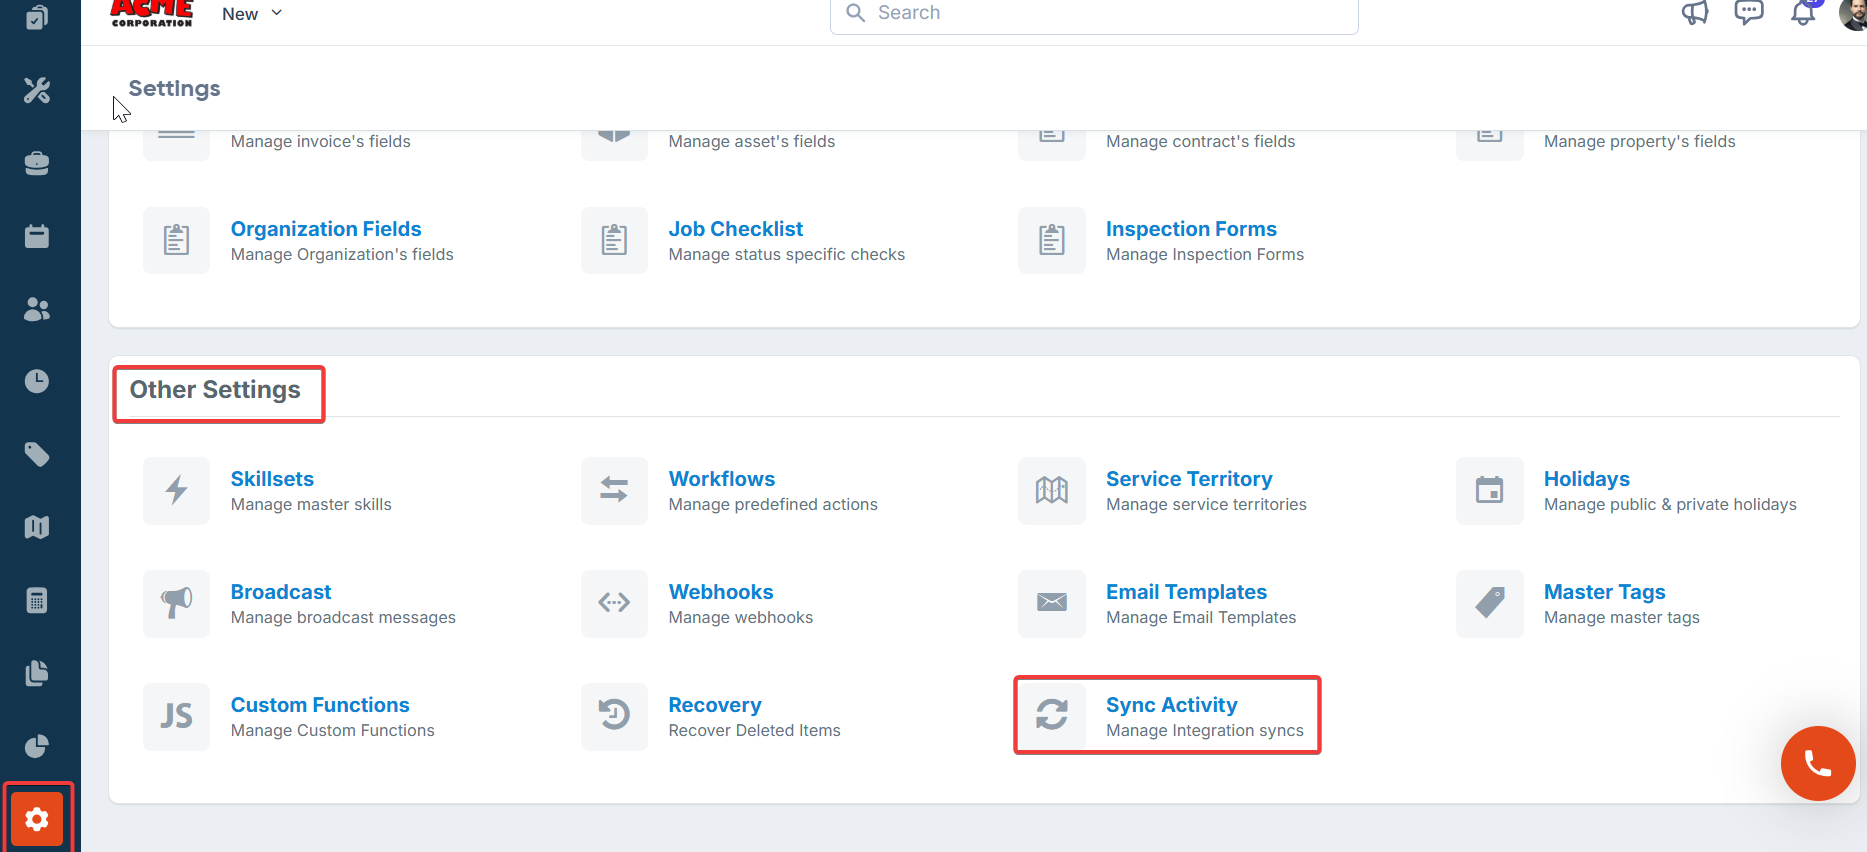
- The “Sync History” list page appears.
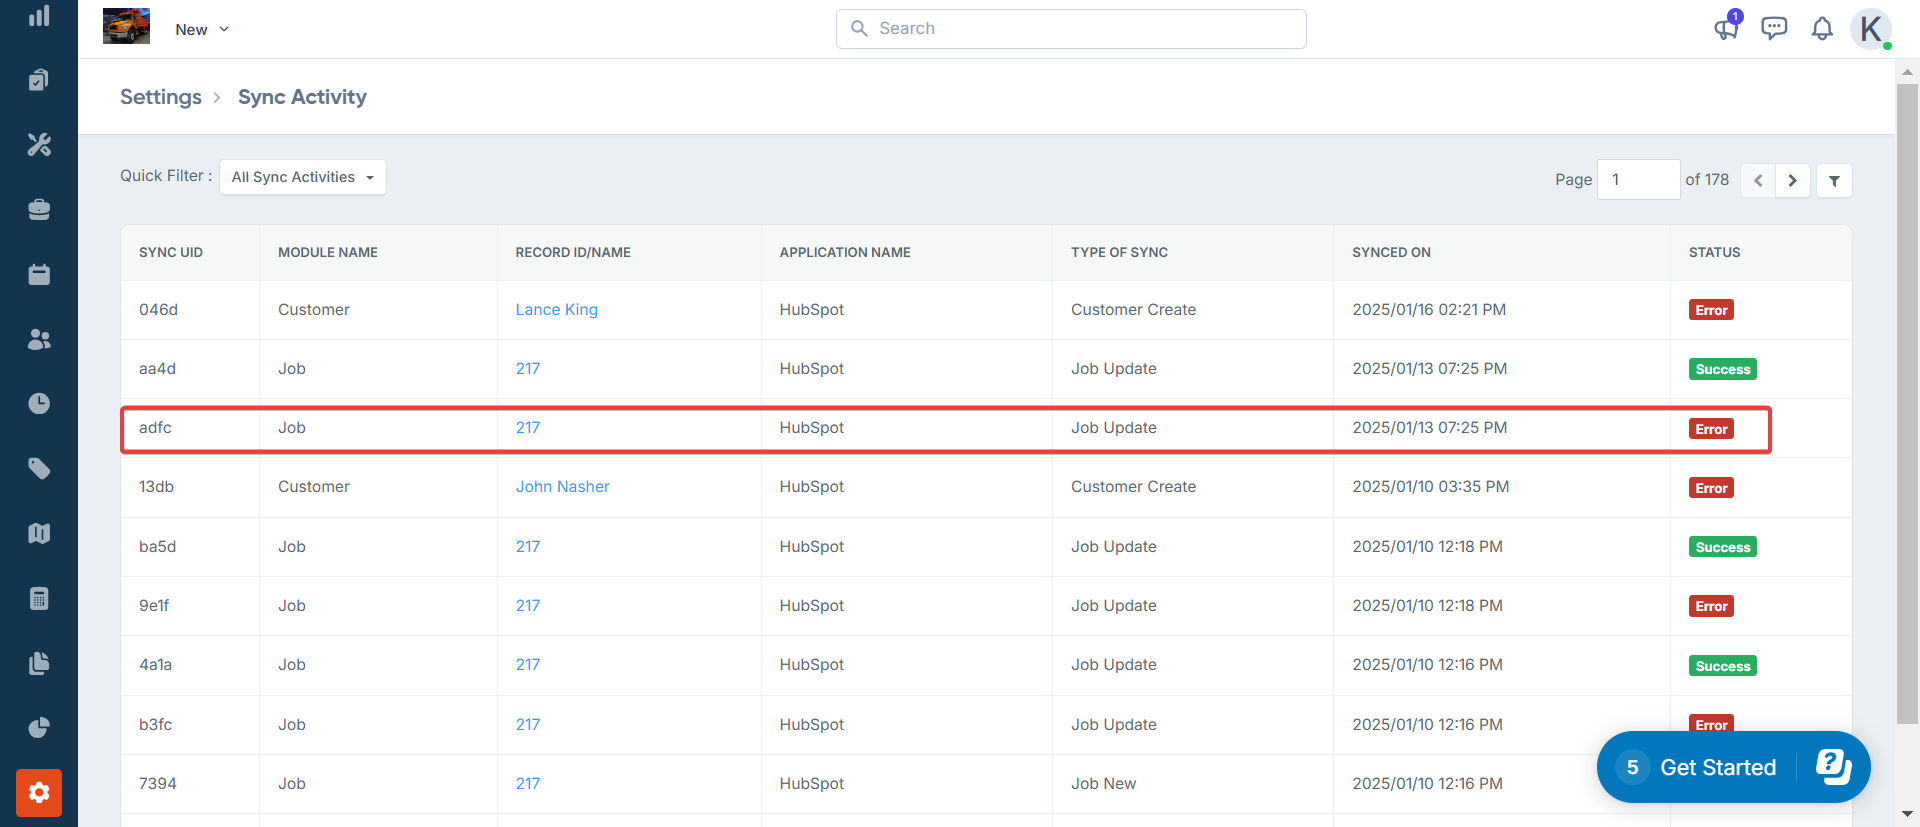
- The sync will happen and be completed in a few seconds. The sync has been successfully completed. To acknowledge and dismiss the error, click the “Acknowledge” button.

Troubleshooting
Use this section when something does not work as expected in your Zuper–HubSpot integration. Each subsection covers a specific area where issues commonly occur.Sync history errors
The Sync History log is your first stop when data does not move correctly between Zuper and HubSpot. It records every sync attempt — successful or failed — so you can find and fix problems quickly. Navigation: Settings → App Store → HubSpot → Sync HistoryHow to read sync history
- Go to Settings and select App Store.
- Select HubSpot from the list of installed integrations.
- Select the Sync History tab.
- Review the list of sync events. Each row shows:
- Date and time of the sync attempt
- Record type — for example, Job, Contact, or Note
- Direction — Zuper to HubSpot, or HubSpot to Zuper
- Status — Success or Failed
- Error message (visible for failed records)
- Select a failed row to expand it and view the full error detail.
Sync History retains records for the last 30 days. If you need older records, export the data before they expire.
Common sync errors and fixes
Error: “Invalid API key” The Zuper API key entered during setup has expired or was deleted.- Go to Settings → Account Settings → API Keys.
- Generate a new API key.
- Go to Settings → App Store → HubSpot → Update HubSpot Settings.
- Enter the new key in the Zuper API Key field.
- Select Update.
- Open the HubSpot contact record.
- Confirm that an email address is present.
- Open the matching customer record in Zuper.
- Confirm that the same email address is entered.
- Trigger a new sync by updating the job status in Zuper.
- Log in to HubSpot and go to Settings → Tickets → Manage Ticket Properties.
- Locate the property with the error.
- Select the property and copy the value from the Internal Name field.
- In Zuper, go to Settings → App Store → HubSpot → Update HubSpot Settings.
- Paste the correct internal name into the HubSpot to Custom Fields Mapping field.
- Select Update.
- Go to Settings → App Store → HubSpot → Update HubSpot Settings.
- Set Sync Zuper Status Updates to Yes.
- Set Sync Zuper Job Notes to Yes if you also want notes to sync.
- Select Update.
HubSpot action logs vs. the notification panel
Zuper and HubSpot each provide a way to track activity. Understanding the difference helps you know where to look when something goes wrong.| HubSpot action logs | Zuper notification panel | |
|---|---|---|
| What it shows | Actions triggered by HubSpot workflows — for example, “Create Zuper Job” or “Update Job Status” | Real-time alerts about job updates, status changes, and sync events inside Zuper |
| Where to find it | HubSpot → Automation → Workflows → select a workflow → History tab | Zuper → bell icon (top right of any page) |
| Best used for | Diagnosing why a HubSpot workflow did not fire or sent incorrect data to Zuper | Checking whether a Zuper event — such as a status change — was received and processed |
| Level of detail | Shows each enrolled record, the action taken, and success or error status | Shows a summary notification per event — no step-by-step breakdown |
When to use HubSpot action logs
Use HubSpot action logs when:- A job was not created in Zuper after a HubSpot ticket or deal was updated
- A workflow action ran but sent incorrect field values to Zuper
- You need to check whether a specific contact or deal was enrolled in a workflow
- Log in to HubSpot.
- Go to Automation → Workflows.
- Select the workflow you want to review.
- Select the History tab.
- Filter by Status — select Failed to focus on errors.
- Select a record row to view the step-by-step action log and error details.
When to use the Zuper notification panel
Use the Zuper notification panel when:- You want to confirm that a job status update was sent from Zuper to HubSpot
- You are checking whether a note or attachment sync was triggered
- You need a quick summary of recent activity without going into the Sync History log
- Log in to Zuper.
- Select the bell icon in the top-right corner of any page.
- Review the list of recent notifications.
- Select a notification to go directly to the related job or record.
The notification panel shows activity for the logged-in user only. To investigate activity for another team member, ask them to check their own panel. For a full cross-user view, use the Sync History log instead.
App Cards configuration for job display
HubSpot App Cards let you view Zuper job details — including the Job Gallery — directly inside a HubSpot Deal or Ticket. If jobs are not displaying correctly in the App Card, use the steps below to diagnose and fix the issue.Jobs do not appear in the Zuper widget
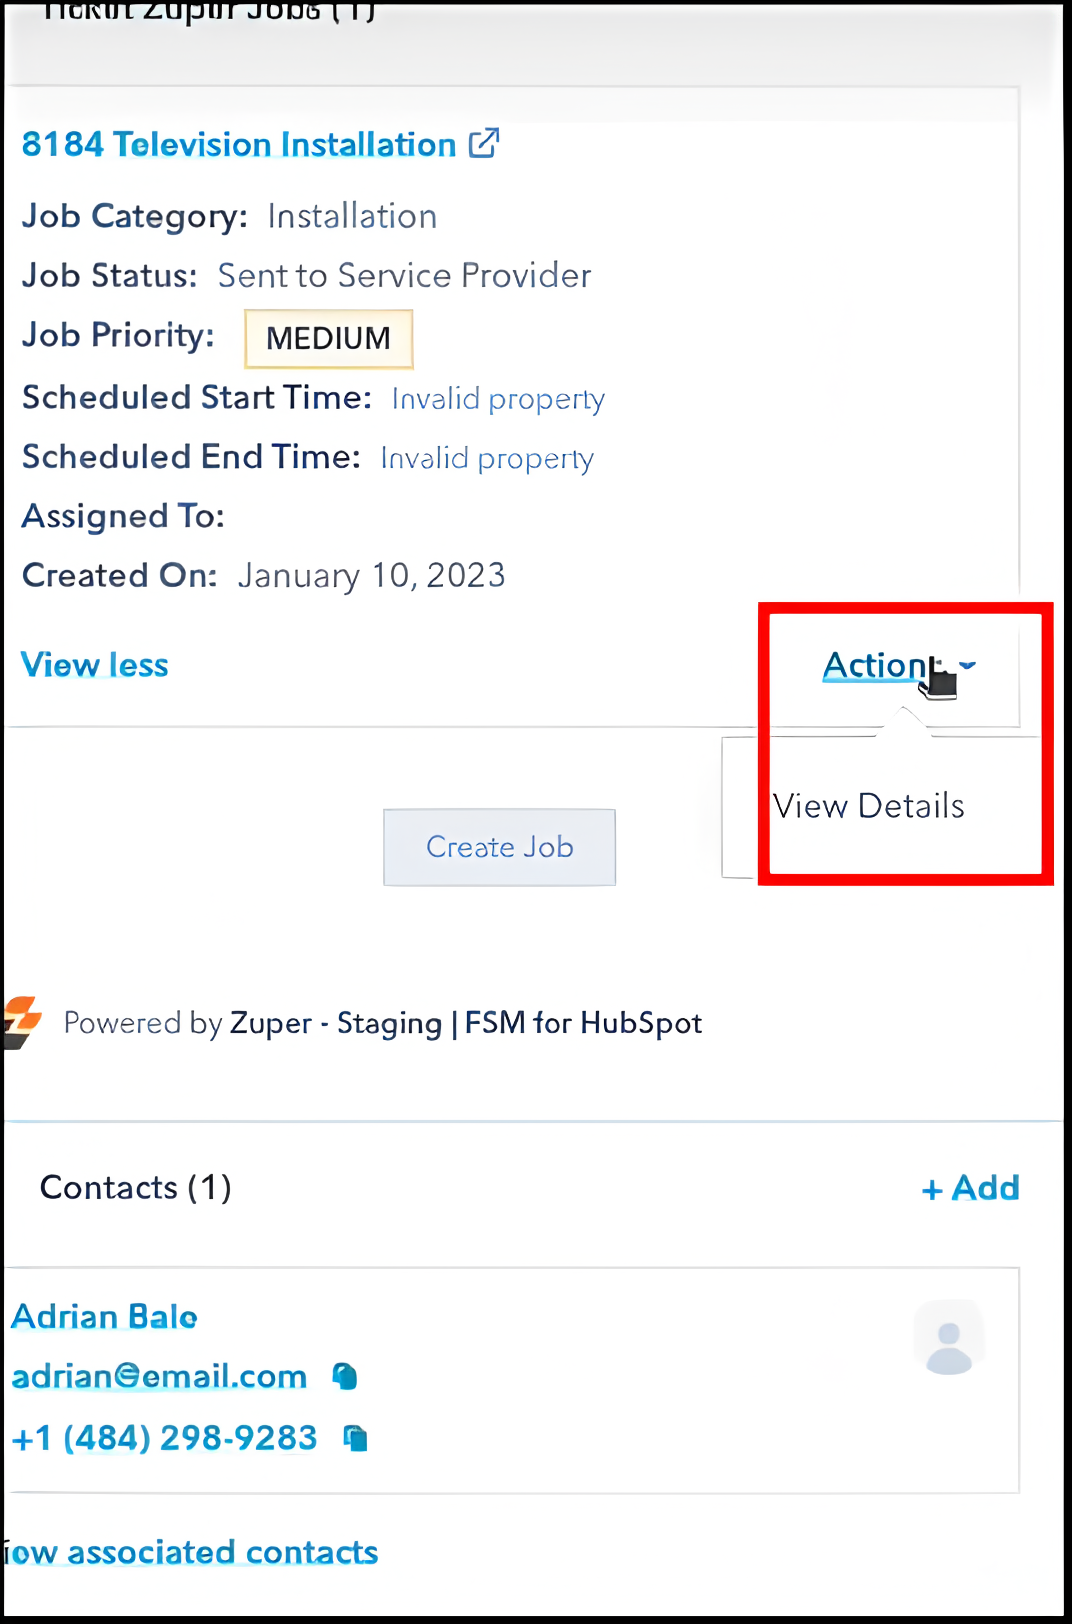
Symptom: The Zuper widget is visible in the HubSpot sidebar, but no jobs are listed. Possible causes and fixes:- The integration is inactive. Go to Settings → App Store → HubSpot in Zuper and confirm the integration status shows Active.
- No jobs are linked to this Deal or Ticket. Select Create Job in the Zuper widget to create the first job for this record.
- The contact email does not match. Zuper matches contacts by email address. Confirm the email on the HubSpot contact record matches the customer email in Zuper.
The Job Gallery card is missing from the Deal or Ticket page
Symptom: The Zuper Job Gallery App Card does not appear on the HubSpot Deal or Ticket details page. Fix:- Open the HubSpot Deals or Tickets page.
- Select Customize Cards (found in the page header or layout settings).
- Select the view you use for that record type.
- Select Add Cards.
- In the Add middle column cards panel, go to Apps and select the Zuper Gallery checkbox.
- Select Save and Exit.
The + button to add a new tab is only available on HubSpot Enterprise plans. On other plans, add the Zuper Gallery card to an existing tab.
The Job Gallery loads but shows no images or videos
Symptom: The Zuper Gallery card appears in HubSpot, but it is empty even though photos or videos exist on the job in Zuper. Possible causes and fixes:- Media was not attached to the job in Zuper. Open the job in Zuper and confirm that photos or videos are present in the Checklists, Notes, or Attachments sections.
- The job is not linked to the HubSpot Deal or Ticket. In the Zuper widget inside HubSpot, confirm the job appears in the job list. If it does not, create a new job or link the existing job to the Deal or Ticket.
- The App Card layout was not saved correctly. Repeat the steps under “The Job Gallery card is missing” above to re-add and save the card.
Job status updates are not showing in HubSpot after the job changes in Zuper
Symptom: The job status changes in Zuper — for example, from Scheduled to In Progress — but the HubSpot ticket or deal property does not update.- Confirm that Sync Zuper Status Updates is set to Yes in your integration settings (see Sync history errors above).
- Confirm that the HubSpot Status Field Name in your integration settings matches the Internal Name of the status property in HubSpot.
- Check the Sync History log for any failed events related to this job.
- If the field name is incorrect, update it and select Update to save.
Troubleshooting
Workflow executes successfully but no Zuper record is created
A sample scenario: A 200 response from a HubSpot workflow action confirms that Zuper received the request — it does not confirm that the record was created. If your workflow returns success but no job, project, or customer appears in Zuper, work through the following checks.Check that all mandatory fields are forward-mapped
Check that all mandatory fields are forward-mapped
Every mandatory field in the target Zuper module must have a Forward or Bidirectional sync direction in the field mapping configuration. A field set to Reverse only (Zuper → HubSpot) will silently block record creation even when the workflow executes without error.Common mandatory fields for job creation:
- Job Category — no default HubSpot equivalent; must be explicitly mapped
- Job Title
- Due Date
Verify custom field names are exact matches
Verify custom field names are exact matches
Custom fields synced via the HubSpot to Custom Fields Mapping section must use the exact API field name from both HubSpot and Zuper. Names are case-sensitive. A mismatch will result in the field being silently skipped — the job will be created but the custom field will not be populated.To find the correct API name in HubSpot: go to Settings → Properties → [Object] → locate the field → copy the value shown under Internal name.
Re-test with a controlled deal or ticket
Re-test with a controlled deal or ticket
After updating any mapping, re-enroll a single test deal or ticket in the workflow. Confirm in Zuper that:
- The record was created
- All mapped standard fields are populated correctly
- All mapped custom fields are populated correctly
Check that only one workflow is active per Zuper module
Check that only one workflow is active per Zuper module
Running more than one active HubSpot workflow that pushes to the same Zuper module (for example, two deal-based workflows both pushing to Jobs) can cause conflicts and unpredictable sync behavior. Ensure only one workflow is active per Zuper module at any time.
FAQs
How long does it take for a Zuper job update to appear in HubSpot?
How long does it take for a Zuper job update to appear in HubSpot?
Updates sync in near real time — typically within a few seconds of the change in Zuper. If an update does not appear after a few minutes, check the Sync History log for errors.
Can I sync custom fields from HubSpot to Zuper?
Can I sync custom fields from HubSpot to Zuper?
Yes. Enter the HubSpot internal field name and the corresponding Zuper custom field name in the HubSpot to Custom Fields Mapping setting, separated by a comma. Both fields must exist before you set up the mapping.
Why does my HubSpot workflow say the "Create Zuper Job" action failed?
Why does my HubSpot workflow say the "Create Zuper Job" action failed?
This usually means a mandatory field — such as Job Category or Scheduled Date — was not included in the workflow action. Open the workflow in HubSpot, review the History tab for the failed record, and check which field caused the error. Update the workflow action to include all required fields.
What happens to my synced data if I uninstall the HubSpot integration?
What happens to my synced data if I uninstall the HubSpot integration?
All data already synced between Zuper and HubSpot is retained in both systems. New changes made after uninstalling will no longer sync. You can reinstall the integration at any time to resume syncing.
The Zuper widget shows a job, but the HubSpot Deal status has not changed. What should I check?
The Zuper widget shows a job, but the HubSpot Deal status has not changed. What should I check?
Start with three checks. First, confirm Sync Zuper Status Updates is set to Yes in your integration settings. Second, confirm the HubSpot Status Field Name matches the property internal name in HubSpot. Third, review the Sync History log for a failed event tied to that job.If the issue continues, contact Support.