Prerequisite: Ensure that the Tasks feature is enabled for your organization. If it is not enabled, contact our support team at support@zuper.co to have it enabled.
Create a new task
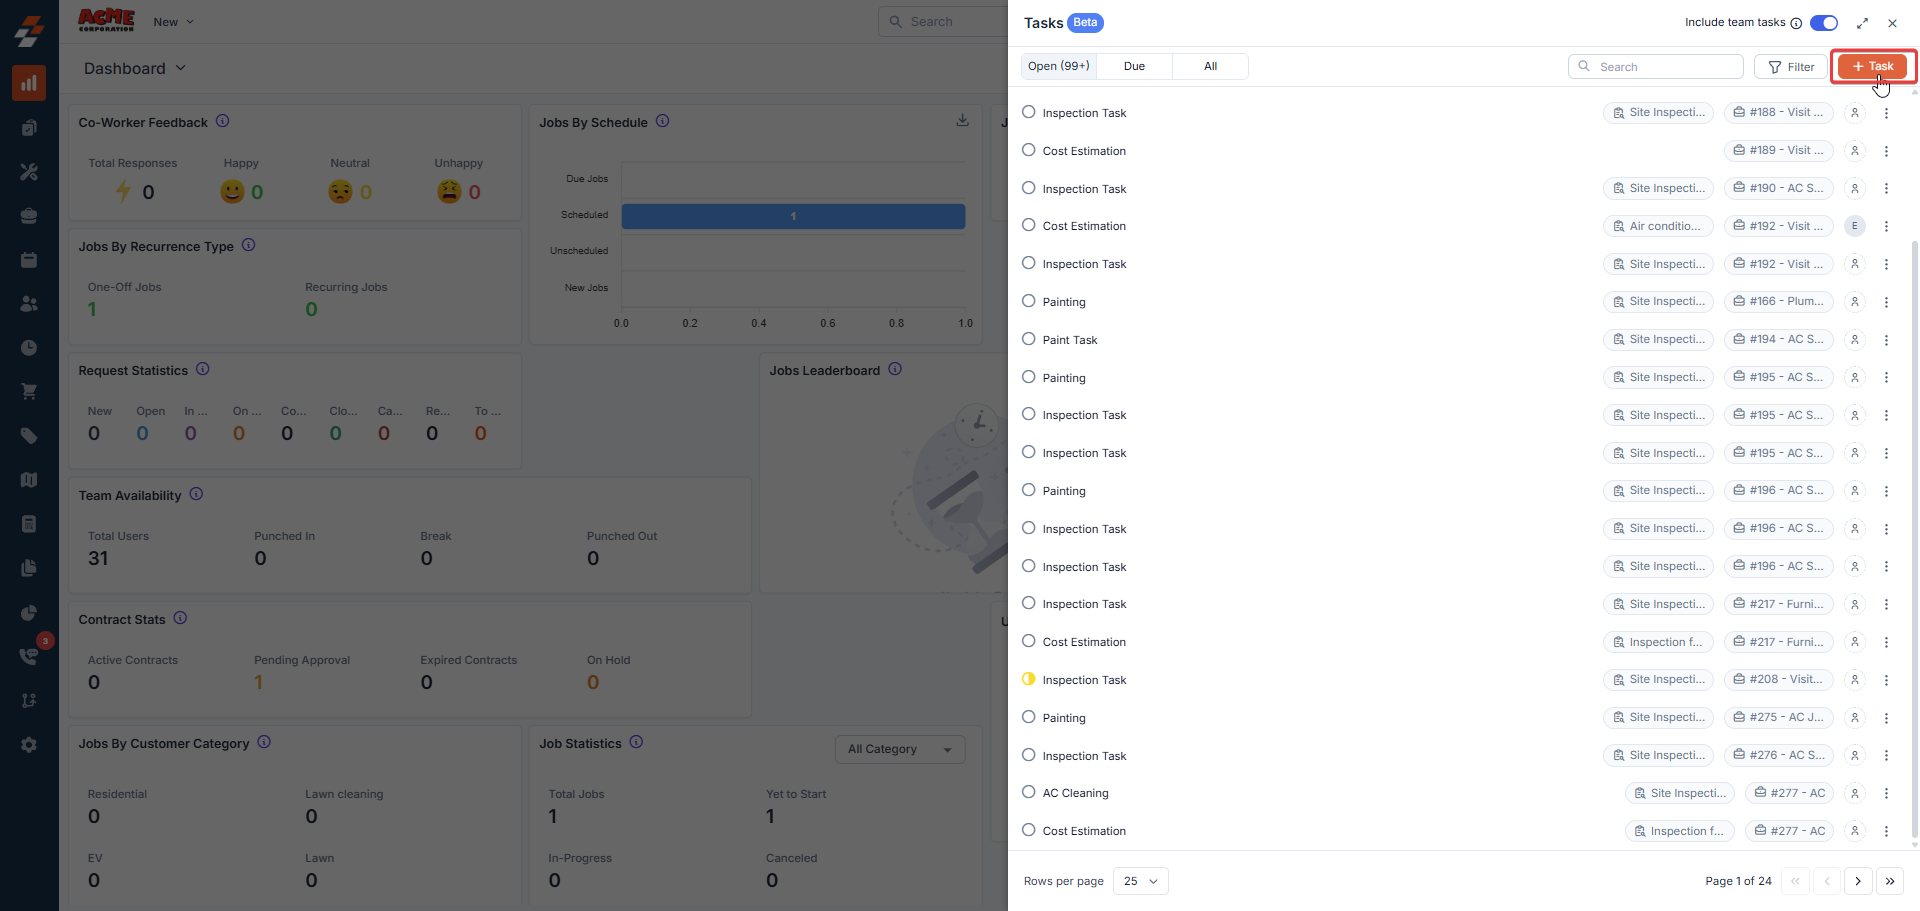
You can create a task in two ways in Zuper:- From the Task list: Click Create Task in the Task List side panel, which you can access by clicking the Tasks icon in the top-right corner of the header bar.
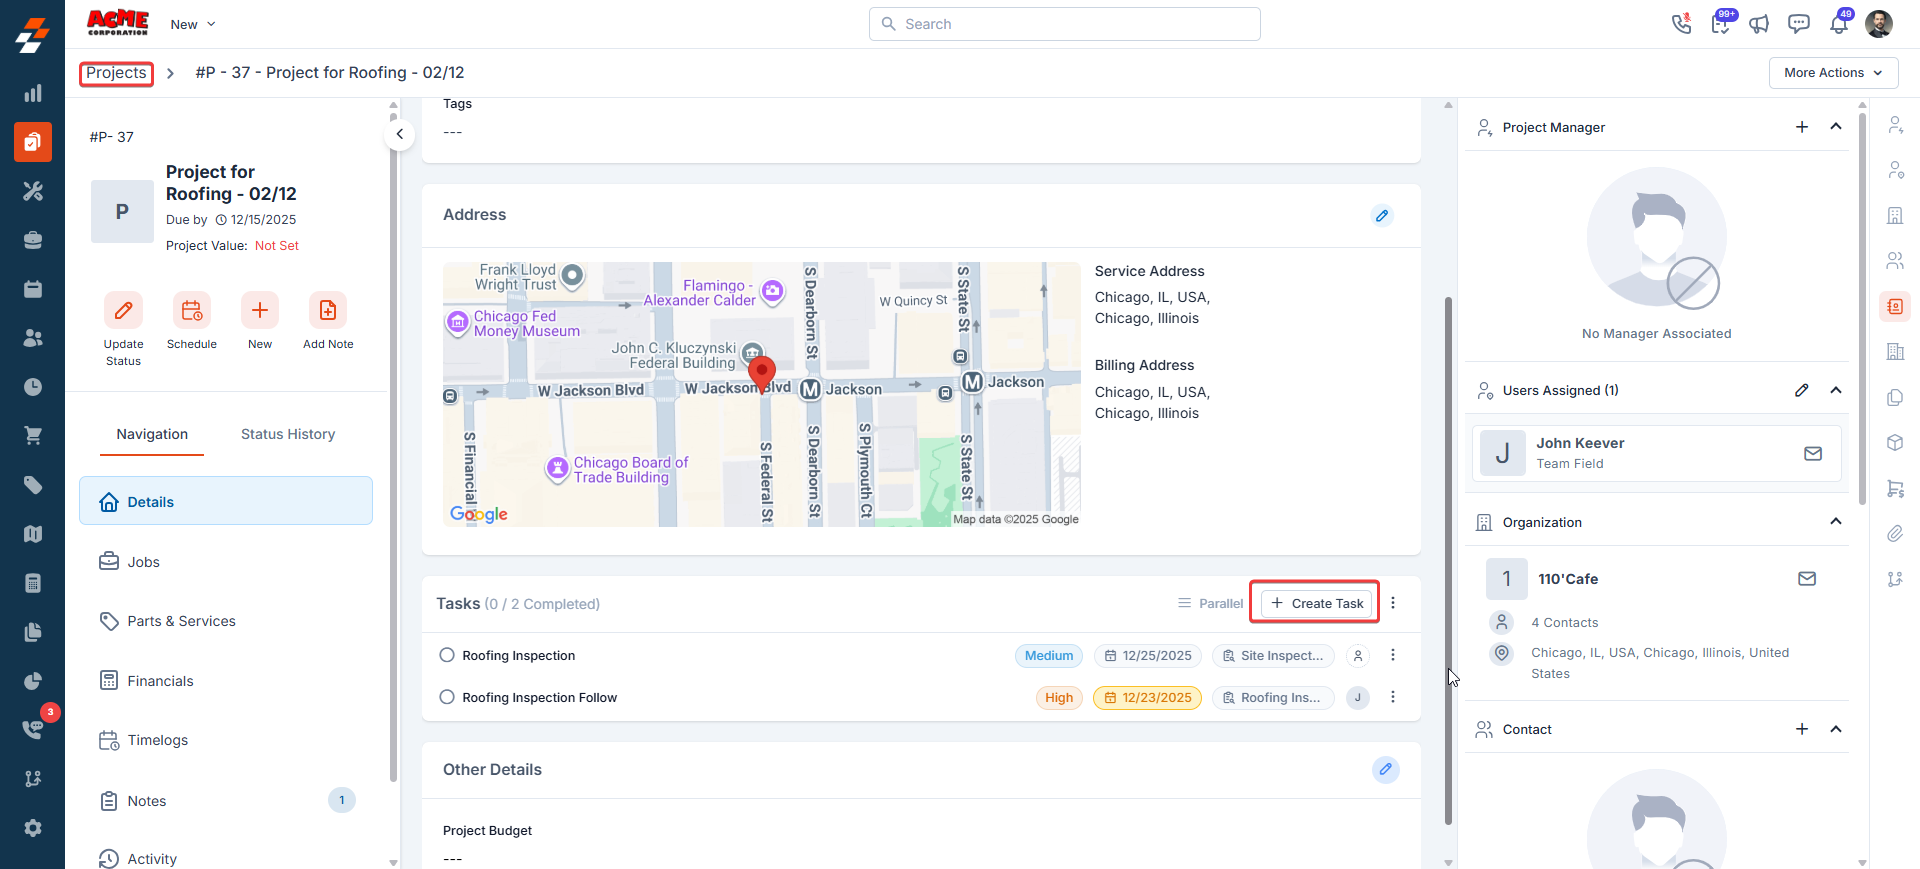
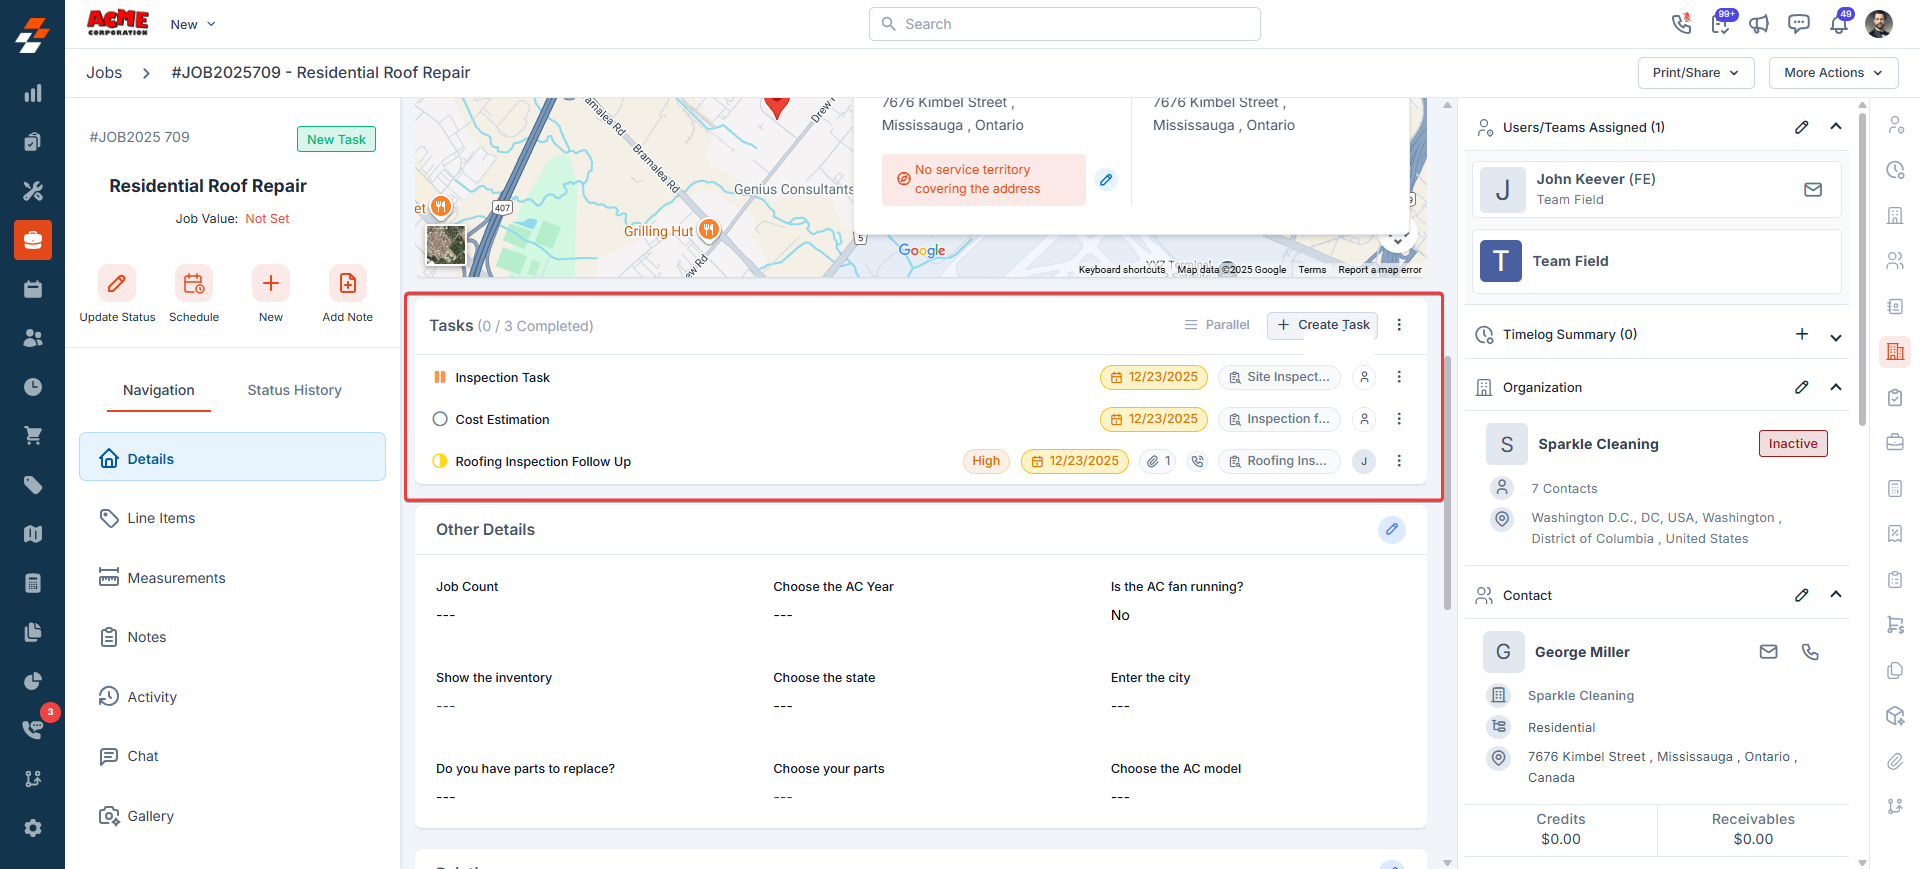
- From a Job or Project: Click Create Task on the Tasks section on a job or project page. When you create a task from a job or project, it will automatically be associated with that job or project.
- Task Name: A task name is required for every task you create. Give your task a clear, descriptive name.
- Task Description: The description is optional but may be used to classify what is expected.
- Priority: Set none, low, medium, or high priority level to help the assignee understand how to accommodate the task in their schedule.
- Assignee: Assign the task to yourself or a team member. This will send a push notification to the team member assigned to the task. If you have added by accident, you can unassign them by clicking the X next to their name.
Note: Only one user can be assigned to a task.
- Task Type: Choose a task type from the predefined list. By default, it is set to Task, but you can change it if needed.
- Associated module: Link the task to a specific Job or Project to keep work traceable and connected.
- Due Date: Specify when the task should be completed. Tasks that are due today are highlighted in amber, and tasks that passed the due date are highlighted in red to indicate they are overdue.
- Set Reminder: Schedule reminders to help the assignee act on time.
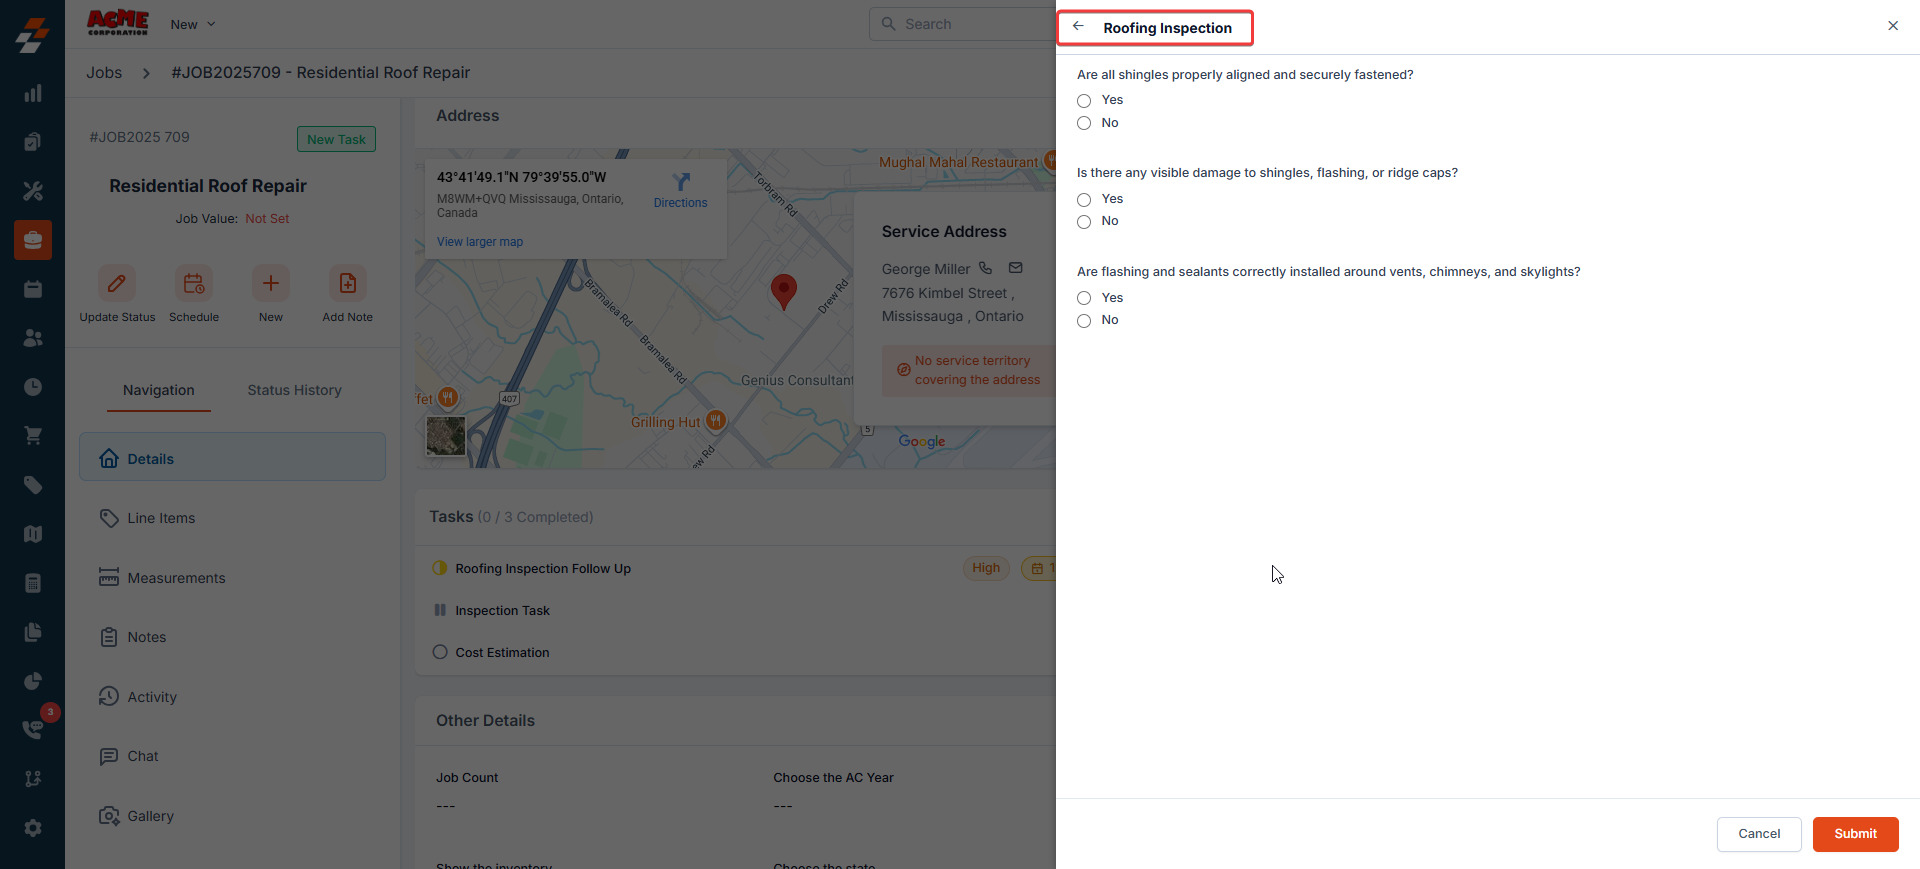
- Inspection Form: Select an inspection form and associate it with the task when the inspection must be completed before the task is closed.
- Attachments: Upload relevant files or documents to support the task with additional context or details.
- After entering all the required details, click “Create” to save the task.
Tips: To save time, create tasks using templates. Click on “Choose a task template” to search and choose the relevant task from the master list. The selected master task will automatically fill in the details on the creation page.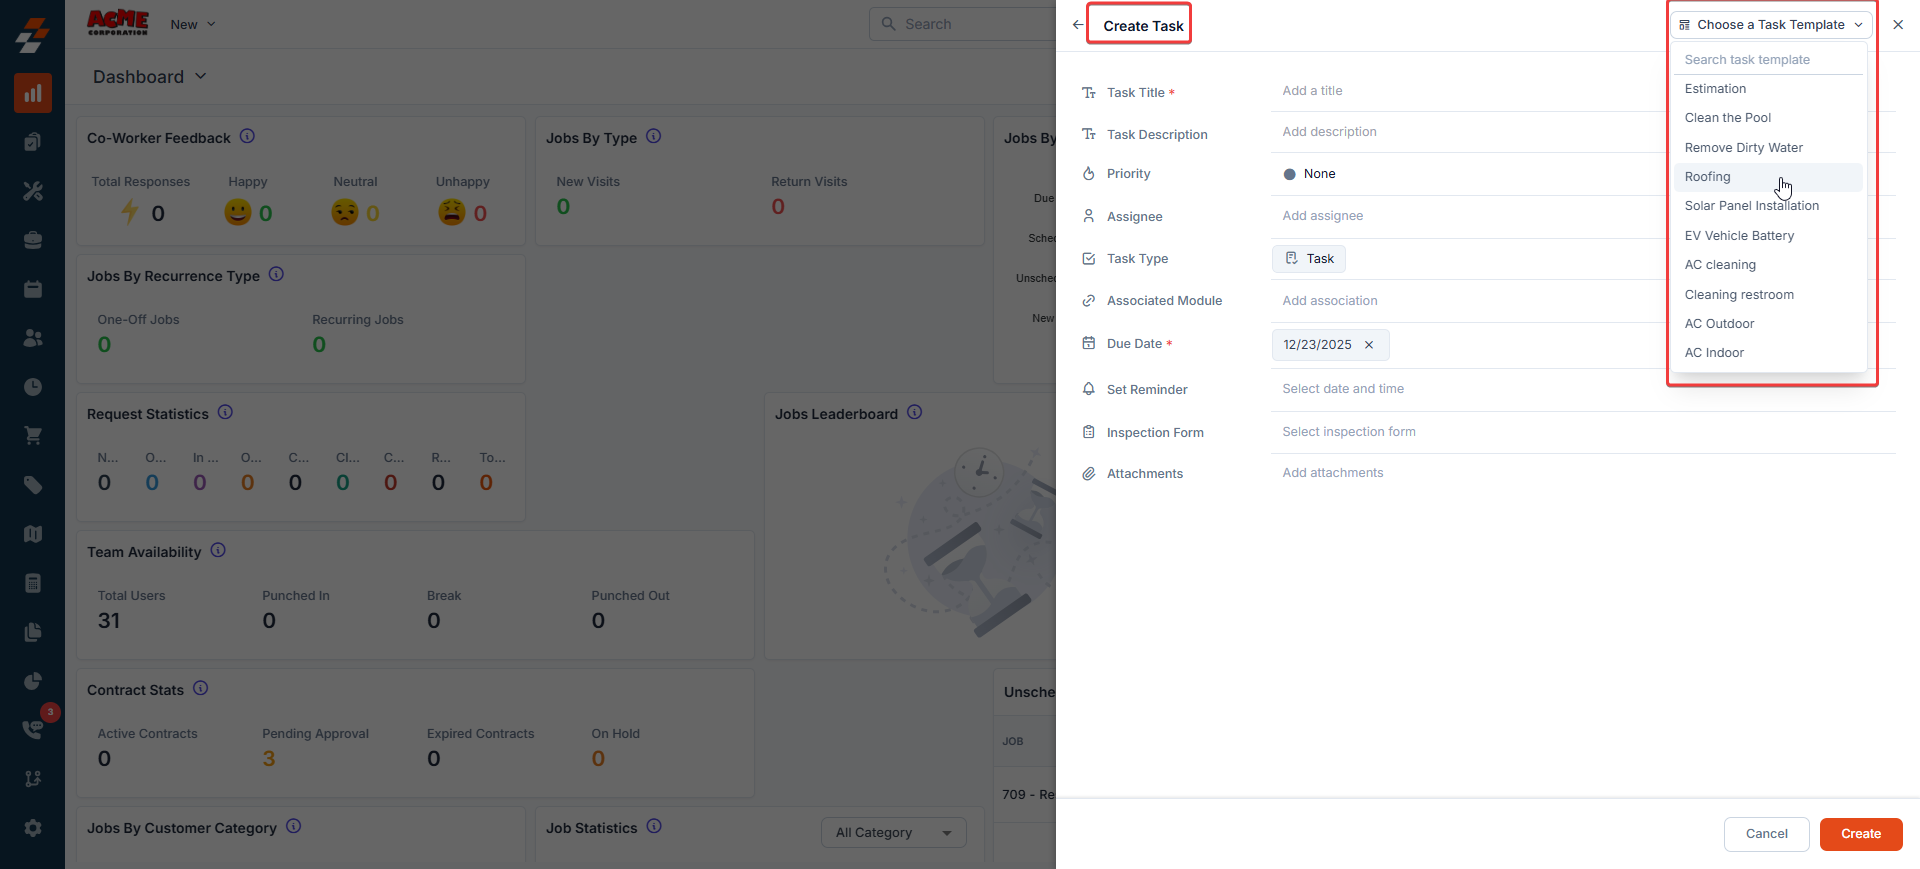
Push notifications
When you assign a user to a task or set a reminder on the task, the assigned user will receive a push notification on their device.
Accessing your tasks
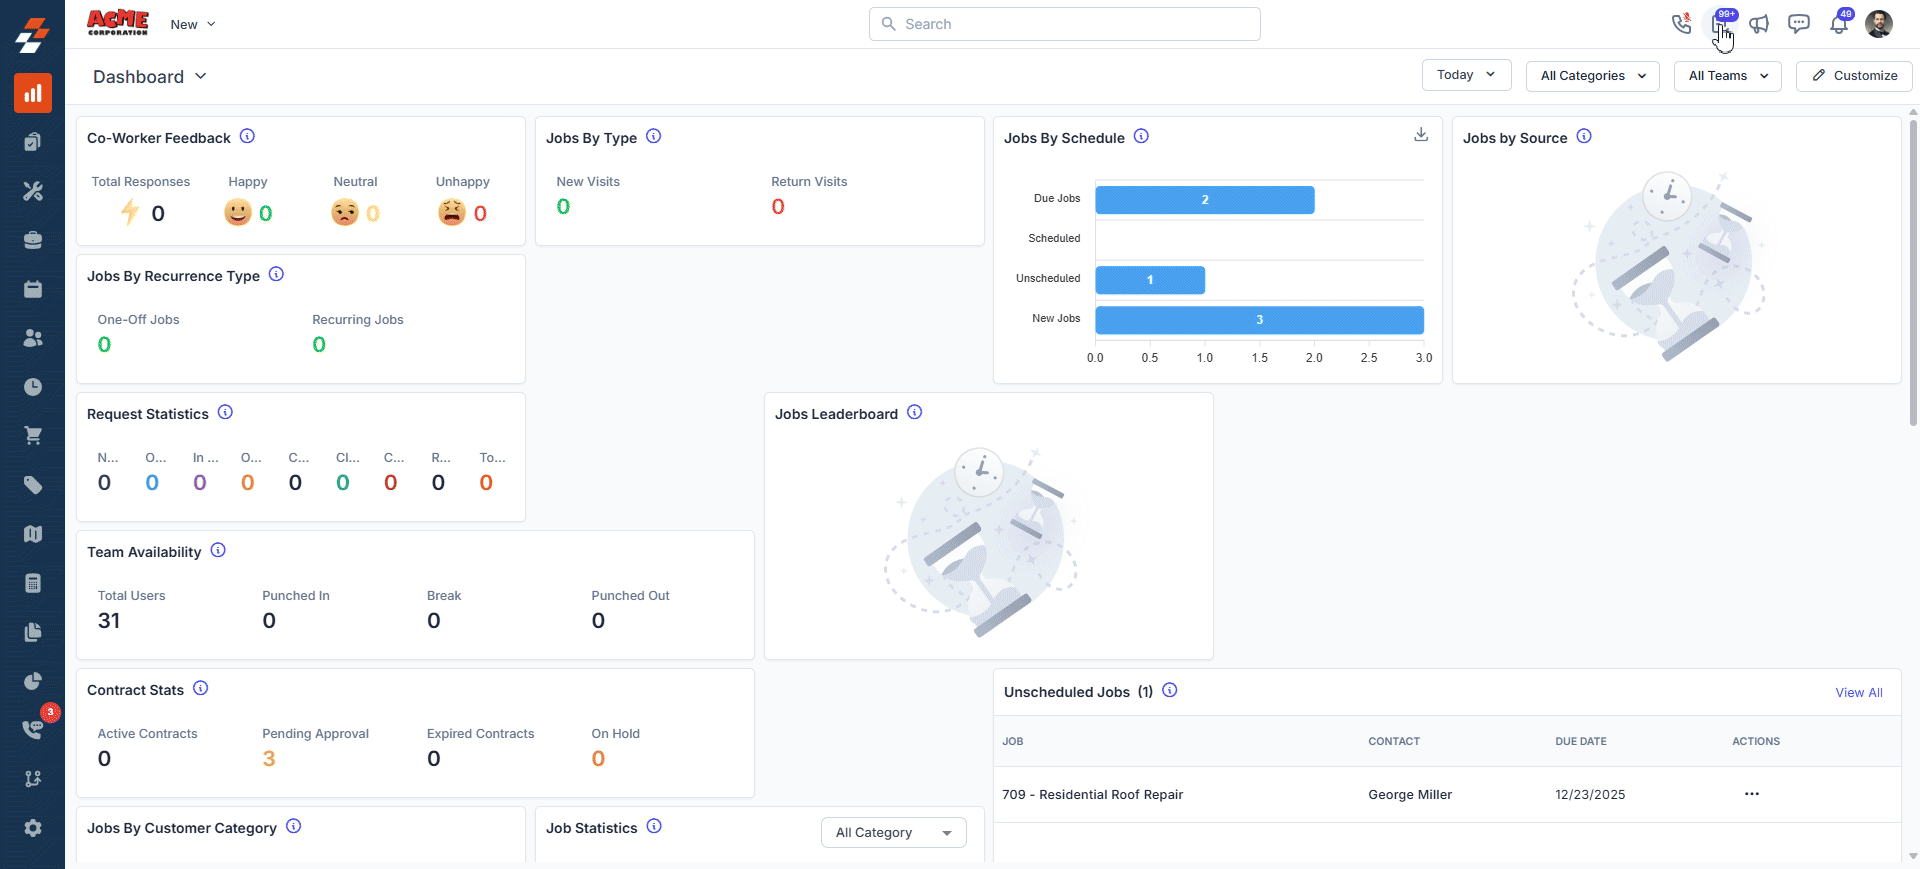
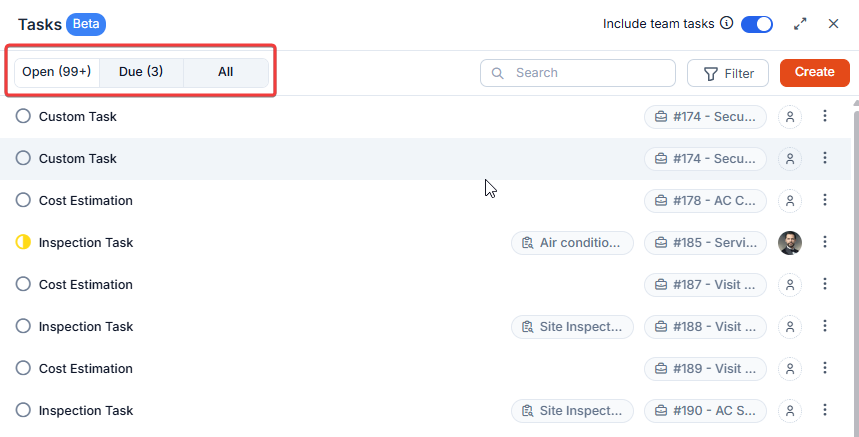
You can access your task list by clicking the Tasks icon in the top right corner of the header bar. The task icon also displays a badge showing the number of open tasks that you created and those assigned to you.
Working in the Task list panel
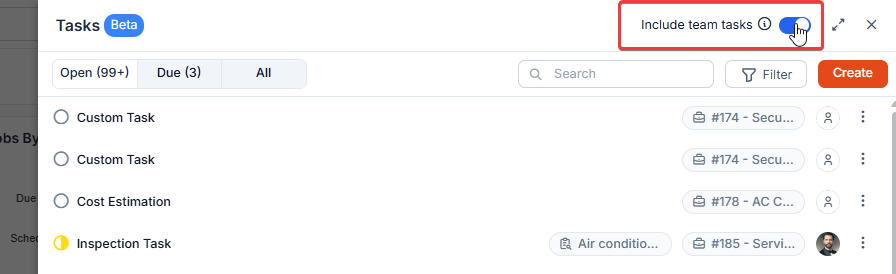
When you open the task panel, you can:- Expand the panel to full screen by using the Expand icon in the top-right corner for better visibility.

- Toggle Include Team Tasks to On to view tasks assigned to your team. Note: Admins and Team Leads can see the tasks of their team members, while Field Techs can only view their own tasks.
- Search for tasks by name.
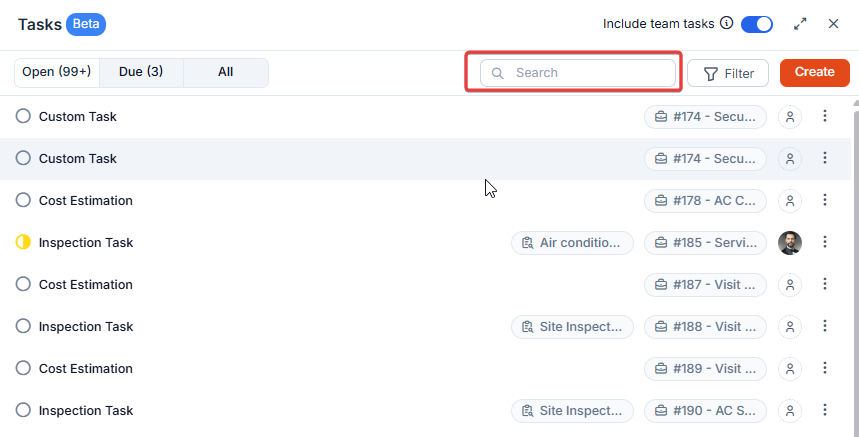
- Filter the task based on priority, task type, assignee, status, and due date. To do so, click on the Filter icon, and in the filter panel, you can apply the filters to narrow down the tasks.
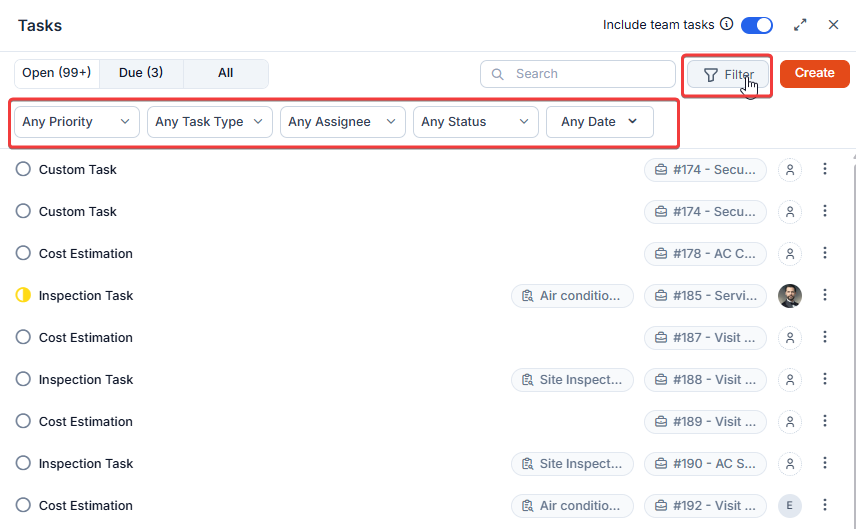
- You can switch between the tabs at any time to manage tasks based on their progress.
- Open Tab: Automatically shows tasks with open statuses (Yet to start, In Progress, On Hold, completed, and so on)
- Due Tab: Displays tasks that are due today by default. You can apply additional filters such as overdue, yesterday, last 7 days, last 30 days, this month, last month, or a custom date range to view tasks due within your preferred timeframe.
- All Tab: Shows all tasks
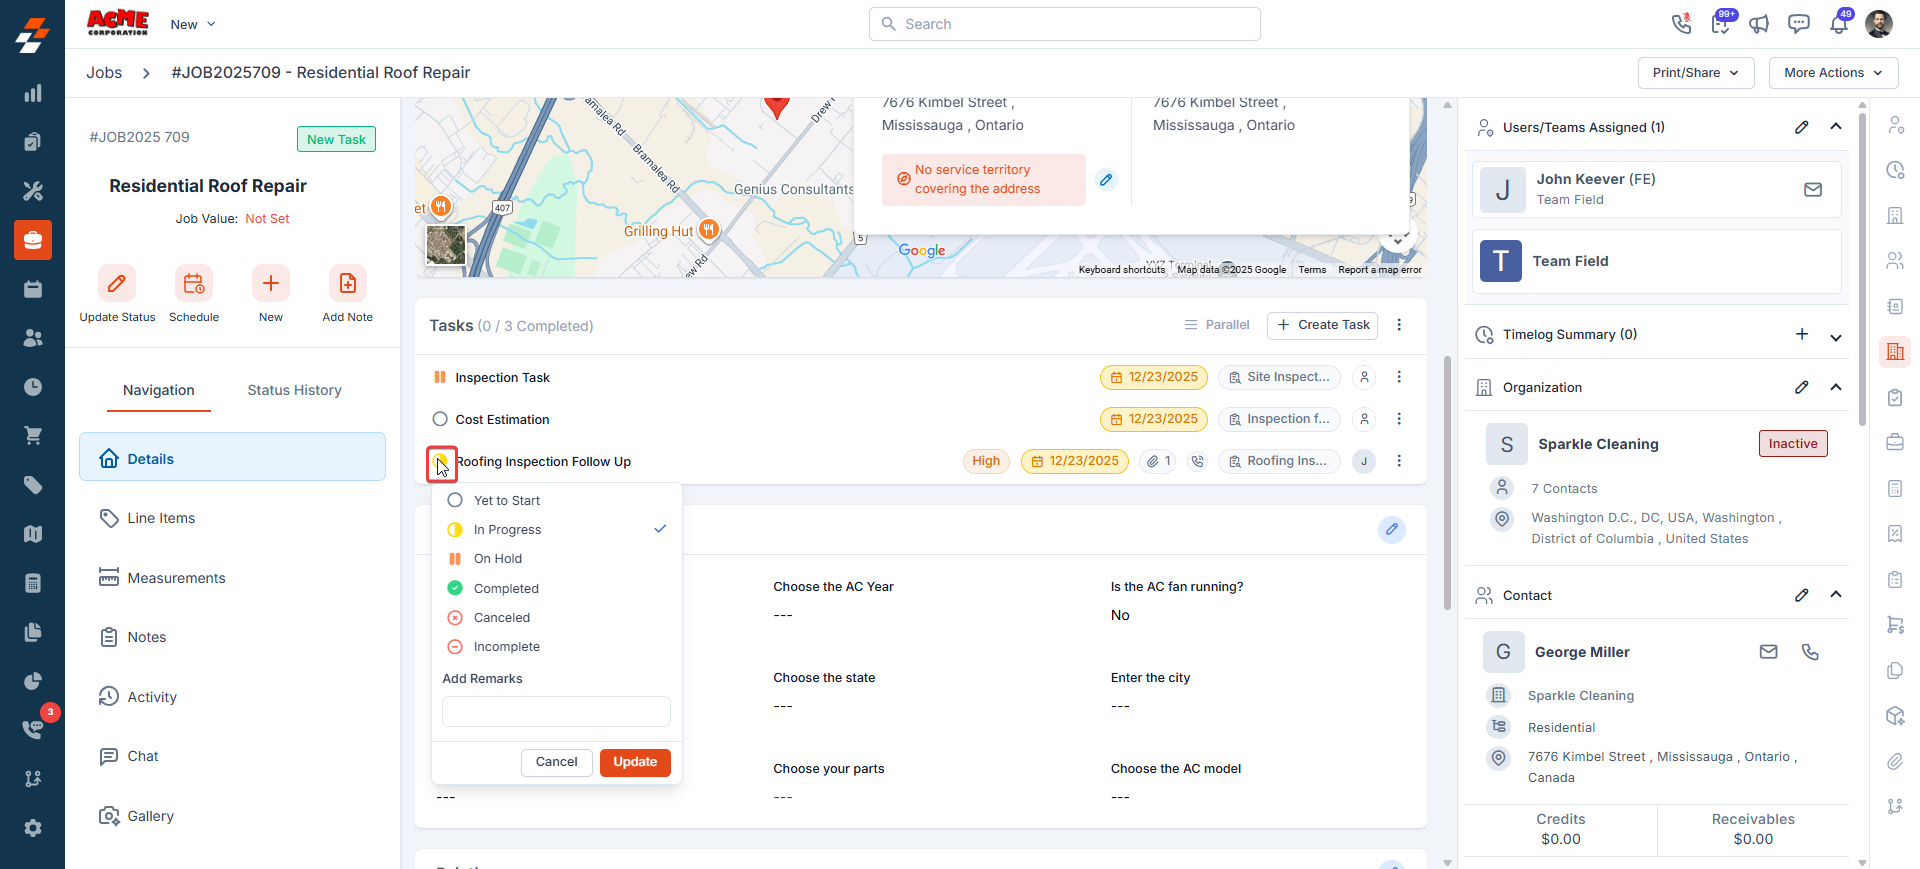
Updating task status
To update the status of a task:- Click the radio button next to the task.
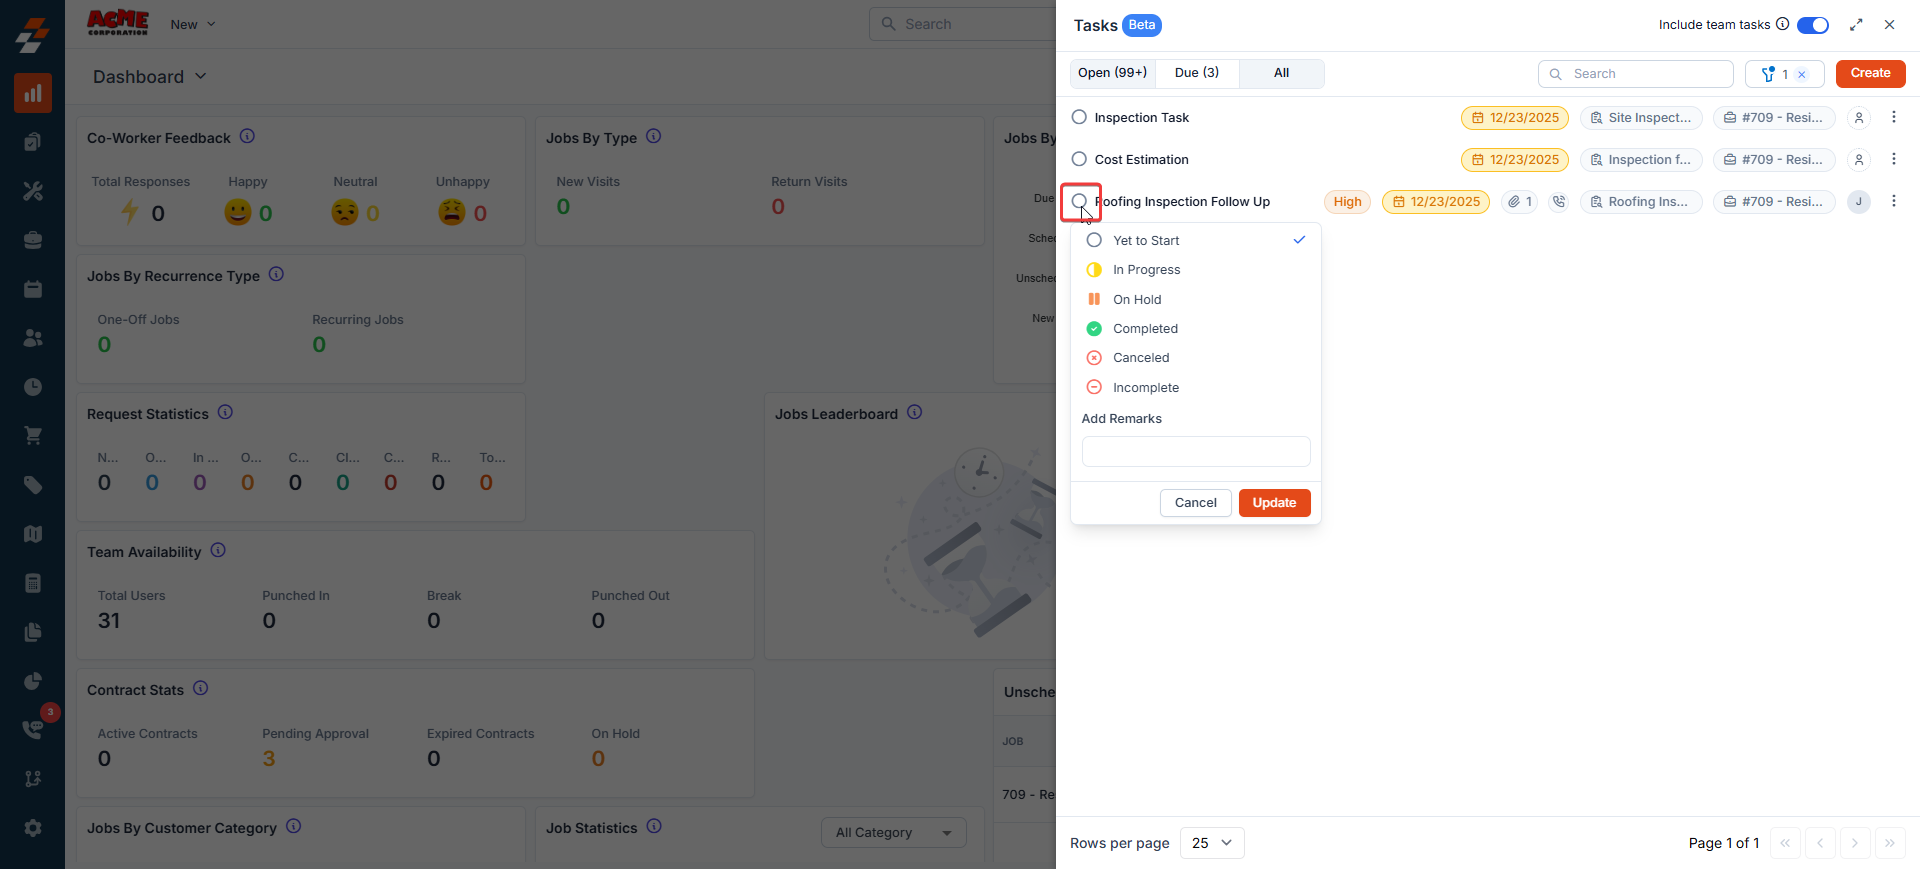
- Choose the relevant status.
- (Optional) Enter remarks to provide clarity on the update.
Note: If a task has an inspection form attached, you’ll be prompted to complete the inspection before marking the task as Completed.
Context Menu actions
You can manage your task with these options: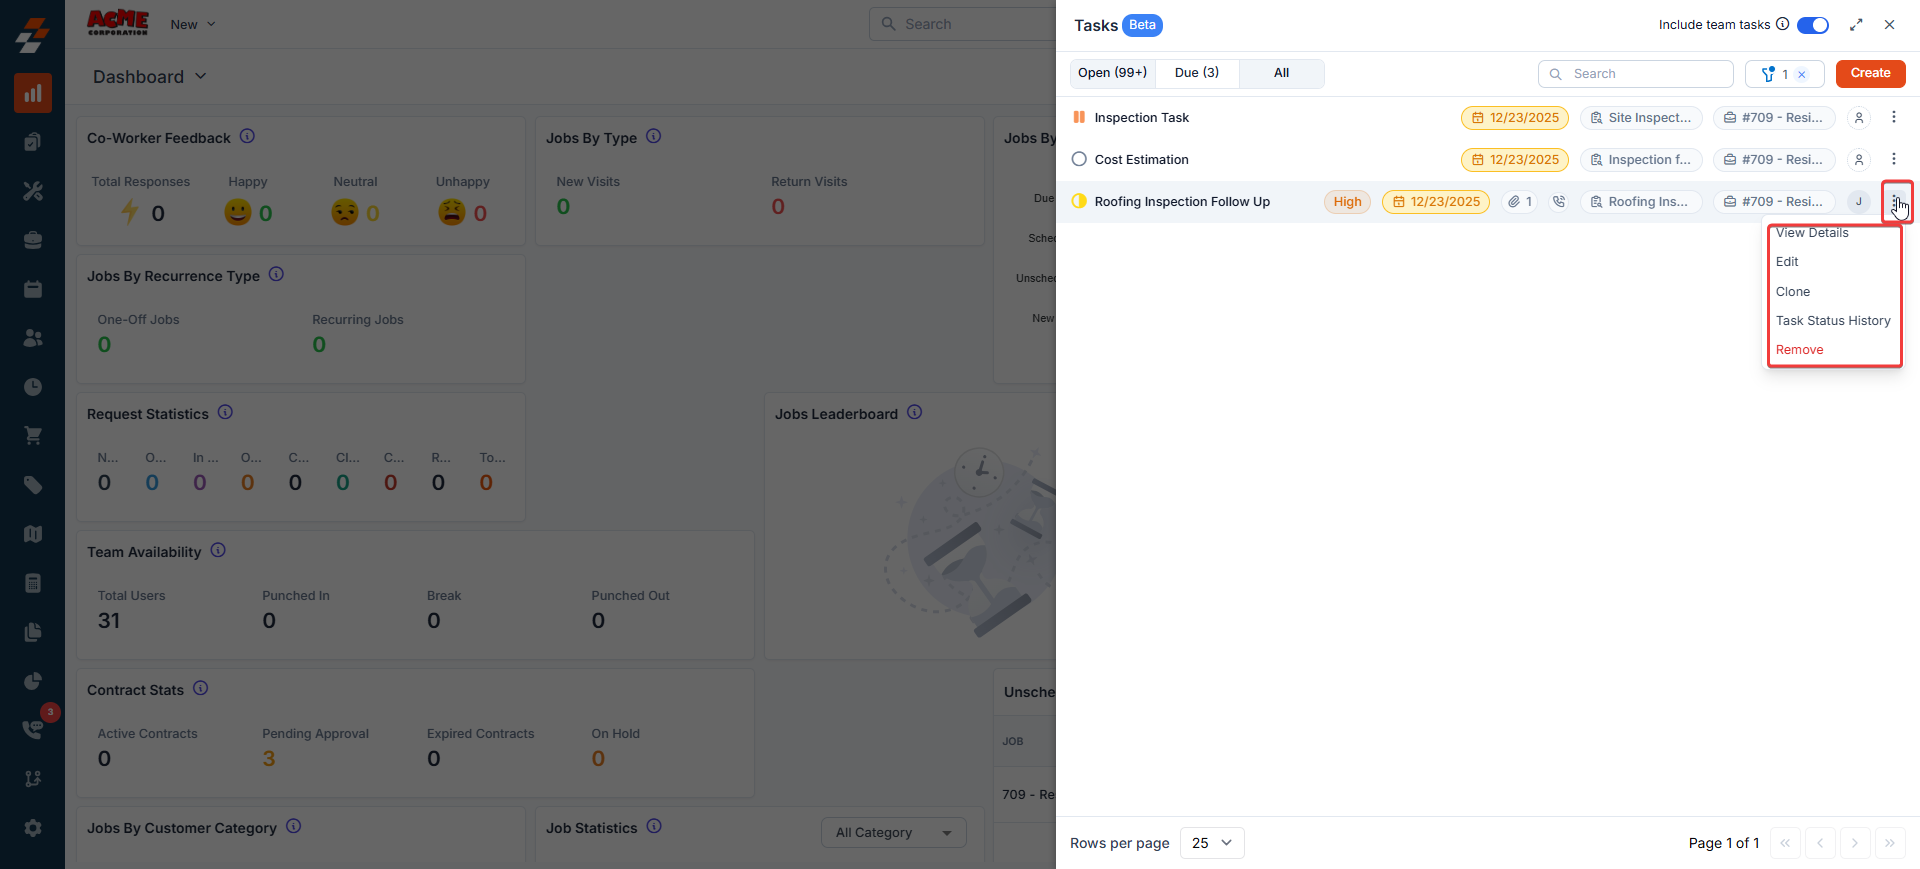
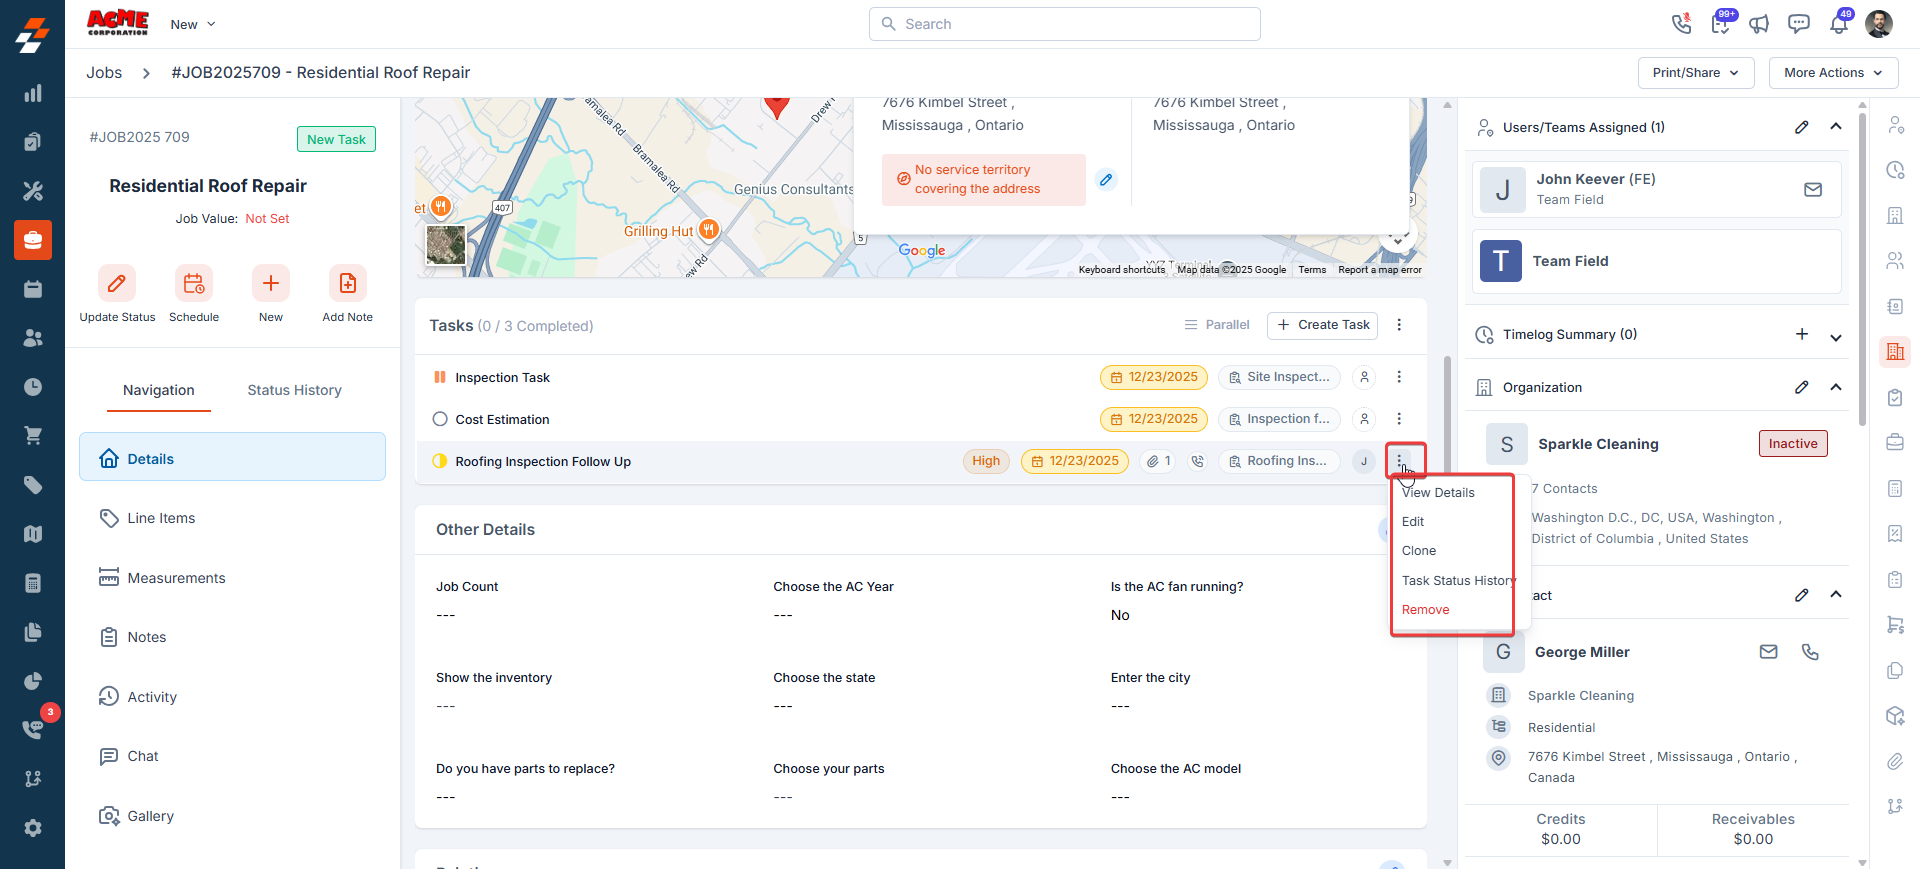
- View Details: You can click to open a task to see its details.
- Edit: You can modify the task details. However, the assignee cannot be changed from this option.
- Clone: you can create an exact copy of the task, preserving its fields and settings.
- Task Status History: It displays a chronological log of all status changes, including who updated the task, when the update was made, and any remarks recorded during the status change.
- Remove: You can delete a task you no longer need to keep your workspace tidy.
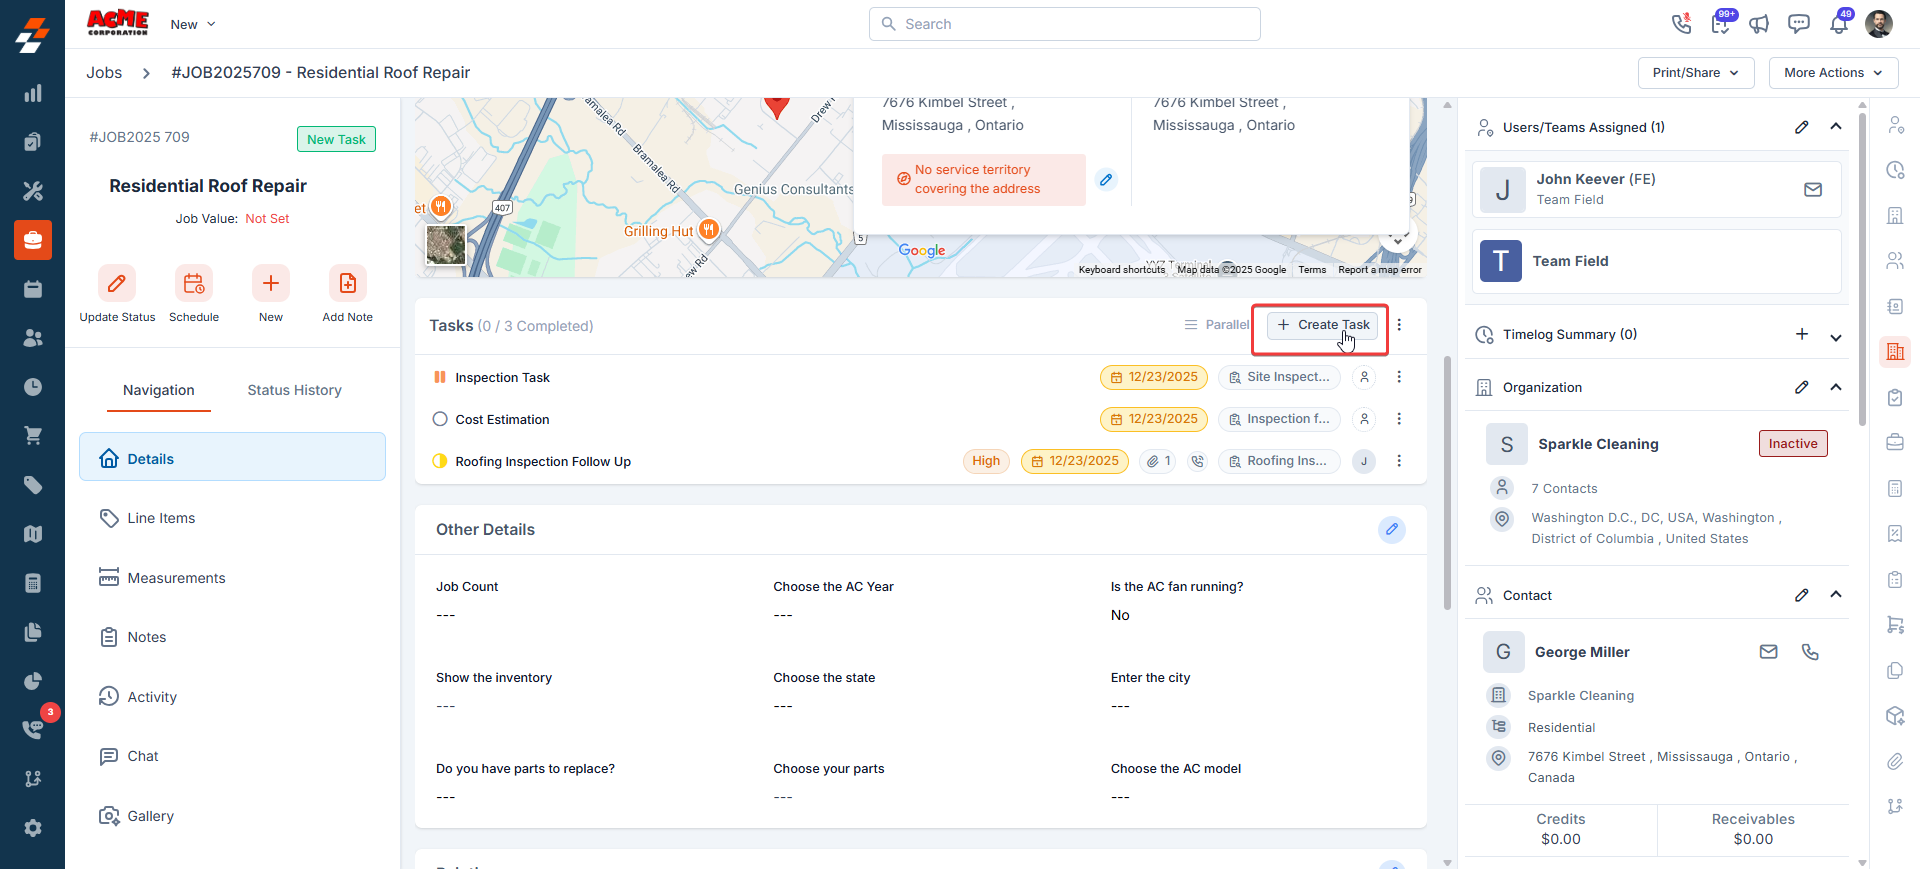
Associating tasks with jobs and projects
Tasks in Zuper can be simple, standalone items, or part of a larger workflow within a job or project. When a task contributes to a specific service activity, Zuper makes it easy to establish that connection. If you’re creating a task that belongs to a job or project, just select the related Job or Project in the Associated Module field on the task creation page. It takes only a second, but it keeps everything neatly organized.Viewing associated tasks
All tasks associated with a job or project appear in the Tasks section on the detail page. This gives you a complete view of all work items for that specific job or project.
Actions available in the Job/Project Task section
From the Job/Project Tasks section, you can perform the following actions:- Create Task: Create a new task that belongs to this job/project.
- Update status: Change a task’s status from the task row using the radio button (for example: Open, In Progress, On Hold, Completed).
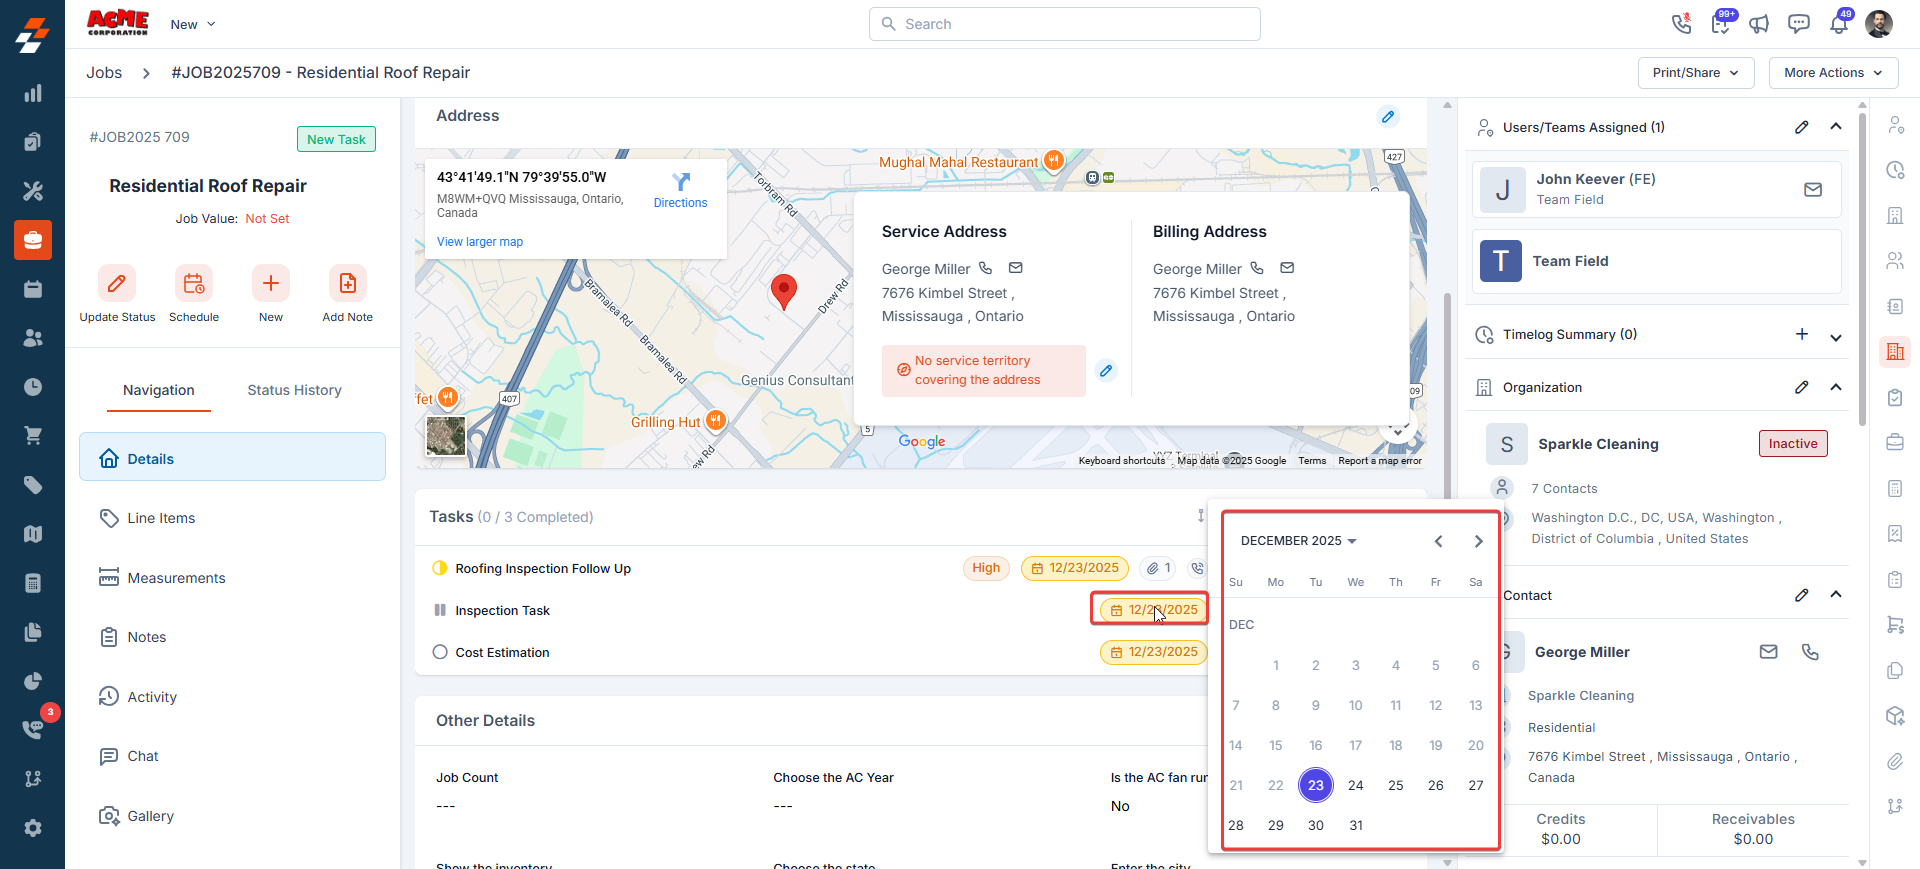
- Due Date: Update the task’s due date directly from the task if needed. Click the due-date badge to pick a new date.
- Associate an Inspection Form: If a task has an inspection form, you can click and fill in the details.
- Attach files: Add attachments to a task for supporting documents (e.g., images, videos, PDFs).
- Assign/unassign: Click the user’s profile picture to add or remove them.
Note: When you assign a user to a task linked to a job or project, Zuper automatically adds the user to that job or project. Likewise, removing a user from the job or project removes them from all related tasks.

- More actions: Click the Kebab icon next to a task to View Details, Edit, see Task Status History, Clone, or Remove the task.
Reordering task
When a job or project contains multiple tasks, you can define the exact order in which they should be completed.- In the Tasks section, click the More Actions (kebab menu) and select Re-order Tasks.
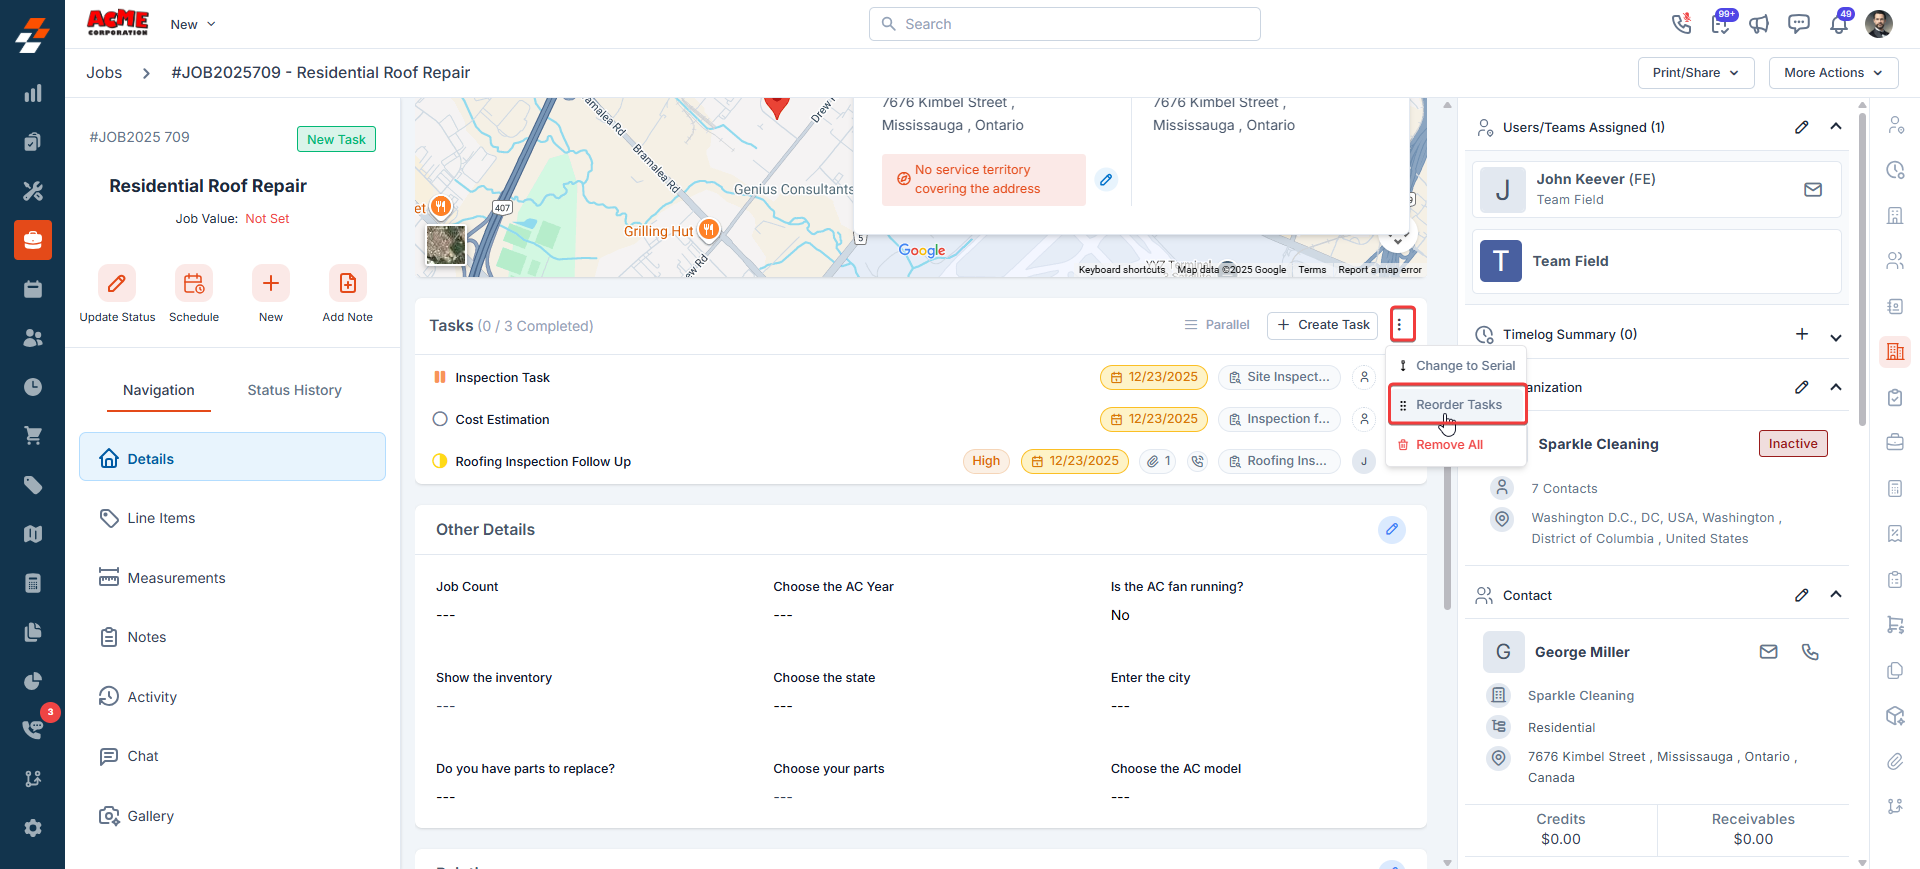
- The list switches to reorder mode.
- Drag and drop tasks to rearrange them.
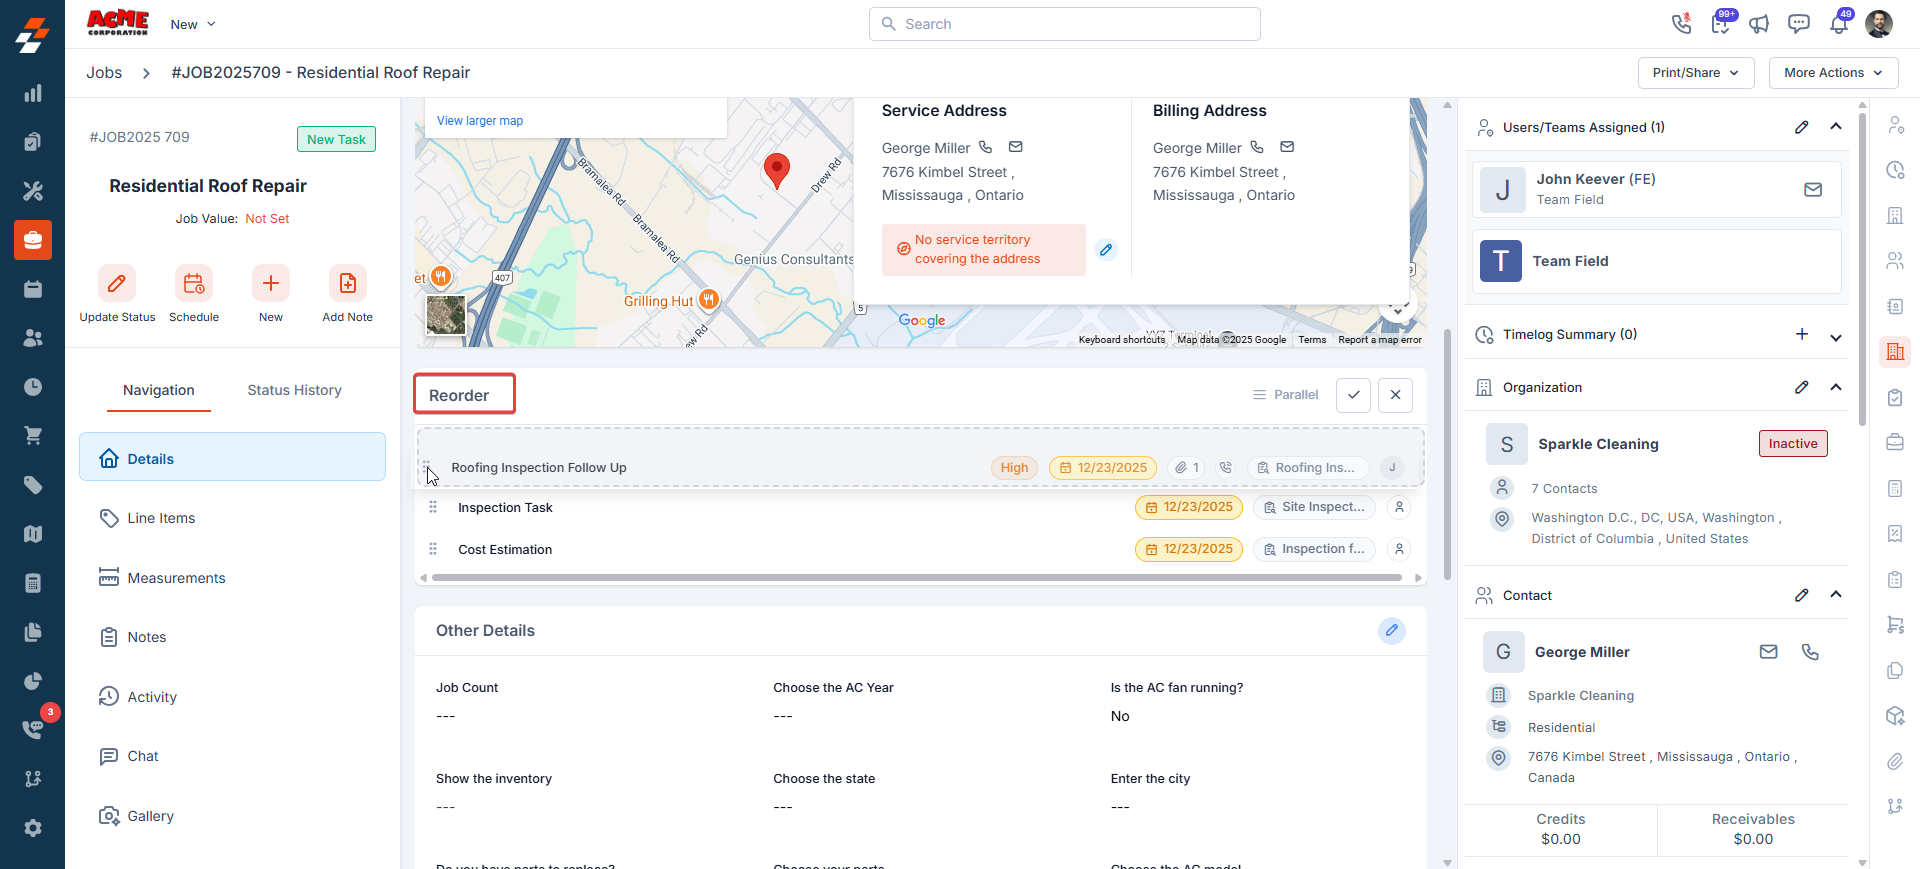
- Click Done(tick icon) to save the order or Cancel to discard.
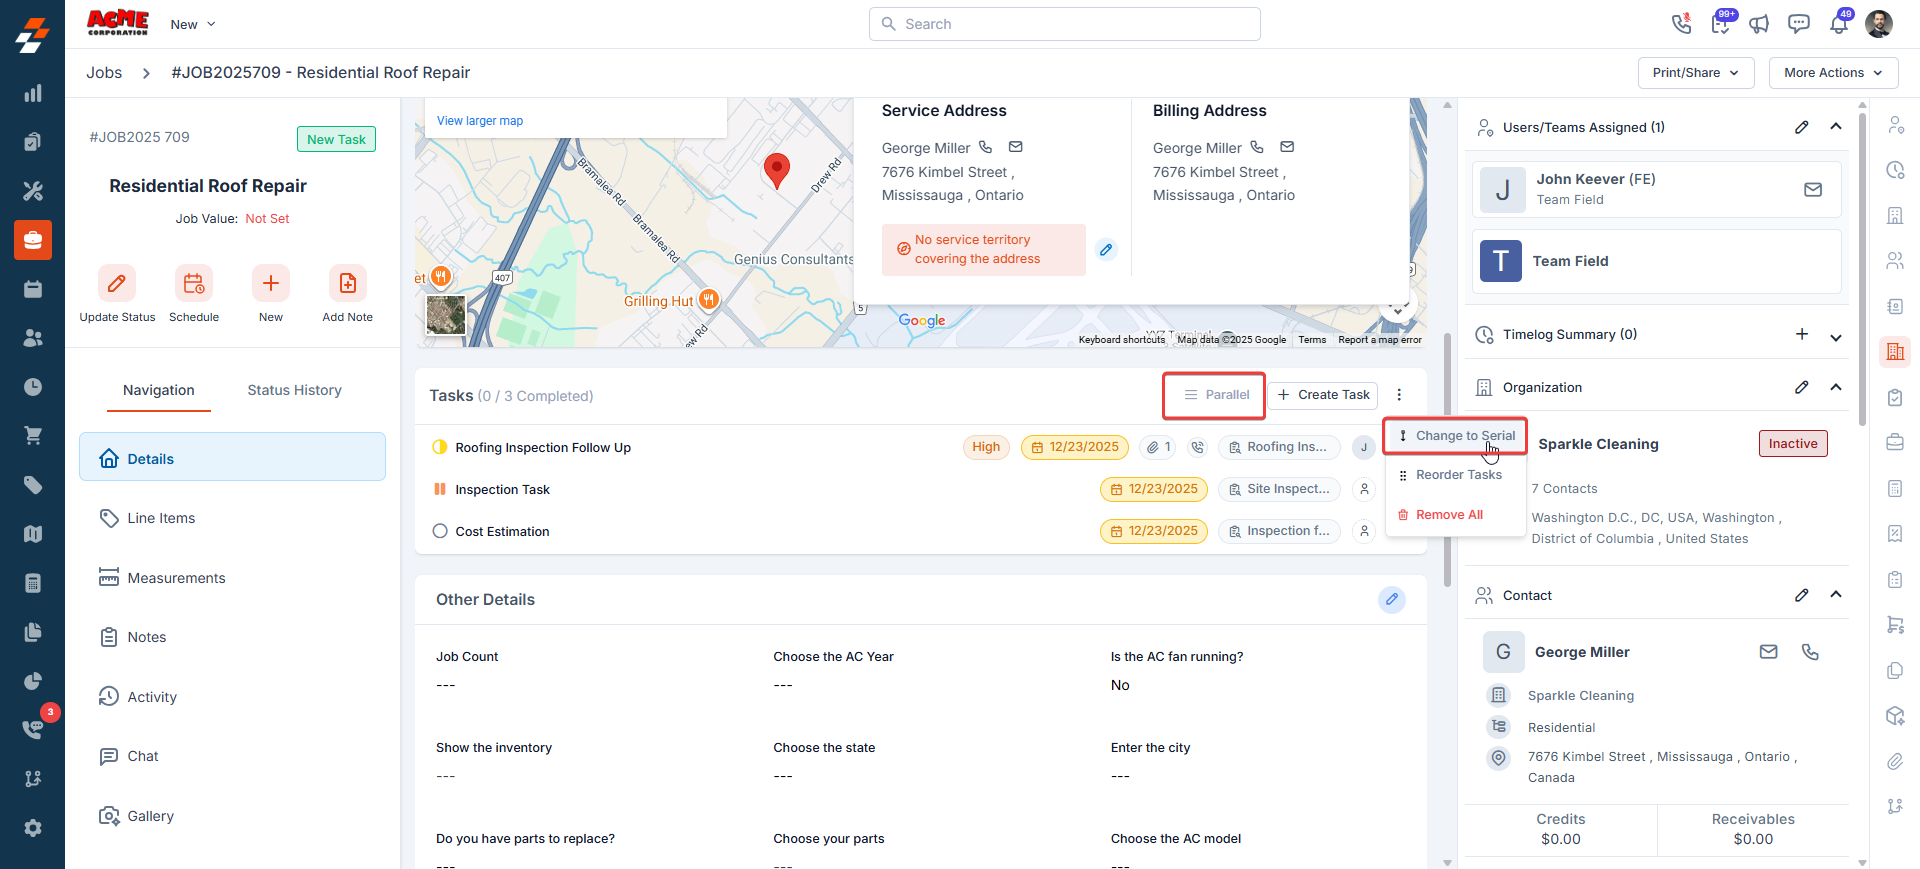
Task execution mode
You have flexibility in determining how tasks should be executed. Zuper supports two execution modes:- Parallel Execution (Default) - Tasks can be completed in any order. This is the default execution mode and works best when multiple team members can work independently without waiting for other tasks to finish.
- Serial Execution - Tasks must be completed in a specific sequence. This is useful when one task depends on the successful completion of the previous one, for example, inspection before installation.
FAQs
Can I create recurring tasks?
Can I create recurring tasks?
No. However, you can use the Clone feature to quickly duplicate tasks.
Can I track who changed the task and when?
Can I track who changed the task and when?
Yes. Use Task Status History to view a chronological log of all status changes, including who updated the status, when it was updated, and any remarks added during the update. Other task updates — such as edits to task details — are recorded in the Job Activity log when the task is associated with a job.
Can I complete a task without filling in its inspection form?
Can I complete a task without filling in its inspection form?
No. If an inspection form is associated with the task, Zuper requires it to be completed before the task status is changed to Completed.
What is a Master Task Template in Zuper?
What is a Master Task Template in Zuper?
A Master Task Template is a pre-configured task created within Zuper. When selected during task creation, this template automatically fills in the task form with predefined details from the service task.
Can I complete a project without completing the associated tasks?
Can I complete a project without completing the associated tasks?
Yes. You can mark the project as Complete even if not all tasks under it are completed.
Can I complete a job without completing the associated tasks?
Can I complete a job without completing the associated tasks?
No. All tasks associated with a job must be completed before the job can be marked as Completed.
How is the due date set when I create a task from a template?
How is the due date set when I create a task from a template?
When you create a task using a task template (master task), the due date is automatically calculated based on the estimated duration defined in the template. For example, if the template has an estimated duration of 5 days, the task’s due date will be set to 5 days from the date you create the task. You can manually change the due date before saving.
How can I change the assignee for a task?
How can I change the assignee for a task?
You can change the assignee only from the Task List view. Click the assignee avatar on the task row and select a different user.
Why is the user assigned to a task also showing up as an assignee on the parent job or project?
Why is the user assigned to a task also showing up as an assignee on the parent job or project?
This is expected behavior. When the Automatically add task assignees to the job/project setting is turned on, anyone assigned to a task is also added as an assignee to the related job or project. This ensures the right people have visibility and access to the job or project the task belongs to.If you don’t want this, an Admin can turn it off under: Settings → Modules → Jobs (or Projects) → General Settings → Assignment tab.
Why can't I update the status of a Service Task?
Why can't I update the status of a Service Task?
If you see an error blocking a task status update, check whether the job’s Task Execution Mode is set to Serial. In Serial mode, tasks must be completed in the configured sequence — you cannot update a later task’s status until the preceding task (the one it depends on) has been marked complete.To resolve this:
- Complete the blocking/dependent task first.
- If the serial order is unintentional, an Admin can change the execution mode to Parallel from the job’s Task section.