

Before you begin, confirm that your administrator has set up your job categories, job custom fields, and parts catalog. These settings fill in much of the job for you, so the steps below go faster.
Open the job creation page
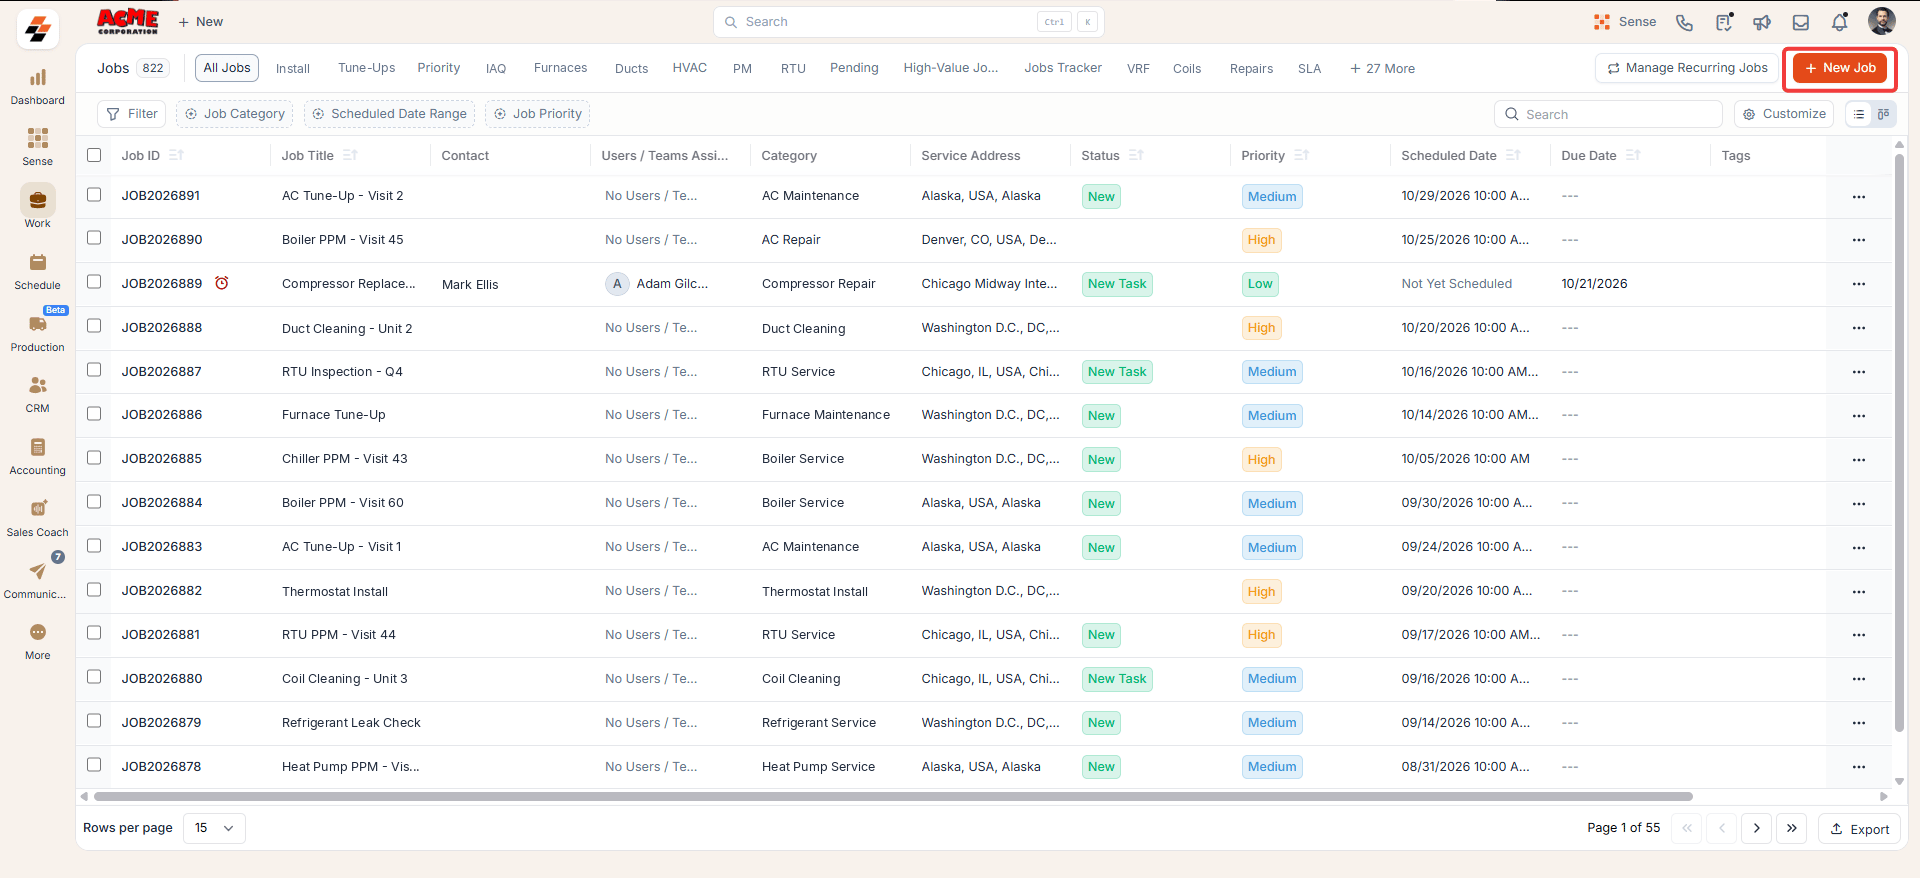
- Go to Work > Jobs.
- Select + New Job in the top-right corner of the jobs listing page.
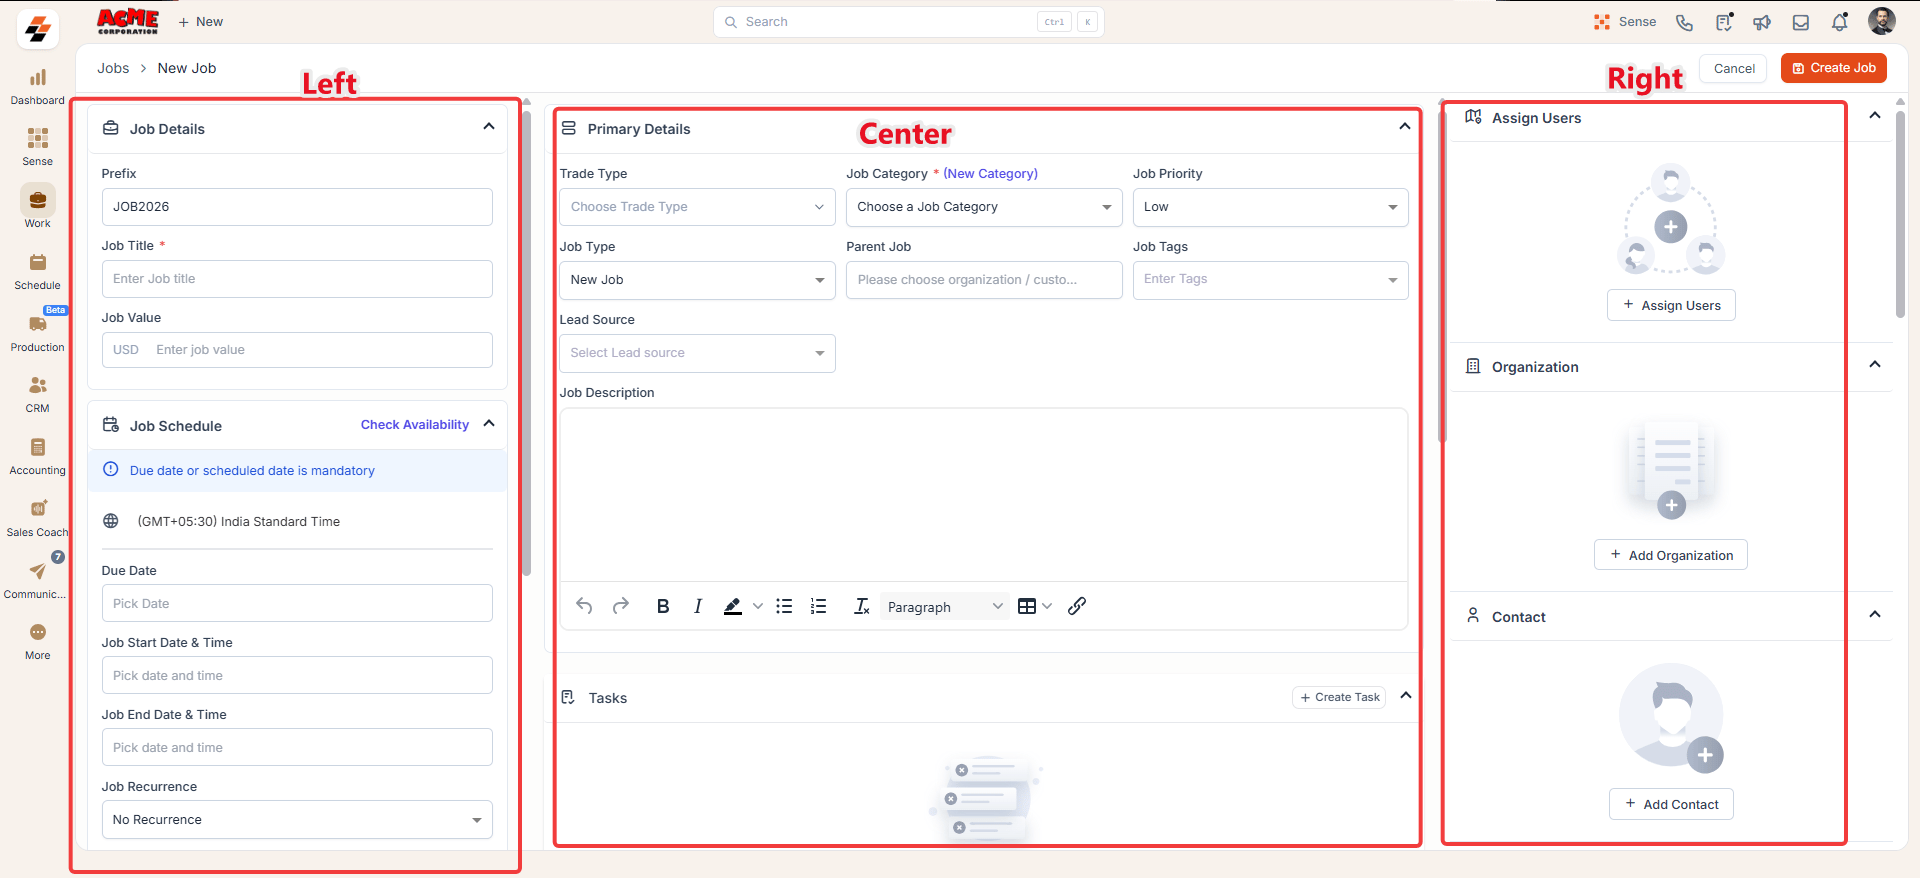
A. Enter the job details
Start with the details that identify the job, so your team can find it quickly later.- Review the Prefix. Zuper fills it in automatically, and it forms the start of the job number.
- Enter the Job Title. Describe the service and the unit, for example, the repair type and the equipment location. This field is mandatory.
- Enter the Job Value in USD, if you know it now. You can update it later, once the technician completes the diagnosis.
B. Describe the work in primary details
Next, move to the Primary Details section in the center panel. The job category shapes much of what follows, so choose it first.- From the Job Category list, select the category that matches the work, for example, a repair or maintenance category. This field is mandatory.
- From the Job Priority list, select how urgent the visit is, for example, High for a no-cooling call.
- From the Job Type list, select the type of job.
- From the Job Tags list, select tags that group similar jobs, for example, jobs covered by a maintenance plan.
- From the Lead Source list, select where the request came from, for example, your website or a phone call.
- From the Job Skills list, select the skills the technician needs, for example, refrigerant handling.
- Enter a Job Description with any details the technician needs before arriving on site.
C. Link the customer
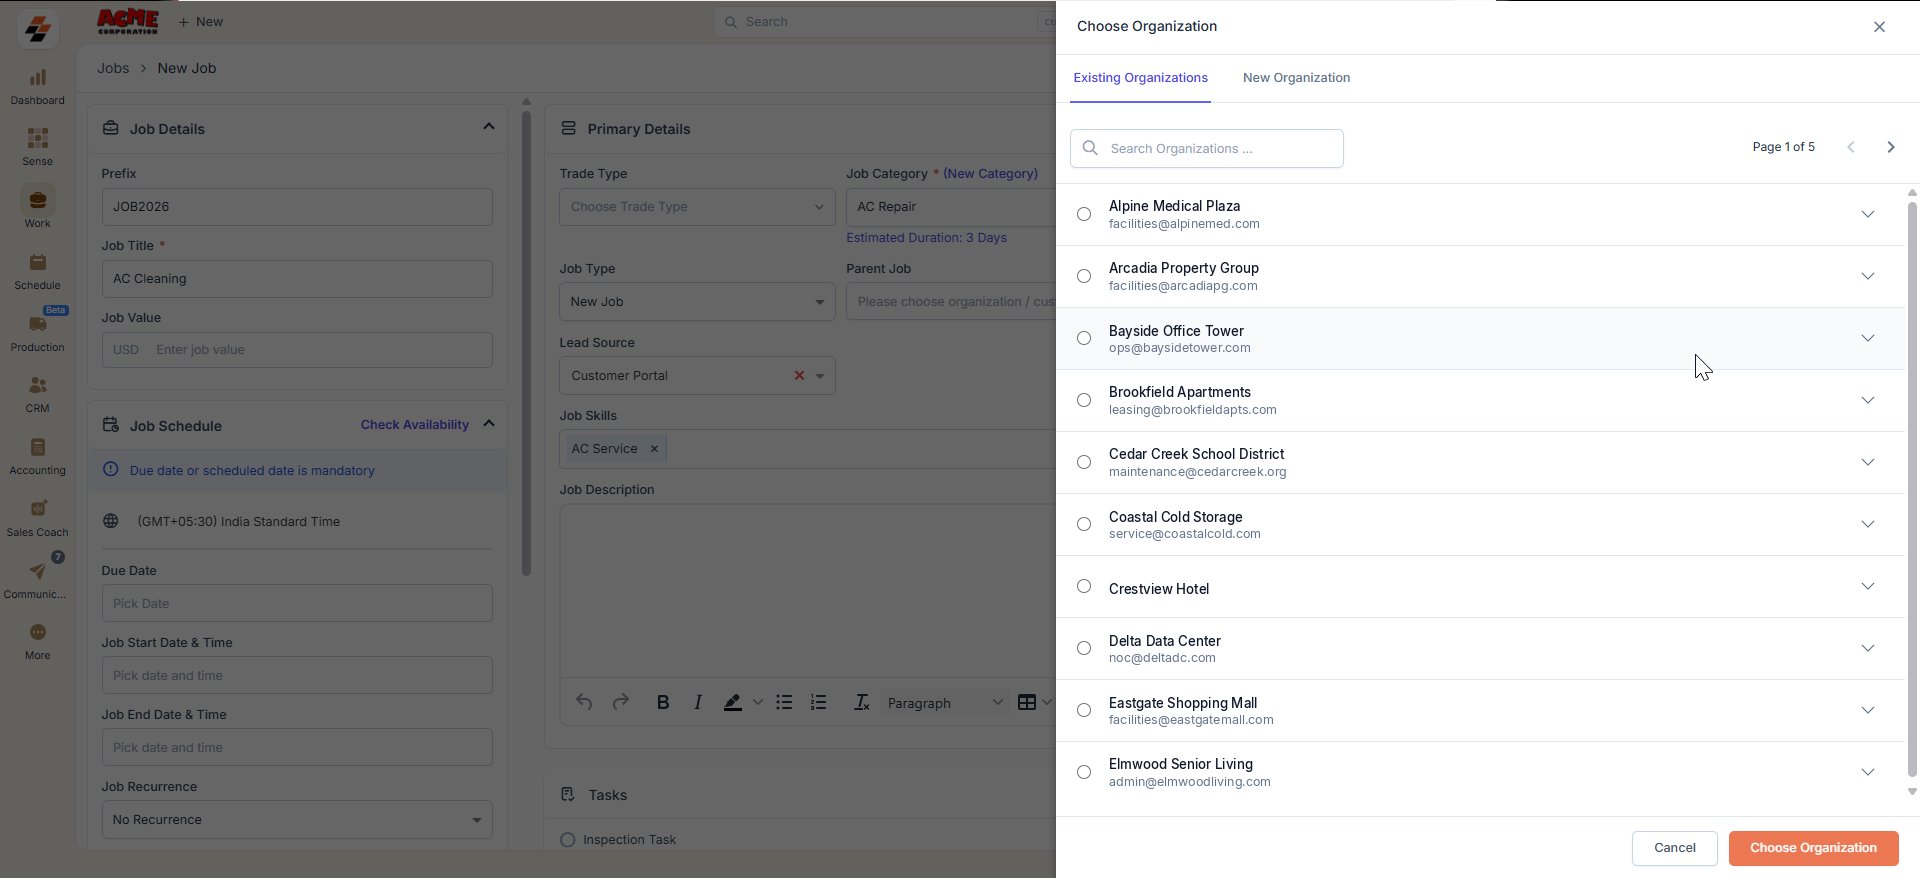
With the work described, link the customer. Zuper then fills in the service address and can suggest technicians who work nearby.- Select + Add Organization in the right panel. The Choose Organization panel opens.
- On the Existing Organizations tab, search for the customer’s organization. To add a new customer, select the New Organization tab instead.
- Select the organization, and then select Choose Organization.
- Select + Add Contact to add the person you work with at that organization.
Service territory
Service territory
Zuper fills in the service territory when the service address falls inside a territory your administrator defined. Territories help Zuper suggest technicians who already work in that area.If you see No service territory covering the address, the address sits outside your defined territories. You can still create the job and assign a territory later from the job details page.If the address falls inside more than one territory, Zuper selects the first one. You can change it later from the job details page.
D. Schedule the visit
Now schedule the visit in the Job Schedule section of the left panel.Enter a Due Date, or enter both a Job Start Date & Time and a Job End Date & Time. Zuper needs at least one of these to create the job.
- Confirm the time zone. It defaults to your account time zone, so change it only if the site is elsewhere.
- Enter a Due Date if the customer needs the work done by a deadline rather than at a fixed time.
- If you already agreed on an appointment, enter the Job Start Date & Time and Job End Date & Time.
Find an open slot with Check Availability
Find an open slot with Check Availability
If you do not know who is free, Check Availability finds open slots for you. It considers each technician’s skills, territory, working hours, and existing jobs.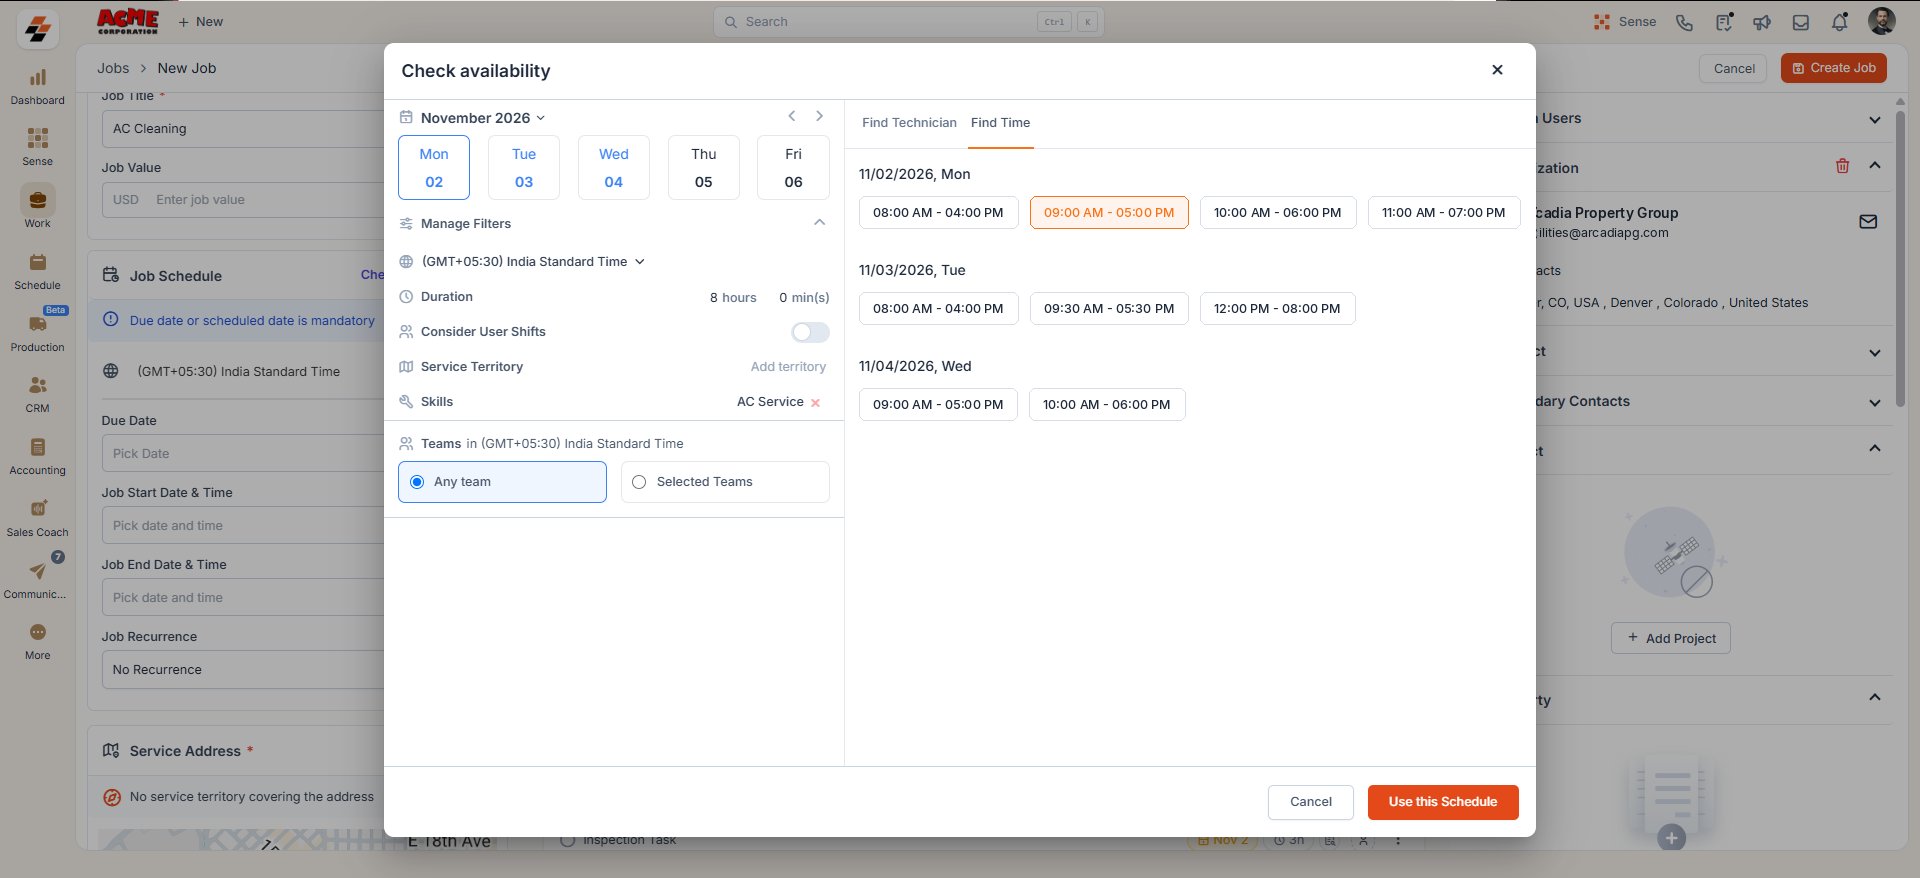
- Select Check Availability in the Job Schedule section. The Check availability dialog box opens.
- Select one or more dates from the calendar.
- Review the filters under Manage Filters, for example, Duration, Service Territory, and Skills. Zuper fills in the duration from the job category, up to eight hours.
- Select Any team to search across all teams, or select Selected Teams to limit the search.
- Select the Find Time tab to see the open time slots for each date, and then select a slot.
- Select Use this Schedule. Zuper adds the selected slot to the job schedule.
Set up recurring maintenance
Set up recurring maintenance
Maintenance agreements often need the same visit on a regular cycle, for example, a tune-up every spring and fall. Instead of creating each visit by hand, set up the pattern once.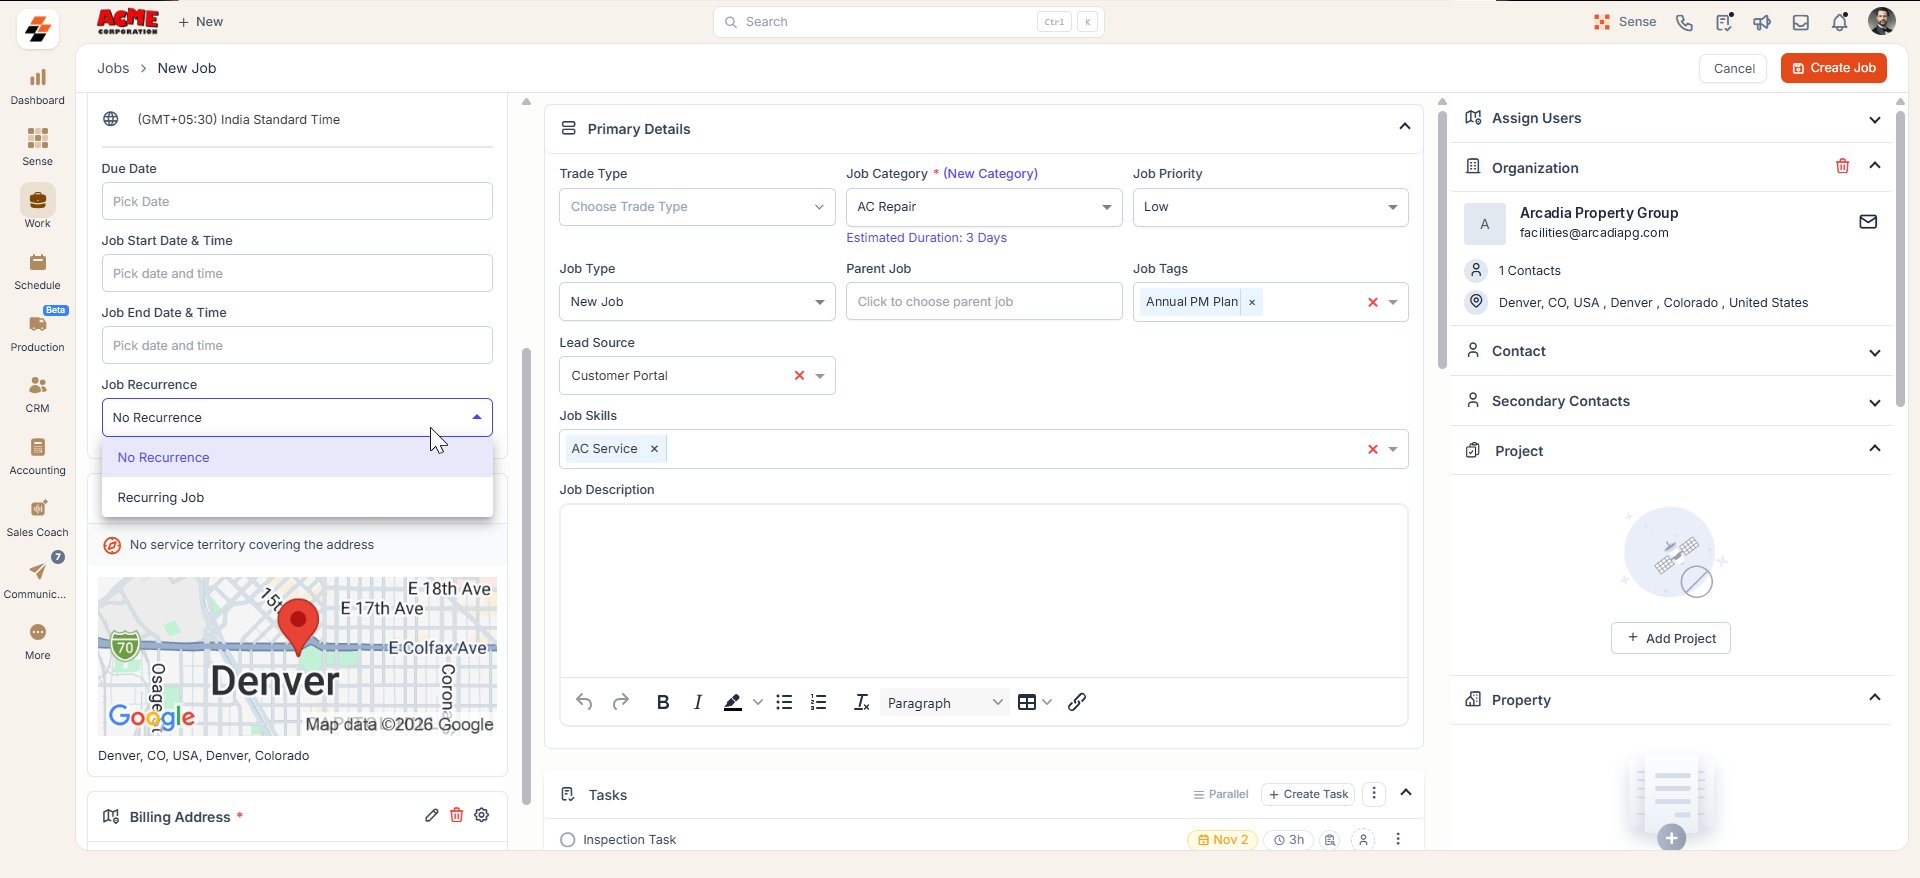
- From the Job Recurrence list, select Recurring Job. The Choose Job Recurrence panel opens.
- Select the date in Recurrence Start From.
- Enter the Recurrence Duration, and select the unit, for example, Years. This setting controls how long the visits continue.
- Enter the Job Start Time and the Job End Time for each visit.
- From the Choose Frequency list, select how often the job repeats, for example, Monthly.
- Enter a number in Repeat Every, for example, six with Monthly for a visit every six months.
- Review the Future Recurring Jobs list, which previews each visit Zuper creates. Delete any visit you do not need.
- Select Save.
E. Complete the other details
The Other Details section holds custom fields, which are extra fields your administrator adds to capture specific information. For example, your team might record the refrigerant type, blower motor status, or supply air temperature.- Complete each field in Other Details. A red asterisk marks a mandatory field.
- Select Click here to choose Part or Service to link a catalog item, where available.
- Select any collapsed section, for example, Refrigerant Readings, to expand it and complete its fields.
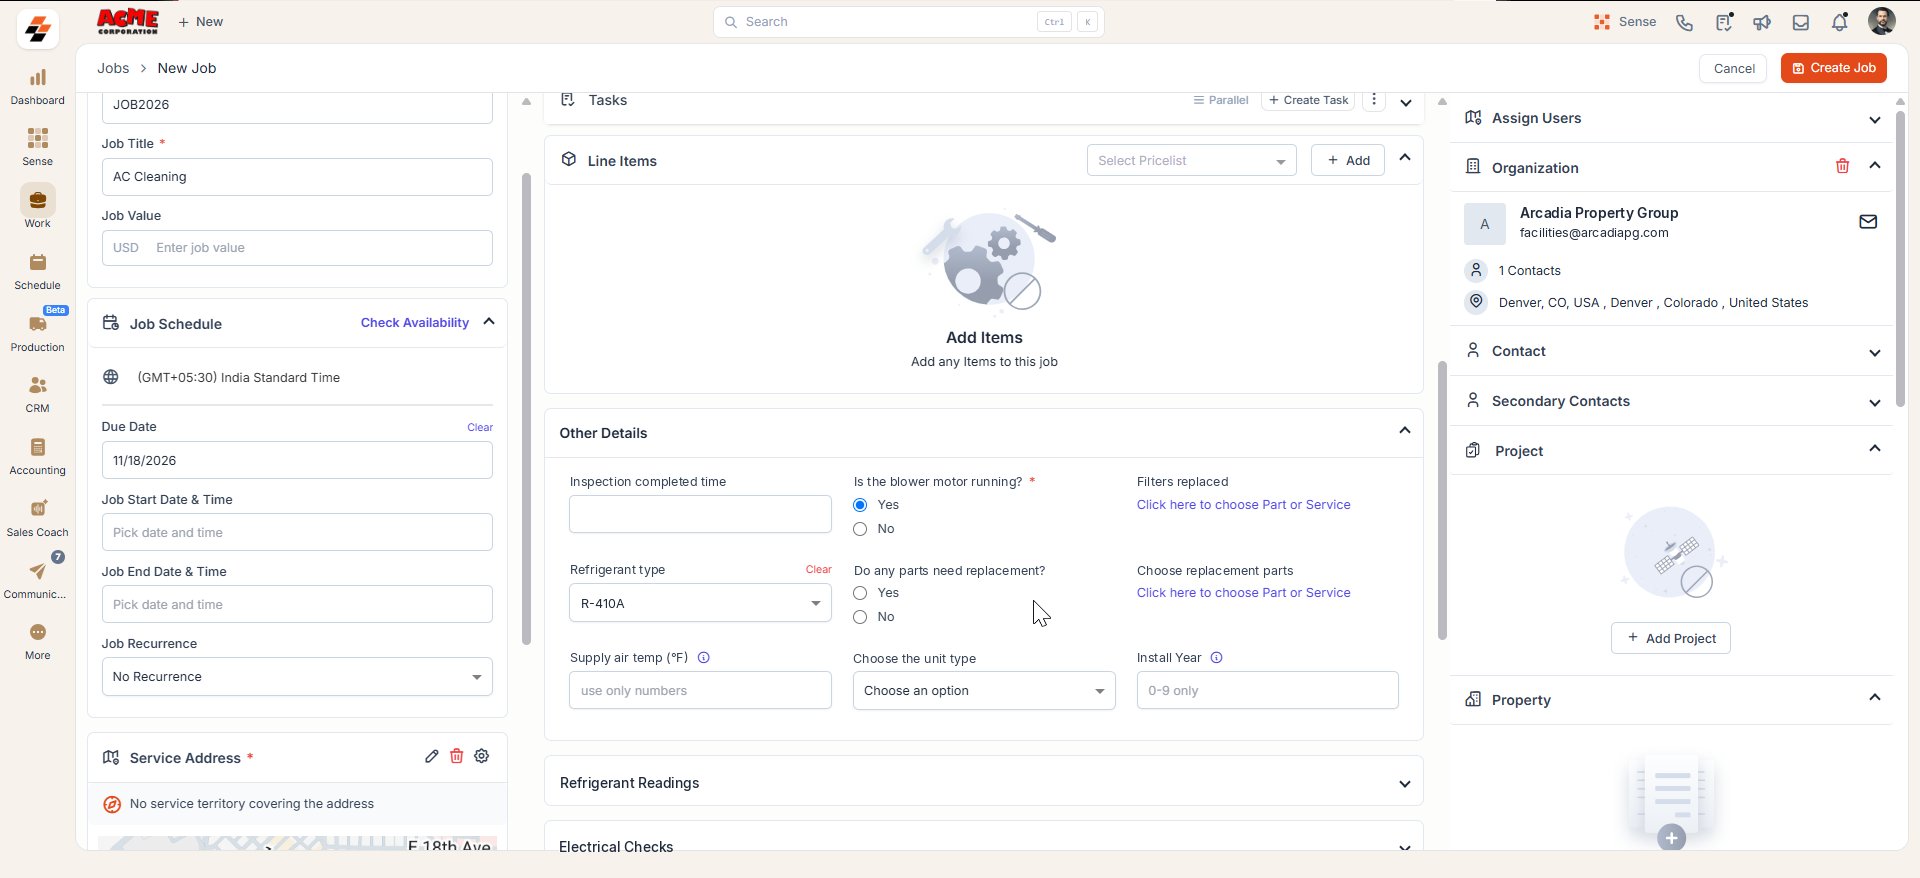
Zuper fills in some custom fields automatically from the customer or organization record. This happens only when a field label matches exactly in both places.
F. Add parts and labor
Next, add the parts and labor the job needs. Your technician then arrives prepared, and your invoice reflects the work.- If your organization uses pricelists, select one from the Select Pricelist list first.
- In the Line Items section, select + Add, and then select Line Item.
- In the Choose Line Item dialog box, search for the part or filter the list, for example, by Product Type.
- Select the checkbox next to each item you need.
- Review the location, serial number, unit cost, and markup for each selected item.
- Select Add Item. The items appear in the Line Items section.
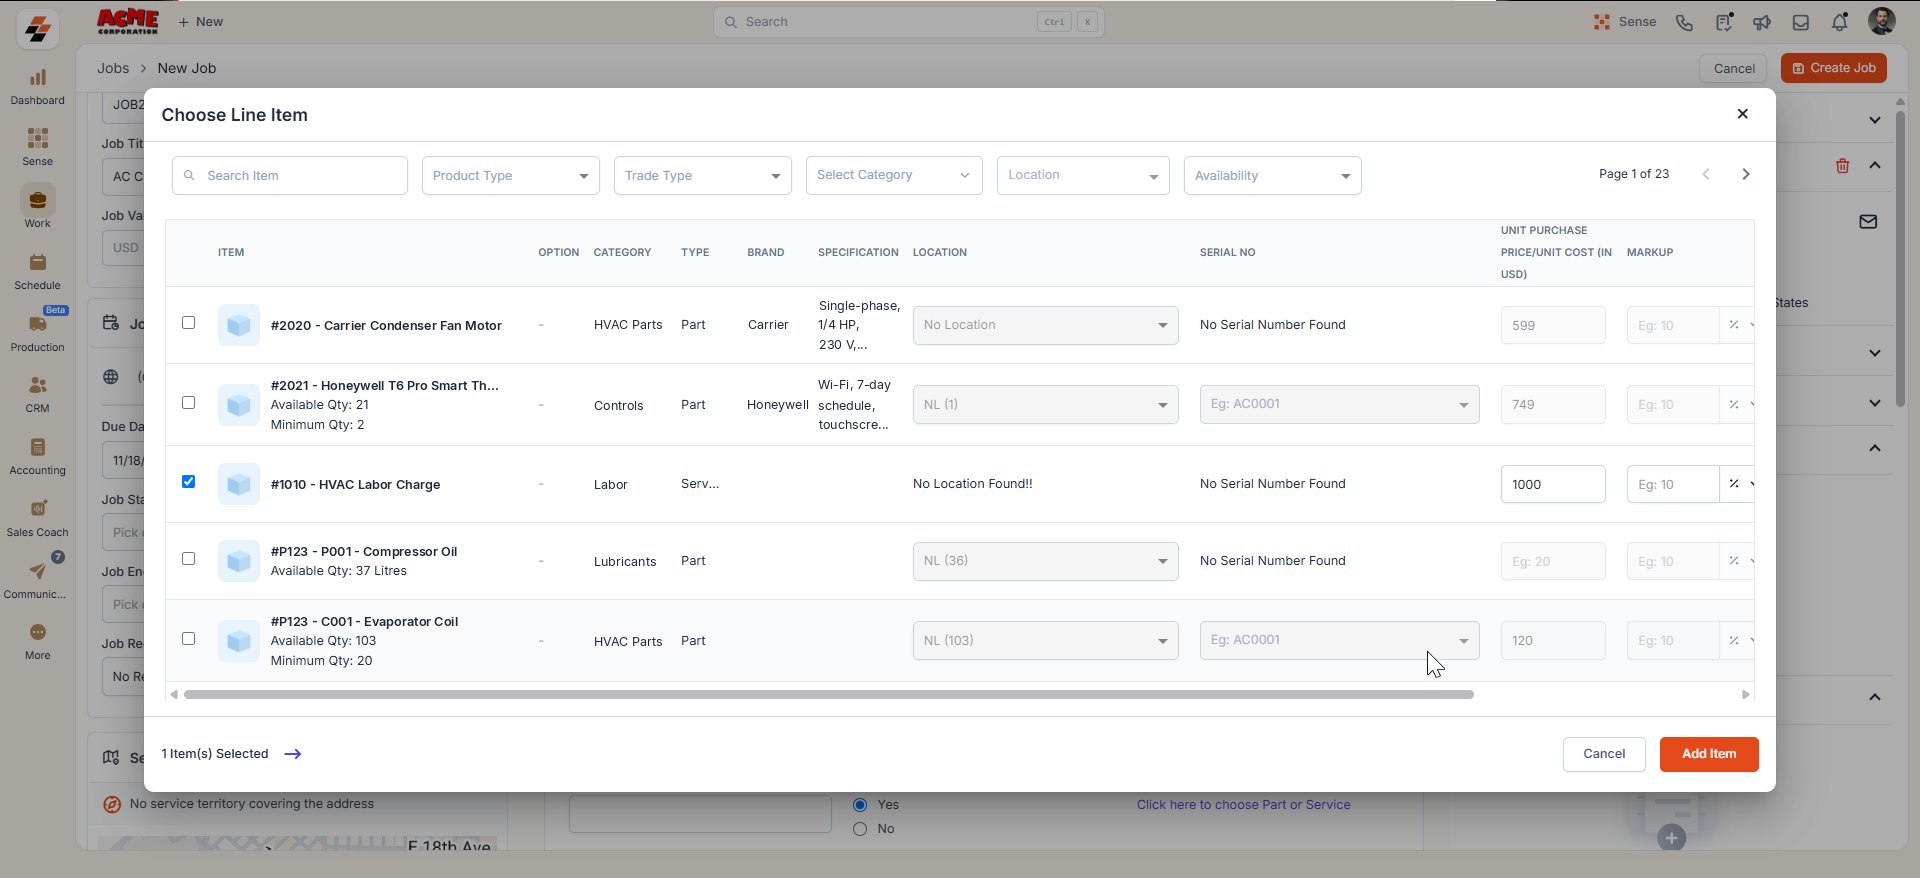
Custom items apply only to this job and do not appear in your inventory. Also, add one product at a time and let each one save, so Zuper does not create duplicate service tasks.
G. Assign the technician and link related records
With the work and schedule set, assign the right person to the job. The right panel also links the records that connect this visit to the rest of the customer’s history. Expand each one to learn when to use it.Assign users
Assign users
Assign the technician or team who performs the work. Zuper lists teams and users based on the job address and its service territory.
- Select + Assign Users in the Assign Users section of the right panel.
- Select the Teams tab or the Users tab, and then select Assign next to each person.
- Select Save.
To see teams and users from every territory, clear the Filter by Territory checkbox.
Secondary contacts
Secondary contacts
Add up to 10 more contacts from the same organization, for example, a facilities manager who needs visit updates.
Your administrator must turn on Enable Secondary Contacts in Settings > Modules > Jobs > General Job Settings first.
Project
Project
Connect the job to larger work that spans several jobs, for example, a full system replacement. You can then track every related visit in one place.
Property
Property
Link the building where the technician performs the work. The link keeps scheduling and dispatch tied to the correct site.
Request
Request
Link the service request that started this job, for example, a request the customer submitted through your customer portal.
Asset
Asset
Link the specific unit the technician services, for example, a furnace or a condenser. Its service history then stays complete, so you can see which equipment needs replacement.
Contract
Contract
Link the maintenance agreement that covers this visit. Your team can then confirm the covered services before the technician arrives.
Attachments
Attachments
Upload documents the technician might need on site, for example, equipment manuals, permits, or earlier service reports.
H. Create the job
- Review each panel for missing or incorrect details.
- Select Create Job in the top-right corner.
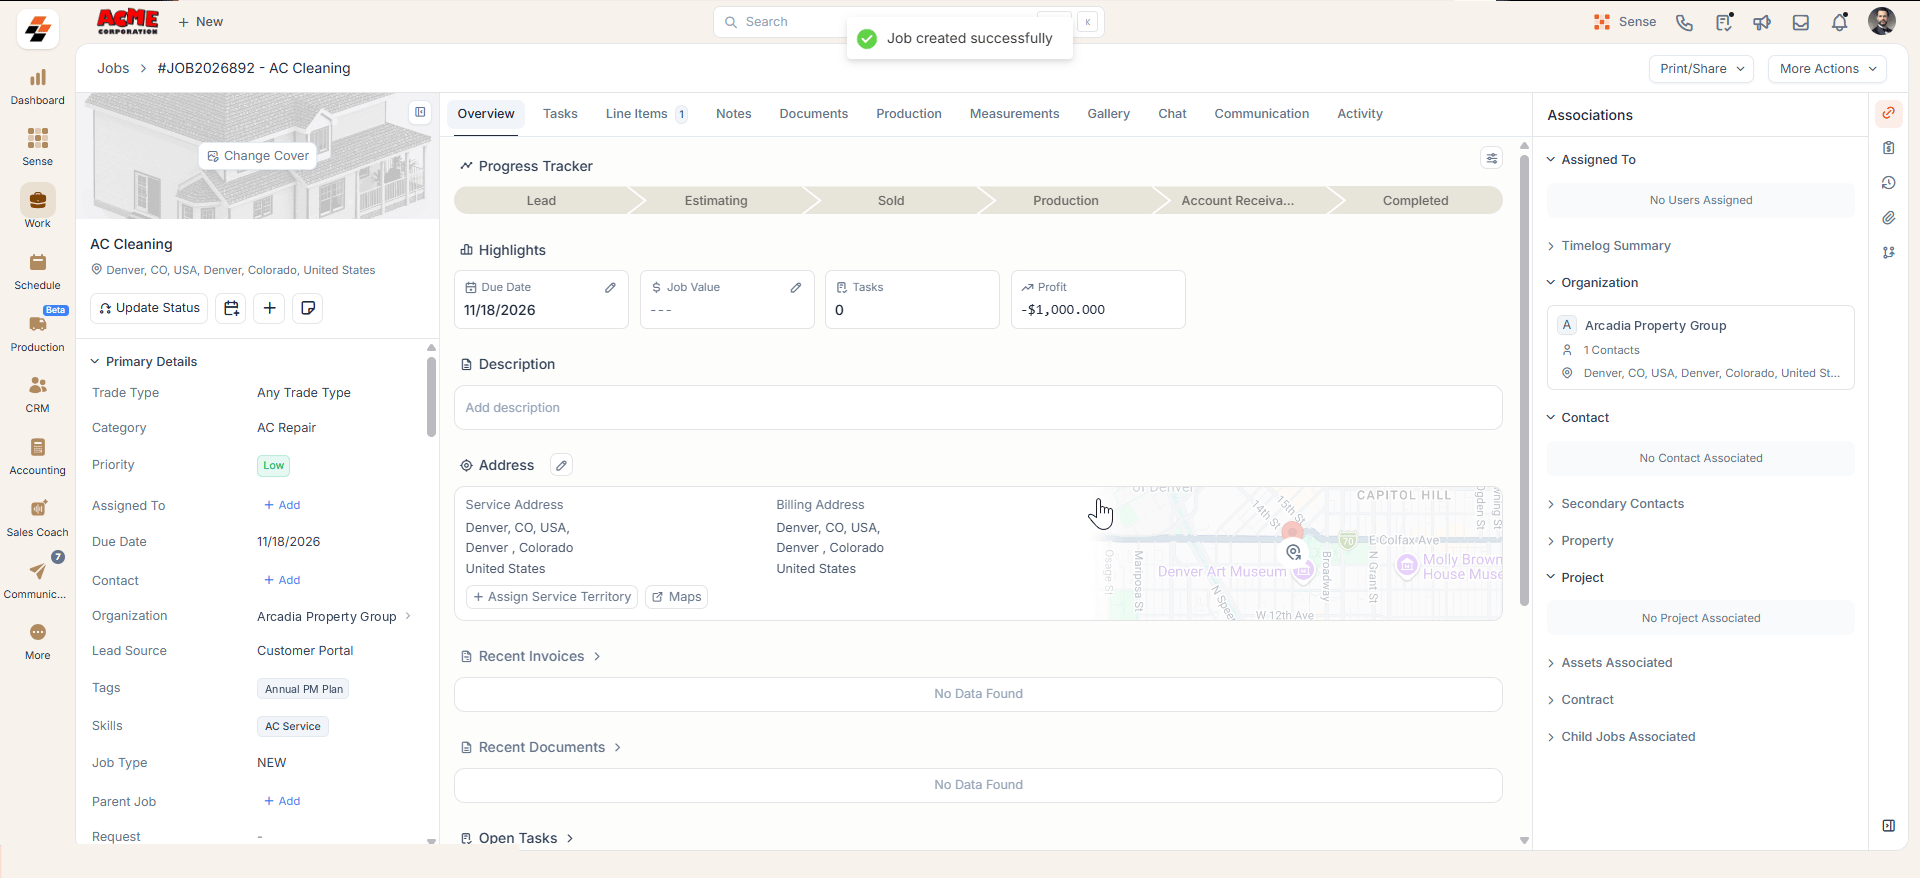
After you create the job
The job details page now becomes the home for everything that happens on this visit. Three tabs matter most as the work moves forward. The Line Items tab lists the parts and labor you added, along with their costs. Your team can update it if the technician finds more work on site. The Notes tab collects photos and notes from the field, for example, a photo of the unit’s data plate. For more information, see Notes and chats. The Activity tab records every action on the job, such as status changes, added notes, and uploaded documents. Use it whenever you need to confirm who did what, and when.Tips and best practices
- Consistent titles: Use the same title pattern for every job, for example, service type and equipment location. Your team can then scan the jobs list quickly.
- Assets: Link the unit to every job. Over time, its service history shows which equipment needs replacement.
- Tags: Tag jobs covered by a maintenance plan, so you can filter and report on them easily.
- Job categories: Ask your administrator to set default service tasks for each category. Technicians then follow the same checklist on every visit.
- Permissions: Confirm that your user role includes the right to create jobs before you start.